

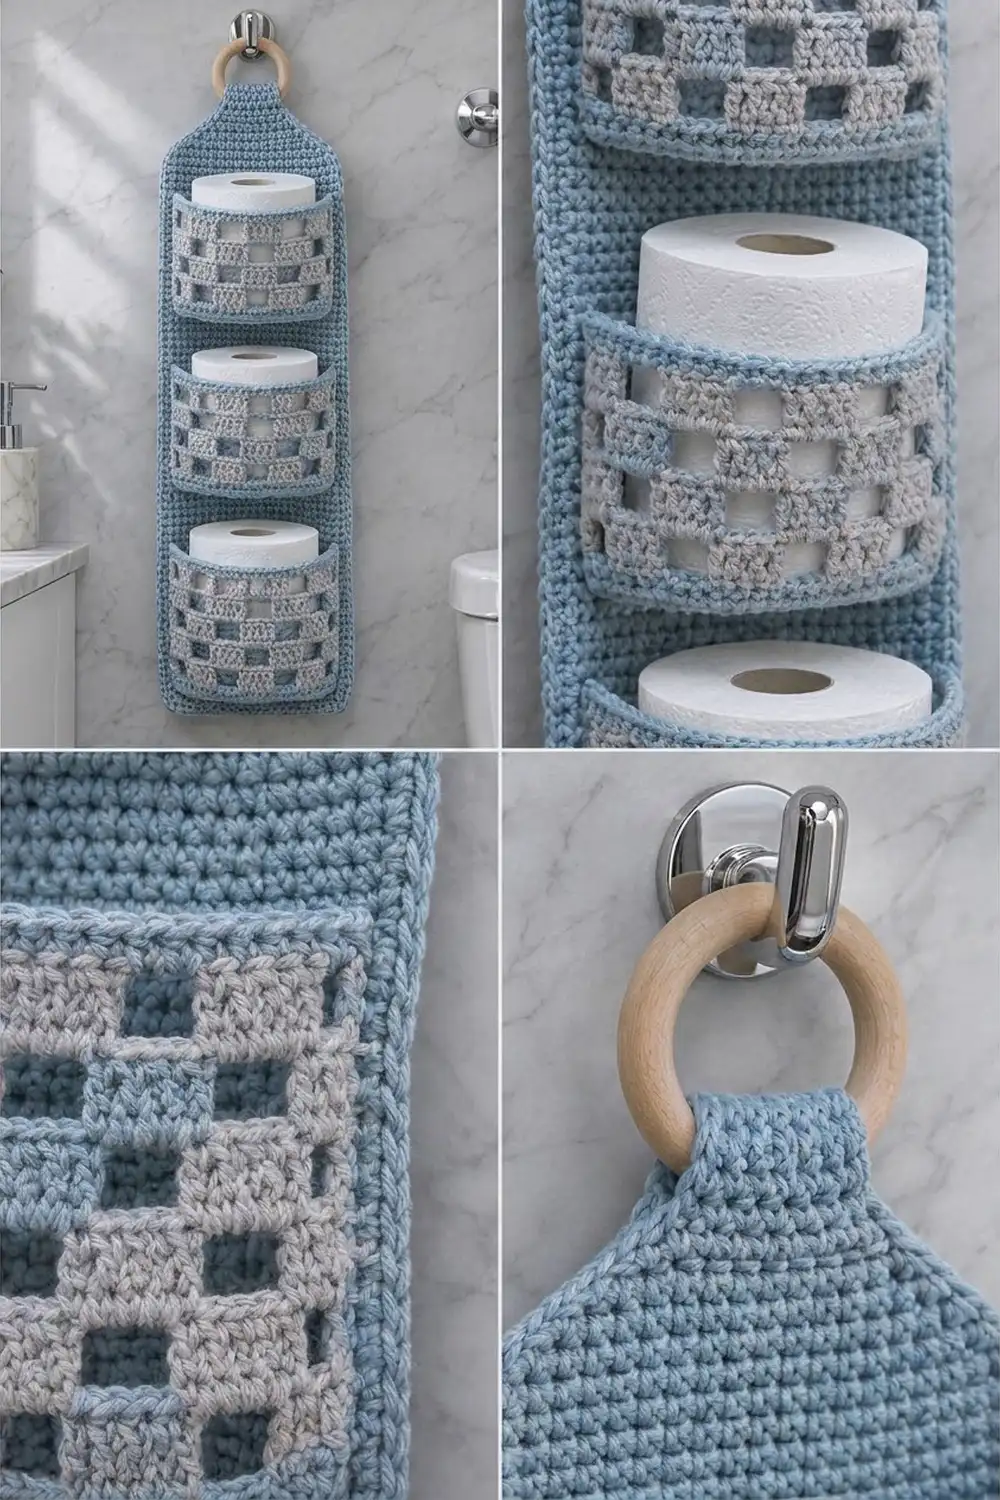
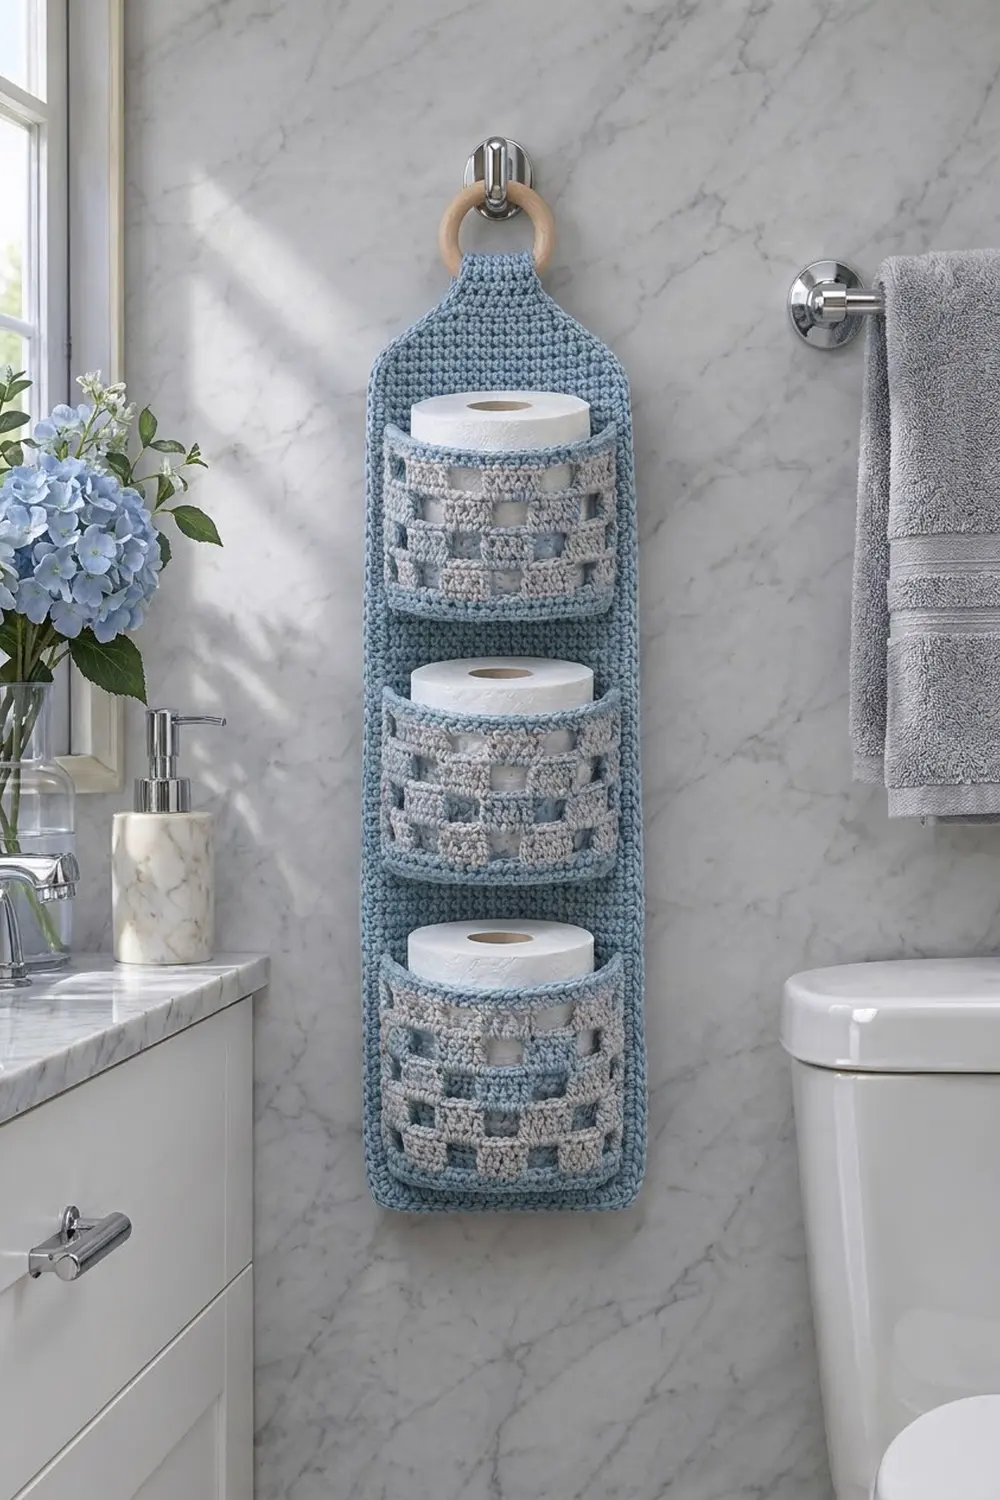
This hanging toilet paper holder keeps three spare rolls on the wall, so they’re easy to grab and don’t take up floor space. A long powder-blue backing panel narrows at the top into a strap that wraps around a natural wooden ring. Three curved pockets are stacked down the front. Each pocket has a light gray filet checkerboard framed in blue, and the blue backing shows through the open squares.
The colors are soft blue and pale gray, which suit a marble or white bathroom. Worsted-weight cotton keeps the holder firm enough to hang straight and hold its shape when the pockets are full.
This pattern uses US crochet terms. The finished holder is 7.5 in (19.1 cm) wide and 31.3 in (79.5 cm) long laid flat. Once the strap is folded over the ring, it hangs about 28.3 in (71.9 cm) long.
Here’s the construction. You’ll work the backing in single crochet rows, shape the shoulders and strap, and add a two-round border. Each pocket has two parts: a filet front, and a blue half-circle base sewn to the front’s bottom edge. Then you’ll sew the three pockets onto the backing and fold the strap over the ring.
Finished Size and Construction
- Finished size: 7.5 in × 31.3 in (19.1 cm × 79.5 cm) flat; about 28.3 in (71.9 cm) hanging
- Skill level: Easy-Intermediate
- Terminology: US
- Yarn weight: Worsted (#4), cotton
- Hook: 5.0 mm (US H-8)
- Number of pieces: 7 (1 backing, 3 pocket fronts, 3 pocket bases), plus 1 wooden ring
- Layout: 3 pockets stacked vertically on one backing
- Pocket front: 12.25 in × 3.7 in (31.1 cm × 9.4 cm) before side edging
- Backing before border: 7 in (17.8 cm) wide; 24 in (61.0 cm) body + 2.4 in (6.1 cm) shoulders + 4.4 in (11.2 cm) strap = 30.8 in (78.2 cm)
- Border depth: 0.25 in (0.6 cm) on every edge
Materials
Use a smooth, mercerized or plain worsted cotton. Cotton holds its shape when the pockets are full and stands up to bathroom humidity. Avoid acrylic, because it stretches under the weight of the rolls.
- Color A, powder blue: 270 g, about 430 m (470 yd)
- Color B, light gray: 80 g, about 130 m (142 yd)
These quantities include a margin of roughly 10%.
Tools:
– 5.0 mm (US H-8) crochet hook
– 1 wooden ring, 3 in (7.6 cm) outer diameter
– Tapestry needle
– 6–8 locking stitch markers
– Rust-proof pins
– Tape measure
– Blocking mat or towel
Abbreviations (US Terms)
- ch – chain
- sc – single crochet
- dc – double crochet
- sl st – slip stitch
- sk – skip
- sp – space
- st(s) – stitch(es)
- sc2tog – single crochet 2 together
- BLO – back loop only
- inc – 2 sc in the same stitch
Filet units: Each unit is 3 sts wide.
– Block: 3 dc.
– Space: ch 2, sk 2, dc in next st.
– Block over block: dc in next 3 dc.
– Block over space: 2 dc in ch-2 sp, dc in next dc.
– Space over block: ch 2, sk 2 dc, dc in next dc.
Gauge and Checkpoints
- Single crochet: 16 sts × 18 rows = 4 in (10.2 cm)
- Filet double crochet: 16 sts × 8 rows = 4 in (10.2 cm)
Before you start the long backing, test your gauge by making one pocket base. It’s quick to make and uses the same single crochet fabric as the backing.
Checkpoints:
– Pocket base after Row 16: the straight edge measures 7.1 in (18.0 cm) and the radius is 3.6 in (9.1 cm).
– Backing after Row 18: 7 in (17.8 cm) wide and 4 in (10.2 cm) tall.
– Backing after Row 108: 24 in (61.0 cm) tall.
– Backing after Row 119: 6 sts across, 1.5 in (3.8 cm).
– Pocket front after Row 9: 12.25 in × 3.7 in (31.1 cm × 9.4 cm).
If your piece is too big, go down 0.5 mm in hook size. If it’s too small, go up 0.5 mm. Don’t add or remove stitches, because every seam below is planned stitch for stitch.
Backing Panel (Color A)
Ch 29.
Row 1: Sc in 2nd ch from hook and in each ch across, turn. (28 sc)
Rows 2–108: Ch 1, sc in each st across, turn. (28 sc)
Place markers at the left edge of Rows 9, 45, and 81. These rows mark where the pocket bases will be sewn. They sit 2 in (5.1 cm), 10 in (25.4 cm), and 18 in (45.7 cm) above the foundation, so each pocket is 8 in (20.3 cm) above the one below it.
Shoulders:
Row 109: Ch 1, sc2tog, sc in next 24 sts, sc2tog, turn. (26 sts)
Rows 110–119: Ch 1, sc2tog, sc across to last 2 sts, sc2tog, turn. Each row is 2 sts shorter than the one before it: 24, 22, 20, 18, 16, 14, 12, 10, 8, 6.
Row 119 is worked as sc2tog, sc in next 4 sts, sc2tog (6 sts).
Strap:
Rows 120–139: Ch 1, sc in each st across, turn. (6 sc)
Don’t fasten off.
Border (Color A, on the backing only)
The border is worked on the backing before the pockets are attached. It doesn’t depend on the pockets at all.
Border gauge: Along the side edges you’ll work 8 sc for every 9 row ends. That gives 4 sc per inch (per 2.5 cm), which matches the stitch gauge, so the edges lie flat without ruffling.
Corner definition: Each corner is a 3-sc group worked into one stitch. The side counts below are the stitches between corner groups, so the corners aren’t counted twice.
Round 1: Work counterclockwise, starting along the strap top.
- Strap top: 3 sc in first st (corner), sc in next 4 sts, 3 sc in last st (corner). Total: 10 sts, including both corner groups.
- Strap side: Work down the 20 row ends with 1 sc in each, skipping the 10th and 20th row ends. (18 sc)
- Shoulder: Work across 11 row ends. *Sc in next row end, 2 sc in next row end; rep from * 3 more times, then sc in each of the last 3 row ends. (15 sc)
- Body side: Work down 108 row ends. *Sc in each of next 8 row ends, sk next row end; rep from * 11 more times. (96 sc)
- Bottom: Work along the foundation loops. 3 sc in first st (corner), sc in next 26 sts, 3 sc in last st (corner). Total: 32 sts, including both corner groups.
- Second side: Work up the other side to match: 96 sc on the body, 15 sc on the shoulder, 18 sc on the strap.
- Join with sl st to the first sc. (300 sts)
Count check: 10 + 32 + 2 × (18 + 15 + 96) = 42 + 258 = 300.
Round 2: Sl st in BLO of each st around. Join and fasten off. (300 sl sts)
Round 2 forms the raised chain ridge along the edge, and the front loops of Round 1 stay free. Neither round adds any stitches outside the corner groups, so the width stays at 7 in (17.8 cm) + 2 × 0.25 in (0.6 cm) = 7.5 in (19.1 cm).
Pocket Base (make 3, Color A)
The base is a flat half circle, worked in turned rows. It grows by 3 sts in every row.
Row 1: Make a magic ring, ch 1, 4 sc in ring, turn. (4 sc)
Row 2: Ch 1, sc in first st, inc in each of next 3 sts, turn. (7 sc)
Rows 3–16: Ch 1, sc in first st, *sc in next (row number − 2) sts, inc in next st; rep from * 2 more times, turn.
For example, Row 3 is: sc, sc 1, inc ×3. Row 3 uses up 7 sts and makes 10.
Each row’s count is 3 × (row number) + 1:
– Row 3: 10
– Row 4: 13
– Row 5: 16
– Row 6: 19
– Row 7: 22
– Row 8: 25
– Row 9: 28
– Row 10: 31
– Row 11: 34
– Row 12: 37
– Row 13: 40
– Row 14: 43
– Row 15: 46
– Row 16: 49
Fasten off and leave a 24 in (61.0 cm) tail for sewing.
The curved edge has 49 sts. The straight edge is made up of 16 row ends on each side of the ring and measures 7.1 in (18.0 cm).
Pocket Front (make 3)
Row 1 (Color A): Ch 50, sc in 2nd ch from hook and in each ch across, turn. (49 sc)
Change to Color B.
Row 2 (Pattern A): Ch 3 (counts as dc throughout). *Dc in next 3 sts (block), ch 2, sk 2, dc in next st (space); rep from * 7 more times, turn. (8 blocks, 8 spaces; 49 sts and chains)
Row 3 (Pattern B): Ch 3. *Space over block, then block over space; rep from * 7 more times, turn.
Row 4: Repeat Row 2’s arrangement, working block over space and space over block.
Rows 5–7: Alternate the arrangement on each row. Rows 5 and 7 match Row 3, and Row 6 matches Row 2.
You now have a checkerboard 6 rows tall. Change to Color A.
Row 8: Ch 1, sc in each dc, 2 sc in each ch-2 sp, turn. (49 sc: 16 units × 3 + 1)
Row 9: Ch 1, sc in each st across. (49 sc) Fasten off.
Side edging (Color A): Work along each short side.
– Sc in Row 1’s row end.
– 2 sc in each dc row end (Rows 2–7).
– Sc in each row end of Rows 8 and 9.
That’s 1 + 12 + 2 = 15 sc per side. Fasten off.
The side edging measures 15 sts ÷ 4 = 3.75 in (9.5 cm), which matches the 3.7 in (9.4 cm) height of the front.
Make All Pieces
- Color A: 1 backing (with border) and 3 pocket bases
- Color A + Color B: 3 pocket fronts
Layout (front view, top to bottom):
[ ring      ]
[ strap     ]
[ shoulders ]
[ backing   ]
[ POCKET 3  ]  base on Row 81
[ backing   ]
[ POCKET 2  ]  base on Row 45
[ backing   ]
[ POCKET 1  ]  base on Row 9
[ backing   ]
Joining
Use Color A and a whipstitch for every seam. Keep the stitches snug but not tight, so the seams lie as flat as the fabric around them.
1. Base to front (stitch for stitch). Hold the curved edge of a base against the foundation loops of a pocket’s Row 1. Both edges have 49 sts. Whipstitch 1 base st to 1 front st all the way across. The pocket is now a D-shaped cup, and the blue base seam makes a rim along the bottom.
2. Base to backing. Lay the backing face up. Center the base’s straight edge along the top of marked Row 9. This edge has 33 points: 16 row ends, the ring, and 16 row ends. Sew it across the backing’s 28 body sts plus the 2 border sc, for 30 sts in total. To ease in the extra 3 points, catch the same backing st twice at 3 evenly spaced places.
3. Front sides to backing. Stand the pocket up. Pin each 15-sc side edge to the next 15 border sc of Round 1 on the backing, working upward from the base line. The backing’s side border has 4 sc per inch (per 2.5 cm), so the seams match stitch for stitch. Whipstitch through the free front loops of the border so the sl st ridge stays visible.
Repeat for Row 45 and Row 81.
4. Ring. Fold the top 3 in (7.6 cm) of the strap to the back around the wooden ring. Sew the strap end securely to the back of the strap at the top of the shoulders.
Size checkpoint: The holder hangs about 28.3 in (71.9 cm) from the top of the strap loop to the bottom edge, and is 7.5 in (19.1 cm) wide. Each pocket front stands 3.7 in (9.4 cm) tall.
Final Blocking
- Before sewing the pockets on, wet block the bordered backing. Pin it to 7.5 in × 31.3 in (19.1 cm × 79.5 cm) and let it dry completely.
- Wet the pocket fronts and pin them flat to 12.25 in × 3.7 in (31.1 cm × 9.4 cm). Line up the filet squares as you pin.
- Pin the bases flat. Shape them so the straight edge measures 7.1 in (18.0 cm).
- Once the holder is assembled, mist the pockets lightly. Put a roll of toilet paper in each one and let the pockets dry curved around the rolls.
- Steam the strap fold lightly so it sits neatly around the ring.
Final Quality-Control Checklist
- [ ] The backing has 300 border sts, and both side counts match.
- [ ] The body is 7 in (17.8 cm) wide before the border and 7.5 in (19.1 cm) after.
- [ ] Each base ends with 49 sts. Each pocket front has 49 sts in Rows 1, 8, and 9.
- [ ] The checkerboard alternates on every row and has 8 blocks and 8 spaces.
- [ ] The pocket bases sit at 2 in, 10 in, and 18 in (5.1 cm, 25.4 cm, 45.7 cm).
- [ ] The side seams follow 15 border sc each, and the sl st ridge stays visible.
- [ ] The ring is stitched firmly, and the holder hangs straight.
- [ ] All ends are woven in on the back.
Troubleshooting
- Backing edges ruffle: You’ve probably worked 1 sc in every row end. Go back to working 8 sc per 9 rows.
- Backing edges pull in: Your border hook may be too small, or your tension too tight. Rework the border with a hook 0.5 mm larger.
- Base cups up: Check the count on every row (3 × row + 1). If the counts are right, block it flat.
- Base ruffles: You may have worked an extra increase. Count each row again.
- Checkerboard misaligned: Make sure the ch 3 at the start of every row counts as the first dc. Rows must end on the turning chain.
- Rolls are too snug: Block the pockets over the rolls. Cotton mesh relaxes slightly with use.
- Holder leans: Center the base seams on the backing, and sew both pocket sides with the same number of stitches.
Care
Hand wash in cool water and lay flat to dry, reshaping the pockets around rolls. Don’t tumble dry.
Final Notes
The measurements all build on each other. The 16 sc gauge gives a 28-st body that is 7 in (17.8 cm) wide. The 96-sc border sides match the 108 body rows exactly, so the bordered panel is 7.5 in (19.1 cm) wide. Each 49-st base sews stitch for stitch to its 49-st pocket front. The 15-sc pocket sides line up with 15 border sc on the backing. If your gauge matches, every seam lines up.
Happy crocheting!