

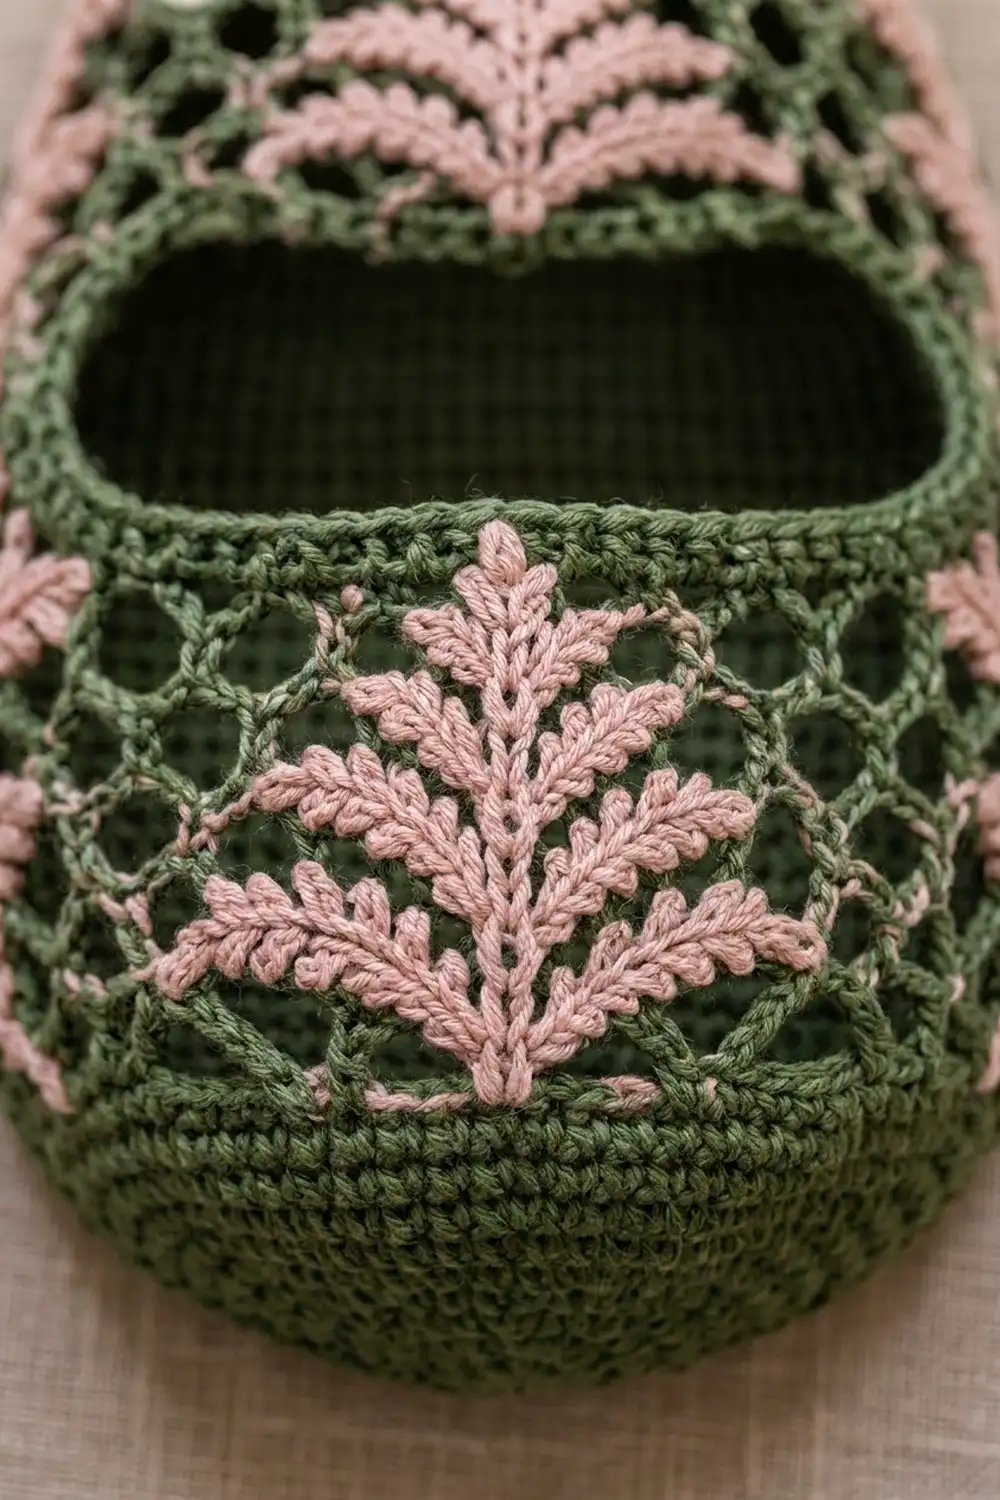
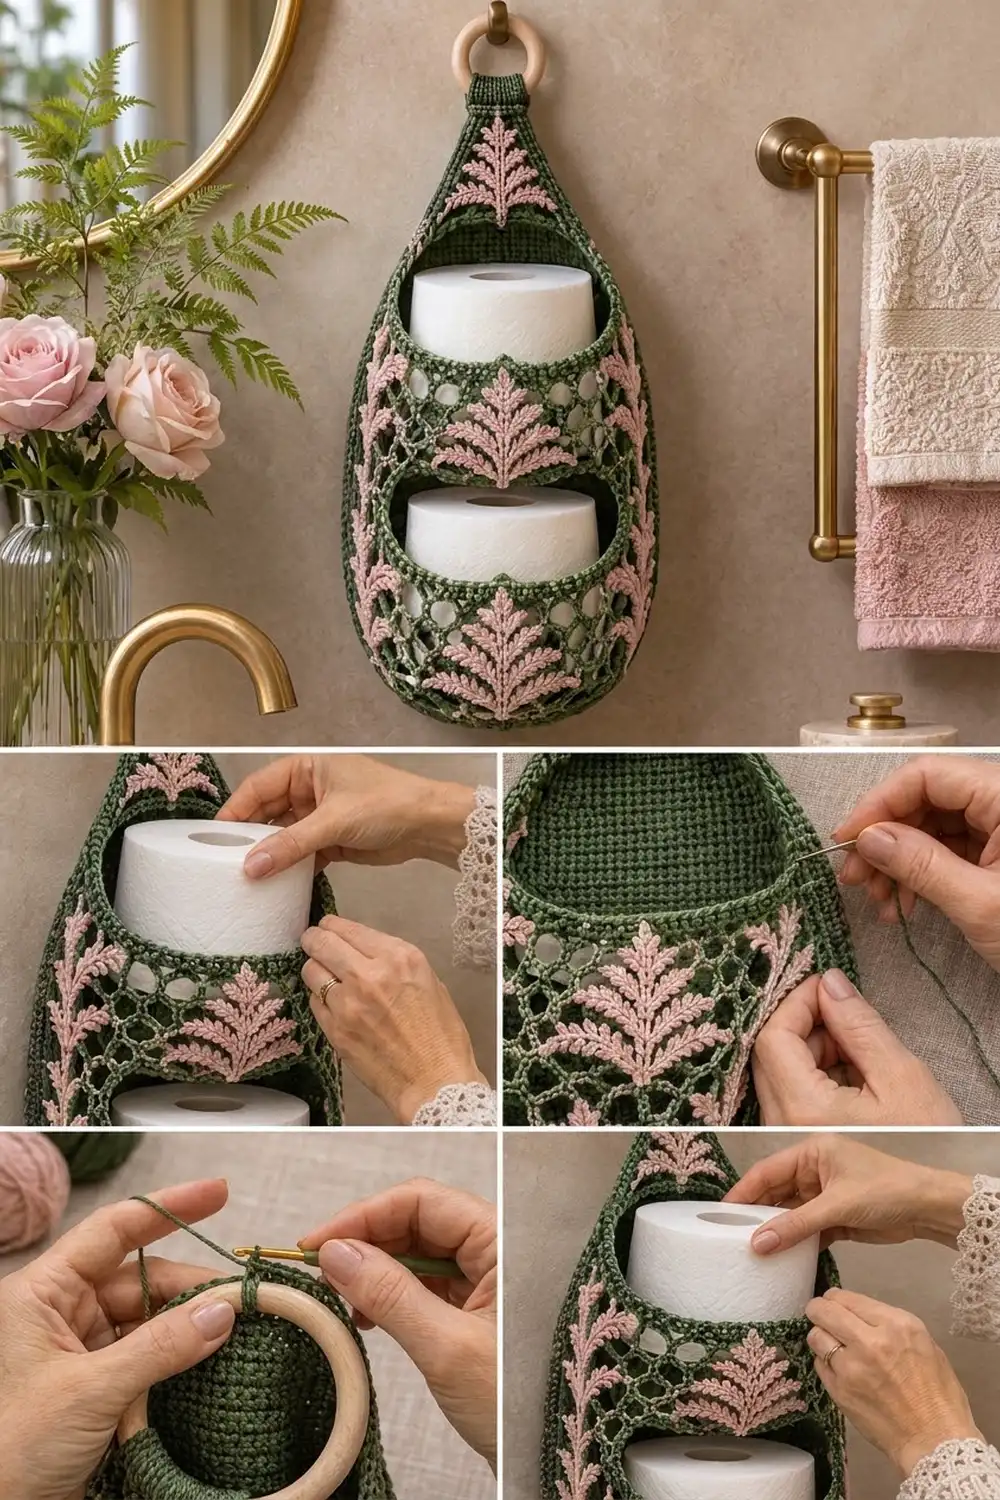
The Fernwood Teardrop is a hanging toilet paper holder shaped like a long drop. It has a solid back, an airy mesh front, and two oval windows that show the rolls stored inside. Dusty-pink fern sprays stand out against the forest-green body, giving it a soft, botanical, spa-bathroom look.
The pattern uses US crochet terms throughout. The finished holder measures about 7.4 in (18.8 cm) wide laid flat and 18.75 in (47.6 cm) tall from the base to the top of the tab, plus a 2.5 in (6.4 cm) wooden ring. It holds two standard rolls up to 4.5 in (11.4 cm) across.
Construction is simple. You crochet a flat disc for the base, then work the body upward in joined, turned rounds of double crochet. The two windows are formed by working rows over the back section only and then chaining across the front. The top tapers to a point and ends in a flat tab that folds over the ring. A matching disc becomes an inner shelf for the upper roll.
Last, you add a rope edging around each window and sew on seven pink fern appliqués.
Finished Size and Construction
- Finished size: 7.4 in (18.8 cm) wide flat × 18.75 in (47.6 cm) tall, excluding the ring
- Skill level: Intermediate
- Terminology: US
- Yarn weight: Worsted (#4), cotton or cotton blend
- Hooks: 5.0 mm (H-8) for the body; 4.0 mm (G-6) for the ferns
- Number of pieces: 1 body, 1 shelf disc, 7 fern appliqués
- Layout: one vertical holder with two stacked front windows
- Body size before edging: 14.8 in (37.6 cm) around, 17.5 in (44.5 cm) from the base edge to the top of the taper
- Window size before edging: 6.3 in (16.0 cm) wide × 5 in (12.7 cm) tall
- Edging depth: 0.25 in (0.6 cm)
Materials
Use a smooth cotton or cotton-blend worsted yarn. Cotton holds its shape under the weight of the rolls and copes well with bathroom humidity. Avoid fuzzy yarns, which hide the mesh and blur the fern fronds.
- Green (main color): 150 g, about 270 m
- Dusty pink (ferns): 50 g, about 90 m
- 5.0 mm (H-8) and 4.0 mm (G-6) crochet hooks
- One wooden ring, 2.5 in (6.4 cm) across
- Tapestry needle
- 4 stitch markers
- Scissors and a measuring tape
- Rust-proof pins and a blocking surface
The quantities include a margin of about 25% for swatching and differences in tension.
Abbreviations (US Terms)
- ch – chain
- sl st – slip stitch
- sc – single crochet
- hdc – half double crochet
- dc – double crochet
- dc2tog – double crochet 2 together
- sk – skip
- sp – space
- st(s) – stitch(es)
- rev sc – reverse single crochet (crab stitch)
Special stitches
- Reverse sc: Working from left to right (right to left if you crochet left-handed), insert the hook into the next stitch to the right, yarn over, pull up a loop, yarn over, and pull through both loops. This makes the twisted rope edge.
- Small frond (SF): Ch 3, sl st in 2nd ch from hook, sc in next ch.
- Medium frond (MF): Ch 5, sl st in 2nd ch from hook, sc in next ch, hdc in next ch, sc in next ch.
- Long frond (LF): Ch 7, sl st in 2nd ch from hook, sc in next ch, hdc in each of next 3 ch, sc in next ch.
Gauge and Checkpoints
Gauge: 14 dc and 8 rounds = 4 in (10.2 cm) with the 5.0 mm hook. Each dc round is 0.5 in (1.3 cm) tall.
Make the shelf disc first and use it as your gauge piece. Once it measures correctly, it becomes part of the holder, so no yarn is wasted.
Checkpoints:
- Shelf disc or base after Rnd 5: 4.75 in (12.1 cm) across
- After Rnd 7: the body is 7.4 in (18.8 cm) wide laid flat and 1 in (2.5 cm) tall above the base edge
- After Row 17: the window opening is 6.3 in (16.0 cm) wide × 5 in (12.7 cm) tall
- After Rnd 21: 8 in (20.3 cm) above the base edge
- After Rnd 33: 14 in (35.6 cm) above the base edge
- After Rnd 40: 17.5 in (44.5 cm) above the base edge
If your disc is too big, go down half a hook size. If it is too small, go up half a size. If your width is right but your rounds are too tall, try pulling your loops up less before each yarn over.
Base and Shelf Disc (Make 2)
Use green yarn and the 5.0 mm hook. Each round starts with ch 3, which counts as the first dc, and ends with a sl st to the top of the beginning ch-3.
Rnd 1: In a magic ring, ch 3, then work 11 dc in the ring; join. (12 sts)
Rnd 2: Ch 3, dc in the same st, then 2 dc in each st around; join. (24 sts)
Rnd 3: Ch 3, 2 dc in next st, [dc in next st, 2 dc in next st] 11 times; join. (36 sts)
Rnd 4: Ch 3, dc in next st, 2 dc in next st, [dc in next 2 sts, 2 dc in next st] 11 times; join. (48 sts)
Rnd 5: Ch 3, dc in next 10 sts, 2 dc in next st, [dc in next 11 sts, 2 dc in next st] 3 times; join. (52 sts)
Fasten off the first disc (the shelf), leaving a 36 in (91.4 cm) tail for sewing. Do not fasten off the second disc; it is the base, and the body continues from it.
Body
From here on, the body is worked in joined, turned rounds. Each round uses 52 stitches, laid out like this:
- Solid section: 30 stitches (the back plus 2 side stitches on each edge)
- Front mesh section: 22 stitches (11 dc + 11 ch-1 spaces)
Place a marker in the first stitch of the round so the join line marks one side of the holder.
Mesh Round A: Ch 3, turn, dc in next 29 dc, [dc in next dc, ch 1, sk next ch-1 sp] 11 times; join. (52 sts)
Mesh Round B: Ch 3, turn, [ch 1, sk next ch-1 sp, dc in next dc] 11 times, dc in next 29 dc; join. (52 sts)
Lower Band
Rnd 6: Do not turn. Ch 3, dc in next 29 sts, [dc in next st, ch 1, sk next st] 11 times; join. (52 sts: 41 dc + 11 ch-1 sps)
Rnd 7: Work Mesh Round B. (52 sts)
Lower Window
Row 8: Ch 3, turn, dc in next 29 dc. Leave the 22 mesh stitches unworked. (30 sts)
Rows 9–17: Ch 3, turn, dc in next 29 sts. (30 sts each row; 10 rows total)
Row 17 ends at the marked edge.
Rnd 18 (closing round): Ch 3, turn, dc in next 29 sts, ch 22, then sl st to the top of the beginning ch-3. Make sure the chain is not twisted. (52 sts: 30 dc + 22 ch)
Middle Band
Rnd 19: Ch 3, turn, [ch 1, sk next ch, dc in next ch] 11 times, dc in next 29 dc; join. (52 sts)
Rnd 20: Work Mesh Round A. (52 sts)
Rnd 21: Work Mesh Round B. (52 sts)
Upper Window
Rows 22–31: Work as for Rows 8–17. (30 sts each row)
Rnd 32: Work as for Rnd 18. (52 sts)
Rnd 33: Ch 3, turn, dc in each of next 22 ch, dc in next 29 dc; join. (52 sts, all solid)
Taper
Keep working turned rounds in solid dc.
Rnd 34: Ch 3, turn, dc in next 10 sts, dc2tog, [dc in next 11 sts, dc2tog] 3 times; join. (48 sts)
Rnd 35: Ch 3, turn, dc in next 5 sts, dc2tog, [dc in next 6 sts, dc2tog] 5 times; join. (42 sts)
Rnd 36: Ch 3, turn, dc in next 4 sts, dc2tog, [dc in next 5 sts, dc2tog] 5 times; join. (36 sts)
Rnd 37: Ch 3, turn, dc in next 3 sts, dc2tog, [dc in next 4 sts, dc2tog] 5 times; join. (30 sts)
Rnd 38: Ch 3, turn, dc in next 2 sts, dc2tog, [dc in next 3 sts, dc2tog] 5 times; join. (24 sts)
Rnd 39: Ch 3, turn, dc in next st, dc2tog, [dc in next 2 sts, dc2tog] 5 times; join. (18 sts)
Rnd 40: Ch 3, turn, dc2tog, [dc in next st, dc2tog] 5 times; join. (12 sts)
The taper is 3.5 in (8.9 cm) tall.
Hanging Tab
Flatten the top so that 6 stitches sit on the front and 6 on the back, with the front stitches centered above the windows.
Row 1: Ch 1, then work 6 sc through both layers at once. (6 sts)
Rows 2–10: Ch 1, turn, sc in each st across. (6 sts)
The tab is 1.5 in (3.8 cm) wide and 2.5 in (6.4 cm) long. Fasten off, leaving a 30 in (76.2 cm) tail.
Inner Shelf
Turn the body wrong side out. Line up the shelf disc’s 52 stitches with the 52 stitches of Rnd 21. Whipstitch each shelf stitch into the space between Rnd 20 and Rnd 21, sewing one stitch to one stitch all the way around.
This places the shelf exactly at the sill of the upper window, so the upper roll sits level with the window opening. Turn the body right side out.
Border: Window Edging
Border gauge: Horizontal edges get 1 sc per stitch (3.5 sc per inch). Side edges get 2 sc per dc row-end (4 sc per inch).
With RS facing and green yarn, join at the bottom-right corner of the lower window.
Rnd 1: Ch 1, then work sc around the opening:
– Bottom edge: 22 sc, one in each dc and one in each ch-1 sp of Rnd 7
– Left side: 20 sc, 2 in each of the 10 row-ends
– Top edge: 22 sc, one in the free loop of each Rnd 18 chain
– Right side: 20 sc, 2 in each of the 10 row-ends
Join. (84 sts)
Rnd 2: Ch 1, rev sc in each st around; join. (84 sts)
Fasten off. Repeat for the upper window, using the top of Rnd 21, Rows 22–31, and the chains of Rnd 32. The counts are the same: 22 + 20 + 22 + 20 = 84.
Why the math works: Each side has exactly as many sc as the edge it covers, so the frame lies flat without ruffling or pulling in. No stitches are added at the corners. That lets the corners round off naturally into the oval window shape in the photo. Reverse sc is worked 1 per stitch, so it adds texture but no extra length.
The edging narrows each opening to about 5.8 in (14.7 cm) × 4.5 in (11.4 cm). The fabric stretches enough to slip a roll in.
Fern Appliqués (Make 7)
Use pink yarn and the 4.0 mm hook. Each fern is about 2.75 in (7.0 cm) tall × 2.5 in (6.4 cm) wide.
Ch 13.
Side 1: Sl st in 2nd ch from hook (this is the tip). Then work:
– SF, [sl st in next 2 ch, SF]
– [sl st in next 2 ch, MF] twice
– [sl st in next 2 ch, LF] twice
– Sl st in last ch
That makes 12 stem stitches and 6 fronds.
Side 2: Rotate and work along the free loops of the chain:
– Sl st in first ch, LF
– [sl st in next 2 ch, LF]
– [sl st in next 2 ch, MF] twice
– [sl st in next 2 ch, SF] twice
– Sl st in last ch at the tip
That makes 12 stem stitches and 6 fronds.
Tip: Make an SF, then sl st into the tip. Fasten off, leaving a 12 in (30.5 cm) tail.
The fronds get longer toward the bottom, which gives the tapered spray shape.
Placement
All ferns point upward.
- Top fern: On the front of the taper, with the stem base at Rnd 33.
- Middle fern: Centered on the band between the windows. Its tips will slightly overlap the rope edging.
- Bottom fern: Centered below the lower window, curving onto the base.
- Side ferns (4): One on each side column beside each window, wrapping around the curve of the side.
Pin all seven, check the look, then sew each fern down along its stem and frond tips with small stitches in the pink tail.
Final Assembly and Blocking
- Fold the tab over the wooden ring so the last row meets Rnd 40. Whipstitch it down with the green tail.
- Wrap the remaining tail tightly around the tab base 6–8 times, then secure it inside.
- Weave in all ends on the inside.
- Mist the holder lightly with water.
- Stuff it with two rolls or a rolled towel to shape the body.
- Pin the window edgings into smooth ovals and press the ferns flat with your fingers.
- Let it dry completely, hanging, before use.
Final Quality-Control Checklist
- [ ] The base and shelf each have 52 stitches and measure 4.75 in (12.1 cm) across.
- [ ] Every body round from Rnd 6 to Rnd 33 has 52 stitches.
- [ ] Each window frame has 84 stitches per round.
- [ ] Both windows are centered on the front, with the same size and height.
- [ ] The shelf is level with the upper window sill.
- [ ] The body measures 17.5 in (44.5 cm) above the base edge.
- [ ] The tab is secure and the ring is centered.
- [ ] All seven ferns point upward and are sewn flat.
Troubleshooting
- The join seam slants: You may have forgotten to turn. Turn after every body round from Rnd 7 onward.
- The mesh doesn’t line up: Each dc should sit on a dc and each ch-1 over a ch-1 sp. Check your Round A and B order.
- The window edge ruffles: You have too many sc on the sides. Use exactly 2 per row-end.
- The window edge pulls in: Loosen your tension or go up to the next hook size for the edging only.
- The rolls won’t fit: Your gauge is tight. Re-swatch so the base measures 4.75 in (12.1 cm).
- The ferns curl: Steam them lightly before sewing.
Care
Hand wash in cool water with mild soap, reshape, and dry flat or hanging. Remove the wooden ring before washing if you can.
Final Notes
Every measurement depends on the gauge disc:
- A 52-stitch disc of 4.75 in (12.1 cm) gives a body of 14.8 in (37.6 cm) around.
- Ten-row windows give openings of 5 in (12.7 cm).
- Thirty-five body rounds at 0.5 in (1.3 cm) each give 17.5 in (44.5 cm).
- The tab adds 1.25 in (3.2 cm), for a total height of 18.75 in (47.6 cm).
Check each checkpoint as you go, and the holder will hang straight and hold its rolls neatly.
Happy crocheting!