

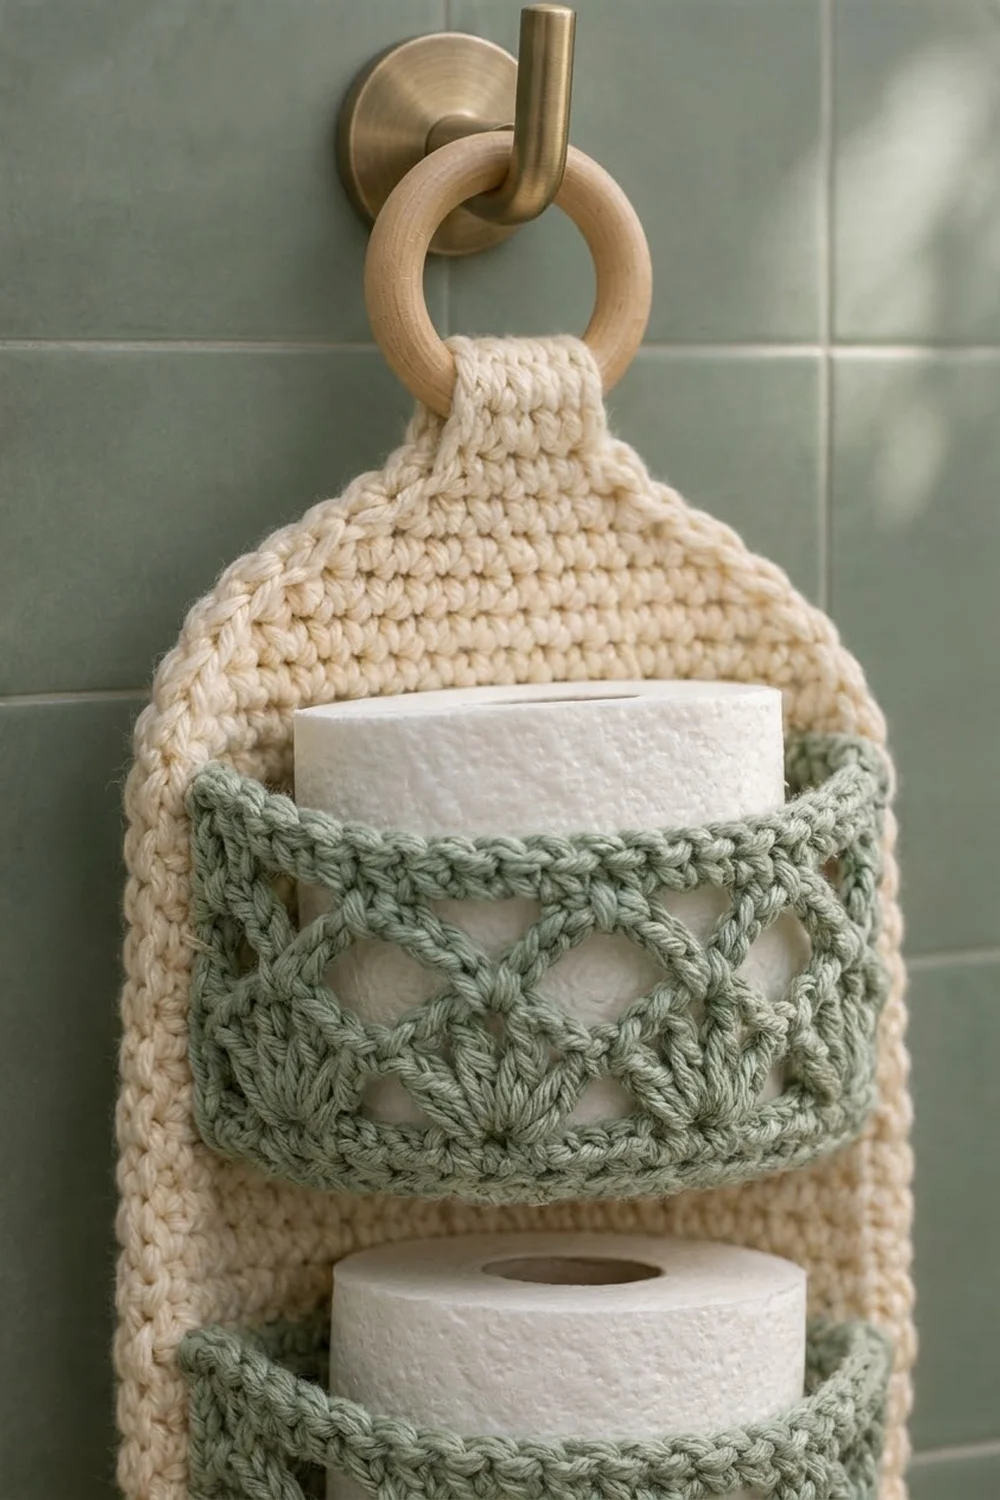
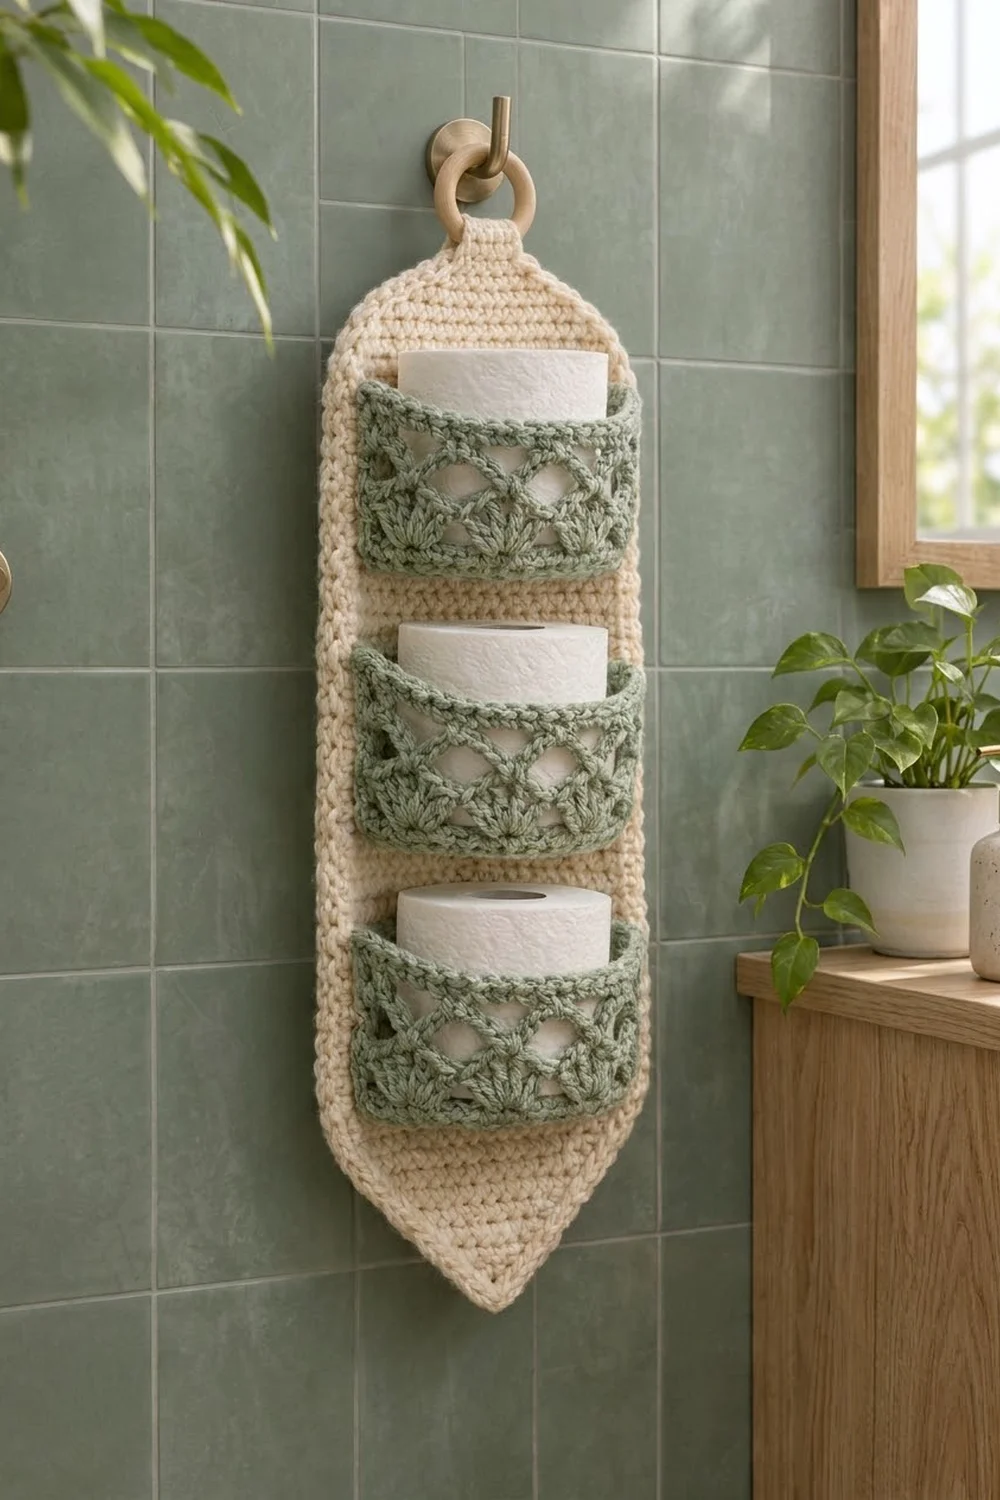
This hanging holder keeps three spare rolls tidy and in easy reach. A solid cream panel hangs from a wooden ring, and three sage green lace pockets hold a roll each. The lace has fans along the bottom and crossing chain arches above them that open into small diamonds.
The colors are soft and calm: warm cream for the backing and muted sage for the pockets. The pattern uses US crochet terms throughout.
The finished panel is 7.0 in (17.8 cm) wide and 23.0 in (58.4 cm) long from the bottom point to the base of the tab. The tab adds 4.5 in (11.4 cm) and wraps around a 2 in (5.1 cm) ring.
You work the panel flat in rows from the bottom point up, shape the domed top and tab, and add a two-round corded border. Each pocket starts as a D-shaped single crochet floor, and the lace wall is worked straight off the floor’s curved edge. You then sew the pockets to the panel.
Finished Size and Construction
- Finished size: 7.0 in x 23.0 in (17.8 cm x 58.4 cm), plus a 4.5 in (11.4 cm) tab
- Skill level: Intermediate
- Terminology: US
- Yarn weight: Medium (#4), worsted cotton
- Hook: 4.5 mm (US 7)
- Number of pieces: 4 (1 panel, 3 pockets)
- Layout: pockets stacked in one vertical column
- Panel size before border: 6.0 in x 22.5 in (15.2 cm x 57.2 cm)
- Pocket size: floor 6.0 in x 3.75 in (15.2 cm x 9.5 cm); lace wall 10.6 in (26.9 cm) long and 3.5 in (8.9 cm) tall
- Border depth: 0.5 in (1.3 cm)
Materials
Use a smooth worsted cotton or cotton blend. Cotton holds its shape in a humid bathroom and shows the lace clearly. These amounts assume about 85 m per 50 g.
- Cream (panel and border): 130 g, about 220 m
- Sage (3 pockets): 110 g, about 190 m
These quantities include a margin for your gauge swatch and sewing tails.
Tools:
– 4.5 mm (US 7) crochet hook
– Wooden ring, 2 in (5.1 cm) outer diameter
– Tapestry needle
– 4 stitch markers
– Sewing pins
– Measuring tape
– Scissors
Abbreviations (US Terms)
- ch: chain
- sc: single crochet
- dc: double crochet
- sc2tog: single crochet 2 together
- st(s): stitch(es)
- sp: space
- BLO: back loop only
- rev sc: reverse single crochet
- RS / WS: right side / wrong side
Shell: 5 dc in the same stitch.
Reverse single crochet (rev sc): work from left to right (right-handed). Insert the hook into the next stitch to the right, yarn over, pull up a loop, yarn over and draw through both loops. This makes the corded edge.
Gauge and Checkpoints
Gauge: 14 sc and 16 rows = 4 in (10.2 cm) in sc worked in rows.
Make your gauge swatch first, then make one pocket before starting the panel. The pocket is small and tests both your sc gauge and your lace tension.
Checkpoints:
– Pocket floor after Row 15: 6.0 in (15.2 cm) across the straight edge and 3.75 in (9.5 cm) deep
– Pocket wall after Row 9: 3.5 in (8.9 cm) tall
– Panel after Row 10: 6.0 in (15.2 cm) wide, 2.5 in (6.4 cm) tall
– Panel after Row 82: 20.5 in (52.1 cm) from the tip
– Panel after Row 90: 22.5 in (57.2 cm) from the tip
If your piece is too big, go down a hook size. If it’s too small, go up a hook size. Keep the stitch counts the same, because the pocket placement and the border math depend on them.
Backing Panel (Cream)
Bottom point
Row 1 (RS): Ch 2, 3 sc in 2nd ch from hook, turn. (3 sts) Place a marker on this side to mark the RS.
Row 2: Ch 1, 2 sc in first st, sc in next st, 2 sc in last st, turn. (5 sts)
Rows 3–10: Ch 1, 2 sc in first st, sc in each st to last st, 2 sc in last st, turn.
Counts: Row 3 (7), Row 4 (9), Row 5 (11), Row 6 (13), Row 7 (15), Row 8 (17), Row 9 (19), Row 10 (21).
Checkpoint: 6.0 in (15.2 cm) wide and 2.5 in (6.4 cm) tall.
Body
Rows 11–82: Ch 1, sc in each st across, turn. (21 sts per row)
That’s 72 rows, or 18 in (45.7 cm). Checkpoint: 20.5 in (52.1 cm) from the tip.
Domed top
Row 83: Ch 1, sc2tog, sc in next 17 sts, sc2tog, turn. (19)
Row 84: Ch 1, sc in each st across, turn. (19)
Row 85: Ch 1, sc2tog, sc in next 15 sts, sc2tog, turn. (17)
Row 86: Ch 1, sc2tog, sc in next 13 sts, sc2tog, turn. (15)
Row 87: Ch 1, sc2tog, sc in next 11 sts, sc2tog, turn. (13)
Row 88: Ch 1, sc2tog, sc in next 9 sts, sc2tog, turn. (11)
Row 89: Ch 1, [sc2tog] twice, sc in next 3 sts, [sc2tog] twice, turn. (7)
Row 90: Ch 1, sc2tog, sc in next 3 sts, sc2tog, turn. (5)
The decreases are gentle at first and steeper near the end, which gives the top a rounded dome instead of a sharp point. Checkpoint: 22.5 in (57.2 cm) from the tip.
Tab
Rows 91–106: Ch 1, sc in each st across, turn. (5 sts per row)
That’s 16 rows. The tab measures 1.4 in (3.6 cm) wide and 4.0 in (10.2 cm) long. Don’t fasten off. Keep the loop on a marker for the border.
Pockets (Sage, make 3)
Floor
Row 1: Ch 22, sc in 2nd ch from hook and in each ch across, turn. (21)
Rows 2–5: Ch 1, sc across, turn. (21)
Row 6: Ch 1, sc2tog, sc in next 17 sts, sc2tog, turn. (19)
Row 7: Ch 1, sc across, turn. (19)
Row 8: Ch 1, sc2tog, sc in next 13 sts, sc2tog, turn. (17)
Row 9: Ch 1, sc across, turn. (17)
Row 10: Ch 1, sc2tog, sc in next 11 sts, sc2tog, turn. (15)
Row 11: Ch 1, sc2tog, sc in next 9 sts, sc2tog, turn. (13)
Row 12: Ch 1, sc2tog, sc in next 7 sts, sc2tog, turn. (11)
Row 13: Ch 1, sc2tog, sc in next 5 sts, sc2tog, turn. (9)
Row 14: Ch 1, sc2tog, sc in next 3 sts, sc2tog, turn. (7)
Row 15: Ch 1, sc2tog, sc in next st, sc2tog. (5) Fasten off.
The foundation chain is the straight back edge. The side row ends and Row 15 together form the curved front edge.
Lace wall
Row 1 (edge row): Join sage in the corner where Row 1 of the floor begins. Ch 1. Work 15 sc evenly up the side (1 per row end). Work 2 sc in the first st of Row 15, sc in the next 3 sts, and 2 sc in the last st. Work 15 sc down the other side, ending at the opposite back corner. Turn.
This row has 15 + 7 + 15 = 37 sts.
Row 2 (shells): Working in BLO, ch 1, sc in first st. Skip 2 sts, shell in next st, skip 2 sts, sc in next st. Repeat from * 5 more times, then turn. (37 sts: 6 shells, 7 sc)
Working in the back loops leaves a ridge that lets the wall fold up from the floor.
Row 3: Ch 5 (counts as dc + ch 2), sc in center dc of next shell. Ch 5, sc in center dc of next shell. Repeat from * 4 more times, then ch 2, dc in last sc, turn.
That’s 1 + 2 + 1 + (5 arches x 6) + 2 + 1 = 37 sts.
Row 4: Ch 1, sc in first dc. Ch 5, sc in 3rd ch of next ch-5 arch. Repeat from * 4 more times, then ch 5, sc in 3rd ch of turning ch, turn. (37 sts: 6 arches, 7 sc)
These arches sit offset from the ones below, so the two layers cross and form the diamond openings.
Row 5 (shells): Ch 3 (counts as dc), 2 dc in first sc. Sc in 3rd ch of next arch, shell in next sc. Repeat from * 4 more times, then sc in 3rd ch of last arch, 3 dc in last sc, turn.
That’s 3 + (6 x 5) + 1 + 3 = 37 sts: 5 full shells and 2 half shells.
Row 6: Ch 1, sc in first dc. Ch 5, sc in center dc of next full shell. Repeat from * 4 more times, then ch 5, sc in top of turning ch, turn. (37 sts: 6 arches, 7 sc)
Row 7: Ch 1, sc in first sc. 5 sc in next arch, sc in next sc. Repeat from * 5 more times, then turn. (37)
Rows 8–9: Ch 1, sc across, turn. (37)
Fasten off and leave a 12 in (30.5 cm) tail.
Checkpoint: the wall is 3.5 in (8.9 cm) tall and 10.6 in (26.9 cm) long along its top edge.
Make All Pieces
- Cream: 1 backing panel
- Sage: 3 pockets
Pocket placement on the panel, counting rows from the tip:
Rows 91–106   [ tab ]
Rows 83–90    [ domed top ]
Rows 73–82    [ plain, 2.5 in ]
Rows 59–72    [ POCKET 3 wall ]   floor on Row 58
Rows 51–58    [ gap, 2 in ]
Rows 37–50    [ POCKET 2 wall ]   floor on Row 36
Rows 29–36    [ gap, 2 in ]
Rows 15–28    [ POCKET 1 wall ]   floor on Row 14
Rows 11–14    [ plain, 1 in ]
Rows 1–10     [ point ]
The rows add up: 10 + 4 + 14 + 8 + 14 + 8 + 14 + 10 + 8 = 90 ✓
Joining
Sew the pockets on before the border so the panel is easier to handle. Use cream yarn and a whipstitch.
- Floor edge. Pin the floor’s foundation edge across the top of panel Row 14 with the RS of both pieces facing you. Sew stitch to stitch: the floor’s 21 foundation loops go into the panel’s 21 sts, one to one.
- Wall sides. Bring the wall up and pin its side edges to panel columns 1 and 21, from Row 15 to Row 28. That’s 9 wall rows over 14 panel rows, so take about 3 panel rows for every 2 wall rows. Sew through the inner half of each edge stitch so the row ends stay free for the border.
- Repeat for Pocket 2 (floor on Row 36) and Pocket 3 (floor on Row 58).
Tension: pull each stitch just snug. Pulling too hard puckers the panel, and loose stitches let the pocket sag.
Size checkpoint: after sewing, the panel should still measure 6.0 in (15.2 cm) across at every pocket. Each pocket should bulge forward with no tension on the side seams.
Border (Cream)
Border gauge: 3.5 sc per inch along every edge, the same as the fabric gauge.
Round 1: With the tab’s live loop on the hook, ch 1 and work along the tab top: 3 sc in first st, sc in next 3 sts, 3 sc in last st (9 sts). Then work down the first long side:
- Tab side, 16 row ends: 14 sc (skip 1 row end in every 8)
- Domed top, 8 row ends: (sc in next row end, 2 sc in next row end) 3 times, sc in next 2 row ends (11 sc)
- Body, 72 row ends: (sc in next 7 row ends, skip 1) 9 times (63 sc)
- Point, 10 row ends: (sc in next 2 row ends, 2 sc in next row end) 3 times, sc in last row end (13 sc)
Work 3 sc in the free loop of the tip chain. Then work up the second side in reverse order: 13 + 63 + 11 + 14 = 101 sc. Join with a sl st to the first sc.
Round 1 total: 9 + 101 + 3 + 101 = 214 sts.
Round 2: Ch 1, rev sc in each st around. (214) Join and fasten off.
Why the math works: each straight section gets 3.5 sc per inch. The body is 18 in (45.7 cm), and 18 x 3.5 = 63 sc. The tab sides are 4.0 in (10.2 cm), and 4 x 3.5 = 14 sc. The diagonal edges are longer than their row count suggests. The point edge is about 3.8 in (9.7 cm), so it needs 13 sc. The dome edge is about 3.2 in (8.1 cm), so it needs 11 sc. Matching the gauge keeps the edge flat, with no ruffling and no cupping.
Final Blocking
- Weave in all ends except the pocket sewing tails, which are already secured.
- Lightly spray the panel with water. Don’t soak it, because the pockets should keep their shape.
- Pin the panel flat to 7.0 in x 23.0 in (17.8 cm x 58.4 cm), with the point centered.
- Stuff each pocket with a rolled towel so the lace dries curved and the diamonds open evenly.
- Let it dry completely.
- Pass the tab through the 2 in (5.1 cm) ring from front to back. Fold it down behind the panel and sew the end to the back of the domed top.
Final Quality-Control Checklist
- The panel is 7.0 in (17.8 cm) wide and 23.0 in (58.4 cm) long
- All three pocket walls are 3.5 in (8.9 cm) tall
- The pockets are level and centered, with 2 in (5.1 cm) gaps
- The rev sc edge is even and lies flat
- The tip is a sharp, centered V
- The tab is securely sewn behind the ring
- A roll slides in easily and stays put
Troubleshooting
Border ruffles: you worked too many sc along the body. Recount to 63 per side.
Point curls: the tip increases are too tight. Use a larger hook for Rows 1–10 only.
Pocket is too tight for a roll: your lace is tight. Remake the wall Rows 2–9 with a hook one size larger.
Diamonds look uneven: count the chains in your arches. Each arch must be exactly 5 ch.
Pocket sags: tighten the side seams, or add a second pass of stitches at the top corners.
Care
Hand wash in cool water, then reshape and lay flat to dry. Don’t tumble dry, because heat can shrink cotton and pull the pockets out of shape.
Final Notes
The measurements build on each other. Gauge is 14 sc to 4 in (10.2 cm). That gives a 6.0 in (15.2 cm) panel and a 22.5 in (57.2 cm) length before the border. Each pocket has a 6.0 in (15.2 cm) floor and a 3.5 in (8.9 cm) wall. The 0.5 in (1.3 cm) border brings the panel to 7.0 in x 23.0 in (17.8 cm x 58.4 cm). Check each stage before you move on, and the rolls will fit neatly.
Happy crocheting!