

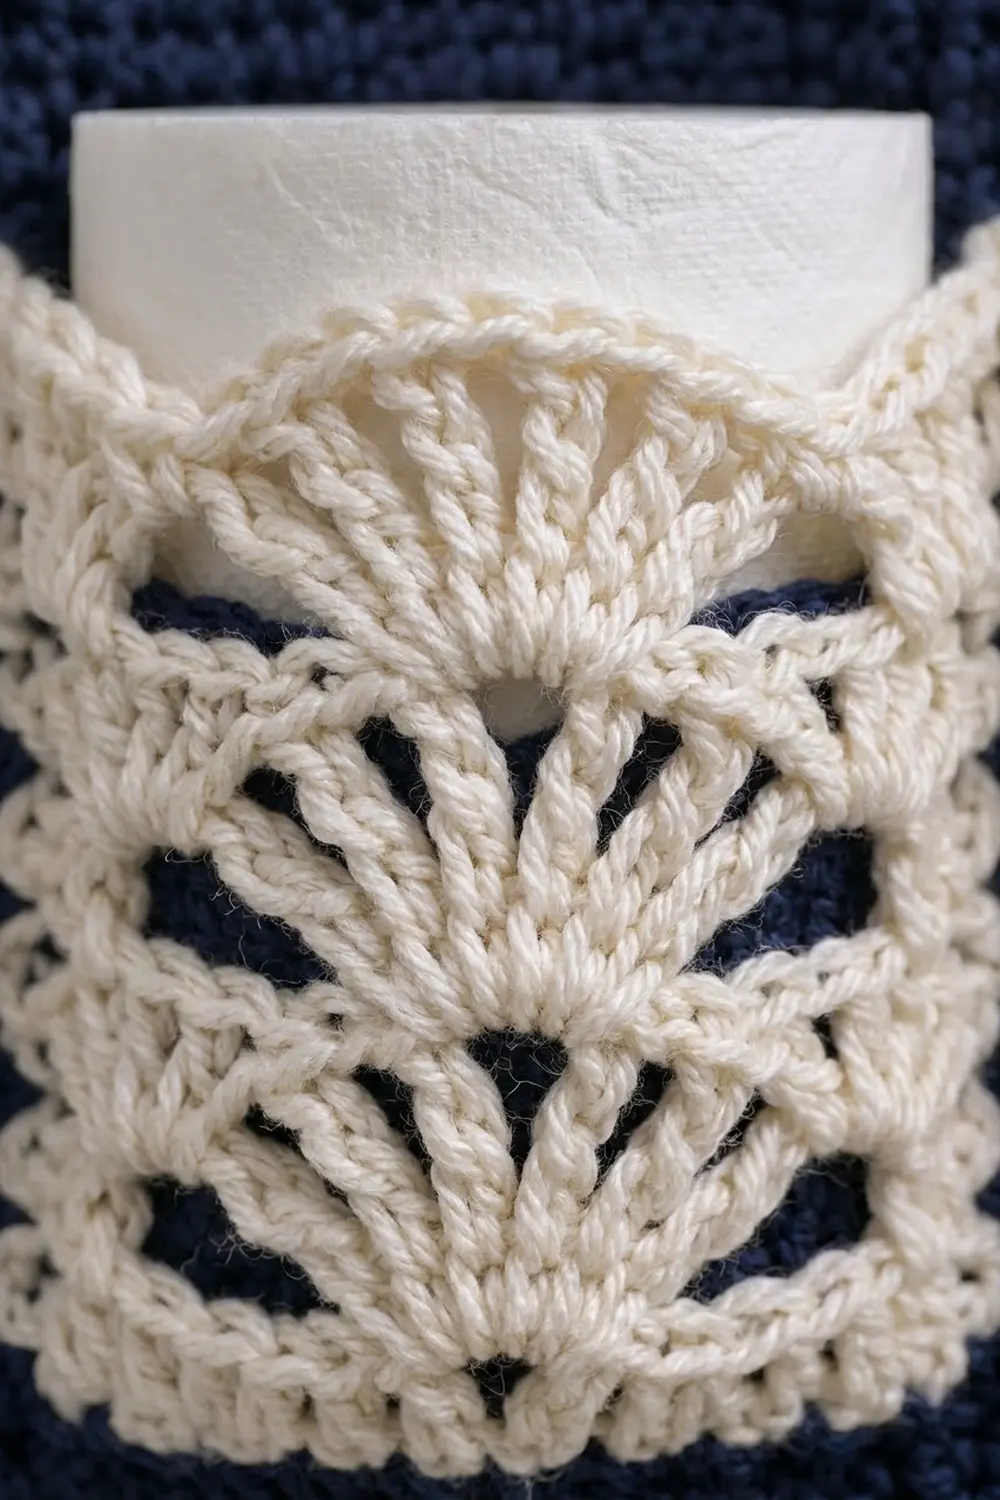
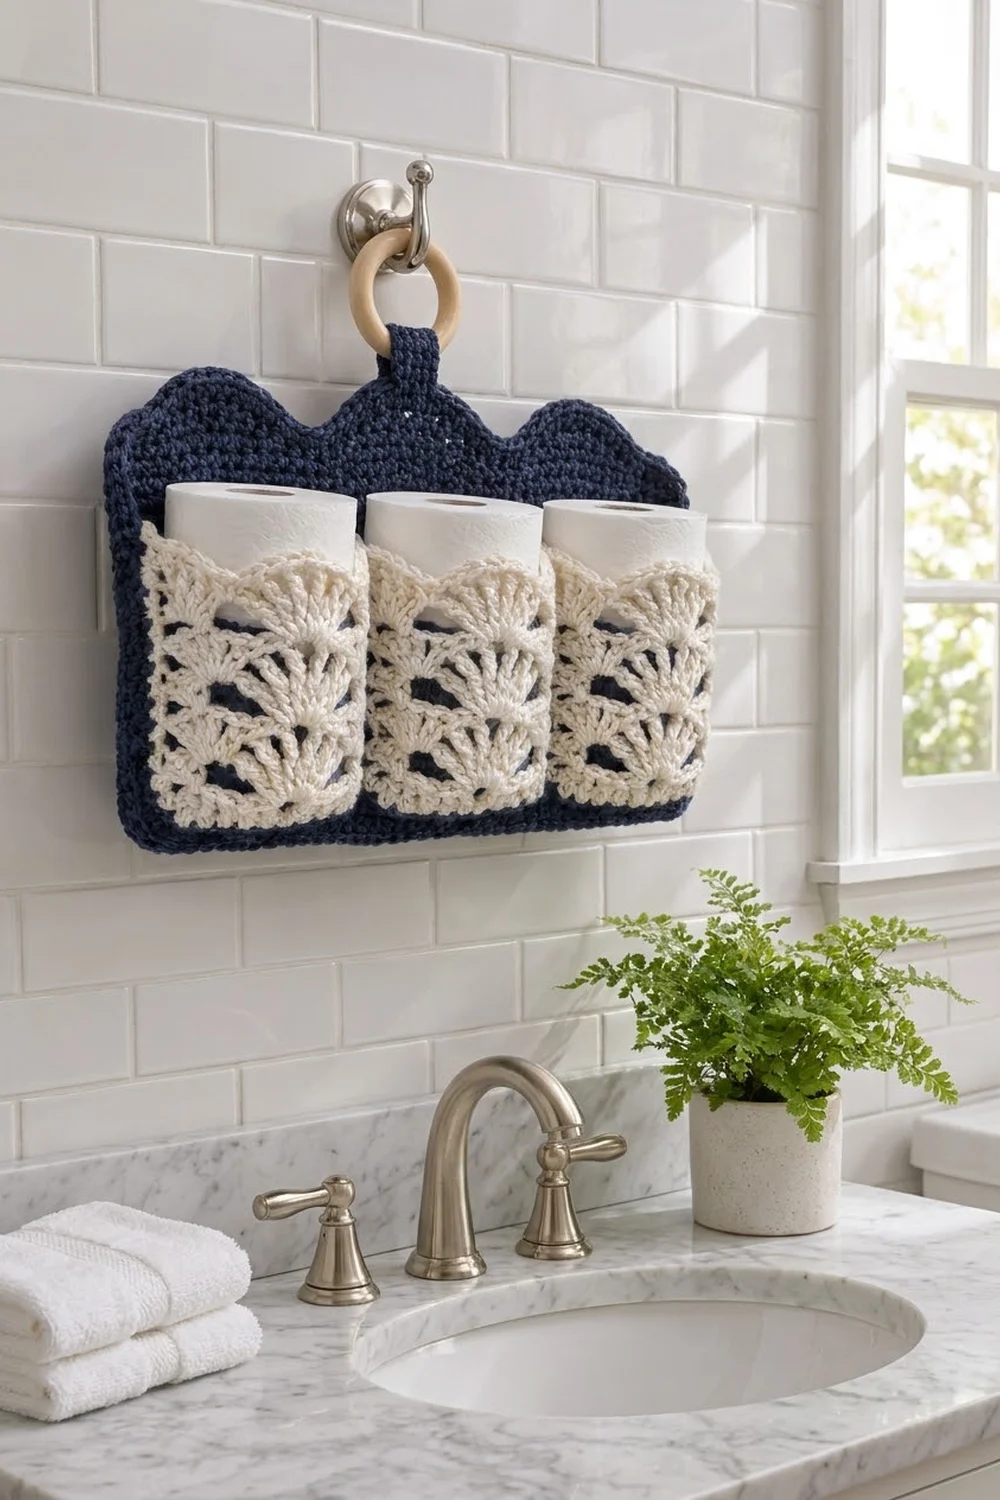
This wall holder is a solid navy panel with three rounded arches along the top and three cream fan-stitch pockets across the front. Each pocket holds one standard roll, and the whole holder hangs from a wooden ring on any towel hook or robe hook.
The two colors give it a crisp, coastal look. The dense navy single crochet keeps the panel firm and flat, and the open cream fans add texture and let a little navy show through. The style is classic and tidy, so it suits both farmhouse and modern bathrooms.
The pattern uses US crochet terms. The finished holder measures 19 in (48.3 cm) wide by 11 in (27.9 cm) tall, not counting the hanging strap and ring.
Here is the construction in brief. You work the backing in rows of single crochet, then shape three arches with short decreasing rows. Next you make three identical lace pockets and a short strap. You sew the pockets to the panel, add a two-round border around the backing, and attach the strap and ring.
Finished Size and Construction
- Finished size: 19 in (48.3 cm) wide × 11 in (27.9 cm) tall
- Skill level: Easy–Intermediate
- Terminology: US
- Yarn weight: Worsted (Category 4) cotton
- Hook: 5.0 mm (H-8)
- Number of pieces: 5 crocheted pieces (1 backing panel, 3 pockets, 1 strap) plus a wooden ring
- Layout: 3 pockets in one row across the front of the panel
- Pocket size: 8 in (20.3 cm) wide × 4.5 in (11.4 cm) tall, sewn over a 6 in (15.2 cm) wide section of panel
- Panel size before border: 18 in (45.7 cm) × 10 in (25.4 cm), including the arches
- Border depth: 0.5 in (1.3 cm), worked in 2 rounds
Materials
Use a smooth worsted-weight cotton or cotton blend. Cotton holds its shape in a humid bathroom and shows the fan stitches clearly. Avoid fuzzy or very stretchy yarns, because a full pocket will pull them out of shape.
- Navy (Color A): 100 g / 170 m, for the backing, border and strap
- Cream (Color B): 50 g / 85 m, for the 3 pockets
Both quantities include a margin of about 40% beyond the measured use, so you have extra yarn for your gauge swatch and for sewing.
Tools:
– 5.0 mm (H-8) crochet hook
– Tapestry needle
– One 3 in (7.6 cm) wooden ring
– Rust-proof pins or locking stitch markers
– Tape measure
– Spray bottle and blocking mat
Abbreviations (US Terms)
- ch – chain
- sc – single crochet
- dc – double crochet
- sc2tog – single crochet 2 together: (insert hook in next st, yarn over, pull up a loop) twice, yarn over, pull through all 3 loops
- st(s) – stitch(es)
- sk – skip
- rep – repeat
- RS / WS – right side / wrong side
Special stitches:
– Fan: 9 dc in the same stitch.
– Half fan: at the start of a row, ch 3 (counts as 1 dc) and work 4 dc in the first stitch, for 5 sts. At the end of a row, work 5 dc in the last stitch.
– Picot: ch 3, worked between 2 sc in the same stitch.
Gauge and Checkpoints
Navy single crochet gauge: 16 sts × 16 rows = 4 in (10.2 cm). This is a square gauge: 4 sts and 4 rows per inch. That is why the border can use exactly 1 sc per row-end later on.
Cream fan gauge: 31 sts in fan pattern = 8 in (20.3 cm) wide, and 6 fan rows = 4 in (10.2 cm) tall, measured after blocking.
Test one piece first. Make one pocket before you start the panel, because it is small and shows your fan gauge right away. Then crochet a 20-st sc swatch in navy for 20 rows and measure the center 16 × 16.
Checkpoints:
– After panel Row 32: 18 in (45.7 cm) wide × 8 in (20.3 cm) tall
– After the arches: 10 in (25.4 cm) tall at the arch peaks
– After the border: 19 in (48.3 cm) × 11 in (27.9 cm)
– Each blocked pocket: 8 in (20.3 cm) × 4.5 in (11.4 cm)
If your piece is too big, go down a half or full hook size. If it is too small, go up a size. Match the navy gauge closely, because the pocket spacing depends on it.
Backing Panel (Color A)
Row 1 (RS): Ch 73, sc in 2nd ch from hook and in each ch across. Turn. (72 sc)
Rows 2–32: Ch 1, sc in each st across. Turn. (72 sc)
Checkpoint: 18 in (45.7 cm) wide × 8 in (20.3 cm) tall. Do not fasten off.
Arches
You work each arch separately over 24 stitches. The ch 1 at the start of a row never counts as a stitch.
Arch 1:
– Row A1: Ch 1, sc in the first 24 sts only. Turn. (24 sc)
– Row A2: Ch 1, sc2tog, sc in next 18 sts, sc2tog. Turn. (20 sc)
Wait—recheck: 24 − 2 decreases (2 sts lost) = 22. Use this row instead:
- Row A2: Ch 1, sc2tog, sc in next 20 sts, sc2tog. Turn. (22 sc)
- Row A3: Ch 1, sc in each st across. Turn. (22 sc)
- Row A4: Ch 1, sc2tog, sc in next 18 sts, sc2tog. Turn. (20 sc)
- Row A5: Ch 1, sc2tog, sc in next 16 sts, sc2tog. Turn. (18 sc)
- Row A6: Ch 1, sc2tog, sc in next 14 sts, sc2tog. Turn. (16 sc)
- Row A7: Ch 1, sc2tog, sc in next 12 sts, sc2tog. Turn. (14 sc)
- Row A8: Ch 1, sc2tog, sc in next 10 sts, sc2tog. (12 sc) Fasten off.
Arch 2: With the RS facing, join Color A in the 25th st of Row 32. Work Rows A1–A8 over sts 25–48.
Arch 3: Join in the 49th st of Row 32 and work Rows A1–A8 over sts 49–72.
Each arch is 8 rows, or 2 in (5.1 cm) tall, and its top is 12 sts, or 3 in (7.6 cm) wide. The V-dips form naturally where the arches meet. Checkpoint: 18 in (45.7 cm) × 10 in (25.4 cm).
Pockets (Color B)
Make 3 pockets. They are worked flat from the bottom up. Each fan row keeps exactly 31 sts.
Row 1 (RS): Ch 32, sc in 2nd ch from hook and in each ch across. Turn. (31 sc)
Row 2: Ch 3 (counts as dc), 4 dc in first st (half fan made). Sk 4 sts, sc in next st, sk 4 sts, fan in next st. Rep from * once more. Sk 4 sts, sc in next st, sk 4 sts, 5 dc in last st. Turn. (31 sts: 2 half fans, 2 fans, 3 sc)
Row 3: Ch 1, sc in first dc. Sk 4 dc, fan in next sc, sk 4 dc, sc in next dc (the center dc of the fan). Rep from * 2 more times, working the last sc in the top of the turning ch. Turn. (31 sts: 3 fans, 4 sc)
Row 4: Ch 3 (counts as dc), 4 dc in first sc. Sc in 5th dc of next fan, fan in next sc. Rep from * once more. Sc in 5th dc of last fan, 5 dc in last sc. Turn. (31 sts)
Rows 5–7: Rep Rows 3, 4 and 3. (31 sts) Row 7 ends with 3 full fans, which form the scalloped top.
Row 8 (trim): Ch 1, sc in first sc. Sc in next 4 dc, (sc, picot, sc) in next dc, sc in next 4 dc, sc in next sc. Rep from * 2 more times. Fasten off, leaving a 12 in (30.5 cm) tail for sewing.
This trim row gives 31 sc (1 per existing st) + 3 extra sc = 34 sc, plus 3 picots.
Checkpoint after blocking: 8 in (20.3 cm) × 4.5 in (11.4 cm). The foundation row adds about 0.25 in (0.6 cm), the 6 fan rows add 4 in (10.2 cm), and the trim adds about 0.25 in (0.6 cm).
Hanging Strap (Color A)
Row 1: Ch 7, sc in 2nd ch from hook and in each ch across. Turn. (6 sc)
Rows 2–28: Ch 1, sc in each st. Turn. (6 sc)
Fasten off, leaving a long tail. The strap is 1.5 in (3.8 cm) wide × 7 in (17.8 cm) long.
Make All Pieces
- Color A: 1 backing panel and 1 strap
- Color B: 3 pockets
Layout, front view:
   ( Arch 1 )( Arch 2 )( Arch 3 )
  +------------------------------+
  |          navy panel          |
  | [Pocket1][Pocket2][Pocket3]  |
  |   sts     sts      sts       |
  |   1–24   25–48    49–72      |
  |    rows 5–22 (all pockets)   |
  +------------------------------+
Joining
Lay the panel RS up. Each pocket is centered under its arch:
- Pocket 1 covers panel stitch columns 1–24.
- Pocket 2 covers columns 25–48.
- Pocket 3 covers columns 49–72.
Bottom edge: Pin each pocket’s foundation row along panel Row 5, which is 1 in (2.5 cm) above the lower edge. The pocket is 8 in (20.3 cm) wide but sits over a 6 in (15.2 cm) span, so it has 2 in (5.1 cm) of extra width. Fold that extra into an inverted box pleat at the bottom center, using two folds that each take up 1 in (2.5 cm). Whipstitch through both layers with 1 stitch into each of the 24 panel stitches.
Side edges: Each pocket side runs from panel Row 5 to Row 22, which is 18 rows or 4.5 in (11.4 cm). Work 1 whipstitch into each panel row, for 18 stitches per side. Space the stitches on the pocket edge like this: 1 into the foundation row, 2 or 3 along each fan-row end (16 in total), and 1 into the trim row, for 18 in total.
Sew the outer sides of Pockets 1 and 3 onto the face of edge columns 1 and 72, not into the row-ends. That keeps the row-ends free for the border. Neighboring pockets share a seam line between columns 24 and 25, and between columns 48 and 49.
Tension: Pull each stitch snug but not tight. The panel must not pucker. Checkpoint: the panel should still lie flat at 18 in (45.7 cm) wide.
Because the seams sit on the face of the panel, you can also work the border before sewing on the pockets if you prefer.
Border (Color A)
The border is worked with the same 4 sts per inch gauge, using 1 sc per stitch or per row-end.
Round 1: With RS facing, join Color A in the bottom right corner. Work around the panel in this order:
- Bottom: 1 sc in each of the 72 foundation loops, with 3 sc in each end loop. (76 sc)
- Left side: 1 sc in each row-end of Rows 1–32. (32 sc)
- Top: On each arch, 1 sc in each of the 8 row-ends going up, 1 sc in each of the 12 top sts, and 1 sc in each of the 8 row-ends going down, for 28 per arch. At each of the 2 V-dips, work the last row-end of one arch and the first row-end of the next arch together as sc2tog. (84 − 2 = 82 sc)
- Right side: 1 sc in each row-end of Rows 32–1. (32 sc)
Sl st to the first sc. (222 sc)
Round 2: Ch 1, sc in each st around, with these changes:
- Work 3 sc in the center sc of each bottom corner. (Bottom: 76 + 4 = 80)
- Sc2tog over each V-dip sc2tog and the stitch after it. (Top: 82 − 2 = 80)
- Sides: 32 sc each.
Sl st to the first sc and fasten off. (80 + 32 + 80 + 32 = 224 sc)
Why the math works: The bottom starts from the panel’s own 72 stitches. The sides start from its 32 rows. Because the gauge is square, 1 sc per row-end keeps the sides flat. Each convex corner gains 2 sts per round, and each concave V-dip loses 1 st per round, which keeps the dips from ruffling. Two rounds add 0.25 in (0.6 cm) each, for 0.5 in (1.3 cm) per edge. That brings the panel from 18 × 10 in (45.7 × 25.4 cm) to 19 × 11 in (48.3 × 27.9 cm).
Strap: Fold the strap in half through the wooden ring. Lay both ends against the back of Arch 2, centered, so they overlap the arch by 1.5 in (3.8 cm). About 2 in (5.1 cm) of strap will show above the arch. Whipstitch around all edges of the overlap through all layers, without letting the stitches show on the front.
Final Blocking
- Weave in all ends along seams or inside the border.
- Pin the holder RS up to 19 in (48.3 cm) × 11 in (27.9 cm), keeping the arch curves smooth.
- Spray it evenly until damp, but not soaked.
- Gently shape each pocket’s fans and open up the picots.
- Stuff each pocket lightly with a rolled towel so it holds a rounded shape.
- Let everything dry completely, about 24 hours, before unpinning.
Final Quality-Control Checklist
- The panel measures 19 in (48.3 cm) × 11 in (27.9 cm).
- All 3 arches match: 8 rows tall with 12-st tops.
- Each pocket has 3 full fans along the top and 3 picots.
- The pocket bottoms all sit on Row 5, and the pleats are centered.
- The side seams line up and are even.
- The strap is secure, and the ring hangs straight.
- No ends are visible on the front.
Troubleshooting
- The panel slants: Count 72 sts every few rows. You may have missed the last stitch of a row.
- The arches look pointed: Make sure Row A3 is a plain row with no decreases.
- The border ruffles: Your border tension is looser than your panel. Go down one hook size for the border only.
- The V-dips pucker: You skipped a dip decrease. Work 1 sc2tog at each dip in each round.
- The pockets are too tight for rolls: Make the box pleat deeper, or block the pockets wider.
- The fans lean to one side: Check that each sc lands in the 5th (center) dc of the fan below.
Care
Hand wash in cool water, press out the water in a towel, and dry flat. Reshape the arches and pockets while the holder is still damp.
Final Notes
Here is the measurement chain:
- The navy gauge of 16 sts × 16 rows = 4 in (10.2 cm) gives a body of 18 × 8 in (45.7 × 25.4 cm).
- The arches add 2 in (5.1 cm) of height, bringing the panel to 18 × 10 in (45.7 × 25.4 cm).
- The two border rounds bring it to 19 × 11 in (48.3 × 27.9 cm).
- Each 8 × 4.5 in (20.3 × 11.4 cm) pocket is eased onto a 6 in (15.2 cm) span to hold a roll.
If you check each stage as you go, the finished holder will hang flat and straight.
Happy crocheting!