

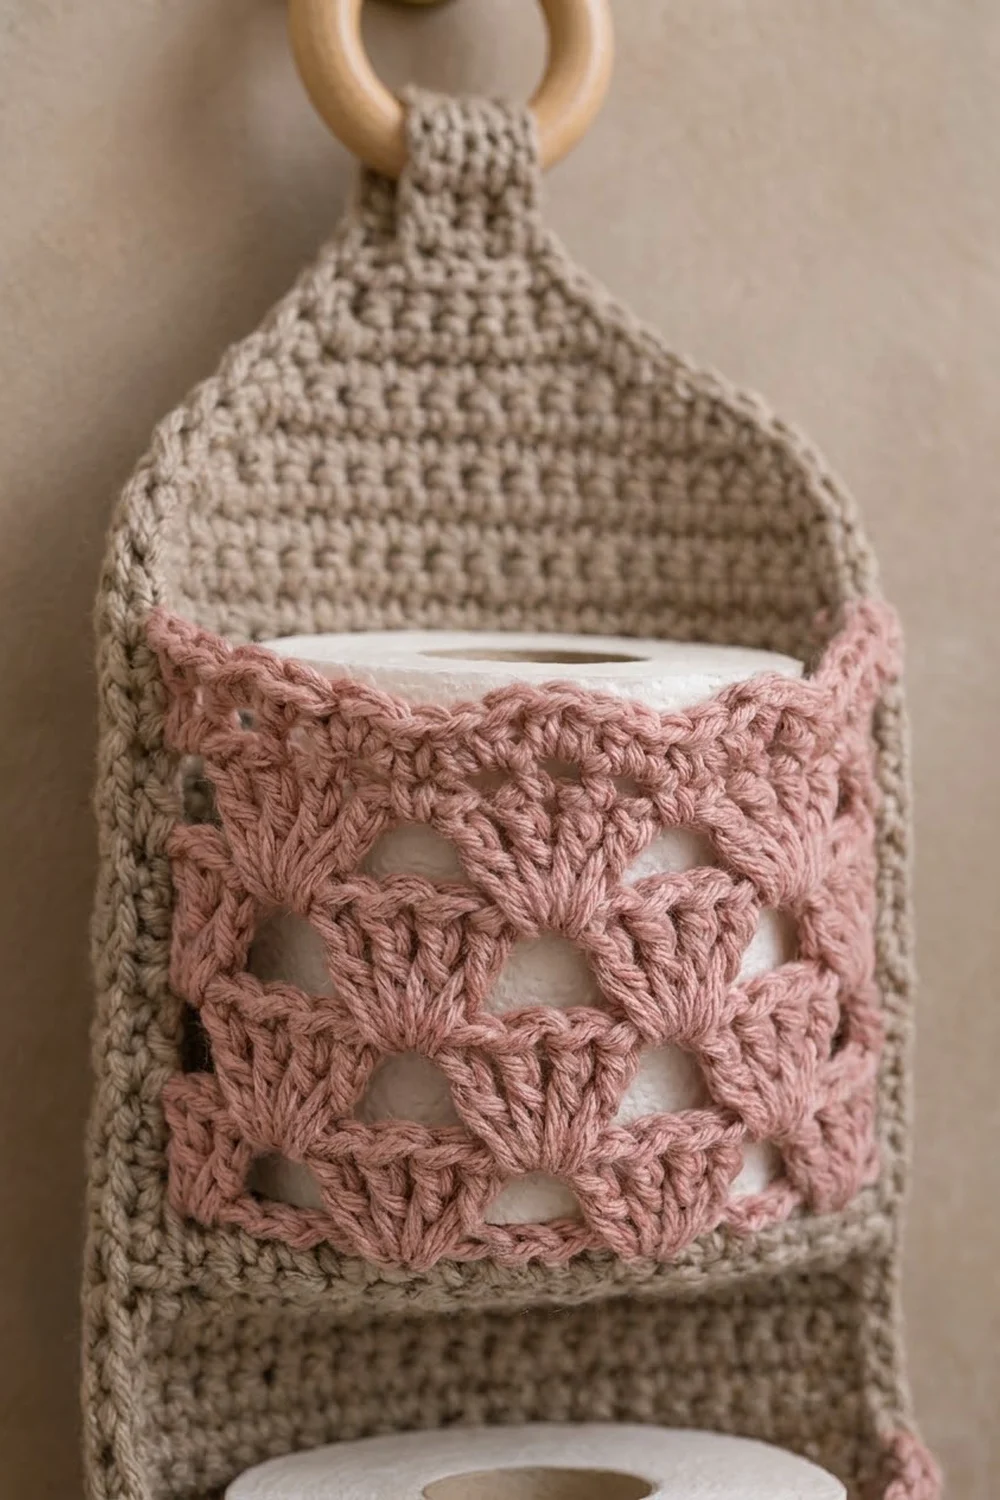
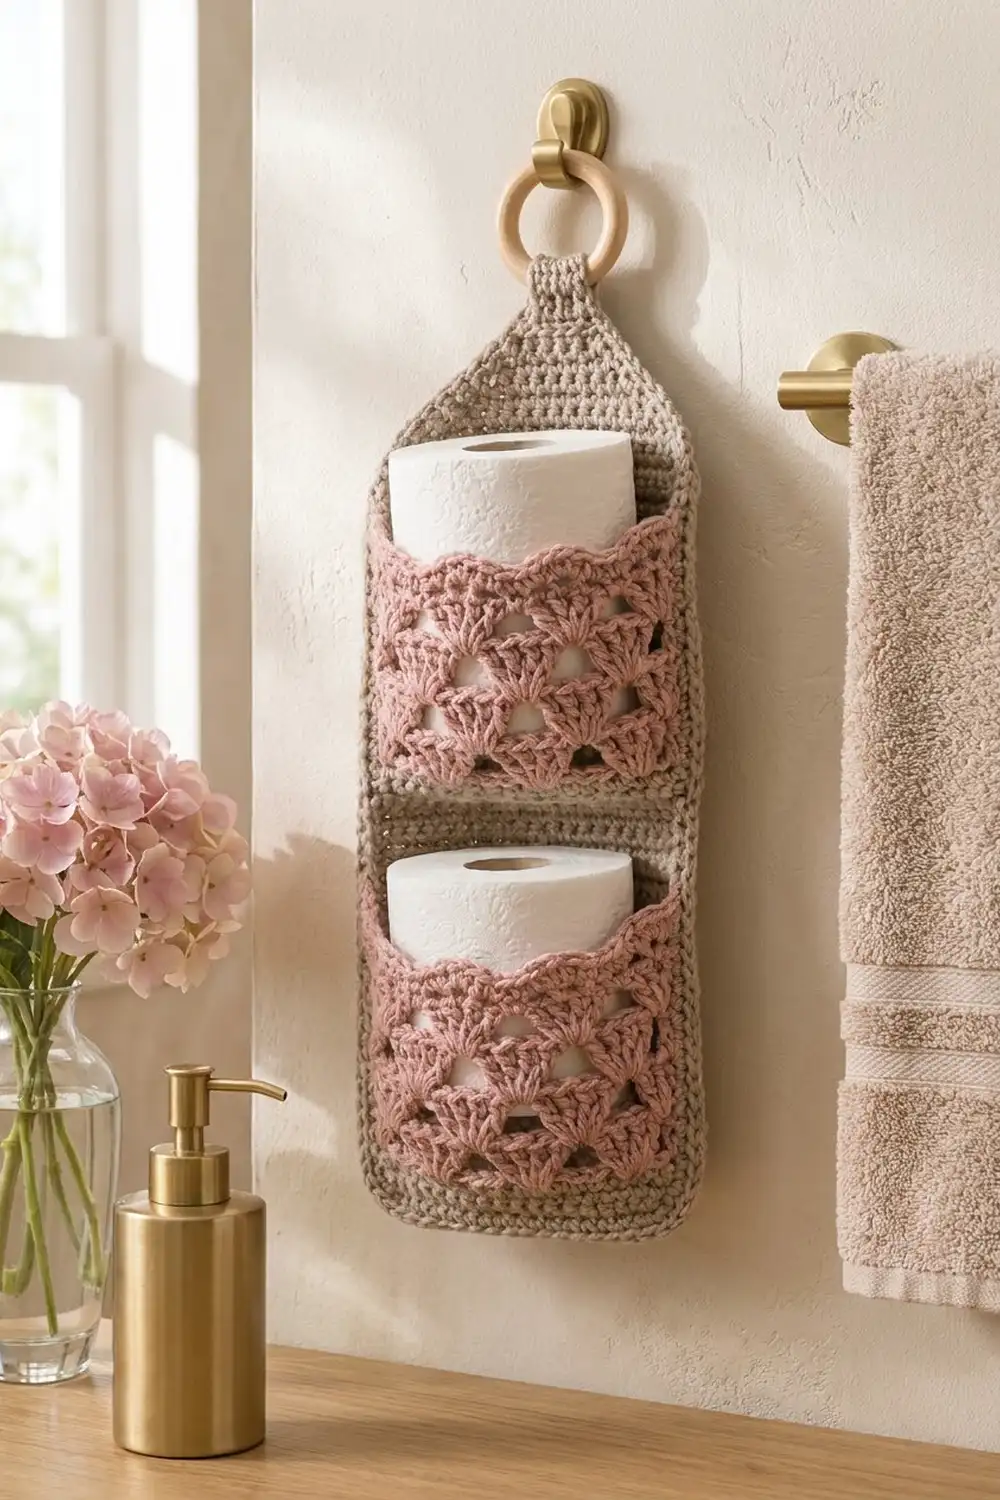
This hanging holder stores two spare rolls in a small strip of wall space. A firm taupe backing hangs from a wooden ring, and two dusty-rose shell-stitch pockets hold the rolls.
The colors are a warm taupe and a soft rose pink, which suit neutral bathrooms. The backing is plain single crochet, so it lies flat. The pockets use stacked fan shells with small open spaces, so they look lacy but still hold their shape. The pattern uses US crochet terms throughout.
The finished holder is 6.5 in (16.5 cm) wide and 18.25 in (46.4 cm) long before the hanging loop. It is about 20 in (50.8 cm) from the bottom edge to the top of the ring. Each pocket sticks out 4 in (10.2 cm) from the wall.
Construction overview: You work the backing flat from the bottom up, taper the top and continue into a tab. Then you add a one-row border. Next you make two rectangular taupe pocket bases and two shell-stitch pocket fronts. Finally you sew each base and front to the backing so they form an open box, and fold the tab around the ring.
Finished Size and Construction
- Finished size: 6.5 in x 18.25 in (16.5 cm x 46.4 cm), plus a 1.75 in (4.4 cm) ring loop
- Skill level: Easy-intermediate
- Terminology: US crochet terms
- Yarn weight: Worsted (#4), cotton or cotton blend
- Hook: 5.0 mm (H-8)
- Number of pieces: 5 (1 backing, 2 pocket bases, 2 pocket fronts)
- Layout: One vertical backing with two pockets stacked one above the other
- Backing size before border: 6 in x 18 in (15.2 cm x 45.7 cm), not counting the tab
- Pocket front size: 14 in x 3.625 in (35.6 cm x 9.2 cm)
- Pocket base size: 6 in x 4 in (15.2 cm x 10.2 cm)
- Border depth: 0.25 in (0.6 cm), one row of single crochet
Materials
Use a smooth worsted-weight cotton or cotton blend. Cotton holds its shape in a humid bathroom and shows the shell texture clearly. Avoid fuzzy yarns, because they blur the open spaces in the lace.
- Color A, Taupe: 85 g / 145 m (backing, tab, border, bases, bottom row of each pocket)
- Color B, Dusty Rose: 35 g / 60 m (pocket shell sections)
These amounts include a safety margin of about 25%.
Tools:
– 5.0 mm (H-8) crochet hook
– One wooden ring, 2.5 in (6.4 cm) outer diameter
– Tapestry needle
– Locking stitch markers (at least 6)
– Scissors
– Measuring tape
– Pins and a blocking mat or folded towel
Abbreviations (US Terms)
- ch: chain
- sc: single crochet
- dc: double crochet
- sc2tog: single crochet 2 together
- sl st: slip stitch
- st(s): stitch(es)
- sp: space
- RS / WS: right side / wrong side
- rep: repeat
Special stitches:
– Shell: 5 dc in the same stitch. The 3rd dc is the center dc.
– Half shell: 3 dc in the same stitch. At the start of a row, ch 3 plus 2 dc counts as a half shell.
Gauge and Checkpoints
Single crochet gauge: 14 sc and 16 rows = 4 in (10.2 cm), which is 3.5 sts and 4 rows per inch.
Shell gauge: 4 shell rows = 2.5 in (6.4 cm), which is 0.625 in (1.6 cm) per shell row.
Make one pocket base first. It works as your gauge swatch, and you can still use it in the holder.
Checkpoints:
– Pocket base (21 sts x 16 rows): 6 in x 4 in (15.2 cm x 10.2 cm)
– Backing after Row 64: 6 in x 16 in (15.2 cm x 40.6 cm)
– Backing after Row 72 (taper): 18 in (45.7 cm) long
– Pocket front after Row 2: 14 in (35.6 cm) wide, 0.5 in (1.3 cm) tall
– Pocket front after Row 7: 3.625 in (9.2 cm) tall
If your piece is too big, go down to a 4.5 mm hook. If it is too small, go up to a 5.5 mm hook. Change hooks before you start the backing, because every later piece is sized to match it.
Backing Panel
Use Color A.
Row 1 (RS): Ch 22, sc in 2nd ch from hook and in each ch across. Turn. (21 sts)
Rows 2–64: Ch 1 (does not count as a stitch), sc in each st across. Turn. (21 sts)
Checkpoint: 6 in x 16 in (15.2 cm x 40.6 cm).
Before you continue, place markers on Row 4 and Row 34. These rows mark where the two pocket bases will sit.
Taper
Row 65: Ch 1, sc2tog, sc in each st to the last 2 sts, sc2tog. Turn. (19 sts)
Row 66: Rep Row 65. (17 sts)
Row 67: Rep Row 65. (15 sts)
Row 68: Rep Row 65. (13 sts)
Row 69: Rep Row 65. (11 sts)
Row 70: Rep Row 65. (9 sts)
Row 71: Rep Row 65. (7 sts)
Row 72: Rep Row 65. (5 sts)
Checkpoint: the panel is 18 in (45.7 cm) long and comes to a neat point with even edges on both sides.
Hanging Tab
Rows 73–86: Ch 1, sc in each st across. Turn. (5 sts)
The tab is 3.5 in (8.9 cm) long. Fasten off and leave a 12 in (30.5 cm) tail for sewing. Don’t fold it yet; you’ll wrap it around the ring after the border.
Pocket Bases (make 2)
Use Color A.
Row 1: Ch 22, sc in 2nd ch from hook and in each ch across. Turn. (21 sts)
Rows 2–16: Ch 1, sc in each st across. Turn. (21 sts)
Fasten off and leave a 20 in (50.8 cm) tail.
Checkpoint: 6 in x 4 in (15.2 cm x 10.2 cm). The base is exactly as wide as the backing before its border, so it fits between the border edges.
Pocket Fronts (make 2)
Each front is one strip that wraps around three sides of a base: 4 in for one side, 6 in for the front and 4 in for the other side, which adds up to 14 in (35.6 cm).
Row 1 (Color A): Ch 50, sc in 2nd ch from hook and in each ch across. Turn. (49 sts) Fasten off Color A.
Row 2 (Color B): Join Color B in the first st. Ch 1, sc in each st across. Turn. (49 sts)
Checkpoint: 14 in (35.6 cm) wide, 0.5 in (1.3 cm) tall.
Row 3: Ch 1, sc in first st, skip 2 sts, shell in next st, skip 2 sts, sc in next st. Rep from * 7 more times. Turn. (8 shells, 9 sc)
Row 4: Ch 3 (counts as dc), 2 dc in first sc (half shell made), ch 1, sc in center dc of next shell, ch 1, shell in next sc. Rep from * 6 more times, then ch 1, sc in center dc of last shell, ch 1, 3 dc in last sc. Turn. (7 shells, 2 half shells, 8 sc, 16 ch-1 sps)
Row 5: Ch 1, sc in first dc, ch 1, shell in next sc, ch 1, sc in center dc of next shell. Rep from * across, working the last sc in the top of the turning ch-3. Turn. (8 shells, 9 sc, 16 ch-1 sps)
Row 6: Rep Row 4.
Row 7: Rep Row 5. Fasten off and weave in the ends.
Row 7 ends with 8 full shells, which form the scalloped top edge. The shells in each row sit over the sc of the row below, so the fans alternate and leave small open spaces between them.
Checkpoint: 14 in x 3.625 in (35.6 cm x 9.2 cm). That height is 0.5 in for Rows 1–2 plus 3.125 in (7.9 cm) for Rows 3–7.
Border
Border gauge: 3.5 sc per inch, the same as the body gauge. Work the border on the backing only, before you add the pockets.
With RS facing, join Color A at the right-hand edge where Row 72 meets the tab. Work every stitch as sc.
Right taper edge: Work 1 sc in the end of each row from Row 72 down to Row 65, with 2 sc in the ends of Rows 72, 69 and 66. (11 sts)
Right straight edge: Work down the row ends from Row 64 to Row 1. Make 1 sc in each row end, but skip every 8th row end. (56 sts)
Bottom edge: Work 3 sc in the first foundation ch (corner), sc in each of the next 19 chs, 3 sc in the last foundation ch (corner). (25 sts)
Left straight edge: Work up the row ends from Row 1 to Row 64, skipping every 8th row end. (56 sts)
Left taper edge: Work 1 sc in each row end from Row 65 to Row 72, with 2 sc in the ends of Rows 66, 69 and 72. (11 sts)
Fasten off. Total: 159 sts (11 + 56 + 25 + 56 + 11).
Why the math works:
– Straight edges: 64 rows at 4 rows per inch are 16 in (40.6 cm). At the 3.5 sc-per-inch gauge, 16 in needs 56 sc. Skipping 1 row end in 8 turns 64 row ends into exactly 56 sc.
– Taper edges: these slope inward, so each one is about 3 in (7.6 cm) long instead of 2 in (5.1 cm). It therefore needs about 11 sc instead of 8, and the 3 doubled row ends add those stitches.
– Bottom edge: the 19 plain sts plus the 2 three-sc corners cover the 21 foundation chs. The corners let the border turn without cupping.
– Size: the backing is now 6.5 in x 18.25 in (16.5 cm x 46.4 cm).
Assembly
Hanging loop: Pass the tab through the wooden ring from front to back. Fold it so Row 86 meets the WS of the panel at the top of Row 72. Whipstitch all 5 sts in place with the tab tail. This forms a 1.75 in (4.4 cm) loop.
Attach the bases: Lay the backing RS up. Pin the foundation edge of one base along the marked Row 4, matching its 21 chs to the 21 sts of that row, one to one. Whipstitch through both layers. Attach the second base the same way along Row 34. Fold each base up so it sticks out from the panel like a shelf.
Attach the pocket fronts: Divide the foundation edge of one front with markers at st 14 and st 35. This gives 14 sts, 21 sts and 14 sts.
– Sew the middle 21 sts to the 21 sts of the base’s free long edge, one to one.
– Sew each set of 14 sts to the 16 row ends of the matching short side of the base. Work in groups of 7 sts to 8 row ends to spread out the slight difference.
Attach the pocket sides: Whipstitch each side edge of the front to the backing, along the column just inside the border. Start at the base and sew straight up for the full 3.625 in (9.2 cm). For the lower pocket, this ends around Row 18. For the upper pocket, it ends around Row 48.
Tension: Pull each whipstitch just snug, so the seam lies flat and doesn’t pucker. Use matching yarn colors so the seams disappear.
Checkpoint: each pocket is 6 in (15.2 cm) wide at the back and sticks out 4 in (10.2 cm). The lower base sits 1 in (2.5 cm) above the bottom of the backing (before its border), and the upper base sits 8.5 in (21.6 cm) above it.
Final Blocking
- Weave in all the remaining ends along seams or inside the pockets.
- Lay the holder face down on a towel and gently pat the backing flat.
- Pin the backing to 6.5 in x 18.25 in (16.5 cm x 46.4 cm).
- Steam the backing lightly, holding the iron above the fabric without pressing.
- Put a roll in each pocket, then steam the shells so they shape themselves around the rolls.
- Gently open up the fan shells on Row 7 with your fingers so the scallops look even.
- Let everything dry completely, then take out the rolls and pins.
Final Quality-Control Checklist
- The backing has 21 sts per row through Row 64.
- The taper is even, with 5 sts left at the tab.
- The border has 159 sts and the edges lie flat without ruffling.
- Each base is 21 sts by 16 rows.
- Each pocket front has 49 sts at the bottom and 8 full shells at the top.
- The pocket fronts are sewn 14/21/14 around the bases.
- The ring loop is secure and centered.
- A standard roll slides in and out without stretching the lace.
Troubleshooting
The border ruffles along the sides. You probably worked into every row end. Skip every 8th row end so there are 56 sc per straight edge.
The border pulls in at the taper. Make sure you doubled the row ends of Rows 66, 69 and 72.
The pocket front is wider than 14 in (35.6 cm). Your shells are loose. Go down half a hook size for Rows 3–7 only.
The roll is too tight. Block the front with a roll inside, or add one more pair of Rows 4–5 for extra height. The extra rows make the pocket slightly taller but not deeper.
The holder tilts on the wall. The tab is off-center. Re-sew it so it sits directly above the 21-st center of the backing.
Care
Hand wash in cool water, press out the water in a towel, and dry flat. Reshape the pockets around rolls while they are damp.
Final Notes
Each measurement in this pattern builds on the one before it:
– 14 sc and 16 rows equal 4 in (10.2 cm).
– So 21 sts make a 6 in (15.2 cm) backing, and 64 rows make 16 in (40.6 cm).
– The taper adds 2 in (5.1 cm), for 18 in (45.7 cm).
– The 159-st border brings the panel to 6.5 in x 18.25 in (16.5 cm x 46.4 cm).
– Each 49-st pocket front wraps exactly 4 + 6 + 4 in around its 21-st base.
If your gauge matches, every piece fits the next. Happy crocheting!