

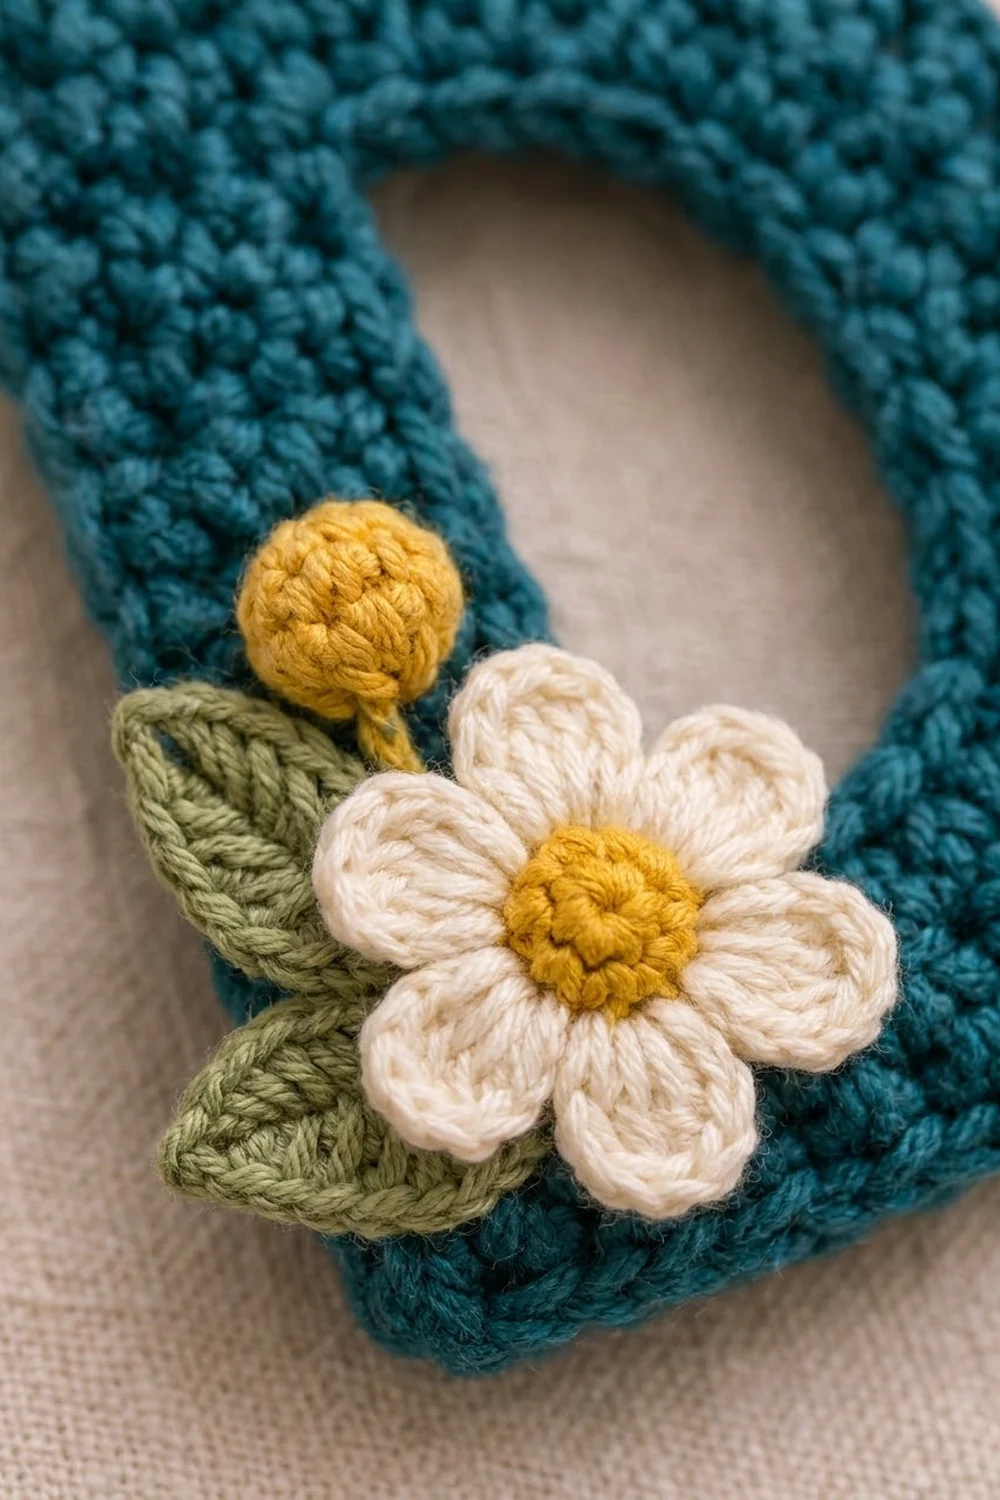
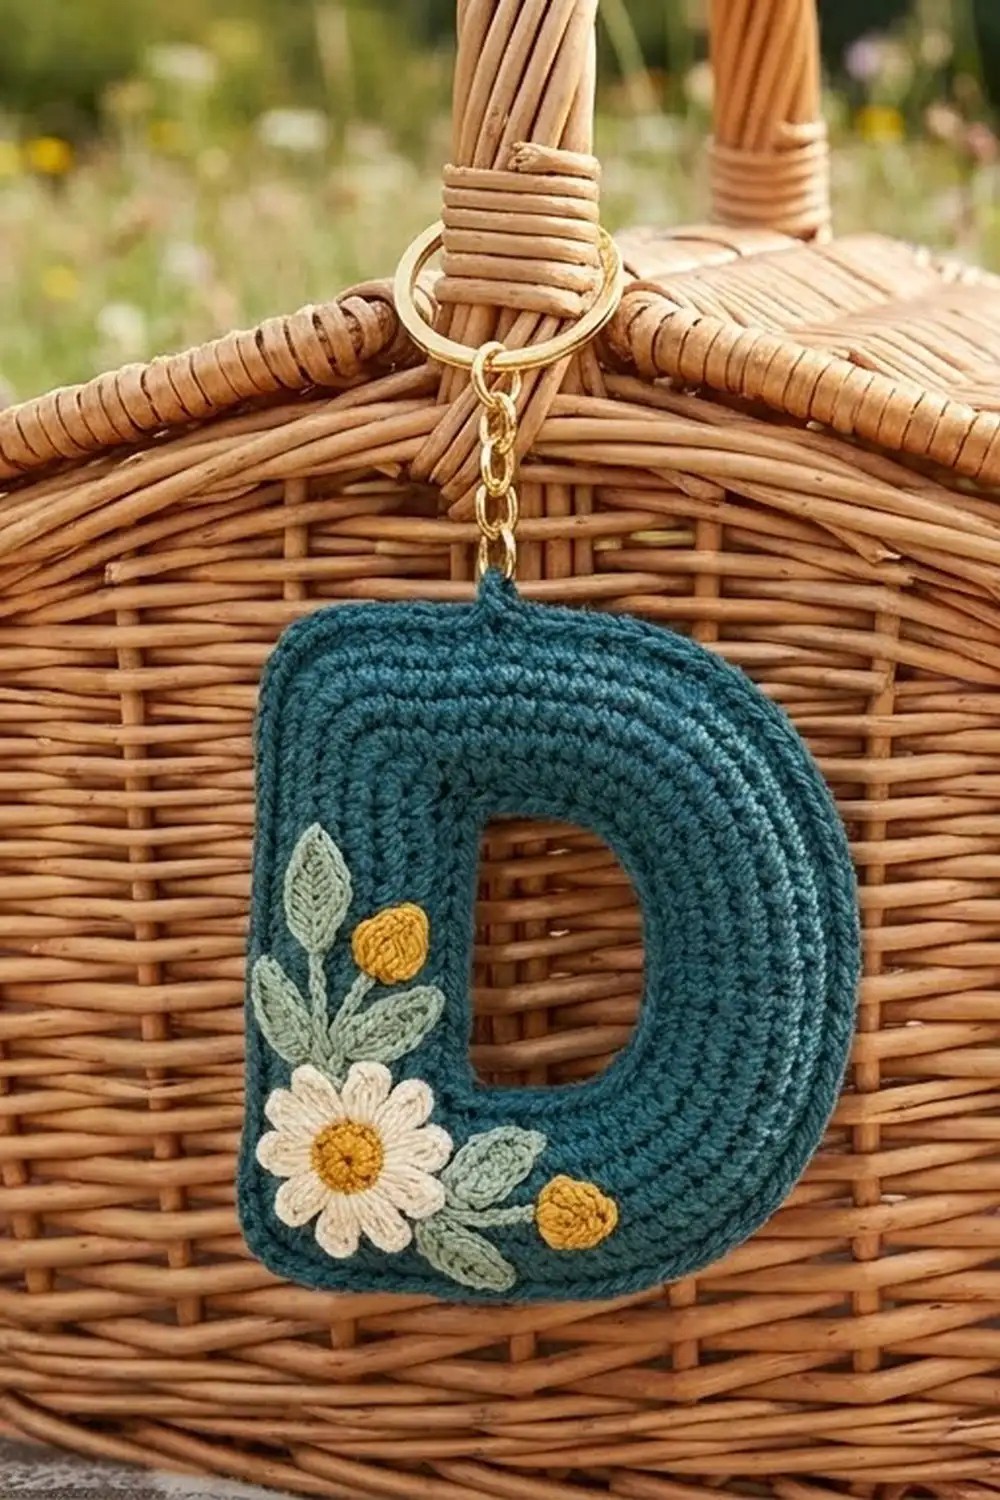
This little letter D keychain is a quick, personal gift. The teal letter is dense and sturdy, and a small cream daisy, a mustard bud and two sage leaves sit at the lower left of the stem. A gold split ring at the top makes it ready for keys, a bag or a picnic basket handle.
The letter is deep teal, the daisy is cream with a mustard-yellow center, the bud is mustard and the leaves are sage green. Tight single crochet gives the letter a pebbly texture, and a slip-stitch outline on both edges keeps the shape crisp.
This pattern uses US crochet terms. The finished keychain measures about 2.6 in (6.6 cm) wide and 3.6 in (9.1 cm) tall, not counting the hardware.
The letter is one piece worked in joined rounds outward from a chain ring. That ring becomes the D-shaped hole. Three increases at each of two corners make the straight stem, and two increases per round along the curve shape the bowl. Next you work a slip-stitch outline on the outer and inner edges, then crochet the daisy, bud and leaves separately and sew them on.
Finished Size and Construction
- Finished size: 2.6 in wide × 3.6 in tall (6.6 cm × 9.1 cm)
- Skill level: Easy
- Terminology: US crochet terms
- Yarn weight: DK (weight 3) cotton or cotton blend
- Hook: 3.5 mm (E-4)
- Number of pieces: 1 letter + 1 daisy + 1 bud + 2 leaves (appliqués sewn on)
- Layout: one single letter D; no joining of letter pieces
- Size before border: 2.4 in × 3.4 in (6.1 cm × 8.6 cm)
- Border depth: about 0.1 in (0.3 cm) on each outer edge
- Inner hole: about 0.7 in × 1.7 in (1.8 cm × 4.3 cm)
- Daisy: about 1 in (2.5 cm) across
Materials
Pick a smooth, mercerized cotton or a cotton blend in DK weight. Cotton holds its shape better than acrylic on a keychain that gets handled every day, and it shows the stitch texture clearly.
- Teal (main color): 8 g, about 17 m
- Cream (petals): 3 g, about 6 m
- Mustard yellow (flower center and bud): 2 g, about 4 m
- Sage green (leaves and stem): 2 g, about 4 m
These quantities include a margin for a gauge swatch and sewing tails.
Tools:
– 3.5 mm (E-4) crochet hook
– Tapestry needle
– Gold split key ring, 1 in (2.5 cm)
– Gold jump ring and a short length of gold chain (3 to 4 links)
– Two pairs of pliers for opening the jump ring
– Stitch markers (2)
– Scissors
– Blocking mat and rust-proof pins
– Spray bottle with water
Abbreviations (US Terms)
- ch – chain
- sl st – slip stitch
- sc – single crochet
- hdc – half double crochet
- dc – double crochet
- inc – 2 sc in the same stitch
- sc2tog – single crochet 2 together
- st(s) – stitch(es)
- rnd – round
- MR – magic ring
Special stitch – corner (3 sc in next st): Work 3 sc into the same stitch. The middle sc of the group is the corner center. Mark it, because the next round’s corner goes into this stitch.
Gauge and Checkpoints
Gauge: 5 sc and 6 rnds = 1 in (2.5 cm) in single crochet.
Make a small swatch first: ch 11 and work 12 rows of sc (10 sts per row). It should measure 2 in × 2 in (5.1 cm × 5.1 cm). Keep the tension snug, because the letter needs a firm fabric with no gaps.
Checkpoints:
– After Rnd 1: the hole measures about 0.7 in × 1.7 in (1.8 cm × 4.3 cm) when laid in a D shape.
– After Rnd 3: the letter measures about 1.7 in × 2.7 in (4.3 cm × 6.9 cm), and the band is 0.5 in (1.3 cm) wide.
– After Rnd 5: the letter measures about 2.4 in × 3.4 in (6.1 cm × 8.6 cm), and the band is 0.8 in (2.0 cm) wide.
If your letter is too big, go down to a 3.25 mm hook. If it is too small, go up to a 3.75 mm hook. If the letter cups, you are crocheting too tightly along the curve. If it ripples, you are crocheting too loosely or adding extra stitches.
Letter D
Use teal. Each round ends with a sl st into the first sc and starts with ch 1, which does not count as a stitch.
Foundation: Ch 20 and sl st into the first ch to form a ring, making sure it isn’t twisted. Lay the ring out as a D: ch 1 is the bottom-left corner of the hole, chs 2–8 run up the straight side, ch 9 is the top-left corner, and chs 10–20 curve around to the right. Work Rnd 1 into the back bumps of the chains so the front loops stay free for the inner outline.
Rnd 1: Ch 1, 3 sc in first ch (corner), sc in next 7 ch, 3 sc in next ch (corner), sc in next 3 ch, inc, sc in next 3 ch, inc, sc in next 3 ch. Join. (26 sts)
Rnd 1 breaks down as 3 + 7 + 3 + 13. Mark both corner centers.
Rnd 2: Ch 1, sc in first st, 3 sc in next st (corner), sc in next 9, 3 sc in next st (corner), sc in next 4, inc, sc in next 4, inc, sc in next 4. Join. (32 sts)
Rnd 3: Ch 1, sc in first 2 sts, 3 sc in next st (corner), sc in next 11, 3 sc in next st (corner), sc in next 5, inc, sc in next 5, inc, sc in next 5. Join. (38 sts)
Rnd 4: Ch 1, sc in first 3 sts, 3 sc in next st (corner), sc in next 13, 3 sc in next st (corner), sc in next 6, inc, sc in next 6, inc, sc in next 6. Join. (44 sts)
Rnd 5: Ch 1, sc in first 4 sts, 3 sc in next st (corner), sc in next 15, 3 sc in next st (corner), sc in next 7, inc, sc in next 7, inc, sc in next 7. Join. (50 sts)
Each round adds exactly 6 stitches: +2 at each corner and +2 on the curve. On Rnd 5, there are 17 sts between the two corner centers on the straight side and 31 sts on the curved side. Counting the 2 corner centers, that’s 2 + 17 + 31 = 50.
Moving the corner one stitch further into each round, as the opening counts do (1, 2, 3, 4), follows the natural drift of the joins and keeps the corners straight above each other. Don’t fasten off. Go straight into the border.
Border
Border gauge: One sl st goes into each sc, so the outline matches the sc gauge of 5 sts per 1 in (2.5 cm) along the edge. A slip stitch adds almost no height, so the border needs no corner increases.
Border Rnd 1 (outer outline): Ch 1, sl st loosely in each st around. Put exactly 1 sl st in each corner center. Join. (50 sl sts)
Counts per side, with both corner centers included in each side:
– Straight left side: 19 sl sts (17 + 2 corners)
– Curved side: 33 sl sts (31 + 2 corners)
– Check: 19 + 33 − 2 shared corners = 50
Fasten off, leaving a 6 in (15.2 cm) tail, and weave it in.
Border Rnd 2 (inner outline): Join teal into the free front loop of foundation ch 1, which is the bottom-left corner of the hole. Sl st loosely into each free loop around the hole. Join. (20 sl sts)
Counts per side:
– Straight inner side: 9 sl sts, including both inner corners
– Inner curve: 11 sl sts
– Check: 9 + 11 = 20
Fasten off and weave in the tail.
Why the math works: Each slip stitch goes into exactly one existing stitch, so the edge length stays the same. The outer edge keeps the 50 sts of Rnd 5, and the inner edge keeps the 20 chains of the foundation. The outline only rolls the edge slightly, which adds about 0.1 in (0.3 cm) on each side. That takes the letter from 2.4 in × 3.4 in (6.1 cm × 8.6 cm) to 2.6 in × 3.6 in (6.6 cm × 9.1 cm).
Daisy Appliqué
Rnd 1 (mustard): Make a MR, ch 1, work 10 sc into the ring, and pull it tight. Join with a sl st to the first sc. (10 sts) Fasten off the mustard.
Rnd 2 (cream): Join cream in any st. [(hdc, 2 dc, hdc) in next st, sl st in next st] 5 times. (5 petals; 25 sts total: 20 petal sts + 5 sl sts)
Fasten off and leave a 12 in (30.5 cm) tail for sewing. The daisy should measure about 1 in (2.5 cm) across.
Bud Appliqué
Rnd 1 (mustard): Make a MR and work 6 sc into it. Join. (6 sts)
Rnd 2: Ch 1, sc2tog 3 times. (3 sts)
Tuck the starting tail inside as stuffing. Fasten off, thread the tail through the remaining 3 sts and pull it closed. The bud should measure about 0.4 in (1.0 cm) across. Leave an 8 in (20.3 cm) tail.
Leaves (Make 2)
Use sage green.
Ch 6. Sc in 2nd ch from hook, hdc in next ch, dc in next ch, hdc in next ch, sc in last ch, then ch 2 for the tip. Working along the other side of the chain: sc in first ch, hdc in next ch, dc in next ch, hdc in next ch, sc in last ch. Sl st into the first sc. (10 sts + ch-2 tip)
Fasten off and leave an 8 in (20.3 cm) tail. Each leaf should be about 0.8 in (2.0 cm) long.
Assembly of Appliqués
The appliqués go on in layers, bottom to top:
- Leaves: Place the leaves on the lower left of the stem, about 0.3 in (0.8 cm) above the bottom edge. Angle one leaf up-left and one leaf down-left, with their tips just past the left outer edge. Whipstitch along the center line of each leaf.
- Daisy: Center the daisy over the base of the leaves so the leaves peek out on its left. Stitch around the edge of the yellow center and tack each petal tip.
- Bud and stem: Place the bud about 0.4 in (1.0 cm) above the top-right petal, then sew it down. With sage green, embroider 2 straight stitches between the bud and the daisy to make the stem.
- Hardware: Open the jump ring with two pairs of pliers. Thread it through the top-left corner center, two rounds in from the edge, then add the chain and split ring and close the jump ring firmly.
Do all sewing through the back layer only, so no stitches show on the teal front.
Final Blocking
- Lightly mist the letter with water until it feels damp but not wet.
- Lay it face up on the blocking mat.
- Pin both outer corners to sharp right angles.
- Pin the curve at 3 to 4 points so it forms a smooth arc.
- Pin the inner hole so it measures 0.7 in × 1.7 in (1.8 cm × 4.3 cm).
- Check that the overall size is 2.6 in × 3.6 in (6.6 cm × 9.1 cm).
- Leave it to dry completely before you remove the pins.
Block the letter before you sew on the appliqués, or mist the appliqués only lightly.
Final Quality-Control Checklist
- The letter measures 2.6 in × 3.6 in (6.6 cm × 9.1 cm).
- The stem’s left edge is straight and both corners are square.
- The curve is smooth, with no points at the increase stitches.
- There are 50 sl sts on the outer outline and 20 on the inner outline.
- The letter lies flat, with no cupping or rippling.
- The daisy has 5 even petals around a round yellow center.
- The leaves show on the left side of the daisy, and the bud sits above it.
- No sewing shows on the front.
- The jump ring is fully closed and the corner stitch around it is secure.
- All tails are woven in.
Troubleshooting
The letter cups along the curve. Your tension is tight on the curve. Loosen up slightly or go up half a hook size, and check you worked the 2 curve increases each round.
The curve ripples. You added extra stitches. Recount against the totals of 26, 32, 38, 44 and 50.
The corners are rounded. Make sure the 3 sc of each corner go into the marked corner center, and pin the corners hard when blocking.
The corners twist out of line. Recheck the stitch counts at the start of each round: 1, 2, 3 and 4 sts before the first corner on Rnds 2 to 5.
The hole closed up. You worked Rnd 1 too tightly over the chain. Work into the back bumps with relaxed tension.
The petals are uneven. Tighten the magic ring fully before joining the cream, and keep the petal stitches the same height.
The keyring pulls the stitches. Move the jump ring one stitch further in, or reinforce the spot with a few teal stitches.
Care
Spot clean with mild soap and cool water, then reshape and lay flat to dry. Don’t put the keychain in the dryer or iron the appliqués.
Final Notes
Measurements build up step by step. With a gauge of 5 sc and 6 rnds per 1 in (2.5 cm), the 20-chain ring makes a 0.7 in × 1.7 in (1.8 cm × 4.3 cm) hole. Five rounds that grow by 6 stitches each take the letter to 50 sts and 2.4 in × 3.4 in (6.1 cm × 8.6 cm). The slip-stitch outline finishes it at 2.6 in × 3.6 in (6.6 cm × 9.1 cm).
If each checkpoint matches, the finished letter will be the right size. Then add the 1 in (2.5 cm) daisy, the bud, the leaves and the gold ring.
Happy crocheting!