

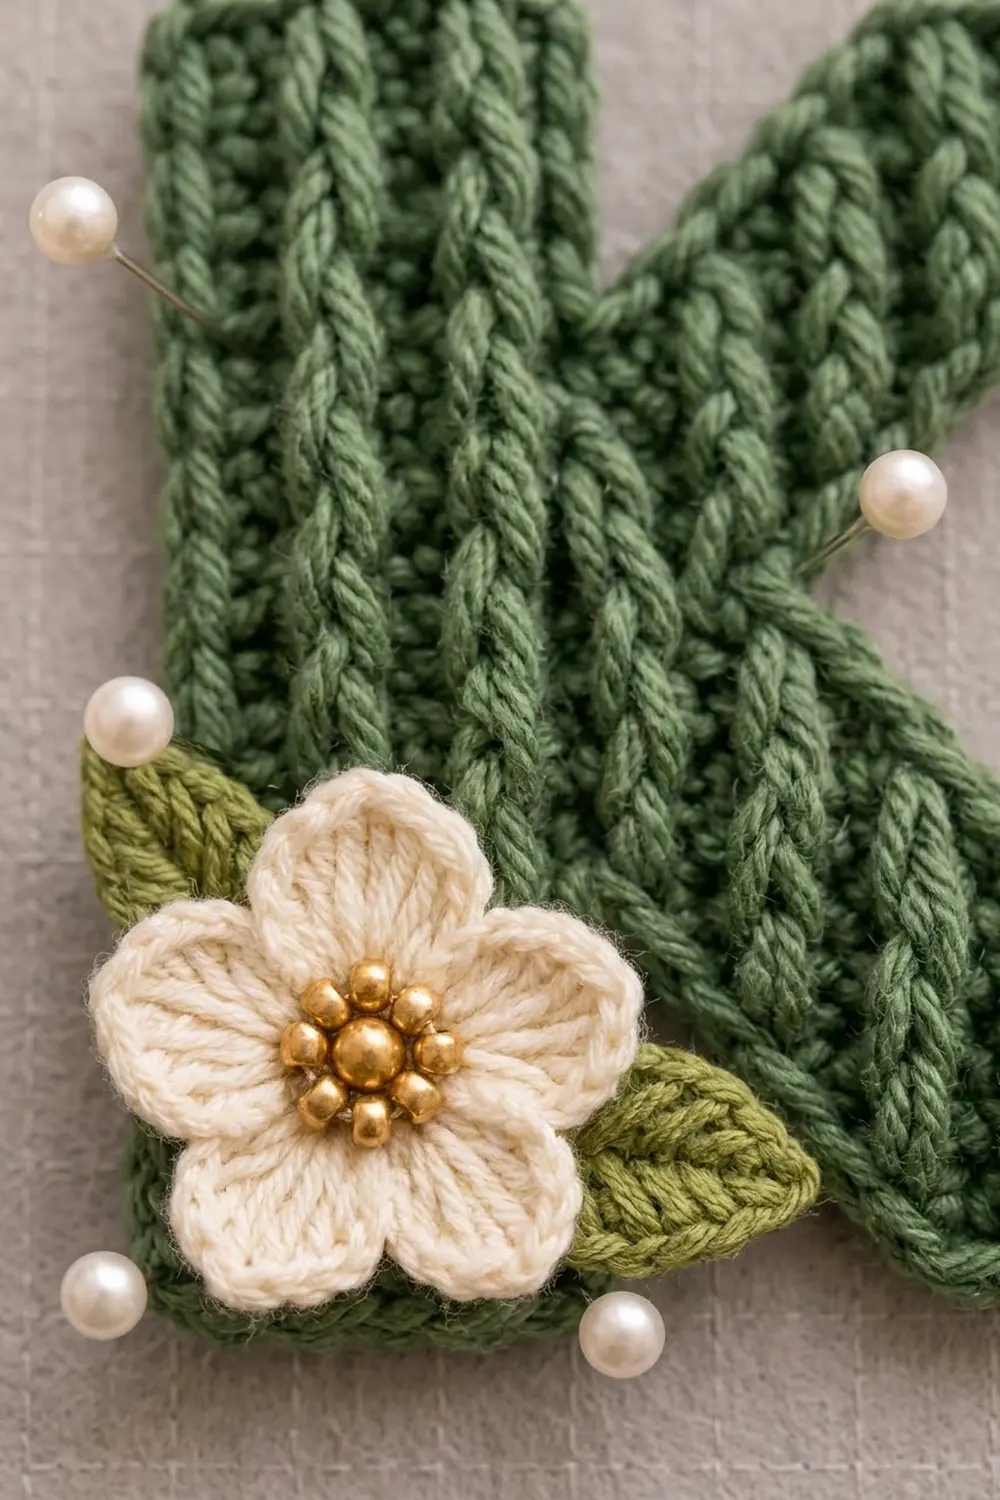
This little letter keychain is a quiet, garden-style accessory. It’s a capital “K” in deep sage green, covered in knit-look ribs, with a cream flower and two soft green leaves tucked at the lower corner. A gold split ring and short chain finish it off, so it is ready for keys, a bag strap, or a gift tag.
The ribs come from the camel stitch, a half double crochet worked into the third loop. Each row adds one raised V column, so the ribs run along the length of every stroke. On the stem they run straight up. On the arm and leg they follow the diagonal, which gives the letter its tailored look.
This pattern uses US crochet terms. The finished letter measures 3.5 in (8.9 cm) tall and 2.8 in (7.1 cm) wide, not counting the key ring hardware.
Construction is simple. You crochet three short ribbed strips (stem, upper arm, lower leg) and sew them into a K. Then you work one round of single crochet around the whole outline to tie the edges together. Finally, you make the flower and two leaves, add the beads, and attach the hardware.
Finished Size and Construction
- Finished size: 3.5 in (8.9 cm) tall x 2.8 in (7.1 cm) wide
- Skill level: Easy to intermediate
- Terminology: US crochet terms
- Yarn weight: DK (#3), cotton or cotton blend
- Hook: 3.5 mm (E-4)
- Number of pieces: 1 finished keychain, built from 3 letter strips, 1 flower, and 2 leaves
- Layout: Single letter; no grid or joining of motifs
- Strip sizes: Stem 3.2 x 1 in (8.1 x 2.5 cm); upper arm 2.2 x 0.8 in (5.6 x 2.0 cm); lower leg 2.4 x 0.8 in (6.1 x 2.0 cm)
- Size before border: 3.2 in (8.1 cm) tall x 2.5 in (6.4 cm) wide
- Border depth: 0.15 in (0.4 cm) on every edge
Materials
Choose a smooth, tightly plied DK cotton. Mercerized cotton shows the V ribs clearly and keeps its shape on a keychain that gets handled every day. Avoid fuzzy or very splitty yarns, since the third loop must be easy to see.
- Color A, sage-forest green (letter and border): 8 g, about 18 m
- Color B, cream (flower): 2 g, about 5 m
- Color C, light olive green (leaves): 1 g, about 3 m
All quantities include a small safety margin.
Tools and notions:
- 3.5 mm (E-4) crochet hook
- Tapestry needle
- Sharp sewing needle and cream sewing thread
- 7 gold seed beads, size 8/0
- 1 gold split key ring, 1 in (2.5 cm) diameter, with a short chain
- 1 gold jump ring, about 0.3 in (0.8 cm)
- 2 pairs of flat-nose pliers
- Stitch markers, rustproof pins, blocking mat, ruler
Abbreviations (US Terms)
- ch – chain
- sl st – slip stitch
- sc – single crochet
- sc2tog – single crochet 2 together
- hdc – half double crochet
- dc – double crochet
- st(s) – stitch(es)
- RS / WS – right side / wrong side
Special stitch – camel hdc (chdc): Yarn over and insert the hook into the third loop of the stitch. This is the horizontal bar just below the top V on the side facing you. Yarn over, pull up a loop, yarn over, and pull through all 3 loops. This rolls the top V forward and creates the raised knit-look rib.
chdc2tog: Yarn over, insert into the third loop of the next st, and pull up a loop. Yarn over, insert into the third loop of the following st, and pull up a loop. Yarn over and pull through all 5 loops.
Gauge and Checkpoints
Gauge: 15 sts x 15 rows = 3 in (7.6 cm) in camel hdc. That is 5 sts and 5 rows per 1 in (2.5 cm).
Make the stem first and use it as your test piece. It is small, and every other measurement depends on it.
Checkpoints:
- Stem after Row 1: 3.2 in (8.1 cm) long.
- Stem after Row 5: 1 in (2.5 cm) wide.
- Upper arm: 2.2 in (5.6 cm) along Row 1, 0.8 in (2.0 cm) wide.
- Lower leg: 2.4 in (6.1 cm) along Row 1, 0.8 in (2.0 cm) wide.
- Assembled letter before border: 3.2 in (8.1 cm) tall x 2.5 in (6.4 cm) wide.
- After border: 3.5 in (8.9 cm) tall x 2.8 in (7.1 cm) wide.
If your stem is too long, go down 0.25 mm in hook size. If it is too short, go up 0.25 mm. Stitch gauge matters more than row gauge, but both should be close. The border places one sc per stitch and one sc per row-end, so both need to match.
Pattern
Stem (make 1, Color A)
Ch 18.
Row 1 (WS): Hdc in 3rd ch from hook and in each ch across. Turn. (16 hdc)
Row 2 (RS): Ch 1 (does not count as a st), chdc in each st across. Turn. (16 sts)
Rows 3–5: Ch 1, chdc in each st across. Turn. (16 sts)
Fasten off, leaving a 10 in (25.4 cm) tail for sewing.
You now have 5 ribs running the full length of the stem. Number the stitches of Row 5 from 1 (bottom) to 16 (top) and mark sts 4, 7, 8, and 11. This last row becomes the right edge of the stem, where the arm and leg attach.
Checkpoint: 3.2 x 1 in (8.1 x 2.5 cm).
Upper Arm (make 1, Color A)
The arm is a slanted strip. Each row adds a st at one end and removes one at the other, so the ends lean while the count stays the same.
Ch 13.
Row 1 (WS): Hdc in 3rd ch from hook and in each ch across. Turn. (11 hdc)
Row 2 (RS): Ch 1, 2 chdc in first st, chdc in next 8 sts, chdc2tog over last 2 sts. Turn. (11 sts)
Row 3: Ch 1, chdc2tog over first 2 sts, chdc in next 8 sts, 2 chdc in last st. Turn. (11 sts)
Row 4: Repeat Row 2. (11 sts)
Fasten off, leaving a 10 in (25.4 cm) tail.
The strip shifts 3 sts over 3 rows, so each short end slants by about 0.6 in (1.5 cm). Checkpoint: 2.2 x 0.8 in (5.6 x 2.0 cm).
Lower Leg (make 1, Color A)
Ch 14.
Row 1 (WS): Hdc in 3rd ch from hook and in each ch across. Turn. (12 hdc)
Row 2 (RS): Ch 1, 2 chdc in first st, chdc in next 9 sts, chdc2tog over last 2 sts. Turn. (12 sts)
Row 3: Ch 1, chdc2tog over first 2 sts, chdc in next 9 sts, 2 chdc in last st. Turn. (12 sts)
Row 4: Repeat Row 2. (12 sts)
Fasten off, leaving a 10 in (25.4 cm) tail. Checkpoint: 2.4 x 0.8 in (6.1 x 2.0 cm).
Assemble the Letter
Lay the stem RS up with its marked edge to the right.
- Upper arm: Place one slanted end against stem sts 8–11, angled up and to the right, with its last row (Row 4) on the top edge.
- Lower leg: Place one slanted end against stem sts 4–7, angled down and to the right, with its Row 1 (foundation) on the bottom edge.
Pin both pieces. Check that the arm tip reaches the stem top and the leg tip sits level with the stem bottom. Adjust the angle, not the stitches.
Using the tails, whipstitch each short end to the stem through the inner loops only, one stitch per stitch, keeping the seams flat. Where the leg’s upper edge meets the arm’s lower edge, tuck the leg slightly under the arm and tack it with 3 small stitches. About 3 sts of the arm’s lower edge and 3 sts of the leg’s upper edge disappear into this junction.
Checkpoint: 3.2 in (8.1 cm) tall x 2.5 in (6.4 cm) wide. Weave in ends.
Border
Border gauge: 5 sc per 1 in (2.5 cm) along every edge. The strip gauge is 5 sts and 5 rows per inch, so you work exactly 1 sc per stitch on long edges and 1 sc per row-end on short edges.
Corner rules (defined for this pattern):
- Outer (convex) corners, 8 total: Work 3 sc into each corner point. These 3 sc are counted separately and are NOT included in the side counts below.
- Inner (concave) corners, 3 total: Work 1 sc2tog bridging the two pieces, with one leg in each piece. This sc2tog is also counted separately.
With RS facing, join Color A at the bottom-left corner of the stem. Work clockwise:
- 3 sc in bottom-left corner.
- Stem left edge (foundation ch): 16 sc.
- 3 sc in top-left corner.
- Stem top (row-ends): 5 sc.
- 3 sc in top-right corner.
- Stem right edge, sts 16–12: 5 sc.
- Sc2tog at the stem/arm inner corner.
- Upper arm outer edge: 11 sc.
- 3 sc in first arm-tip corner.
- Arm tip (row-ends): 4 sc.
- 3 sc in second arm-tip corner.
- Arm inner edge, free sts: 8 sc.
- Sc2tog at the arm/leg crotch.
- Leg upper edge, free sts: 9 sc.
- 3 sc in first leg-tip corner.
- Leg tip (row-ends): 4 sc.
- 3 sc in second leg-tip corner.
- Leg lower edge: 12 sc.
- Sc2tog at the leg/stem inner corner.
- Stem right edge, sts 3–1: 3 sc.
- 3 sc in bottom-right corner.
- Stem bottom (row-ends): 5 sc.
Sl st to first sc. Fasten off and weave in.
Total: 82 side sc + 24 corner sc (8 corners x 3) + 3 sc2tog = 109 sts.
Why the math works: Every side count equals the free stitches or row-ends on that edge, so the border adds no extra fabric. The 3-sc corners give just enough ease to turn sharp points without cupping. The sc2tog at each inner corner pulls the notch in cleanly. One sc adds about 0.15 in (0.4 cm) on each side. That takes the height from 3.2 in to 3.5 in (8.9 cm) and the width from 2.5 in to 2.8 in (7.1 cm).
Flower (make 1, Color B)
Rnd 1: Make a magic ring and work 10 sc in the ring. Pull the ring closed and sl st to the first sc. (10 sc)
Rnd 2: *(Hdc, 3 dc, hdc) in next sc, sl st in next sc; repeat from * 4 more times. The last sl st lands in the first st of the round. (5 petals: 25 petal sts + 5 sl sts)
Fasten off, leaving a 12 in (30.5 cm) tail. Checkpoint: about 1.25 in (3.2 cm) across.
With sewing thread, sew 1 gold bead at the center and 6 beads in a ring around it to fill the magic ring area.
Leaves (make 2, Color C)
Ch 5.
Leaf:
- Sc in 2nd ch from hook, hdc in next ch, hdc in next ch.
- Work (sc, ch 2, sc) in the last ch for the tip.
- Rotate and work along the other side of the foundation: hdc in next ch, hdc in next ch, sc in next ch.
- Sl st in the first skipped ch. (8 sts + ch-2 tip)
Fasten off, leaving an 8 in (20.3 cm) tail. Checkpoint: about 0.75 in (1.9 cm) long.
Layer the Appliqué
Place one leaf behind the flower pointing up and to the left and the other pointing right, so both tips peek out between petals. Tack the leaves to the back of the flower.
Position the flower at the lower-left corner of the K, overlapping the stem bottom and the start of the leg. Whipstitch it in place around the center and under each petal base so the petals stay free and raised.
Attach the Hardware
Open the jump ring with two pairs of pliers by twisting sideways; never pull the ends apart. Pass it through the border at the center of the stem top, between the 2nd and 3rd of the 5 top sc. Add the end link of the key ring chain and close the jump ring fully.
Final Blocking
- Lightly mist the letter with water until just damp.
- Lay it RS up on the blocking mat.
- Pin the 8 outer corners first, checking 3.5 in (8.9 cm) tall and 2.8 in (7.1 cm) wide.
- Straighten each rib so it runs parallel to its stroke.
- Pin the arm and leg ends so the slants are crisp.
- Shape the petals and leaves gently with your fingers; do not pin through them.
- Let dry completely before removing pins.
Final Quality-Control Checklist
- Letter measures 3.5 x 2.8 in (8.9 x 7.1 cm).
- Stem shows 5 ribs; arm and leg show 4 ribs each.
- Ribs run lengthwise on every stroke.
- Border total is 109 sts with no puckering at corners.
- Seams are flat and hidden under the border.
- Flower has 5 even petals and 7 secure beads.
- Both leaf tips are visible behind the flower.
- Jump ring is fully closed and centered on the stem top.
- All ends are woven in on the WS.
Troubleshooting
- Ribs look flat: You are working into the top loops. Make sure you insert into the horizontal third loop.
- Strips curl: Camel hdc tends to roll. Block firmly and keep the border sc relaxed.
- Arm ends are not slanted: Make sure the increase and decrease swap ends on Row 3.
- Border ruffles: Go down 0.5 mm in hook size for the border only.
- Border pulls in: Go up 0.5 mm, or check that you worked 3 sc in every outer corner.
- Gaps at inner corners: Work the sc2tog tighter and tack the junction from the back.
- Flower cups: Pull the magic ring fully closed, then press the petals flat while damp.
Care
Hand wash in cool water with mild soap, press out the water in a towel, and dry flat. Keep the beads and metal hardware away from bleach.

Final Notes
The measurement chain is short and reliable. At 5 stitches and 5 rows per inch, you get a 3.2 x 1 in (8.1 x 2.5 cm) stem, a 2.2 in (5.6 cm) arm, and a 2.4 in (6.1 cm) leg. Assembled, the letter is 3.2 x 2.5 in (8.1 x 6.4 cm). The 109-stitch single crochet border brings it to 3.5 x 2.8 in (8.9 x 7.1 cm). Add the flower, leaves, beads, and gold ring, and your initial is ready to carry.
Happy crocheting!