

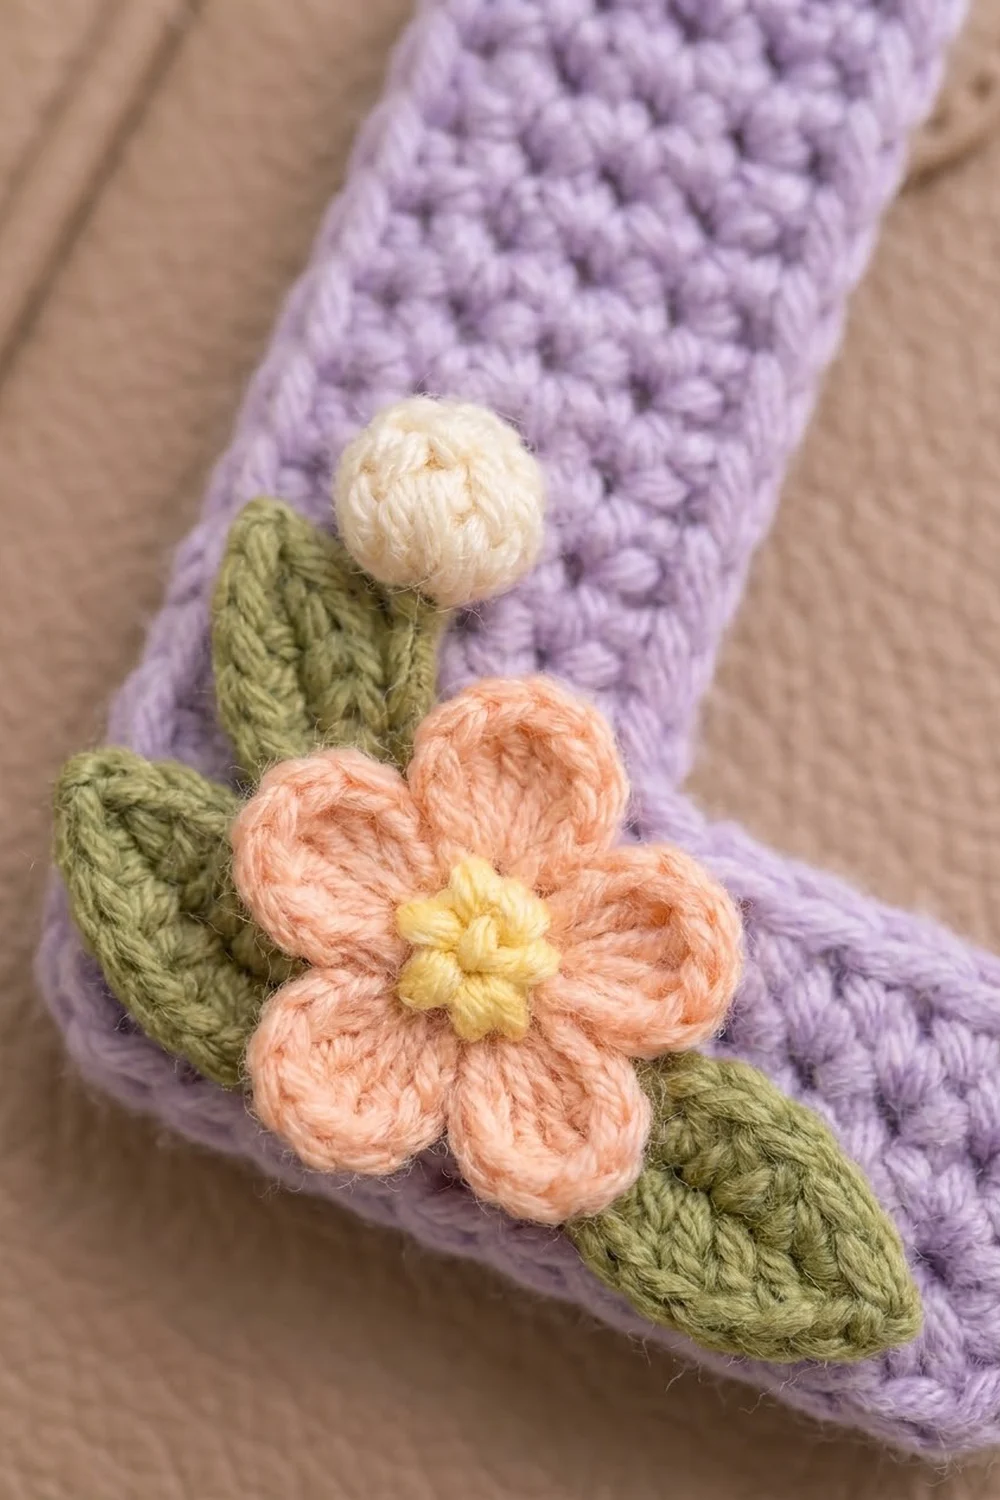
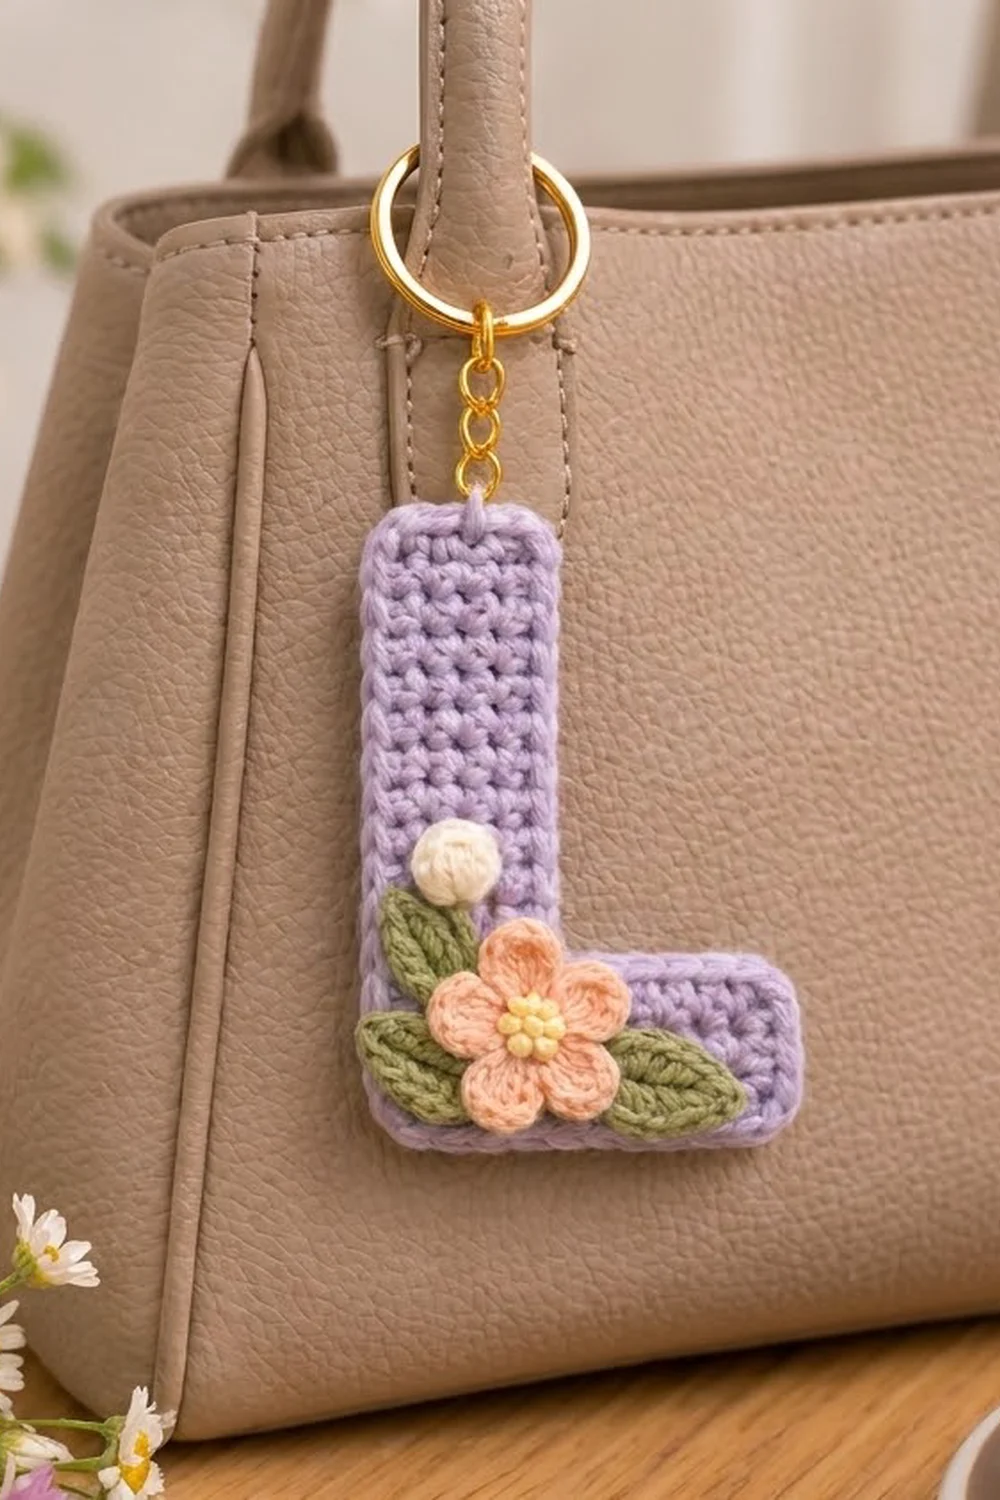
This little initial keychain is a soft lavender capital “L” decorated with a small spring bouquet. A peach five-petal flower with a sunny yellow center sits in the inner corner of the letter, with two olive-green leaves and a round cream bud around it. A gold key ring finishes it off, so it is ready to clip onto a bag, a pencil case, or your keys.
The style is clean and modern. The letter is worked in plain single crochet, which makes a firm, flat fabric that keeps its shape. All the color comes from the appliqués. Lavender, peach, yellow, green, and cream give it a gentle pastel look that works well as a gift.
This pattern uses US crochet terms. The finished keychain measures 3.0 in (7.6 cm) wide and 3.7 in (9.4 cm) tall, not counting the ring hardware.
Construction is simple. You crochet the foot of the “L” in rows, then keep going over only part of the last row to make the upright stem. One round of single crochet edging outlines the whole letter. Finally, you make the flower, leaves, and bud separately, sew them on, and attach the ring.
Finished Size and Construction
- Finished size: 3.0 in wide × 3.7 in tall (7.6 cm × 9.4 cm)
- Skill level: Easy
- Terminology: US crochet terms
- Yarn weight: DK / light worsted (#3), cotton or cotton blend
- Hook: 3.0 mm (US C/2–D/3)
- Number of pieces: 1 letter body, plus 4 small appliqués (1 flower, 2 leaves, 1 bud)
- Layout: a single “L” shape; appliqués grouped in the lower inner corner
- Piece size before edging: 2.8 in wide × 3.5 in tall (7.1 cm × 8.9 cm)
- Stem width: 1.0 in (2.5 cm) before edging, 1.2 in (3.0 cm) after
- Edging depth: about 0.1 in (0.3 cm) on every side
Materials
Yarn advice: Use a smooth, mercerized or matte cotton in DK weight. Cotton gives crisp stitch definition and holds a flat shape, which is what you want for a keychain. Soft acrylic will work but may need firmer blocking.
- Lavender (body and edging): 8 g, about 18 m
- Peach (flower petals): 2 g, about 4 m
- Yellow (flower center): 1 g, about 2 m
- Olive green (leaves): 2 g, about 4 m
- Cream (bud): 1 g, about 2 m
All quantities include a margin for your gauge swatch and sewing tails.
Tools:
- 3.0 mm crochet hook
- Tapestry needle
- Gold split key ring, 25 mm (1 in / 2.5 cm) diameter, with a short attached chain
- One small gold jump ring, 6–8 mm, plus two flat-nose pliers
- Stitch markers
- Rust-proof pins and a blocking board
- Scissors
Abbreviations (US Terms)
- ch – chain
- sl st – slip stitch
- sc – single crochet
- hdc – half double crochet
- dc – double crochet
- sc2tog – single crochet 2 together
- st(s) – stitch(es)
- MR – magic ring
- RS / WS – right side / wrong side
Special stitch – sc2tog across the inner corner: Insert the hook in the stitch shown and pull up a loop. Insert the hook in the row end shown and pull up a loop. Yarn over and pull through all 3 loops on the hook. This uses 2 edge spots but makes only 1 stitch, which pulls the inner corner in neatly.
Gauge and Checkpoints
Gauge: 5 sc and 6 rows = 1 in (2.5 cm) in single crochet worked in rows.
Make a test swatch first. Ch 11, sc in the 2nd ch from the hook and in each ch across (10 sc), then work 11 more rows (12 rows in total). The swatch should measure 2 in × 2 in (5.1 cm × 5.1 cm).
Checkpoints:
- After Row 5: the foot measures 2.8 in (7.1 cm) wide and about 0.8 in (2.0 cm) tall.
- After Row 21: the full letter measures 3.5 in (8.9 cm) tall, and the stem is 1.0 in (2.5 cm) wide.
- After the edging: 3.0 in × 3.7 in (7.6 cm × 9.4 cm).
If your piece is too big: go down to a 2.75 mm hook. If it is too small: go up to a 3.25 mm hook. Change the hook, not the stitch counts. The edging math relies on these exact counts.
Letter Body
Work in lavender. Each row begins with ch 1, which does not count as a stitch. Turn at the end of every row. Leave a 6 in (15.2 cm) starting tail for later.
Foundation: Ch 15.
Row 1 (RS): Sc in the 2nd ch from the hook and in each ch across. Turn. (14 sc)
Rows 2–5: Ch 1, sc in each st across. Turn. (14 sc per row)
Check: the foot should be 2.8 in (7.1 cm) wide. Row 5 ends at the left edge when the RS of Row 1 faces you.
Row 6 (start of stem): Ch 1, sc in the first 5 sts only. Leave the remaining 9 sts unworked. Turn. (5 sc)
Place a marker in the first of the 9 unworked stitches next to the stem. This marks where the inner corner will be.
Rows 7–21: Ch 1, sc in each of the 5 sts. Turn. (5 sc per row)
That gives 16 stem rows (Rows 6–21), which is about 2.7 in (6.9 cm) of stem above the foot. Row 21 ends at the top left corner of the stem. Do not fasten off.
Check: the full height is 3.5 in (8.9 cm) and the stem is 1.0 in (2.5 cm) wide.
Edging
Edging gauge: Along stitch edges (the foundation and the tops of rows), the edging matches the body at 5 sc per 1 in (2.5 cm). Along the side edges, you work 1 sc into the end of each row. That gives 6 sc per 1 in (2.5 cm), the same as the row gauge. Each edging stitch sits beside a row of the same height, so the sides stay flat instead of ruffling or puckering.
Edging round (continue in lavender, RS facing): Ch 1. Do not turn. Work around the letter counterclockwise, as follows:
- Left side: sc in the end of each row from Row 21 down to Row 1. (21 sc)
- Bottom left corner: 3 sc in the free loop of the first foundation ch. (3 sc)
- Bottom edge: sc in the free loop of each of the next 12 foundation chs. (12 sc)
- Bottom right corner: 3 sc in the last foundation ch. (3 sc)
- Right side of foot: sc in the end of each of Rows 1–5. (5 sc)
- Top right corner of foot: 3 sc in the outer end stitch of Row 5. (3 sc)
- Top of foot: sc in each of the next 7 unworked Row 5 sts. (7 sc)
- Inner corner: sc2tog over the marked stitch and the end of Row 6. (1 st)
- Right side of stem: sc in the end of each of Rows 7–21. (15 sc)
- Top right corner of stem: 3 sc in the first st of Row 21. (3 sc)
- Top edge: sc in each of the next 3 sts. (3 sc)
- Top left corner of stem: 3 sc in the last st of Row 21. (3 sc)
Sl st to the first sc. Fasten off and weave in the end. Total: 79 sts.
Why the math works: The edge of the body offers 70 spots to work into:
- 21 row ends on the left
- 14 foundation chains
- 5 row ends on the right side of the foot
- 9 unworked Row 5 stitches
- 1 row end at Row 6
- 15 row ends on the right side of the stem
- 5 stitches at the top of Row 21
Each of the 5 outer corners works 3 sc into 1 spot, which adds 2 stitches per corner, or 10 in total. The inner sc2tog uses 2 spots to make 1 stitch, which removes 1. So the total is 70 + 10 − 1 = 79.
The 3-stitch corners let the edging turn 90 degrees without cupping. The sc2tog stops the inner corner from bunching.
The edging adds about 0.1 in (0.3 cm) on every side. That takes the piece from 2.8 in × 3.5 in (7.1 cm × 8.9 cm) to 3.0 in × 3.7 in (7.6 cm × 9.4 cm).
Appliqués
Leave an 8 in (20.3 cm) tail on every appliqué for sewing.
Flower (make 1)
Rnd 1 (yellow): Work 5 sc in a MR. Pull the ring tight and sl st to the first sc. Fasten off. (5 sc)
Rnd 2 (peach): Join peach in any st. Ch 1, 2 sc in each st around. Sl st to the first sc. (10 sc)
Rnd 3 (petals): Work the following 5 times: (sc, hdc, dc) in the next st, then (dc, hdc, sc) in the next st. Sl st to the first sc. Fasten off. (30 sts, 5 petals)
Each petal is built over 2 stitches, so the 10 stitches of Rnd 2 make exactly 5 petals. The flower should measure about 1.25 in (3.2 cm) across.
Leaves (make 2)
Work in olive green.
Ch 6. Working along the chain:
- sc in the 2nd ch from the hook
- hdc in the next ch
- dc in the next ch
- hdc in the next ch
- 3 sc in the last ch (this makes the tip)
Rotate the piece and work along the other side of the foundation chain:
- hdc in the next ch
- dc in the next ch
- hdc in the next ch
- sc in the last ch
Sl st to the first sc. Fasten off. (11 sts)
Each leaf is about 0.9 in (2.3 cm) long, with a pointed tip and a slight ridge down the center from the chain.
Bud (make 1)
Work in cream.
Rnd 1: 6 sc in a MR. Pull tight. (6 sc)
Rnd 2: Sc in each st around. (6 sc)
Tuck the starting tail inside to fill the bud. Fasten off, leaving a tail. Thread that tail through the front loops of all 6 stitches and pull to close. The bud should be a firm little ball about 0.4 in (1.0 cm) across.
Assembly
- Lay the letter RS up with the stem on the left.
- Place the flower over the inner corner, where the stem meets the foot. Its left edge should sit about 0.2 in (0.5 cm) in from the left edging.
- Slip one leaf under the upper-left petals so its tip points up and to the left.
- Slip the second leaf under the right petals so its tip points right, along the foot.
- Set the bud on the stem just above the flower.
- Sew the leaves first, then the flower, then the bud. Use small stitches through the back loops of each appliqué’s edge, and catch only the top layer of the body so nothing shows on the back.
- Open the jump ring with two pliers. Pass it through the middle edging stitch on the top of the stem. That is the 2nd of the 3 plain sc on the top edge, which makes it the center stitch of the 9 top edging stitches.
- Hook the key ring’s chain onto the jump ring and close the jump ring fully.
Final Blocking
- Lightly mist the letter body with water, or steam it from a distance without letting the iron touch the yarn.
- Pin it RS up on the blocking board to 3.0 in × 3.7 in (7.6 cm × 9.4 cm). Use the grid to keep the stem at 1.2 in (3.0 cm) wide.
- Put one pin in each outer corner. Then add pins halfway along the long sides.
- Check that the inner corner is a crisp right angle and that the stem lines up with the left edge of the foot.
- Let it dry completely, at least 2 hours.
- Block the flower and leaves flat separately before sewing them on, or press them gently with your fingers after sewing. Do not flatten the bud.
Final Quality-Control Checklist
- The body measures 3.0 in × 3.7 in (7.6 cm × 9.4 cm).
- The stem is 1.2 in (3.0 cm) wide and its edges are straight.
- The edging has 79 sts, and all 5 outer corners are rounded and flat.
- The inner corner lies flat with no gap or pucker.
- The flower has 5 even petals and the yellow center shows.
- Both leaves are secure and their tips point outward.
- The bud is round and firmly attached.
- The jump ring is fully closed and centered on the top of the stem.
- All ends are woven in, and no sewing stitches show on the back.
Troubleshooting
- The sides ruffle: you worked more than 1 sc per row end. Work exactly 1 per row end.
- The sides pull in: you skipped some row ends. Count each side: 21 on the left, 5 on the foot, 15 on the stem.
- The corners cup: make sure every outer corner has 3 sc in one stitch.
- There is a hole at the inner corner: work the sc2tog through both spots firmly, then close any gap with the yarn tail.
- The stem leans: you probably added or lost a stitch. Count 5 sc on every stem row.
- The petals are uneven: keep the (sc, hdc, dc) and (dc, hdc, sc) groups exactly paired.
- The keychain feels floppy: go down a hook size, or block with a light spray starch.
Care
Spot clean with mild soap and cool water, then reshape and dry flat. Take it off the key ring before washing, and avoid the dryer.
Final Notes
Here is the measurement chain to keep in mind as you work:
- Your gauge of 5 sc and 6 rows per 1 in (2.5 cm) sets the size of everything else.
- That gives a foot 2.8 in (7.1 cm) wide.
- The full letter is 3.5 in (8.9 cm) tall before edging.
- The 79-stitch edging brings it to 3.0 in × 3.7 in (7.6 cm × 9.4 cm).
If your swatch is right, everything after it will be right too. Once you know this shape, you can make a whole set of initials for gifts.
Happy crocheting!