

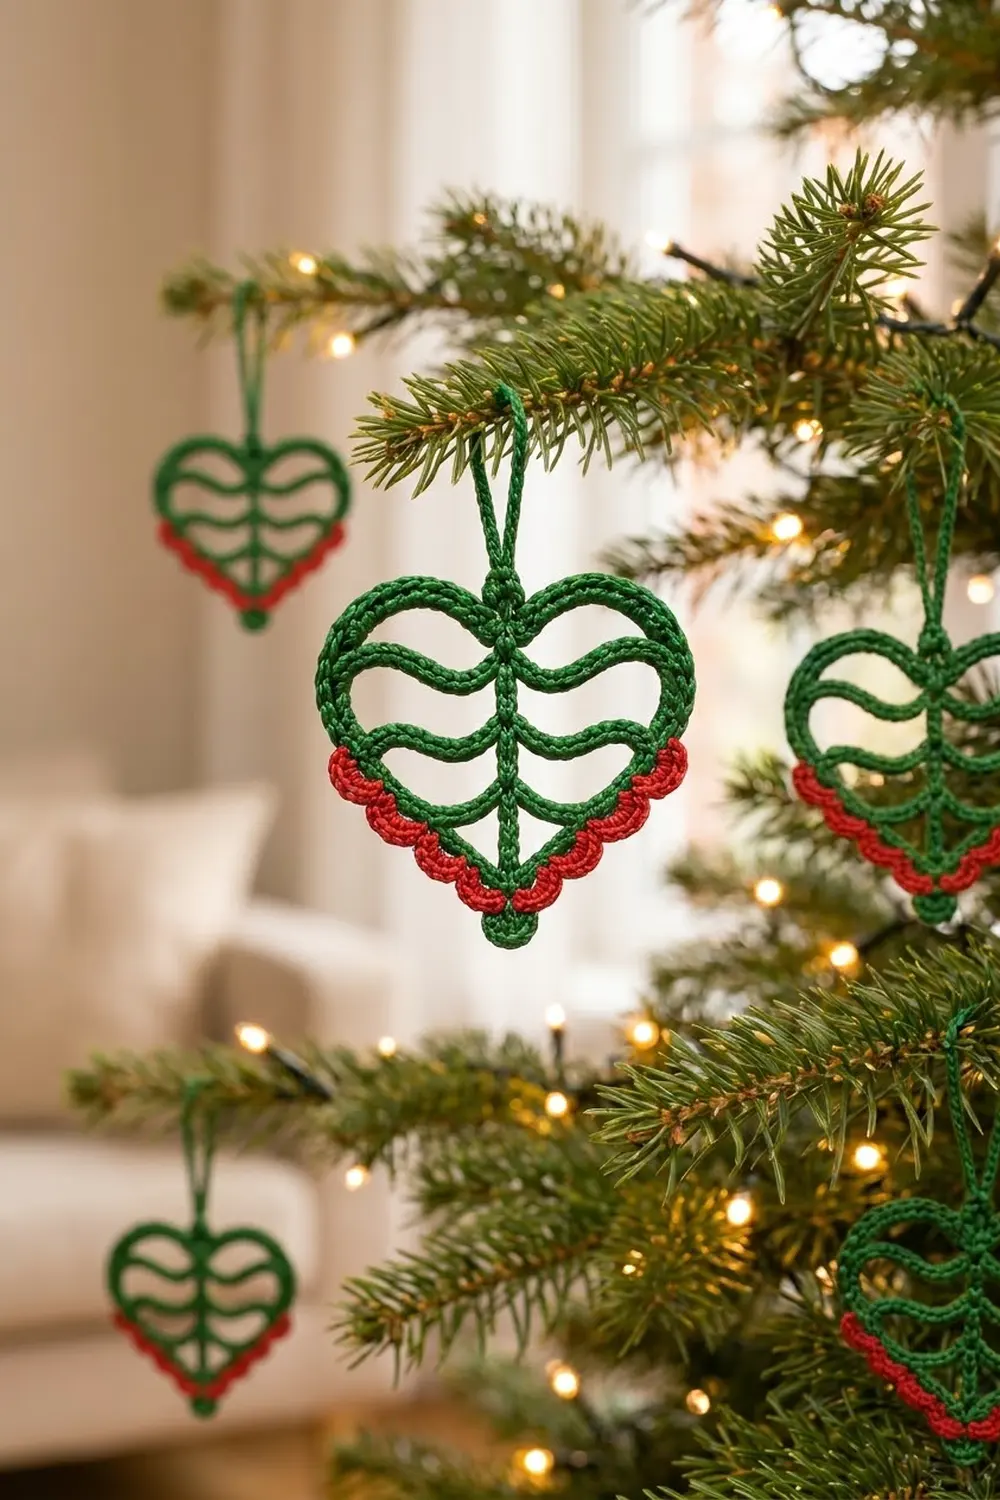
The Holly Vein Heart is a light, openwork Christmas ornament made of smooth green cord. It looks like a leaf: a heart outline, a center spine, and curved “veins” that branch out to the sides. A row of small red scallops along the lower edges gives it a holly-berry finish, and a small green disk marks the point of the heart.
The palette is classic: deep forest green for the frame and bright Christmas red for the edging. Mercerized cotton gives the stitches the glossy, rope-like look shown here. Hang one on its own on a branch or gift tag, or make several and spread them around the tree.
This pattern uses US crochet terms. The finished ornament is 3 in (7.6 cm) wide and 3.5 in (8.9 cm) tall including the bottom disk. With the hanging loop it measures 4.75 in (12.1 cm) overall.
The construction is simple. First you make one long chain ring and cover it with single crochet to form the outline. Next you add the spine and three bars as covered chains anchored to the outline. Then you add the hanging loop, work the red shell edging along the lower sides, and sew on the bottom disk.
Finished Size and Construction
- Finished size: 3 in (7.6 cm) wide × 3.5 in (8.9 cm) tall; 4.75 in (12.1 cm) tall with the loop
- Skill level: Easy
- Terminology: US
- Yarn weight: DK / light worsted (#3), mercerized cotton
- Hook: 3.5 mm (E-4)
- Number of pieces: 1 ornament (frame worked in one piece, plus 1 small disk sewn on)
- Layout: single heart; spine plus 2 wavy bars and 1 chevron bar inside
- Outline perimeter: 50 sc = 10 in (25.4 cm)
- Size before border: 3 in (7.6 cm) wide × 3 in (7.6 cm) from point to lobe tops
- Border depth: red scallops stand out 0.25 in (0.6 cm) from the lower sides
Materials
Pick a smooth, firmly twisted mercerized cotton in DK weight. A tight twist gives the rounded cord look; fuzzy or loosely plied yarn will blur the outlines.
- Forest green: 10 g / 25 m
- Christmas red: 3 g / 8 m
Both amounts include a safety margin of roughly 30% for gauge swatching and weaving in ends. If you’re making a set, multiply the amounts by the number of ornaments.
Tools:
– 3.5 mm (E-4) crochet hook
– Tapestry needle
– 4 locking stitch markers
– Scissors
– Blocking board or foam mat with rust-proof pins
– Spray bottle with water (optional: light spray starch)
Abbreviations (US Terms)
- ch – chain
- sl st – slip stitch
- sc – single crochet
- hdc – half double crochet
- dc – double crochet
- st(s) – stitch(es)
- MR – magic ring
- sp – space
Special technique – Covering sc: Insert the hook into the space under the chain (or through the ring), not into the chain stitches. Pull up a loop and complete the sc. The stitches wrap around the chain and turn it into a round cord.
Special stitch – Shell: (hdc, dc, hdc) all in the same st.
Gauge and Checkpoints
Gauge: 5 covering sc = 1 in (2.5 cm) along the cord. 5 ch = 1 in (2.5 cm), unstretched.
The ornament is small, so the outline is your gauge swatch. Make Section 1 first and lay it flat before you go on.
- Checkpoint 1 (outline): The 50-sc ring measures 10 in (25.4 cm) around. Shaped into a heart, it is 3 in (7.6 cm) wide and 3 in (7.6 cm) from point to lobe tops.
- Checkpoint 2 (spine): 13 sc = 2.6 in (6.6 cm), from the top dip to the bottom point without pulling.
- Checkpoint 3 (bars): The wavy bars arch gently; they don’t lie straight. The chevron bar is taut and straight.
- Checkpoint 4 (finished): 3.5 in (8.9 cm) tall with the disk; 4.75 in (12.1 cm) with the loop.
Too big? Go down to a 3.25 mm (D-3) hook. Too small or stiff? Go up to a 3.75 mm (F-5) hook. Always change the hook rather than the stitch counts, because every anchor position depends on the 50-stitch outline.
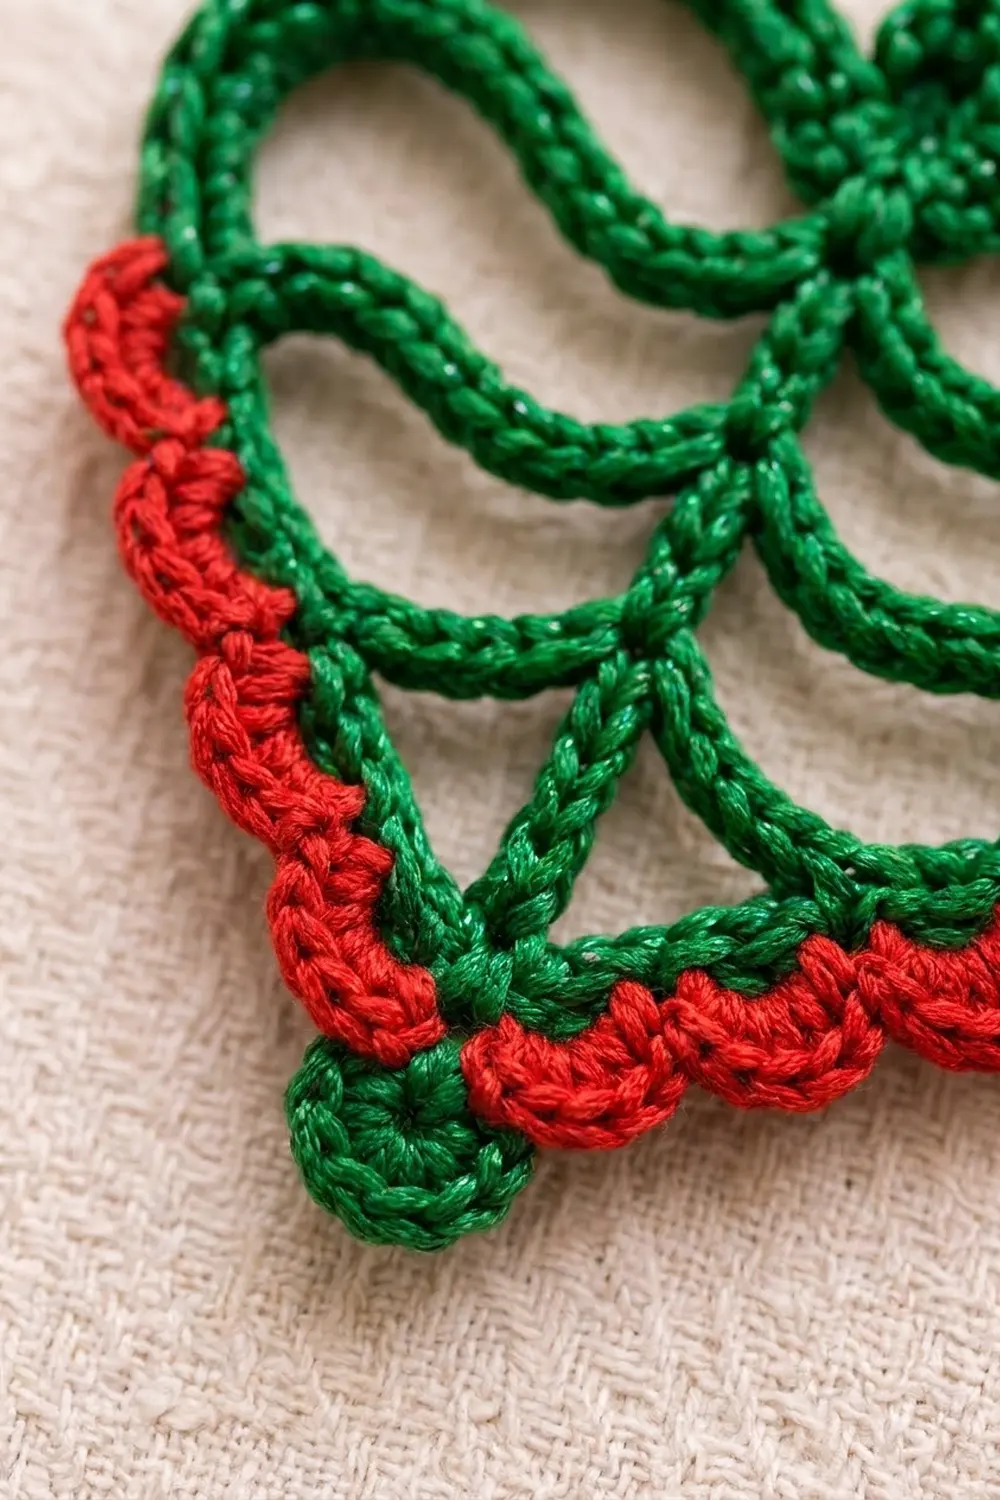
Section 1: Heart Outline (Green)
Foundation: Ch 50. Sl st into the first ch to form a ring, making sure the chain isn’t twisted.
Rnd 1: Ch 1 (does not count as a st). Work 50 covering sc around the ring, encasing the chain completely. Sl st in the first sc to join. (50 sc)
Don’t fasten off yet. Number the stitches as follows. The joining sc is sc 1, and it becomes the top center dip of the heart.
- sc 1: top dip
- sc 2–13: right lobe (12 sts, 2.4 in / 6.1 cm)
- sc 14–25: right lower side (12 sts)
- sc 26: bottom point
- sc 27–38: left lower side (12 sts)
- sc 39–50: left lobe (12 sts)
Check: 1 + 12 + 12 + 1 + 12 + 12 = 50. Mirror positions always add up to 52 (for example, sc 10 ↔ sc 42).
Place markers in sc 1, sc 14, sc 26 and sc 38. Fasten off and leave a 6 in (15.2 cm) tail.
Section 2: Center Spine (Green)
Working from the inside of the heart, join green with a sl st through the body of sc 26 (bottom point).
Step 1: Ch 13. Sl st through the body of sc 1 (top dip).
Step 2: Work 13 covering sc over the ch-13, from top to bottom. Sl st in sc 26. (13 spine sc)
Number the spine sc from the top: spine sc 1 is next to the top dip and spine sc 13 is next to the point. Spine length is 2.6 in (6.6 cm). Fasten off.
Section 3: Wavy Bars and Chevron (Green)
Each bar is worked as one continuous strand. You chain across from the right side to the spine and on to the left side, then cover the chains on the way back.
Bar 1 (upper wave):
1. Join green with a sl st in outline sc 10.
2. Ch 8, sl st around spine sc 3, ch 8, sl st in outline sc 42.
3. Work 9 covering sc over the left ch-8, then sl st around spine sc 3.
4. Work 9 covering sc over the right ch-8, then sl st in outline sc 10. (18 sc)
Each half has 9 sc = 1.8 in (4.6 cm) of cord, and the straight distance it spans is about 1.4 in (3.6 cm). That extra length is what pushes each half into an upward arch. Fasten off.
Bar 2 (middle wave):
1. Join green in outline sc 14.
2. Ch 9, sl st around spine sc 7, ch 9, sl st in outline sc 38.
3. Work 10 covering sc over the left ch-9, then sl st around spine sc 7.
4. Work 10 covering sc over the right ch-9, then sl st in sc 14. (20 sc)
Each half has 10 sc = 2 in (5.1 cm) of cord across the widest part of the heart, which gives the deepest wave. Fasten off.
Bar 3 (lower chevron):
1. Join green in outline sc 18.
2. Ch 6, sl st around spine sc 11, ch 6, sl st in outline sc 34.
3. Work 6 covering sc over the left ch-6, then sl st around spine sc 11.
4. Work 6 covering sc over the right ch-6, then sl st in sc 18. (12 sc)
Here 6 sc = 1.2 in (3.0 cm), which matches the diagonal distance, so these bars lie straight and form a V. Fasten off.
Section 4: Hanging Loop (Green)
From the outside of the heart, join green with a sl st in the top of sc 1.
Ch 12, then sl st in the same sc 1. Work 14 covering sc over the ch-12 loop. Sl st in sc 1. (14 sc)
The loop is 2.8 in (7.1 cm) around and hangs about 1.25 in (3.2 cm) tall. Fasten off and weave the tail into the base of the loop. That forms the small knot visible above the heart.
Section 5: Bottom Disk (Green)
Rnd 1: MR, ch 1, 8 sc in ring. Pull the ring closed and sl st to the first sc. (8 sc)
The disk is 0.5 in (1.3 cm) across. Fasten off and leave an 8 in (20.3 cm) tail for sewing. Set it aside until the border is done.
Section 6: Red Scalloped Border
Border gauge: 1 shell + 1 sl st uses 2 outline sts and covers 0.4 in (1.0 cm). Work into the tops of the outline sc, which face outward.
Right lower side:
1. Join red with a sl st in sc 14.
2. Shell in next st, sl st in next st; repeat 4 more times (sc 15–24).
3. Shell in sc 25.
That gives 6 shells (in sc 15, 17, 19, 21, 23, 25) and 5 sl sts (in sc 16, 18, 20, 22, 24), plus the joining sl st. Count: 18 + 5 + 1 = 24 red sts.
Bottom point: Sl st in sc 26. (1 st)
Left lower side:
1. Shell in next st, sl st in next st; repeat 5 more times (sc 27–38).
That gives 6 shells (in sc 27, 29, 31, 33, 35, 37) and 6 sl sts (in sc 28, 30, 32, 34, 36, 38). Count: 18 + 6 = 24 red sts.
Total border: 24 + 1 + 24 = 49 sts.
Why the math works: Each side has 12 outline sts, and each shell-plus-sl-st unit uses 2 of them, so each side holds exactly 6 scallops. The 12 sts cover 2.4 in (6.1 cm), so the scallops sit evenly without ruffling or pulling. The border uses outline sc 14 to 38: 12 + 1 + 12 = 25 sts. It starts and stops at sc 14 and sc 38, which are the same anchors as Bar 2, so the red begins exactly at the widest point on both sides.
Fasten off and weave in the ends along the back of the cord.
Attach the disk: Center the disk over sc 26 so that half of it sits below the point. Using the green tail, sew around the disk’s edge through the outline cord and the red sl st at sc 26. Weave in the tail.
Final Blocking
- Lightly mist the ornament until it is damp but not wet.
- Lay it right side up on a gridded board.
- Pin the loop top, then the top dip (sc 1), then the bottom point (sc 26), with 3 in (7.6 cm) between dip and point vertically, measured to the outer edge.
- Pin the lobe tops, then the widest points (sc 14 and sc 38), 3 in (7.6 cm) apart.
- Pin the lower sides at sc 20 and sc 32 to straighten them.
- Use your fingers to push each half of Bars 1 and 2 into an even upward arch. Pull the chevron straight.
- Open each red shell into a rounded scallop.
- If you want a stiffer ornament, spray lightly with starch.
- Let it dry completely, at least 6 hours, before unpinning.
Final Quality-Control Checklist
- Outline has 50 sc, with sc 1 at the top dip
- Spine has 13 sc and runs straight from the dip to the point
- Bar 1 has 18 sc, Bar 2 has 20 sc and Bar 3 has 12 sc
- Bars are attached at mirror positions (10/42, 14/38, 18/34)
- Hanging loop has 14 sc and is centered
- 6 red shells on each side, 49 border sts total
- Disk is centered over the point
- Size is 3 in (7.6 cm) × 3.5 in (8.9 cm); 4.75 in (12.1 cm) with the loop
- All ends are woven in and hidden inside the cord
Troubleshooting
Outline ring is twisted. Undo the joining sl st and lay the chain flat before you join again.
Chain shows through the covering sc. Pack the sc closer together, or go down one hook size.
Wavy bars sag instead of arching. Block them with pins underneath to hold the curves. If they still sag, work 1 fewer covering sc per half.
Chevron bows outward. Your chain is loose. Rework it with ch 5 and 6 sc.
Border ruffles. Make sure each shell goes into one stitch, followed by a sl st in the next. Never skip a stitch.
Heart leans to one side. Check that every anchor pair adds up to 52.
Care
Hand wash in cool water, press out the moisture in a towel, and re-block flat. Store flat or hanging, away from heavy ornaments.
Final Notes
The measurement chain builds in order:
- 50 outline sc = 10 in (25.4 cm), which shapes into a 3 in (7.6 cm) heart.
- A 13-sc spine = 2.6 in (6.6 cm).
- Bars of 18, 20 and 12 sc, anchored at mirrored stitches.
- 6 red shells per side on 12 stitches each.
- A 0.5 in (1.3 cm) disk, which brings the height to 3.5 in (8.9 cm).
- A 14-sc loop, for 4.75 in (12.1 cm) overall.
Check each stage before you move on, and the finished heart will hang straight.
Happy crocheting!