

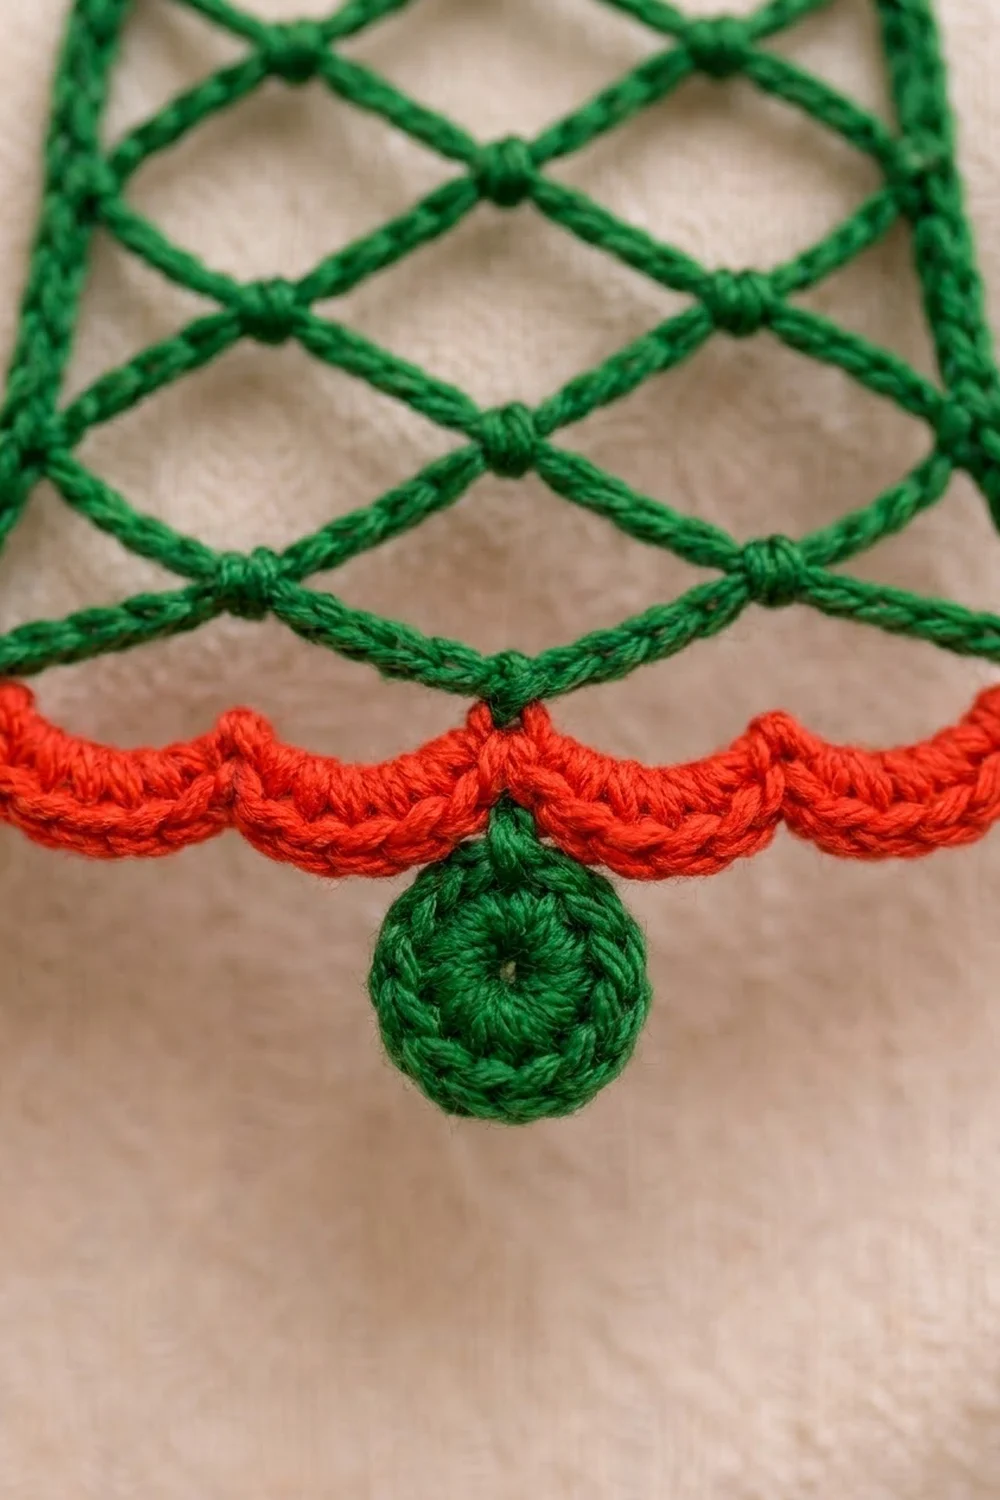
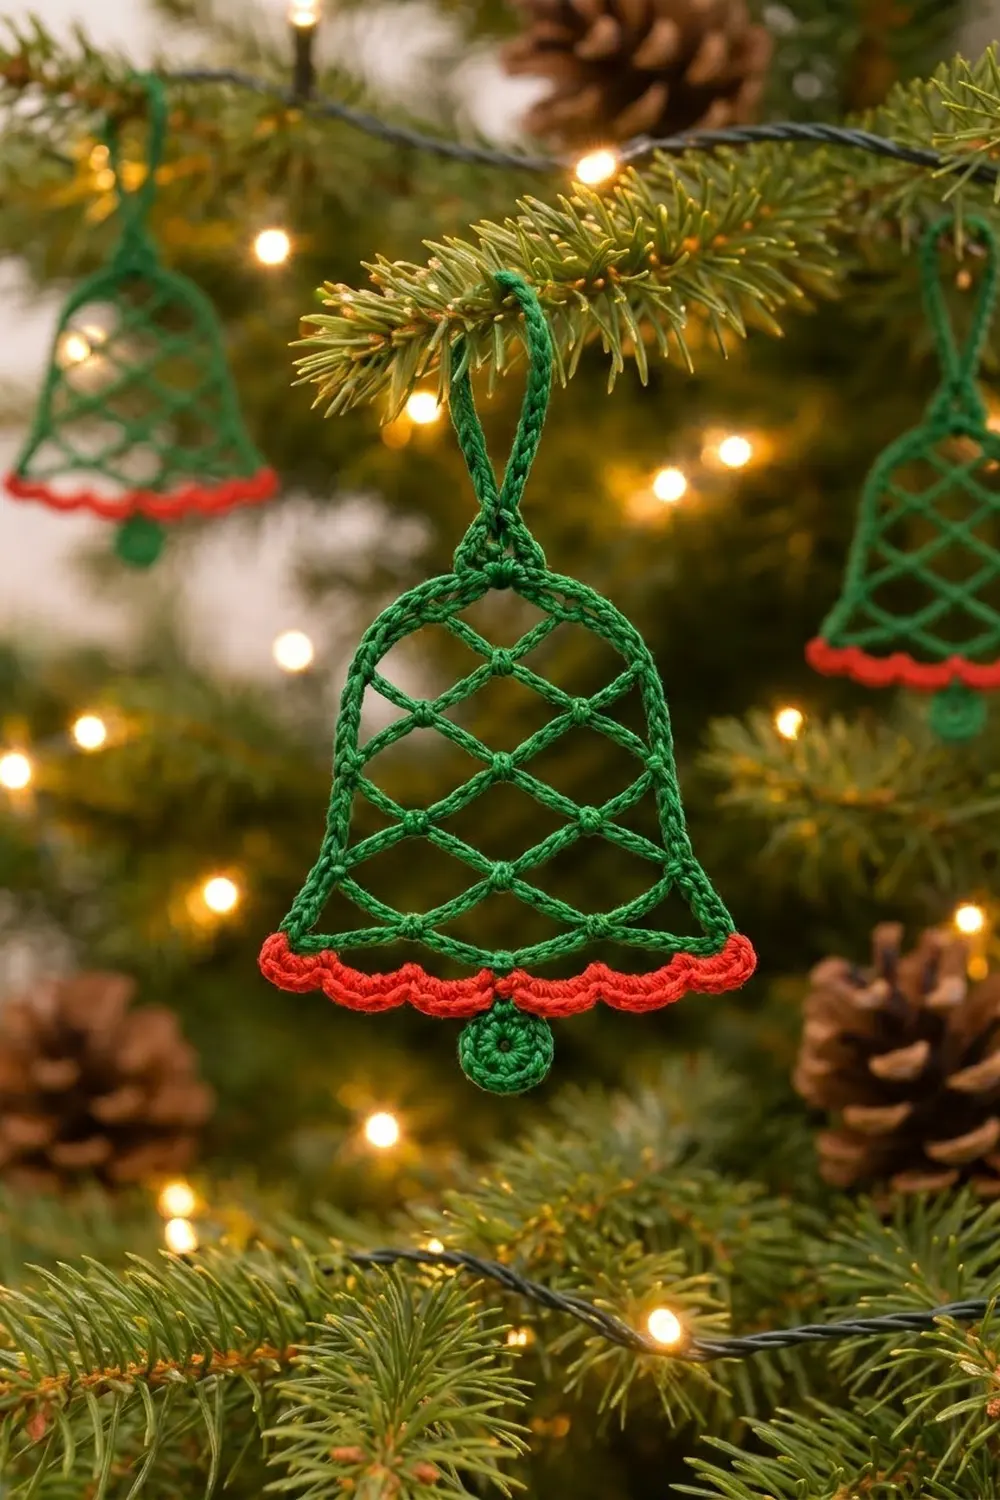
This little bell ornament is all about clean lines and open space. The forest-green body is a chain-loop lattice that forms neat diamonds, with a small knot at every point where the lines cross. A firm green outline holds the silhouette, a row of bright red scallops trims the hem, and a solid green disc hangs below the center as the clapper.
The colors are classic Christmas: deep forest green for the bell, loop and clapper, and a warm tomato red for the scalloped hem. The look is light and lacy but still graphic, so it reads clearly on a tree branch, a gift tag or a window.
The pattern uses US crochet terms. The finished ornament measures 3.5 in (8.9 cm) wide at the hem and 5.5 in (14.0 cm) tall, from the top of the hanging loop to the bottom of the clapper.
Construction is simple. You crochet the lattice flat from the top down, adding one loop per row so the bell widens. Next, one green round of single crochet outlines the whole shape and builds the hanging loop. Then you work the red scallops along the hem only, make a small clapper and sew it to the center of the hem.
Finished Size and Construction
- Finished size: 3.5 in (8.9 cm) wide x 5.5 in (14.0 cm) tall overall
- Skill level: Easy-Intermediate
- Terminology: US crochet terms
- Yarn weight: Super fine (#1) mercerized cotton, such as size 3 crochet thread
- Hook: 2.25 mm (US B-1)
- Number of pieces: 1 bell plus 1 clapper, sewn into a single ornament
- Layout: Single ornament; no motifs to join
- Piece size (bell body after outline): 3.5 in (8.9 cm) wide x 3.25 in (8.3 cm) tall
- Size before border: the lattice measures 3.25 in (8.3 cm) wide x 3 in (7.6 cm) tall
- Border depth: the green outline adds 0.125 in (0.3 cm); the red scallops add 0.25 in (0.6 cm) at the hem
Materials
Choose a smooth mercerized cotton. It gives crisp chains and clear knots, and it holds its shape after blocking. Avoid fuzzy or very stretchy yarns, which blur the lattice.
- Forest green: 8 g (about 26 m)
- Tomato red: 2 g (about 7 m)
Tools:
- 2.25 mm (US B-1) crochet hook
- Tapestry needle
- Scissors
- 2 locking stitch markers
- Blocking board or foam mat, rustproof pins and a spray bottle
- Optional: spray starch for a firmer ornament
The quantities include a margin of about 25 percent for testing your gauge and weaving in ends.
Abbreviations (US Terms)
- ch – chain
- sl st – slip stitch
- sc – single crochet
- hdc – half double crochet
- sk – skip
- sp – space
- st(s) – stitch(es)
- rep – repeat
- RS – right side
- MR – magic ring
Special stitch – Scallop: Sk 1 st, 5 hdc in next st, sk 1 st, sl st in next st. Each scallop uses 4 sts of the edge it is worked into.
Knot: In this pattern, a “knot” is the sc that anchors two ch-5 loops together. These make the small bumps where the lattice lines cross.
Gauge and Checkpoints
Exact gauge is not critical for an ornament, but it decides whether the outline and scallops land evenly. Test it by working the bell body through Row 4 and measuring before you go on.
- Outline gauge: 8 sc = 1 in (2.5 cm)
- Scallop gauge: 1 scallop = 0.5 in (1.3 cm) wide
- Lattice gauge: each net row adds about 0.5 in (1.3 cm) of height when lightly stretched
Checkpoints:
- After Row 1 (crown): 9 sc measure 1.125 in (2.9 cm) wide.
- After Row 4: about 1.5 in (3.8 cm) tall from the foundation chain, lightly stretched.
- After Row 7: about 3 in (7.6 cm) tall and 3.25 in (8.3 cm) wide across the bottom loops.
- After the outline: 3.5 in (8.9 cm) between the bottom corners and 3.25 in (8.3 cm) tall.
If your crown is wider than 1.125 in (2.9 cm), go down to a 2 mm hook. If it is narrower, go up to a 2.5 mm hook. A small difference is fine, because blocking can adjust the lattice by about 0.25 in (0.6 cm) either way.
Bell Body (Lattice)
Use forest green. Work flat in rows from the crown down.
Foundation: Ch 10.
Row 1 (crown): Sc in 2nd ch from hook and in each ch across, turn. (9 sc)
Row 2: Ch 1 (does not count as a st), sc in first sc, [ch 5, sk 3 sc, sc in next sc] twice, turn. (2 ch-5 loops, 3 knots)
The knots sit on sc 1, sc 5 and sc 9. These form the first two diamonds at the crown.
Row 3: Ch 5 (counts as first loop), sc in first ch-5 sp, ch 5, sc in next ch-5 sp, ch 5, sc in same ch-5 sp (increase made), turn. (3 ch-5 loops)
Rows 4–7 (increase rows): Ch 5 (counts as first loop), sc in first ch-5 sp, *ch 5, sc in next ch-5 sp; rep from * across to the last ch-5 sp, ch 5, sc in same last ch-5 sp (increase made), turn.
Each row has exactly one more loop than the row before:
- Row 4: 4 ch-5 loops
- Row 5: 5 ch-5 loops
- Row 6: 6 ch-5 loops
- Row 7: 7 ch-5 loops
Because you turn at the end of every row, the increases alternate sides, which keeps the bell symmetrical. Fasten off after Row 7.
Why it forms diamonds: Each new loop is anchored in the middle of a loop from the row above. That shifts each row half a diamond sideways, so the chains cross diagonally and the knots line up in a diamond grid.
Checkpoint: the lattice should measure about 3 in (7.6 cm) tall and 3.25 in (8.3 cm) across the bottom loops when lightly stretched.
Border
The border has two parts. A green outline round goes around the whole bell and builds the hanging loop. Then a red scallop row runs along the hem only.
Border gauge: 8 sc = 1 in (2.5 cm). Along the hem, the 28 stitch spans between the two corner sc measure 3.5 in (8.9 cm). Seven scallops of 4 sts each fill that span exactly.
Round 1 – Green Outline and Hanging Loop
With RS facing, join green at the top-right corner of the crown.
Top (crown) edge: Working into the free loops of the foundation chain, sc in each of the first 5 ch. Ch 20, then sl st in the 5th sc you just made to form the hanging loop. Work 28 sc over the ch-20 loop to cover it, then sl st again in the same 5th sc. Sc in each of the remaining 4 ch. (9 sc across the crown; the loop is not counted)
Left side: Work 2 sc in the row end of Row 1, then 3 sc in each of the 6 net-row ends (Rows 2–7). Work into the outermost loop or around the edge knot, whichever that row has. (20 sc)
Bottom-left corner: 1 sc in the corner point at the end of Row 7. Place a marker in this sc. (1 sc)
Bottom (hem) edge: [3 sc in next ch-5 loop, sc in next knot] 6 times, 3 sc in last ch-5 loop. (27 sc: 7 loops x 3 sc + 6 knots x 1 sc)
Bottom-right corner: 1 sc in the corner point. Place a marker. (1 sc)
Right side: 3 sc in each of the 6 net-row ends (Rows 7 up to 2), then 2 sc in the row end of Row 1. (20 sc)
Sl st to the first sc of the round. Fasten off and weave in the end.
Round total: 9 + 20 + 1 + 27 + 1 + 20 = 78 sc, plus the covered hanging loop.
The 20 sc on each side do not include the corner sc. Each corner is counted once, as its own stitch.
Checkpoint: the two marked corner sc should be 3.5 in (8.9 cm) apart, and the bell body should be 3.25 in (8.3 cm) tall.
Row 2 – Red Scallop Hem
With RS facing, join red with a sl st in the marked bottom-left corner sc.
Sk 1 sc, 5 hdc in next sc, sk 1 sc, sl st in next sc; rep from * 6 more times. The final sl st lands in the marked bottom-right corner sc. (7 scallops: 35 hdc, 8 sl st)*
Fasten off and weave in the ends.
Why the math works: The hem has 29 sts from corner to corner (1 + 27 + 1). Once you sl st into the first corner, 28 sts remain. Each scallop uses exactly 4 sts (skip, 5-hdc st, skip, sl st), and 7 x 4 = 28. So the last sl st falls in the second corner with nothing left over. At 8 sc per inch, those 28 sts measure 3.5 in (8.9 cm), which makes each scallop 0.5 in (1.3 cm) wide.
The scallops hang 0.25 in (0.6 cm) below the outline. The bell now measures 3.5 in (8.9 cm) from the crown to the scallop tips.
Clapper
Use forest green. Work in joined rounds with RS facing.
Round 1: MR, ch 2 (does not count as a st), 10 hdc in ring, pull the ring closed, sl st to first hdc. (10 hdc)
Round 2: Ch 1, 2 sc in each st around, sl st to first sc. (20 sc)
Fasten off, leaving a 6 in (15.2 cm) tail for sewing. The clapper measures 0.75 in (1.9 cm) across.
Attach: Find the 4th (middle) scallop. Its center is the 3rd of its 5 hdc. Line up the clapper’s join just behind the base of that hdc. With the tail, sew the clapper’s top 2 sts to the outline sc under the scallop using 2 or 3 small stitches. The clapper’s top edge should sit level with the scallop tips, so it hangs straight down from the center of the hem. Weave in the tail.
The clapper hangs 0.75 in (1.9 cm) below the hem, and the hanging loop rises 1.25 in (3.2 cm) above the crown. Total height: 1.25 + 3.25 + 0.25 + 0.75 = 5.5 in (14.0 cm).
Final Blocking
- Weave in all ends before blocking, but don’t trim them yet.
- Pin the bell RS up on a gridded foam board.
- Pin the top of the hanging loop straight up, centered over the crown.
- Pin the two shoulders, where the crown meets the sides, 1.75 in (4.4 cm) apart.
- Pin the two hem corners 3.5 in (8.9 cm) apart and level with each other.
- Pin each side at the waist so it curves gently inward and then flares out toward the hem. This gives the bell its curved shape.
- Open each diamond with a fingertip so the knots line up.
- Mist until damp. Add a light coat of spray starch if you want a stiffer ornament.
- Let it dry completely, at least 4 hours, before unpinning. Then trim the ends.
Final Quality-Control Checklist
- The lattice has a crown row plus net rows of 2, 3, 4, 5, 6 and 7 loops
- The outline totals 78 sc: 9 on top, 20 per side, 27 on the hem and 1 per corner
- The hanging loop is centered and fully covered with 28 sc
- There are 7 even red scallops, with sl sts in both corner sc
- The hem measures 3.5 in (8.9 cm) from corner to corner
- The clapper is 0.75 in (1.9 cm) across and centered under the 4th scallop
- The overall height is 5.5 in (14.0 cm)
- All ends are secure and trimmed
Troubleshooting
The bell leans to one side. You probably missed an increase at the end of a row. Count the loops: each row should have exactly one more than the row above.
The diamonds look uneven. Your chain tension is changing. Chain a little more loosely and evenly, and even out what’s left when you block.
The scallops don’t end in the corner. The hem count isn’t 27. Redo that part of the outline with exactly 3 sc per loop and 1 sc per knot.
The hem ruffles. Your outline is looser than 8 sc per 1 in (2.5 cm). Redo the outline with a 2 mm hook.
The hem cups or pulls in. Your outline is too tight. Use a 2.5 mm hook for the outline round only.
The hanging loop twists. Space the 28 covering sc evenly, without crowding, and pin the loop flat while blocking.
The clapper flips forward. Sew it to both the outline sc and the base of the hdc, so it is held at two points.
Care
Hand wash in cool water with mild soap, roll in a towel and reshape. Pin flat to dry, and re-starch if needed.
Final Notes
The measurements build step by step. The 9-sc crown measures 1.125 in (2.9 cm). Six net rows grow the lattice to 3 in (7.6 cm) tall and 3.25 in (8.3 cm) wide. The 78-sc outline brings the body to 3.5 in (8.9 cm) wide and 3.25 in (8.3 cm) tall. Seven 4-st scallops fill the 28-st hem exactly and add 0.25 in (0.6 cm). With a 1.25 in (3.2 cm) loop and a 0.75 in (1.9 cm) clapper, the finished bell measures 5.5 in (14.0 cm) tall.
Make one for the tree and another for a gift, and watch the lattice open up as you block it.
Happy crocheting!