

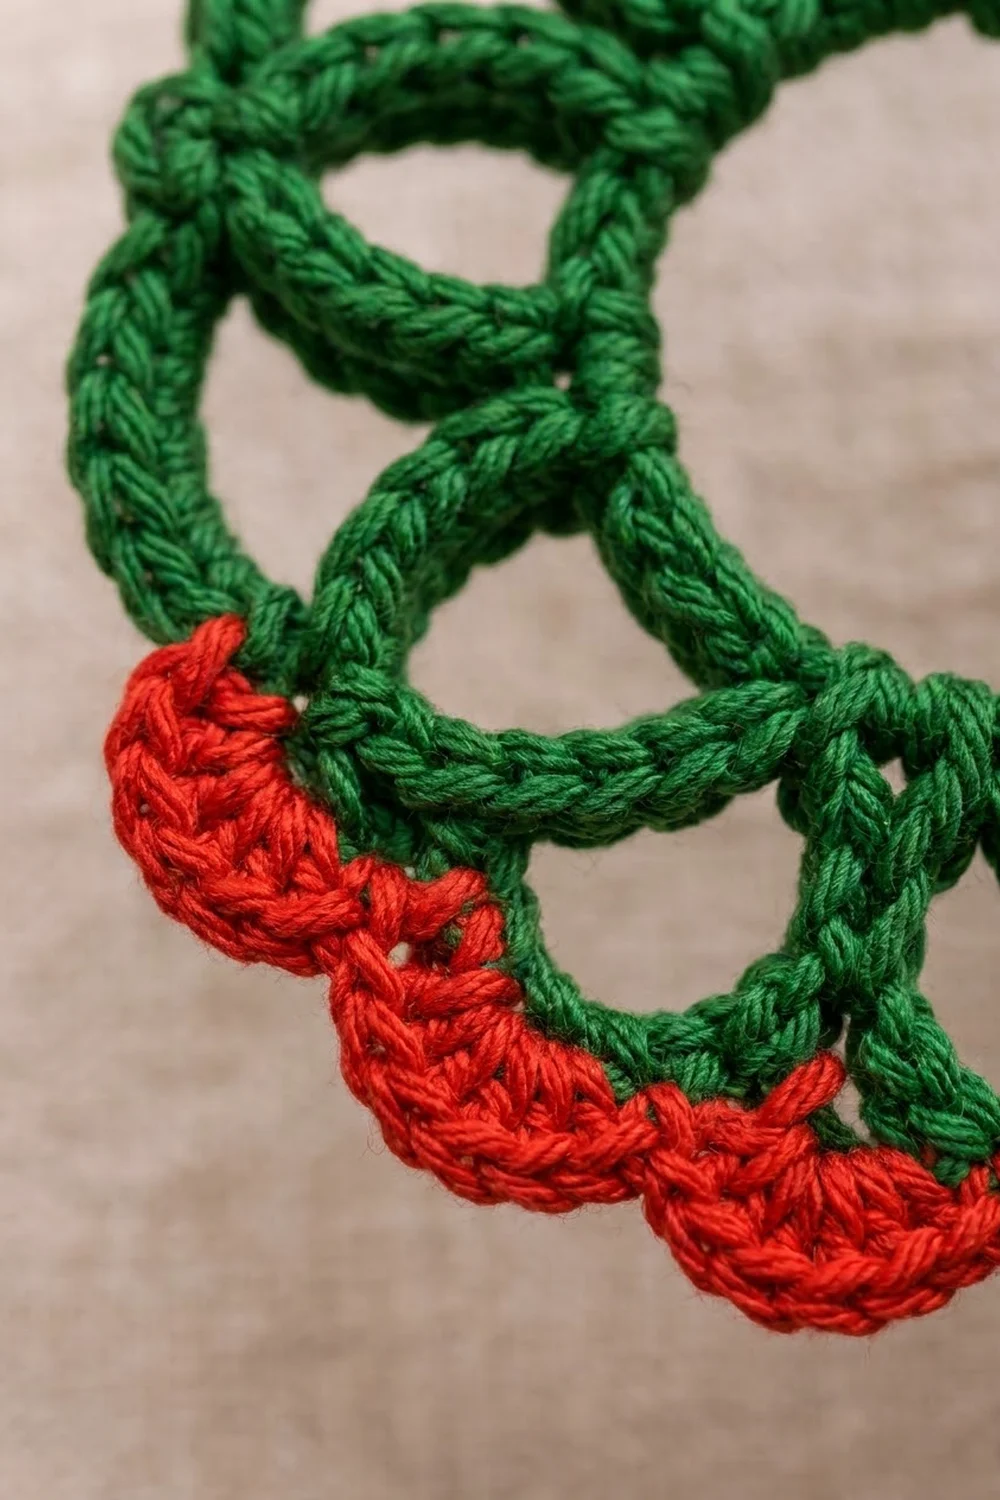
The Holly Halo is a small, open lace ornament built from loops around a single center ring. Eight rounded petals circle the ring, eight larger arches overlap them on the outside, and a bright red scalloped trim runs along the lower edge. A slim hanging loop at the top means it goes straight onto the tree.
The palette is two colors: deep forest green for the lace and true Christmas red for the trim. Every loop is a chain covered in packed single crochet, so the lines look like smooth, rounded cord instead of flat chain. It reads as vintage lace but is quick to make.
This pattern uses US crochet terms. The finished ornament is 4 in (10.2 cm) across and 5.75 in (14.6 cm) tall, measured from the bottom of the trim to the top of the hanging loop.
You work everything as one piece. You start with a sc-covered center ring, add a round of chain loops, and cover them in sc to make petals. Next comes a round of chain arches between the petal tips, also covered in sc. Then you add the hanging loop at the top and work two short rows of red trim across the bottom three arches.
Finished Size and Construction
- Finished size: 4 in (10.2 cm) wide x 5.75 in (14.6 cm) tall, including the loop
- Skill level: Easy-intermediate
- Terminology: US crochet terms
- Yarn weight: Sport weight (#2) mercerized cotton
- Hook: 3.0 mm (US C/2 or D/3, depending on brand)
- Number of pieces: 1 (single motif, no joining)
- Layout: Center ring, 8 petals, 8 outer arches, hanging loop at top, trim across the 3 bottom arches
- Piece size (lace body): 4 in (10.2 cm) across after Round 5
- Size before border: 4 in (10.2 cm) across
- Border depth: 0.5 in (1.3 cm), on the lower edge only
- Hanging loop: 1.25 in (3.2 cm) tall
Materials
Yarn advice: Use a smooth, tightly plied mercerized cotton. It gives crisp stitch definition, holds its shape after blocking, and won’t fuzz on the tree. Avoid acrylic and loosely spun yarn, because the loops will go limp.
- Color A, forest green: 6 g / 18 m (about 20 yd)
- Color B, Christmas red: 2 g / 6 m (about 7 yd)
Both quantities include a margin of roughly 50% for gauge testing, tails, and the odd restart. One standard 50 g ball of each color makes a whole set of ornaments.
Tools:
- 3.0 mm crochet hook
- Tapestry needle
- Small sharp scissors
- Stitch marker
- Blocking mat or foam board, plus rust-proof pins
- Spray bottle, or fabric stiffener (optional)
- Ruler or tape measure
Abbreviations (US Terms)
- ch – chain
- sl st – slip stitch
- sc – single crochet
- dc – double crochet
- sk – skip
- st(s) – stitch(es)
- sp – space
- RS / WS – right side / wrong side
Special technique, packed sc: “Work X sc in ch-sp” means you work every sc around the chain into the space, not into individual chains. On purpose, the count is higher than the chain count. Pushing the stitches together as you go makes the chain curve into a round, cord-like loop.
Gauge and Checkpoints
Gauge: 7 sc = 1 in (2.5 cm), worked in rows with a 3.0 mm hook. Gauge matters less here than in a garment, but it controls how round the loops become.
Test one ornament first. The piece is small, so a full test ornament is the best swatch. Check it against these checkpoints:
- After Round 1: center ring is 1.5 in (3.8 cm) across at its outer edge
- After Round 3: petal circle is 3 in (7.6 cm) across, tip to tip
- After Round 5: lace body is 4 in (10.2 cm) across
- After the trim: total height without the loop is 4.5 in (11.4 cm)
If the piece is too big: If Round 5 measures more than 4.25 in (10.8 cm), go down 0.25 mm in hook size. Also check that you are packing the sc tightly along the chains.
If the piece is too small: If Round 5 measures less than 3.75 in (9.5 cm), or the arches buckle and won’t lie flat, go up 0.25 mm in hook size.
If it’s the right size but wavy: Your chains are probably tighter than your sc. Work the chains slightly looser and leave the hook size as it is.
Lace Body (Color A, Green)
Round 1: Center Ring
With Color A, ch 16 and sl st to the first ch to form a ring, taking care not to twist it.
Ch 1, then work 32 sc into the ring. Sl st to the first sc to join. (32 sc)
That is 2 sc for every foundation chain, which packs the ring into the thick, smooth halo that sits in the middle. Check: 1.5 in (3.8 cm) across.
Round 2: Petal Chains
Ch 1 and sc in the same st as the join. Ch 12, sk 3 sc, sc in the next sc. Repeat from * 6 more times. Ch 12, sk the last 3 sc, and sl st to the first sc to join.
(8 sc and 8 ch-12 loops)
Each repeat uses 4 sts of Round 1 (1 sc + 3 skipped). Since 8 repeats x 4 sts = 32 sts, the loops are spaced evenly around the ring.
Round 3: Petals
Sl st into the first ch-12 loop. Ch 1, then work 16 sc in the same loop. Work 16 sc in the next ch-12 loop. Repeat from * 6 more times. Sl st to the first sc to join.
(128 sc: 8 petals of 16 sc each)
Don’t work into the sc of Round 2. Each petal goes straight into the next. Push the 16 sc together along each 12-chain loop so that each petal bends into a rounded teardrop. Check: 3 in (7.6 cm) across, tip to tip.
Round 4: Arch Chains
Sl st in each of the next 7 sc, so you reach the 8th sc of the first petal. This is the petal’s center point.
Ch 1 and sc in the same st. Ch 14, then sc in the 8th sc of the next petal. Repeat from * 6 more times. Ch 14 and sl st to the first sc to join.
(8 sc and 8 ch-14 arches)
Every chain arch runs from the tip of one petal to the tip of the next. Because each arch is longer than the straight gap between tips, it bows outward and overlaps the petals. That overlap creates the interlocking-circle look.
Round 5: Covered Arches
Sl st into the first ch-14 arch. Ch 1, then work 17 sc in the same arch. Sl st in the next sc (the petal tip), then work 17 sc in the next ch-14 arch. Repeat from * 6 more times. Sl st in the first sc of Round 4 to join.
(136 sc in 8 arches of 17 sc each, plus 8 sl sts at the petal tips)
Fasten off and weave in the ends. Check: 4 in (10.2 cm) across.
The odd count of 17 sc gives each arch a true center stitch, the 9th sc. That is what puts both the hanging loop and the trim exactly on center.
Hanging Loop
Choose any arch as the top arch. Mark its 9th sc (the center).
Holding the RS toward you, join Color A with a sl st in the marked sc. Ch 20 and sl st in the same sc.
Work 28 sc into the ch-20 loop, then sl st into the base sc. (28 sc)
Fasten off and weave in the ends, running the tail back through the base for strength. Check: the loop stands 1.25 in (3.2 cm) above the arch.
Border: Red Scallop Trim (Color B)
The trim only covers the bottom three arches. With 8 arches and the loop on center at the top arch, the arch directly opposite (the 5th arch counting from the top) is the bottom arch. Its neighbors on each side complete the trim zone.
Border gauge: Each scallop is about 0.75 in (1.9 cm) wide across the curved edge. The trim is 0.5 in (1.3 cm) deep. Row 1 contributes 0.125 in (0.3 cm) and Row 2 the remaining 0.375 in (1.0 cm).
Row 1: Base Row
Hold the RS toward you with the loop at the top. Join Color B with a sl st in the 2nd sc of the arch to the right of the bottom arch.
- Ch 1. Sc in the same st and in each of the next 15 sc. (16 sc on the first arch: sc 2–17)
- Skip the sl st at the petal tip. Sc in each of the 17 sc of the bottom arch. (17 sc)
- Skip the next sl st. Sc in each of the first 16 sc of the next arch. (16 sc: sc 1–16)
(49 sc total: 16 + 17 + 16)
Turn.
On the side arches, leaving one sc unworked at the outer end (sc 1 on the first arch, sc 17 on the last) makes the trim symmetrical about the bottom arch’s 9th sc.
Row 2: Scallops
Ch 1 and sc in the first sc. Sk 3 sc, work 7 dc in the next sc, sk 3 sc, sc in the next sc. Repeat from * 5 more times.
(6 scallops: 42 dc + 7 sc = 49 sts)
Fasten off and weave in the ends along the WS of the red band.
Why the Math Works
Each scallop repeat uses exactly 8 sts of Row 1 (3 skipped + 1 dc base + 3 skipped + 1 sc). The opening sc uses 1 st, so 1 + (6 x 8) = 49. That matches the Row 1 count exactly.
The trim has 6 scallops, so the center falls on the sc between the 3rd and 4th scallops. That sc is the 25th st of Row 1. It sits in the 9th sc of the bottom arch (16 + 9 = 25), the exact center of the piece, so the trim hangs balanced with the hanging loop directly above it.
Final Blocking
- Weave in all remaining tails before blocking. Wet yarn holds them in place as it dries.
- Soak the ornament in cool water for 5 minutes. Roll it in a towel to press out the excess water.
- Lay it RS up on a blocking mat. Pin the center ring into a true circle, 1.5 in (3.8 cm) across.
- Pin each of the 8 petal tips evenly around a 3 in (7.6 cm) circle. The grid on the mat helps keep the spacing even.
- Ease every arch outward into a smooth curve until the body measures 4 in (10.2 cm) across.
- Pin the hanging loop straight up, in line with the bottom arch’s center.
- Shape every red scallop with your fingertips, and pin the center of each one if it curls.
- For extra stiffness, brush on diluted fabric stiffener or spray starch at this stage.
- Let it dry completely, usually 6–12 hours, before you unpin it.
Final Quality-Control Checklist
- Center ring is round, 1.5 in (3.8 cm) across, and not twisted
- 8 petals of 16 sc each, all the same size
- 8 arches of 17 sc each, with a sl st at every petal tip
- Body measures 4 in (10.2 cm) across
- Hanging loop is centered on an arch and 1.25 in (3.2 cm) tall
- Red trim has 6 even scallops across exactly 3 arches
- Center of the trim lines up with the hanging loop
- Total height is 5.75 in (14.6 cm)
- All ends are woven in invisibly, and no tails show on the RS
- Ornament hangs straight without tilting
Troubleshooting
Petals or arches look flat instead of round. The sc aren’t packed tightly enough. Push each stitch firmly against the last one along the chain, or go down 0.25 mm in hook size. Keep the counts the same so the trim math still works.
Arches won’t lie flat and they ruffle. The chains are too tight compared with the sc. Rework Round 4 with slightly looser chains.
The ornament tilts when it hangs. The hanging loop is off center. Make sure it sits in the 9th sc of an arch, not at a petal tip.
Trim scallops are uneven or there are 5 instead of 6. Recount Row 1. It must be exactly 49 sc. A miscount usually means you worked into a petal-tip sl st.
Center ring is twisted. Before joining, lay the 16-chain foundation flat on the table with all the chain “v”s facing up, then join.
Care
Hand wash in cool water with mild soap, then reshape and dry flat, re-pinning if needed. Store flat or hanging, away from heavy ornaments that could crush the loops.

Final Notes
The whole design follows one measurement chain. A 1.5 in (3.8 cm) center ring supports a 3 in (7.6 cm) circle of petals. The overlapping arches widen that to a 4 in (10.2 cm) lace body. The 0.5 in (1.3 cm) red trim and the 1.25 in (3.2 cm) hanging loop finish the ornament at 5.75 in (14.6 cm) tall.
If your test ornament hits each checkpoint, every other one you make will match, so a whole tree’s worth will look like a set.
Happy crocheting!