

This butterfly appliqué is small, lacy and a little bit fancy. Four lilac wings with radiating lace “veins” sit around a body made of a column of pearl beads. Two slim pearl-tipped antennae finish the top, and a crisp cream scalloped edge outlines every wing.
The palette is soft lilac with cream trim and white pearls. The same pattern works in dusty blue or sage green with the same cream edge, so a few butterflies in different colors look like a set. Use them as brooches, hair-clip toppers, gift-wrap ties, or appliqués on a cardigan or bag.
This pattern uses US crochet terms. The finished butterfly is about 4 in (10.2 cm) wide and 3.25 in (8.3 cm) tall, not counting the antennae.
Construction is simple. You crochet two upper wings and two lower wings as small fans, working in rows from a ring. Each wing gets a solid edge round, then two rounds of cream border. Last, you overlap and stitch the wing points together at the center and sew the pearl body and antennae on top.
Finished Size and Construction
- Finished size: 4 in (10.2 cm) wide x 3.25 in (8.3 cm) tall, not counting the antennae
- Skill level: Intermediate (fine thread, small pieces, working into row ends)
- Terminology: US crochet terms
- Yarn weight: Size 3 mercerized cotton crochet thread (CYC #1 Super Fine)
- Hook: 2.0 mm
- Number of pieces: 4 wings (2 upper, 2 lower) plus a beaded body and wire antennae
- Layout: Upper wings side by side at the top, lower wings below, all four points meeting under the pearl body
- Upper wing size before border: 1.75 in (4.4 cm) tall x 1.5 in (3.8 cm) wide
- Upper wing size after border: 2.25 in (5.7 cm) tall x 2 in (5.1 cm) wide
- Lower wing size before border: 1.25 in (3.2 cm) across
- Lower wing size after border: 1.75 in (4.4 cm) across
- Border depth: about 0.25 in (0.6 cm) on each edge
Materials
Choose a smooth, mercerized cotton thread. The sheen makes the lace veins stand out, and the twist holds the small scallops firmly. Avoid fuzzy or very soft yarns, because they blur the openwork.
- Color A, Lilac (wings): 5 g, about 20 m
- Color B, Cream (border): 3 g, about 12 m
These quantities include a margin for swatching and sewing tails.
Tools and notions:
– 2.0 mm crochet hook
– Tapestry needle and a fine beading needle
– 1 white pearl bead, 8 mm (head)
– 5 white pearl beads, 6 mm (body)
– 2 white pearl beads, 4 mm (antenna tips)
– 6 in (15.2 cm) of 26-gauge craft wire
– Small amount of clear fabric glue (optional)
– Rustproof pins, a blocking mat and a spray bottle
– Scissors and a ruler
Abbreviations (US Terms)
- ch – chain
- sl st – slip stitch
- sc – single crochet
- hdc – half double crochet
- dc – double crochet
- tr – treble crochet
- sp(s) – space(s)
- st(s) – stitch(es)
- RS / WS – right side / wrong side
- rep – repeat
Special stitch: Scallop – (hdc, dc, hdc) all in the same stitch.
Gauge and Checkpoints
Gauge: 8 sc = 1 in (2.5 cm) with Color A and a 2.0 mm hook.
For a piece this small, gauge is about keeping the wings in proportion. Make one lower wing first, block it lightly, and measure it before you go on.
Checkpoints:
– Lower wing after Row 3: about 1.25 in (3.2 cm) across the curve
– Upper wing after Row 4: about 1.5 in (3.8 cm) wide and 1.75 in (4.4 cm) from the point to the top of the curve
– Any wing after the border: about 0.5 in (1.3 cm) bigger in each direction than before the border
If your wing is too big, switch to a 1.75 mm hook, or tighten the chain spaces. If it is too small, switch to a 2.25 mm hook. If the outer curve ruffles, your sc band is too loose for your tr rows, so go down a hook size for the sc rows only. If the curve cups, use a slightly looser tension on the sc band.
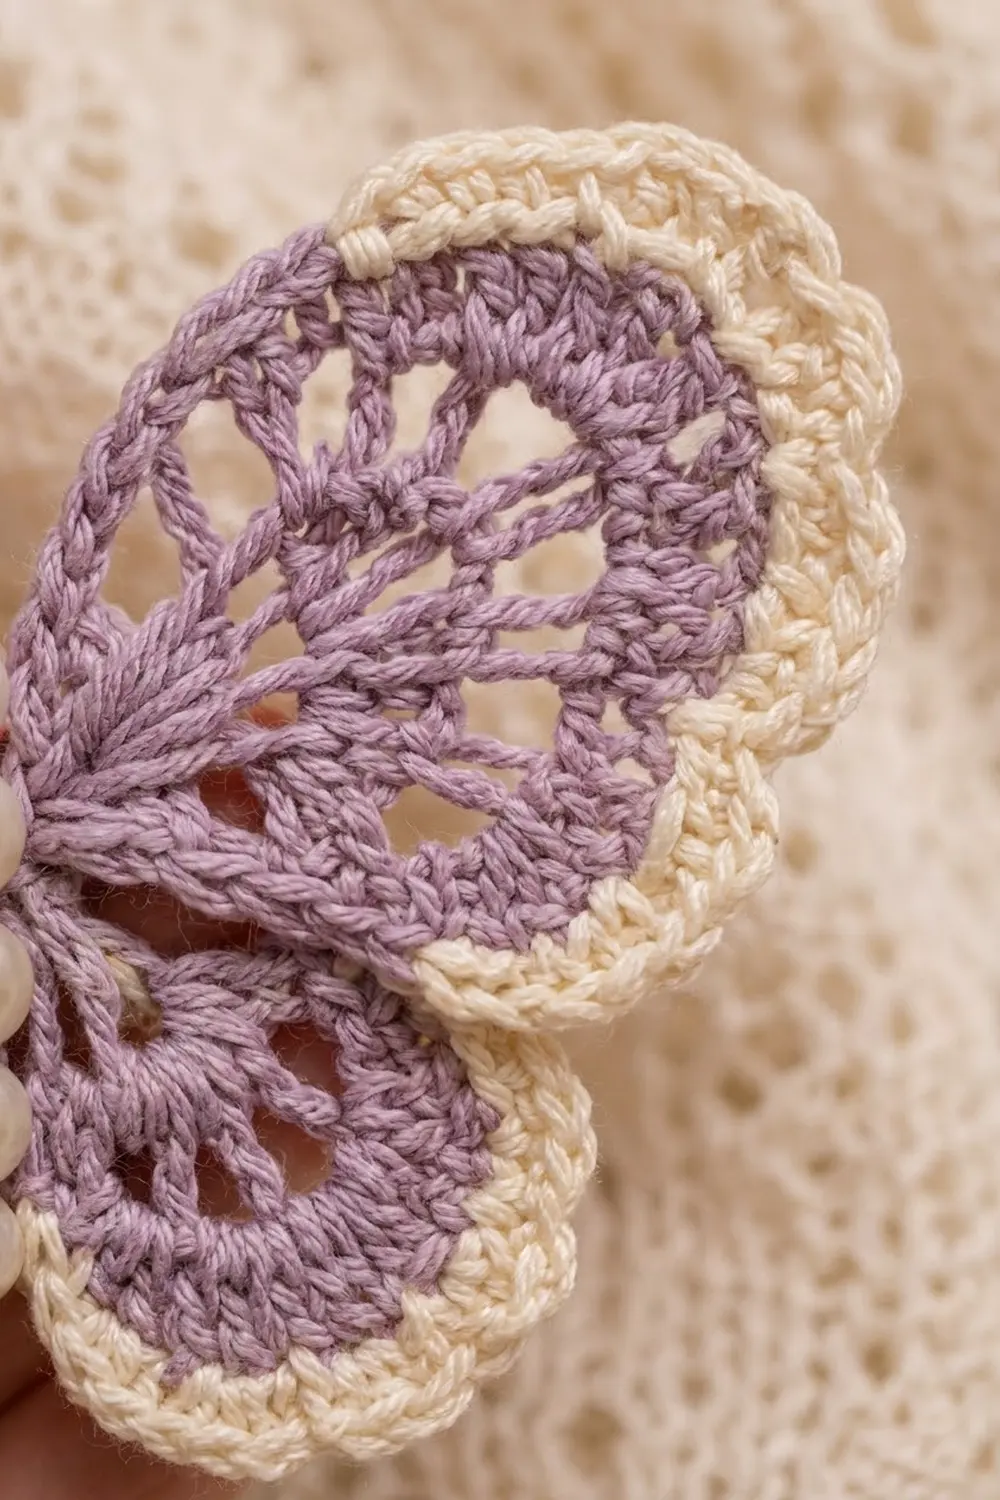
Upper Wing (Make 2)
With Color A, ch 5 and join with a sl st in the first ch to form a ring. Leave an 8 in (20.3 cm) tail for sewing.
Row 1 (RS): Ch 4 (counts as tr here and throughout), 12 tr in ring. Turn. (13 tr)
The ring fills only partly. The open part becomes the wing’s narrow point at the body.
Row 2 (WS): Ch 5 (counts as tr + ch 1), tr in next tr, ch 1, tr in next tr; rep from * across, ending with tr in the top of the turning ch. Turn. (13 tr, 12 ch-1 sps)*
Row 3: Ch 1, sc in first tr, ch 3, skip ch-1 sp, sc in next tr; rep from * across. Turn. (13 sc, 12 ch-3 sps)*
Rows 1 to 3 form the radiating veins: tall stitches with open spaces between them, fanning out from the point.
Row 4: Ch 1, sc in first sc, [3 sc in next ch-3 sp] 12 times, sc in last sc. Turn. (1 + 36 + 1 = 38 sc)
This solid band closes the outer curve of the wing.
Round 5 (edge, RS): Now you work around the whole wing, so do not turn at the end of this round.
1. Ch 1, then sc in each of the 38 sc across the curve.
2. Work 9 sc down the first straight side: 1 sc in the end of Row 4, 1 in Row 3, 3 in Row 2 and 4 in Row 1.
3. Work 1 sc in the ring at the point.
4. Work 9 sc up the second side: 4 in Row 1, 3 in Row 2, 1 in Row 3 and 1 in Row 4.
5. Join with a sl st to the first sc.
(38 + 9 + 1 + 9 = 57 sc)
Fasten off Color A. Pull the starting tail to close the ring firmly at the point.
Checkpoint: 1.75 in (4.4 cm) tall x 1.5 in (3.8 cm) wide.
Lower Wing (Make 2)
With Color A, ch 4 and join with a sl st to form a ring. Leave an 8 in (20.3 cm) tail.
Row 1 (RS): Ch 3 (counts as dc), 8 dc in ring. Turn. (9 dc)
Row 2 (WS): Ch 1, sc in first dc, ch 3, sc in next dc; rep from * 7 more times. Turn. (9 sc, 8 ch-3 sps)*
Row 3: Ch 1, sc in first sc, [3 sc in next ch-3 sp] 8 times, sc in last sc. Turn. (1 + 24 + 1 = 26 sc)
Round 4 (edge, RS): Do not turn at the end of this round.
1. Ch 1, then sc in each of the 26 sc across the curve.
2. Work 6 sc down the first side: 1 sc in the end of Row 3, 1 in Row 2 and 4 in Row 1.
3. Work 1 sc in the ring at the point.
4. Work 6 sc up the second side: 4 in Row 1, 1 in Row 2 and 1 in Row 3.
5. Join with a sl st to the first sc.
(26 + 6 + 1 + 6 = 39 sc)
Fasten off Color A and close the ring.
Checkpoint: about 1.25 in (3.2 cm) across. Because the fan wraps more than halfway around the ring, the lower wing comes out rounder than the upper wing, as it should.
Make All Pieces
| Piece | Quantity | Color A | Color B |
|---|---|---|---|
| Upper wing | 2 | Rows 1–4 + edge round | Border Rounds 1–2 |
| Lower wing | 2 | Rows 1–3 + edge round | Border Rounds 1–2 |
Layout (seen from the front):
[ Upper L ] [ body ] [ Upper R ]
[ Lower L ] [ body ] [ Lower R ]
Each wing’s point faces the center line. For the left wings, flip the piece over so the WS faces front. Then each pair is a true mirror image, and the lace runs symmetrically on both sides.
Joining
Work the border on all four wings before you join them (see Border below). Joining happens at the points only. The outer edges stay free so the butterfly keeps its shape.
Method:
1. Lay the two upper wings with their points touching at the center line, outer curves angled up and out.
2. Tuck the point of each lower wing 0.25 in (0.6 cm) under the bottom edge of the upper wing on the same side, with the lower points also meeting at the center.
3. With a Color A tail and a tapestry needle, whipstitch the two upper wings together through the 3 border stitches at each tip, working stitch to stitch: tip stitch to tip stitch, and the stitches on either side to each other.
4. Join the two lower wings the same way, 3 stitches to 3 stitches.
5. Tack each lower wing to the back of its upper wing with 2 or 3 small stitches through the overlap.
Tension: Pull each stitch snug but not tight. Tight sewing puckers the points and flattens the scallops. All of these stitches will be hidden under the beaded body.
Size checkpoint: 4 in (10.2 cm) wide x 3.25 in (8.3 cm) tall.
Border
Work this border on every wing before joining.
Border gauge: the two rounds add about 0.25 in (0.6 cm) all around, so each wing grows by about 0.5 in (1.3 cm) in width and height.
With RS facing, join Color B with a sl st in any sc along the outer curve.
Upper wing
Border Round 1: Ch 1, sc in each st around, sl st to first sc. (57 sc, worked 1 into each existing stitch with nothing added)
This round makes the smooth cream band just inside the scallops.
Border Round 2: Ch 1, sc in next 2 sts, Scallop in next st; rep from * 18 more times, sl st to first sc. (19 repeats; 57 sts worked into + 38 extra stitches from the scallops = 95 sts)*
Lower wing
Border Round 1: Ch 1, sc in each st around, sl st to first sc. (39 sc, 1 per existing stitch)
Border Round 2: Ch 1, sc in next 2 sts, Scallop in next st; rep from * 12 more times, sl st to first sc. (13 repeats; 39 sts worked into + 26 extra = 65 sts)*
Fasten off and weave in the Color B ends.
Why the math works: The scallop repeat uses 3 stitches. The edge rounds were planned to be exact multiples of 3: 57 = 19 × 3 and 39 = 13 × 3. So the repeat ends cleanly with no leftover or squeezed stitches. Each Scallop adds 2 stitches (3 made from 1 used), and that small flare lets the border lie flat around the curves. Border Round 1 stays at a 1:1 count, which keeps the edge firm and stops the scallops from stretching the lace.
Body and Antennae
- Antennae: Fold the 6 in (15.2 cm) wire in half to form a narrow V. Starting at the fold, wrap the wire closely with Color A, adding a dot of glue at each end. Leave 0.125 in (0.3 cm) of bare wire at each tip, slide on a 4 mm pearl, and curl the wire end back to hold it. Each finished antenna is about 1.25 in (3.2 cm) long.
- Head: Hold the fold of the V just above the point where the upper wings meet. Sew the 8 mm pearl over the fold so it holds the antennae in place.
- Body: Sew the five 6 mm pearls one at a time in a straight line down the center, passing the needle through all the layers. The body column should cover every joining stitch.
- Knot the thread on the back and weave the tail into the Color A stitches.
Final Blocking
- Before adding the beads, spray the joined wings until they are damp but not soaking wet.
- Pin them face up on the blocking mat at 4 in (10.2 cm) x 3.25 in (8.3 cm).
- Pin out each Scallop tip, with one pin per scallop on the outer curves.
- Gently open the chain spaces with a pin tip so the veins look even.
- Leave to dry completely, then unpin.
- For a crisper appliqué, mist lightly with fabric stiffener before the final drying.
- Add the body and antennae once the butterfly is dry.
Final Quality-Control Checklist
- Upper wings measure 2.25 in (5.7 cm) x 2 in (5.1 cm) each.
- Lower wings measure 1.75 in (4.4 cm) across.
- Upper border has 19 scallops and lower border has 13, with no doubled or missing repeats.
- The wings mirror each other left to right.
- The rings are pulled closed at the points.
- No joining stitches show around the pearl body.
- The antennae are symmetrical and the pearls are secure.
- The butterfly is 4 in (10.2 cm) wide and 3.25 in (8.3 cm) tall.
- All ends are woven in and invisible from the front.
Troubleshooting
- The fan won’t lie flat: Your Row 1 stitches are crowding the ring. Make the starting ring with a looser chain.
- Uneven veins: Keep your chain-1 and chain-3 spaces the same size. Count your chains in every repeat.
- Scallops don’t end evenly: Recount the edge round. It must be 57 (upper) or 39 (lower) before you start the border.
- Gap at the point: Pull the starting tail firmly, then add one tacking stitch.
- Wings droop when worn: Use fabric stiffener, or sew a small felt backing behind the center.
- Antennae splay unevenly: Rebend them at the fold before sewing the head bead.
Care
Spot clean or gently hand wash in cool water. Press out the water in a towel, then reshape and dry flat. Do not soak pieces that have glue in them.
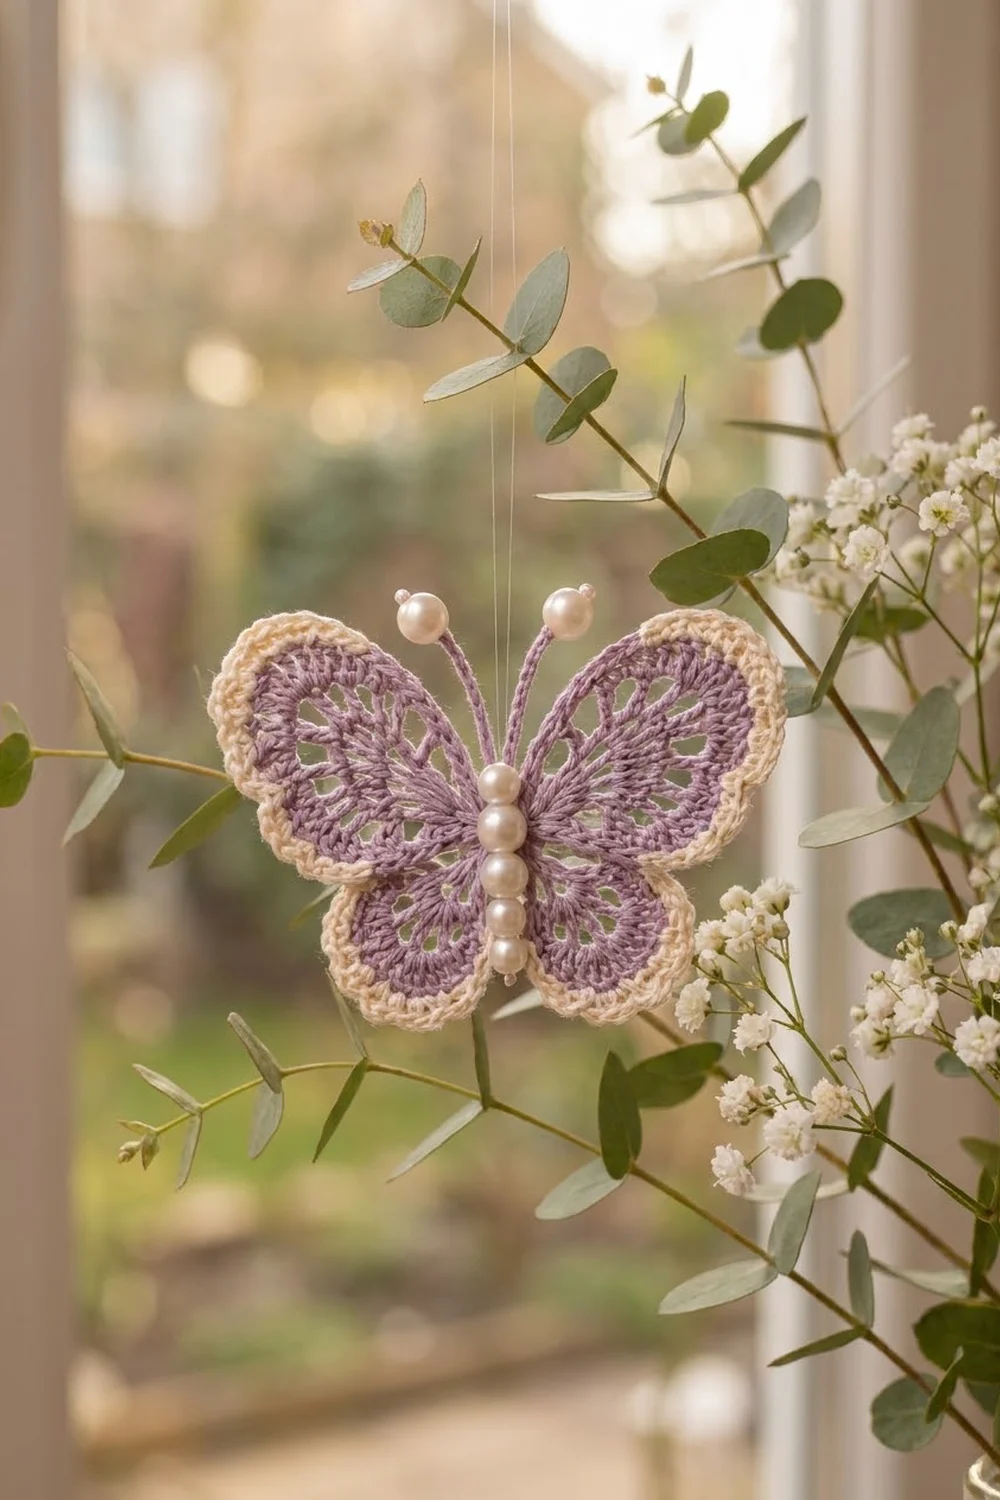
Final Notes
The measurement chain for this pattern is short:
– Upper wing: 1.75 in (4.4 cm) x 1.5 in (3.8 cm) after 57 edge stitches, then 2.25 in (5.7 cm) x 2 in (5.1 cm) after the border.
– Lower wing: 1.25 in (3.2 cm) after 39 edge stitches, then 1.75 in (4.4 cm) after the border.
– Joined butterfly: 4 in (10.2 cm) x 3.25 in (8.3 cm).
Check your measurements at each step and the finished butterfly will come out the right size. Make one in lilac, then try blue and green for a whole flutter.
Happy crocheting!