

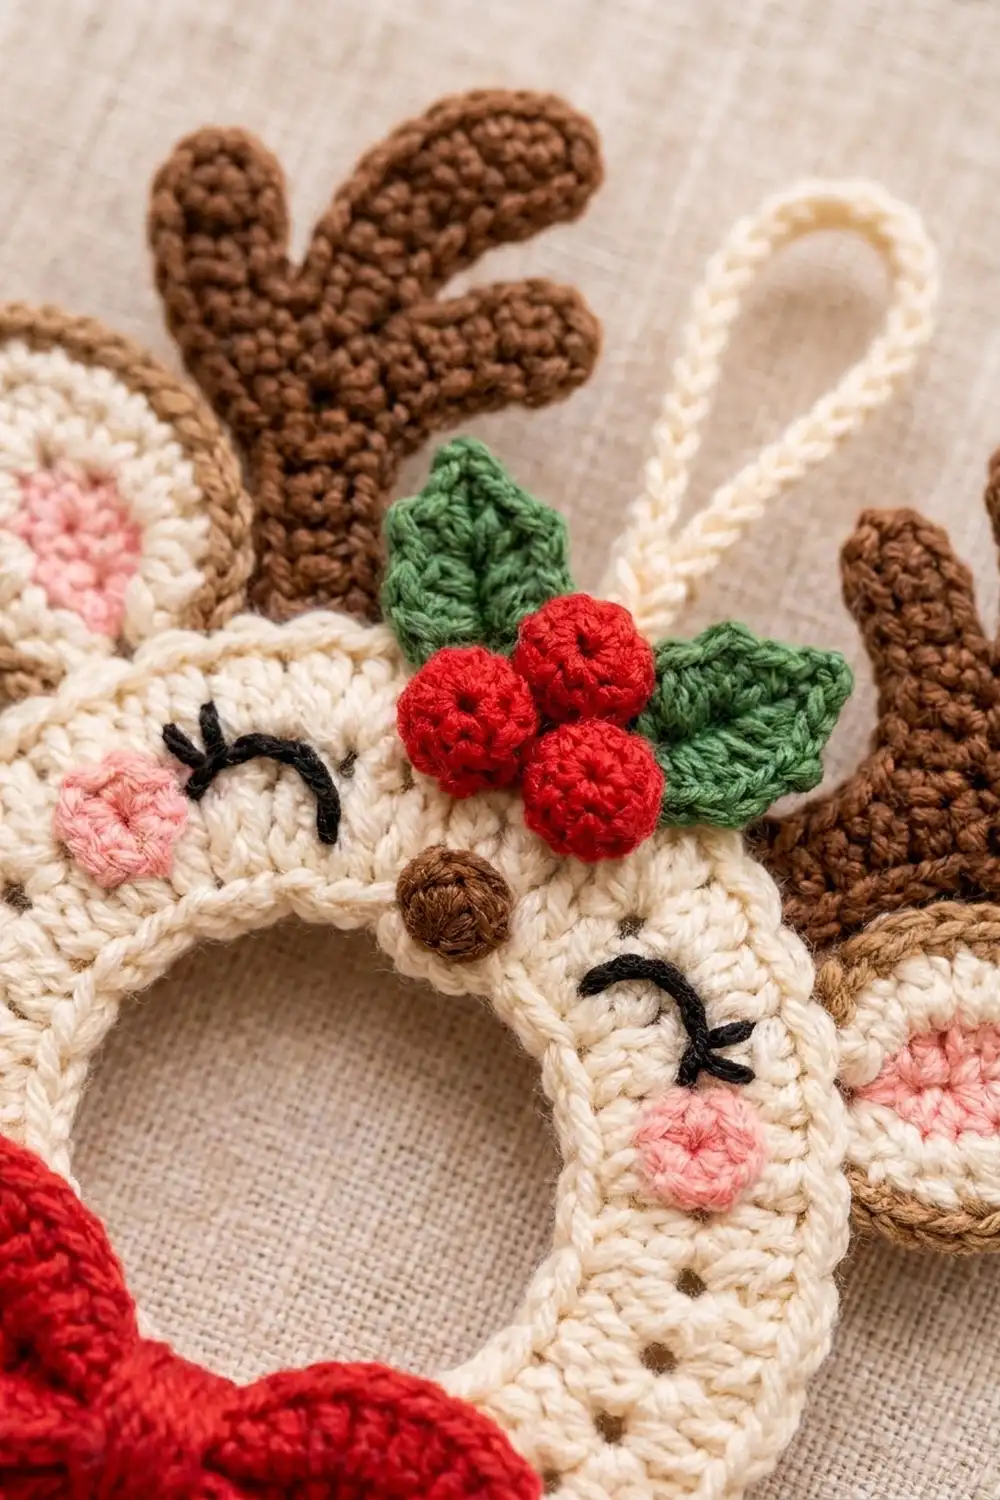
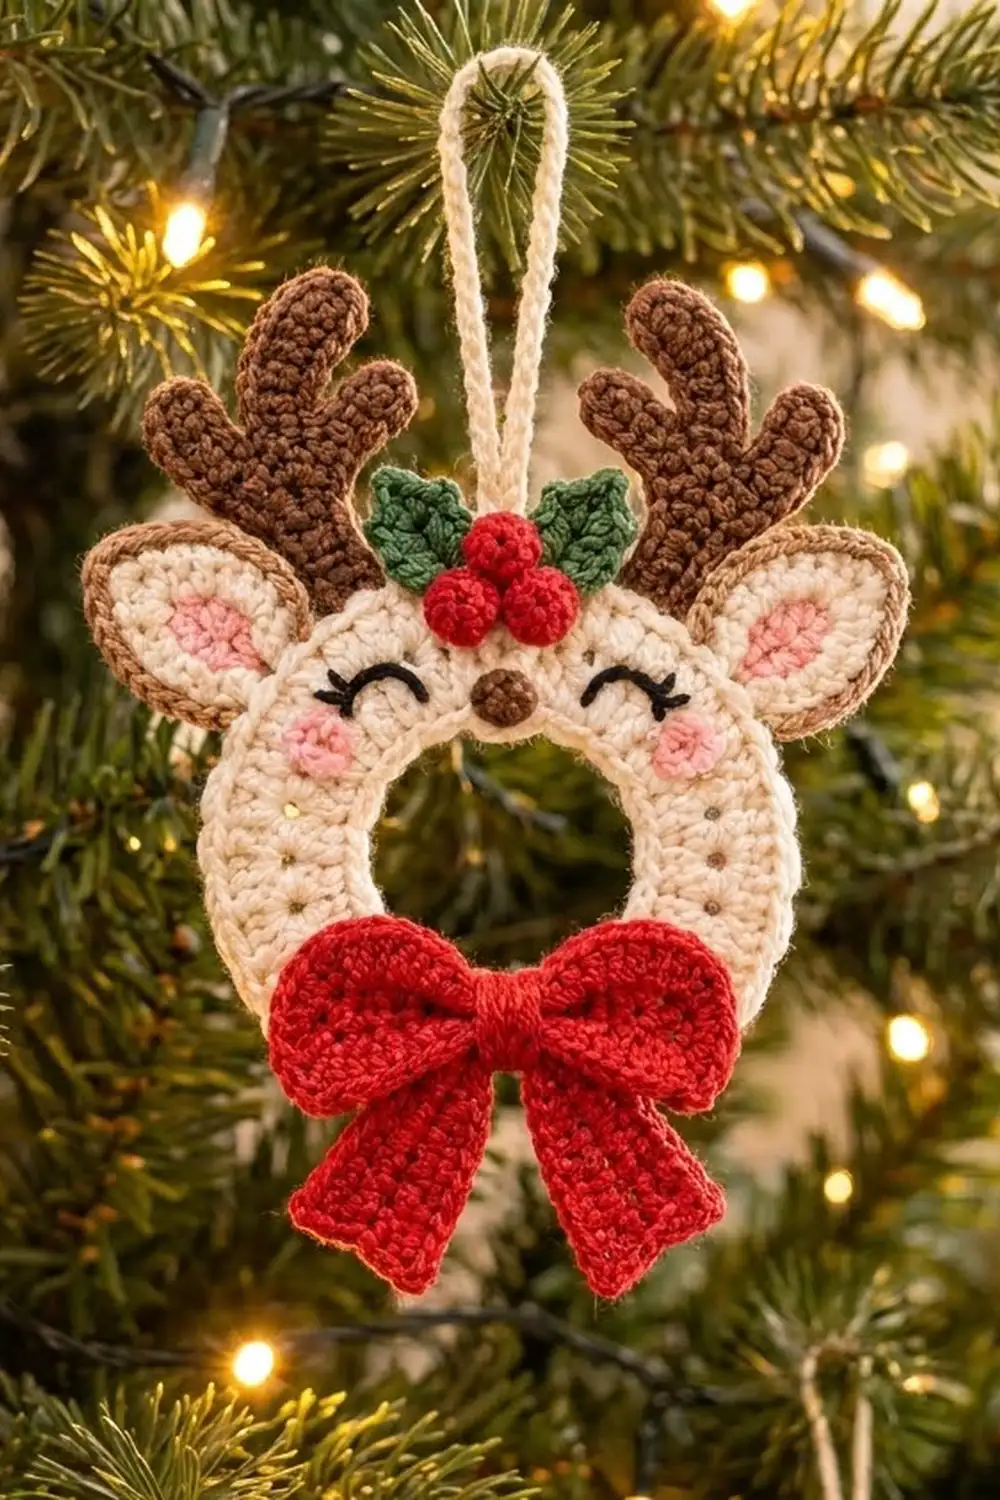
This little reindeer is a single wreath-style ornament. It’s a cream crochet ring with two rings of eyelets, brown antlers, soft ears and a sprig of holly at the top, and a bright red bow at the bottom. The face is embroidered right onto the ring, with sleepy closed eyes, a tiny brown nose and pink cheeks.
The colors are classic Christmas:
– cream for the ring and hanging loop
– chocolate brown for the antlers, ear edges and nose
– cherry red for the bow and berries
– holly green for the leaves
– small amounts of pink and black for the face
The style is cozy and cute, and the crisp stitches suit mercerized cotton.
This pattern uses US crochet terms. The finished ring measures 4 in (10.2 cm) across. With the antlers, ears and bow attached, the whole ornament is about 5.5 in (14.0 cm) wide and 6 in (15.2 cm) tall. That doesn’t include the 2 in (5.1 cm) hanging loop.
Construction is simple. You work the ring in the round from a chain foundation and add a two-round edging. Then you make the small appliqué parts flat and sew them on. The face is embroidered last.
Finished Size and Construction
- Finished ring size: 4 in (10.2 cm) outer diameter; center hole about 1.25 in (3.2 cm)
- Full ornament: about 5.5 in (14.0 cm) wide x 6 in (15.2 cm) tall, plus a 2 in (5.1 cm) loop
- Skill level: Easy to Intermediate
- Terminology: US crochet terms
- Yarn weight: Sport (CYC 2), cotton
- Hook: 3.0 mm (US C/2 or D/3)
- Number of pieces: 1 ornament: 1 ring plus sewn-on appliqués (2 antlers, 2 ears, 2 leaves, 3 berries, bow, hanging loop)
- Layout: single ring, antlers and ears at the top, bow centered at the bottom
- Ring size before border: 3.5 in (8.9 cm) after Rnd 4
- Border depth: about 0.25 in (0.6 cm) per side, 2 rounds
Materials
Choose a smooth sport-weight cotton or cotton blend, about 150 m per 50 g. Mercerized cotton gives the crisp eyelets and sharp antler tips seen here. Avoid fuzzy or very stretchy yarns, because the ring needs to stay flat.
Yarn:
– Cream (ring, border, loop): 15 g, about 45 m
– Red (bow, berries): 8 g, about 24 m
– Brown (antlers, ear edging, nose): 6 g, about 18 m
– Green (holly leaves): 2 g, about 6 m
– Pink (inner ears, cheeks): 1 g, about 3 m
– Black (eyes): 1 g, about 3 m
These amounts include about 20 percent extra for testing gauge and for sewing tails.
Tools:
– 3.0 mm crochet hook
– Tapestry needle
– Stitch marker
– Scissors
– Blocking mat, rust-proof pins and a spray bottle
– Small amount of fiberfill or yarn scraps (optional, for berries)
Abbreviations (US Terms)
- ch – chain
- sl st – slip stitch
- sc – single crochet
- hdc – half double crochet
- dc – double crochet
- sc2tog – single crochet 2 together
- MR – magic ring
- sp – space
- st(s) – stitch(es)
- rep – repeat
- rev sc – reverse single crochet
Special stitch – reverse single crochet (rev sc): If you’re right-handed, work from left to right. Insert the hook into the next stitch to the right, yarn over and pull up a loop. Yarn over again and pull through both loops. This makes a twisted, corded edge.
Gauge and Checkpoints
Gauge: 24 sc and 22 rows = 4 in (10.2 cm) in rows of sc. That is 6 sc per inch (2.5 cm).
Gauge matters more than usual here. Each round’s stitch count is set to fit its circumference so the ring lies flat. You don’t need a separate swatch: make the ring first and check it against these measurements, laid flat without stretching:
- After Rnd 1: 1.6 in (4.1 cm) across
- After Rnd 2: 2.4 in (6.1 cm) across
- After Rnd 3: 2.75 in (7.0 cm) across
- After Rnd 4: 3.5 in (8.9 cm) across
- After Rnd 6 (border): 4 in (10.2 cm) across
If your ring is too big by more than 0.25 in (0.6 cm) after Rnd 2, change to a 2.75 mm hook.
If it is too small or starts to cup, change to a 3.25 mm hook.
If the ring ripples, change hook size rather than removing stitches, so the stitch counts below stay correct.
The Ring
Use cream. Join each round with a sl st to the first stitch (or the top of the starting ch-3). Do not turn.
Foundation: Ch 24. Without twisting the chain, sl st to the first ch to form a ring.
Rnd 1: Ch 1 (does not count as a st), sc in next 3 ch, 2 sc in next ch; rep from * 6 times total. Join. (30 sc)*
Each repeat uses 4 chains, so 6 repeats use all 24 chains.
Rnd 2 (eyelet round): Ch 3 (counts as first dc), dc in next st, ch 1, dc in next 2 sts, ch 1; rep from * around. Join to top of ch-3. (45 sts: 30 dc and 15 ch-1 sps)*
This makes the inner ring of 15 eyelets.
Rnd 3 (conversion round): Ch 1, sc in each of next 8 sts (count each dc and each ch-1 sp as one st), 2 sc in next st; rep from * 5 times total. Join. (50 sc = 45 worked 1 per existing st + 5 extra)*
Each repeat covers 9 stitches, and 5 repeats cover all 45.
Rnd 4 (eyelet round): Ch 3 (counts as first dc), dc in next st, ch 1, dc in next 2 sts, ch 1; rep from * around. Join to top of ch-3. (75 sts: 50 dc and 25 ch-1 sps)*
This makes the outer ring of 25 eyelets. Checkpoint: the ring should now measure 3.5 in (8.9 cm) across.
Do not fasten off. Continue to the border.
Border
Border gauge: 6 sc per inch (2.5 cm), the same as the main gauge.
Rnd 5: Ch 1, sc in each dc and sc in each ch-1 sp around. Join. (75 sc = 75 worked 1 per existing st + 0 extra)
Rnd 6: Ch 1, rev sc in each st around. Join. (75 rev sc)
Fasten off and weave in ends.
Why the math works: Before blocking, the finished outer edge is about 3.9 in (9.9 cm) across. Its circumference is about 3.14 x 3.9 = 12.25 in (31.1 cm). At 6 sts per inch, that edge needs about 73 to 74 stitches. Rnd 5 has 75, which leaves just enough room for the rev sc round to stay flat instead of pulling the ring into a bowl. Rev sc goes one stitch into each stitch, so the count stays at 75. Blocking opens the ring to the full 4 in (10.2 cm).
Antlers (make 2)
Use brown. Each antler is worked along both sides of one foundation chain. Short chain branches make the tines.
Branch: Ch 5, sl st in 2nd ch from hook, sc in next 3 ch. You are now back at the main beam.
Ch 12.
Side 1: Sl st in 2nd ch from hook (tip), sc in next 3 ch, work Branch, sc in next 3 ch, work Branch, hdc in next 4 ch. (11 sts along the beam, plus 2 branches)
That is 1 sl st + 3 sc + 3 sc + 4 hdc = 11, one for each of the 11 chains after the skipped one.
Side 2: Ch 1, rotate, and work into the free loops of the foundation chain: sc in next 5 loops, work Branch, sc in next 5 loops, sl st in last loop at the tip. (11 sts plus 1 branch)
Fasten off, leaving a 10 in (25.4 cm) tail. Each antler is about 2 in (5.1 cm) tall with three tines. Pin it flat and steam lightly so the tines point outward.
Ears (make 2)
Rnd 1 (cream): Ch 6. Sc in 2nd ch from hook, hdc in next ch, dc in next ch, hdc in next ch, 3 sc in last ch (tip). Working in free loops on the other side: hdc in next ch, dc in next ch, hdc in next ch, sc in last ch. (11 sts) Fasten off cream.
Rnd 2 (brown edging): Join brown in the first sc. Sc in next 5 sts, 3 sc in center sc of the tip, sc in next 5 sts. Do not join; leave the base open. (13 sc = 11 worked 1 per existing st + 2 extra)
Fasten off, leaving a sewing tail. Each ear is about 1.25 in (3.2 cm) long.
Inner ear: With pink, work 4 to 5 vertical satin stitches over the center dc and hdc stitches to make a soft oval.
Holly Leaves (make 2)
Use green. Ch 7.
Rnd 1: Sc in 2nd ch from hook, hdc in next ch, dc in next 2 ch, hdc in next ch, (sc, ch 2, sc) in last ch for the tip. Working in free loops: hdc in next ch, dc in next 2 ch, hdc in next ch, sc in last ch. Sl st to first sc. (12 sts plus ch-2 tip)
Fasten off, leaving a tail. Each leaf is about 1 in (2.5 cm) long.
Berries (make 3)
Use red.
Rnd 1: 6 sc in MR. Pull closed. (6 sc)
Rnd 2: Sc2tog 3 times. (3 sts)
Tuck the yarn tails (or a pinch of fiberfill) inside. Cut the yarn, leaving a tail, and cinch closed. Each berry is about 0.5 in (1.3 cm) across.
Bow
Use red. The bow has three parts: a loop piece, two tails and a center band.
Loop piece: Ch 40.
– Row 1: Sc in 2nd ch from hook and in each ch across. Turn. (39 sc)
– Rows 2–7: Ch 1, sc in each st across. Turn. (39 sc)
Fasten off, leaving a 12 in (30.5 cm) tail. Sew the short ends together to make a tube, then flatten it with the seam at the center back. The strip is 6.5 in (16.5 cm) long (39 sts ÷ 6 per inch). Folded in half, it is about 3.25 in (8.3 cm) wide and 1.25 in (3.2 cm) tall.
Tails (make 2): Ch 6.
– Row 1: Sc in 2nd ch from hook and in each ch across. Turn. (5 sc)
– Rows 2–9: Ch 1, sc in each st across. Turn. (5 sc)
– Row 10 (slant): Sl st in first st, sc in next st, hdc in next st, dc in last 2 sts. (5 sts)
Fasten off. Each tail is about 1.75 in (4.4 cm) long and 0.85 in (2.2 cm) wide. Flip the second tail over before sewing so the slants mirror each other.
Center band: Ch 9.
– Row 1: Sc in 2nd ch from hook and in each ch across. Turn. (8 sc)
– Rows 2–3: Ch 1, sc in each st across. Turn. (8 sc)
Assembly: Run a strand of red through the center of the loop piece and pull tight to pinch it. Lay the tails behind it, angled outward. Wrap the center band around the pinch and the tails, and sew its short ends together at the back.
Assembly and Face
Lay the ring flat, right side up. Turn it so the yarn join is at the bottom, where the bow will hide it.
- Antlers: Sew them to the back of the ring at about 11 and 1 o’clock, so 1.5 in (3.8 cm) of each antler rises above the edge.
- Ears: Sew them to the front at about 10 and 2 o’clock, overlapping the antler bases, with the tips pointing outward.
- Holly: Sew the 2 leaves at top center in a shallow V. Sew the 3 berries in a cluster where the leaves meet.
- Face:
- Eyes: With black, backstitch two curved closed eyes over Rnds 3–4, about 0.75 in (1.9 cm) apart. Add 2 short lashes to each.
- Nose: With brown, make 3 stacked French knots on Rnd 3, just below top center.
- Cheeks: With pink, satin-stitch round cheeks below and outside each eye.
- Bow: Sew it to the bottom center, covering Rnds 3–6.
- Loop: With cream, ch 24 (about 4 in, 10.2 cm). Fold it in half and sew both ends to the back at top center to make a 2 in (5.1 cm) loop.
Final Blocking
- Weave in all remaining ends on the back.
- Pin the ring to a blocking mat, right side up, at 8 evenly spaced points.
- Ease it into a true circle 4 in (10.2 cm) across, keeping the center hole round at 1.25 in (3.2 cm).
- Spray with water until damp, not soaked.
- Shape the antler tines, ear tips and bow loops with your fingers.
- Let it dry completely, at least 4 hours, before unpinning.
If you prefer, block the plain ring before sewing on the appliqués. Then just mist and reshape after assembly.
Final Quality-Control Checklist
- Ring is 4 in (10.2 cm) across and lies flat
- 15 inner eyelets and 25 outer eyelets are evenly spaced
- Border has 75 sts with a neat corded edge
- Antlers match, each with 3 tines
- Ears mirror each other, with brown edging and pink centers
- Eyes are level and the nose is centered
- Bow is centered and hides the round joins
- Loop is secure and the ornament hangs straight
- All ends are woven in on the back
Troubleshooting
Ring cups into a bowl: Your stitches are too short or tight. Go up a hook size, and check that Rnd 3 has 50 sts and Rnd 4 has 75.
Ring ruffles: You may have extra stitches. Recount Rnds 3 and 4, or go down a hook size.
Eyelets uneven: Keep each ch-1 the same size by pulling it snug against the hook.
Antlers curl: Steam-block them flat and pin each tine.
Ornament tilts when hung: Move the loop slightly toward the heavier side until it hangs level.
Join seam visible: Turn the ring so the seam sits under the bow.
Care
Spot clean or hand wash gently in cool water, then reshape and dry flat. Store it flat or hanging, away from heavy objects that could crush the antlers.
Final Notes
The whole ornament depends on one measurement chain. At 6 sc per inch, you start with a 24-chain foundation, then work 30 sc in Rnd 1, 45 sts in Rnd 2, 50 sc in Rnd 3 and 75 sts in Rnd 4. That gives a 3.5 in (8.9 cm) ring, and the 75-stitch border brings it to 4 in (10.2 cm). Check each stage as you go, and the antlers, ears and bow will line up as planned.
Happy crocheting!