

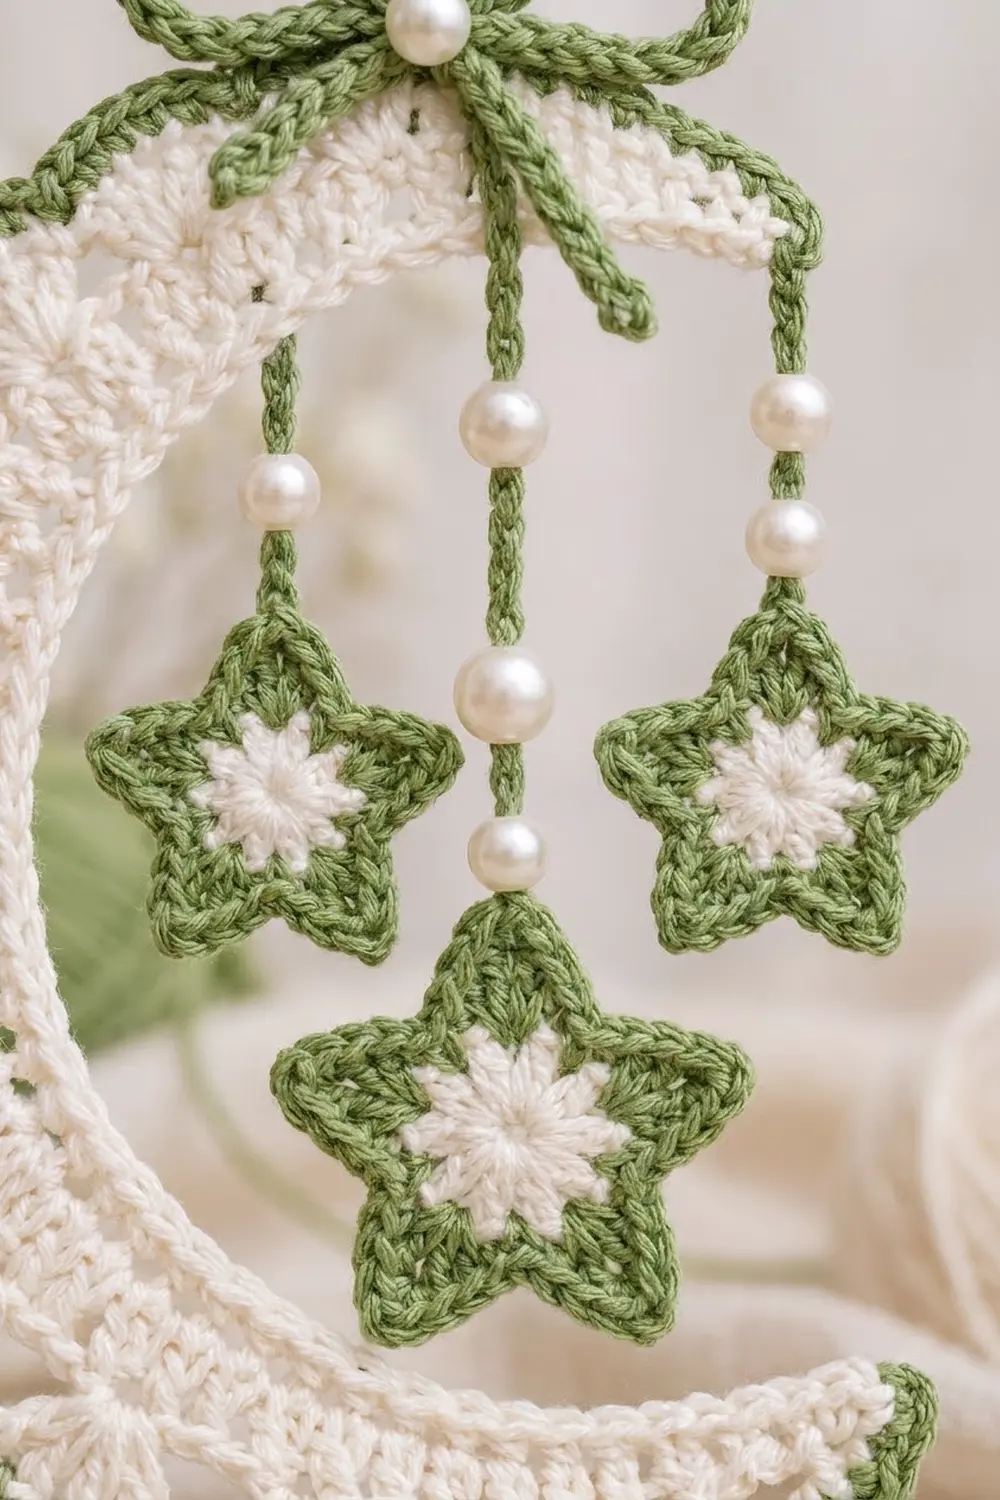
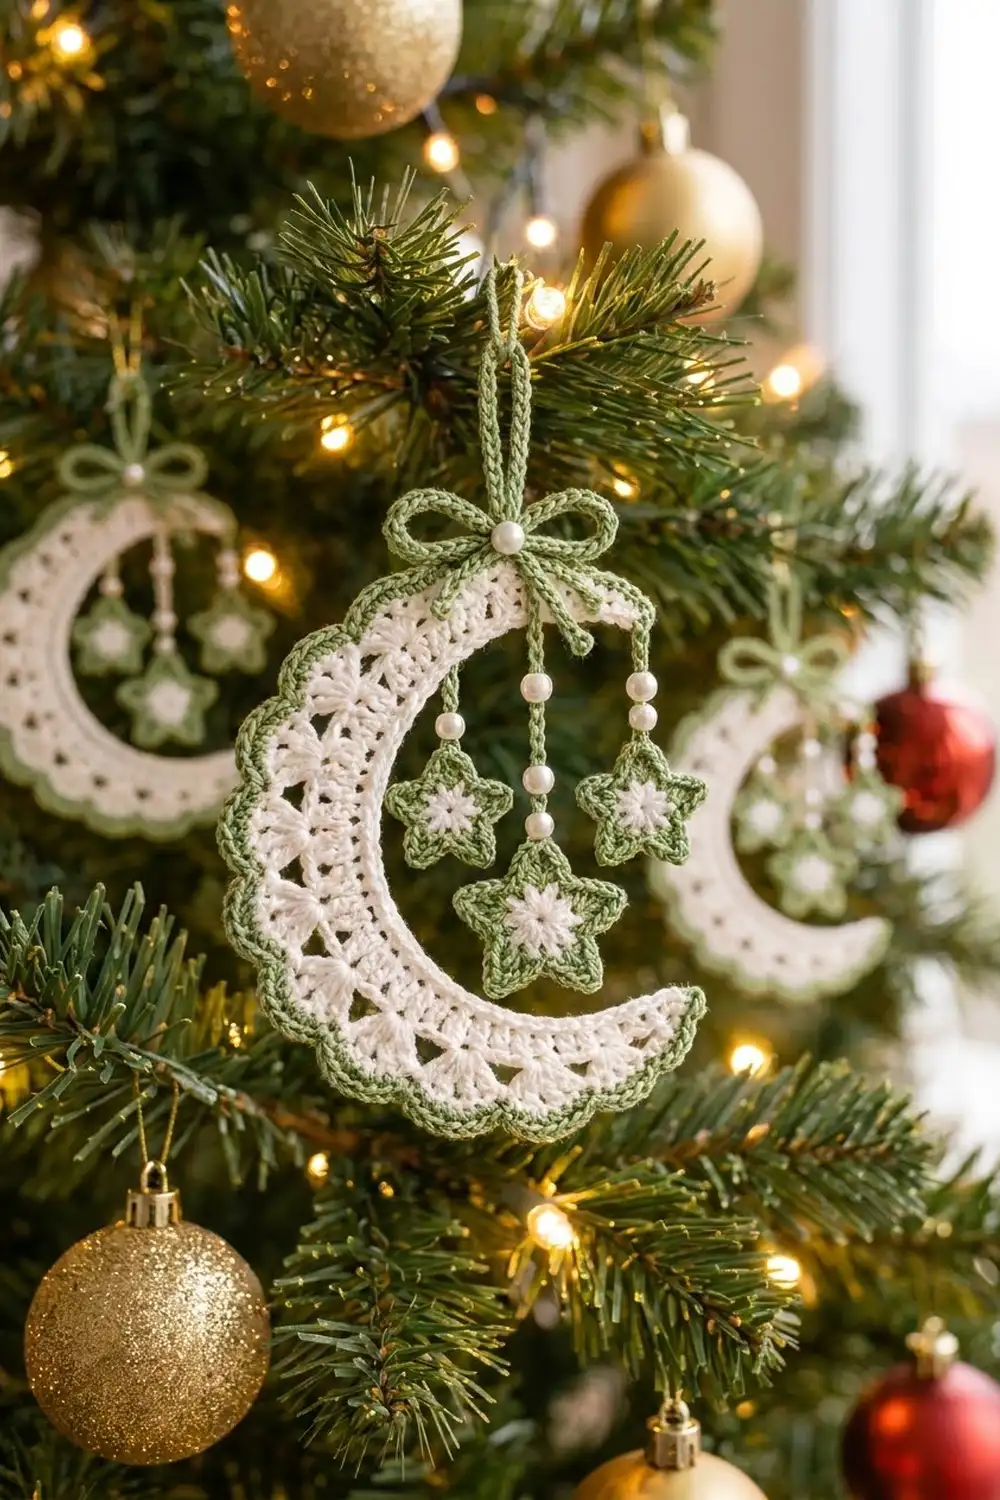
The Sage Starlight Moon is a lacy crescent ornament in soft cream with a sage-green scalloped edge. Three small green stars hang inside the curve on beaded chain strands, and a little green bow with a pearl center sits at the top.
The style is vintage and delicate, but it’s quick to make. Two colors of fingering-weight cotton give crisp stitch definition, and the pearls add a little shine when the tree lights are on.
This pattern uses US crochet terms. The finished moon measures 4.75 in (12.1 cm) tall and 3.5 in (8.9 cm) wide. With the hanging loop, the ornament is about 6 in (15.2 cm) long.
You work the moon flat in five rows, starting from a straight chain that becomes the inner curve. Increases in the dc rows make the band curve into a crescent, and short stitches at each end keep the horns pointed. A two-round green border adds the outline and scallops. Then you make three stars, chain the beaded strands, and add a bow and loop.
Finished Size and Construction
- Finished moon size: 4.75 in (12.1 cm) tall × 3.5 in (8.9 cm) wide
- Total length with loop: about 6 in (15.2 cm)
- Skill level: Easy-intermediate
- Terminology: US
- Yarn weight: Fingering / #1 super fine cotton (size 3 thread)
- Hook: 2.25 mm (US B-1)
- Number of pieces: 1 ornament: 1 moon, 3 stars (2 small, 1 large), 1 bow cord, 1 hanging loop
- Layout: Stars hang inside the crescent’s hollow, under the upper horn
- Moon size before border: 4 in (10.2 cm) tall × 3 in (7.6 cm) wide
- Band depth before border: 1 in (2.5 cm) at the widest point
- Border depth: 0.375 in (1.0 cm)
- Star sizes: small 1.25 in (3.2 cm), large 1.75 in (4.4 cm), point to point
Materials
Use smooth mercerized cotton in fingering weight (about 170 m per 50 g). Mercerized cotton holds the lace shape well after blocking and doesn’t fuzz on the tree.
- Cream: 8 g / 27 m (moon and star centers)
- Sage green: 6 g / 20 m (border, star outlines, strands, bow, loop)
These quantities include a margin for swatching and tails.
Tools:
– 2.25 mm (US B-1) crochet hook
– 8 white pearl beads, 6 mm, with holes large enough for the yarn (7 used, 1 spare)
– Beading needle or dental-floss threader for stringing the pearls
– Tapestry needle
– Rustproof pins and a blocking mat
– Spray bottle
– Optional: light fabric stiffener
Abbreviations (US Terms)
- ch – chain
- sl st – slip stitch
- sc – single crochet
- hdc – half double crochet
- dc – double crochet
- sk – skip
- sp – space
- st(s) – stitch(es)
- MR – magic ring
- RS / WS – right side / wrong side
- rnd – round
Special stitches:
– Shell: 5 dc in the same stitch or space.
– Pearl lock (PL): Slide one pre-strung pearl up against the hook, then ch 1 snugly so the chain holds the pearl in place. A PL counts as 1 ch.
Gauge and Checkpoints
Gauge: 28 sc = 4 in (10.2 cm), or 7 sc = 1 in (2.5 cm). One dc row is about 0.25 in (0.6 cm) tall.
The moon is your test piece, so check it as you go:
- After Row 1: The 42 sc lie straight and measure 6 in (15.2 cm).
- After Row 3: The band is about 0.625 in (1.6 cm) deep and has started to curve.
- After Row 5: The band is 1 in (2.5 cm) deep at the center. Laid flat, the crescent measures about 4 in (10.2 cm) tall × 3 in (7.6 cm) wide.
- After the border: 4.75 in (12.1 cm) × 3.5 in (8.9 cm).
If Row 1 is longer than 6.25 in (15.9 cm), go down 0.25 mm in hook size. If it’s shorter than 5.75 in (14.6 cm), go up 0.25 mm. Don’t change any stitch counts, because the border math depends on them.
Moon (Cream)
Ch 43.
Row 1 (RS): Sc in 2nd ch from hook and in each ch across. Turn. (42 sc)
This row is the inner curve of the moon.
Row 2 (WS): Ch 1 (does not count as a st throughout). Sc in first 2 sts, hdc in next 2 sts, [dc in next 3 sts, 2 dc in next st] 8 times, dc in next 2 sts, hdc in next 2 sts, sc in last 2 sts. Turn. (50 sts: 4 sc, 4 hdc, 42 dc)
Check: the row uses 2 + 2 + 32 + 2 + 2 + 2 = 42 stitches. The 8 increases are all in the middle, so the band starts to curve while the ends stay short.
Row 3 (RS), windows: Ch 1, sc in first 2 sts, hdc in next 2 sts, dc in next 2 sts, [ch 2, sk 2 sts, dc in next 2 sts] 10 times, hdc in next 2 sts, sc in last 2 sts. Turn. (50 sts counting chains: 4 sc, 4 hdc, 22 dc, 10 ch-2 sps)
Each ch-2 space makes one rectangular window. The dc pairs between the windows act as posts.
Row 4 (WS), shells: Ch 1, sc in first 2 sts, hdc in next 2 sts, sk next dc, sc in next dc, [shell in next ch-2 sp, sk next dc, sc in next dc] 10 times, hdc in next 2 sts, sc in last 2 sts. Turn. (69 sts: 10 shells (50 dc), 11 sc between shells, 4 hdc, 4 sc)
Check: 4 + 1 + (10 × 6) + 4 = 69.
Row 5 (RS), arches: Ch 1, sc in first 2 sts, hdc in next 2 sts, sc in next sc, [ch 3, sk 2 dc, sc in center dc of shell, ch 3, sk 2 dc, sc in next sc] 10 times, hdc in next 2 sts, sc in last 2 sts. (89 sts counting chains: 20 ch-3 arches, 21 sc between them, 4 hdc, 4 sc)
Check: 4 + 1 + (10 × 8) + 4 = 89. Fasten off cream.
Checkpoint: Pin the crescent flat. It should be about 4 in (10.2 cm) tall and 3 in (7.6 cm) wide, with horns about 0.25 in (0.6 cm) wide.
Border (Green)
Border gauge: 1 sc for each stitch or chain along the edges, 3 sc in each ch-3 arch, and 1 sc per row end on the tips, with 2 sc in the Row 3 end.
Each tip has 5 row ends. Before you start, decide which end of Row 5 is tip A and which is tip B.
Rnd 1: With RS facing, join green with a sl st in the Row 1 end at tip A. Work each section in this order:
- Tip A, 6 sc: Ch 1. Work 1 sc in each row end of Rows 1, 2, 4 and 5, and 2 sc in the Row 3 end.
- Outer edge, 89 sc: Sc in each of the first 5 sts. Then [3 sc in ch-3 arch, sc in next sc] 20 times, and sc in the last 4 sts.
- Tip B, 6 sc: Work down the row ends the same way as tip A.
- Inner edge, 42 sc: Work 1 sc in each ch on the opposite side of the foundation chain.
Sl st in the first sc to join. (143 sc)
Outer edge check: 4 + 1 + (20 × 3) + 20 sc between arches + 4 = 89. That matches Row 5’s 89 stitches.
Rnd 2: Ch 1, sc in first sc (first st of tip A). [Sk 1 st, shell in next st, sk 1 st, sc in next st] 25 times. You should finish in the last sc of tip B. Sl st in each of the 42 inner-edge sts, then sl st in the first sc. Fasten off. (25 scallops, 26 sc, 42 sl sts)
Why the math works: The scallop section runs from tip A, along the outer edge, to tip B: 6 + 89 + 6 = 101 stitches. Each scallop repeat uses 4 stitches, so 25 repeats use 100, plus 1 starting sc = 101. The extra sc in each Row 3 end is what makes the count come out exactly. The sl sts on the inner edge keep it flat and neat without making it taller.
The border should be 0.375 in (1.0 cm) deep on the outer edge. The moon should now measure 4.75 in (12.1 cm) × 3.5 in (8.9 cm).
Stars
Small Star (make 2)
Rnd 1 (cream): MR, ch 1, 10 sc in ring, sl st to first sc. Fasten off cream. (10 sc)
Rnd 2 (green): Join green in any st, ch 1, 2 sc in each st around, sl st to first sc. (20 sc)
Rnd 3 (green), points: Ch 1. [Sc in next st, (hdc, dc) in next st, (dc, ch 2, dc) in next st, (dc, hdc) in next st] 5 times. Sl st to first sc. Fasten off, leaving a short tail. (35 sts + 5 ch-2 sps)
The small star measures 1.25 in (3.2 cm) from point to point.
Large Star (make 1)
Rnd 1 (cream): MR, ch 1, 10 sc in ring, sl st to first sc. (10 sc)
Rnd 2 (cream): Ch 1, 2 sc in each st around, sl st to join. Fasten off cream. (20 sc)
Rnd 3 (green): Join green, ch 1, [sc in next 3 sts, 2 sc in next st] 5 times, sl st to join. (25 sc)
Rnd 4 (green), points: Ch 1. [Sc in next st, (hdc, dc) in next st, (dc, ch 2, dc) in next st, (dc, hdc) in next st, sc in next st] 5 times. Sl st to join. Fasten off. (40 sts + 5 ch-2 sps)
The large star measures 1.75 in (4.4 cm) from point to point.
Beaded Strands, Bow, and Loop (Green)
Chain gauge is about 10 ch per 1 in (2.5 cm). Before you start each strand, string 2 pearls onto the green yarn.
Small strand (make 2): Join green with a sl st in the ch-2 sp of one star point (this becomes the top point). Ch 6, PL, ch 4, PL, ch 3. (15 ch including PLs) Fasten off, leaving a 6 in (15.2 cm) tail for sewing. The strand is about 1.5 in (3.8 cm) long.
Center strand (make 1, on the large star): Join as above. Ch 10, PL, ch 8, PL, ch 3. (23 ch including PLs) Fasten off, leaving a 6 in (15.2 cm) tail. The strand is about 2.25 in (5.7 cm) long.
Bow cord: Ch 50. Sl st in the back bump of the 2nd ch from hook and each ch across. (49 sl sts) The cord is about 5 in (12.7 cm) long. Tie it into a bow with two loops about 0.75 in (1.9 cm) tall and tails about 0.75 in (1.9 cm) long. Sew 1 pearl over the knot.
Hanging loop: Ch 25, sl st in first ch to form a ring. Fasten off, leaving an 8 in (20.3 cm) tail. The loop hangs about 1.25 in (3.2 cm) above the moon.
Assembly
- Lay the moon RS up with the opening on the right. Tip A is the top horn.
- Count the inner-edge sts from tip A. Sew the strands under the sl sts so the stitches don’t show:
- One small star at st 6
- The large star at st 11
- The other small star at st 16
- Sew the bow to the outer edge directly above the center strand, covering the top of Rnd 2.
- Sew the hanging loop to the back of the moon, behind the bow knot.
- Weave in all ends on the WS.
Final Blocking
- Weave in all tails before blocking.
- Spray the moon and stars until they are damp, not dripping.
- Pin the moon RS up to 4.75 in (12.1 cm) × 3.5 in (8.9 cm). Put a pin in each horn tip first, then pin along the outer curve every 0.5 in (1.3 cm).
- Pin each shell scallop open, and stretch each window gently into a rectangle.
- Pin each star point outward to the star’s finished size.
- Let the stars hang straight while you pin the strands flat.
- Leave everything to dry completely, at least 6 hours. If you want a firmer ornament, brush on a thin coat of fabric stiffener before it dries.
Final Quality-Control Checklist
- Row 1 has 42 sc, Row 2 has 50 sts, Row 3 has 10 windows, Row 4 has 10 shells, and Row 5 has 20 arches.
- Border Rnd 1 has 143 sc, and Rnd 2 has 25 scallops.
- Both horns are tapered and the same length.
- The inner edge lies flat and doesn’t ruffle.
- Small stars are 1.25 in (3.2 cm) and the large star is 1.75 in (4.4 cm).
- The strands hang evenly, with the large star lowest.
- The bow is centered, and the ornament hangs straight from its loop.
Troubleshooting
- The band won’t curve: Your Row 2 increases may be missing. Recount for 50 sts.
- The band ruffles: Your tension is loose in the dc rows. Go down one hook size.
- The horns are blunt: Make sure every row starts and ends with sc 2, hdc 2.
- Scallops don’t end at tip B: Recount Rnd 1. The outer edge needs 89 sts, and each tip needs 6.
- Star points curl: Block them flat, and work Rnd 3 a little more loosely.
- The ornament tilts: Move the hanging loop slightly toward the heavier side.
- Pearls slide: Make each PL chain snugger.
Care
Hand wash in cool water, press out the water in a towel, and reshape the ornament while it’s damp. Store it flat in tissue paper so the horns and scallops keep their shape.
Final Notes
The measurements build on each other. Row 1 is 42 sc at 6 in (15.2 cm). After five rows, the crescent is 4 in (10.2 cm) × 3 in (7.6 cm) with a band 1 in (2.5 cm) deep. The 143-st border adds 0.375 in (1.0 cm) and brings the moon to 4.75 in (12.1 cm) × 3.5 in (8.9 cm). The stars measure 1.25 in (3.2 cm) and 1.75 in (4.4 cm), and the loop brings the full ornament to about 6 in (15.2 cm). If you check each stage as you go, the finished ornament will come out the right size.
Happy crocheting!