

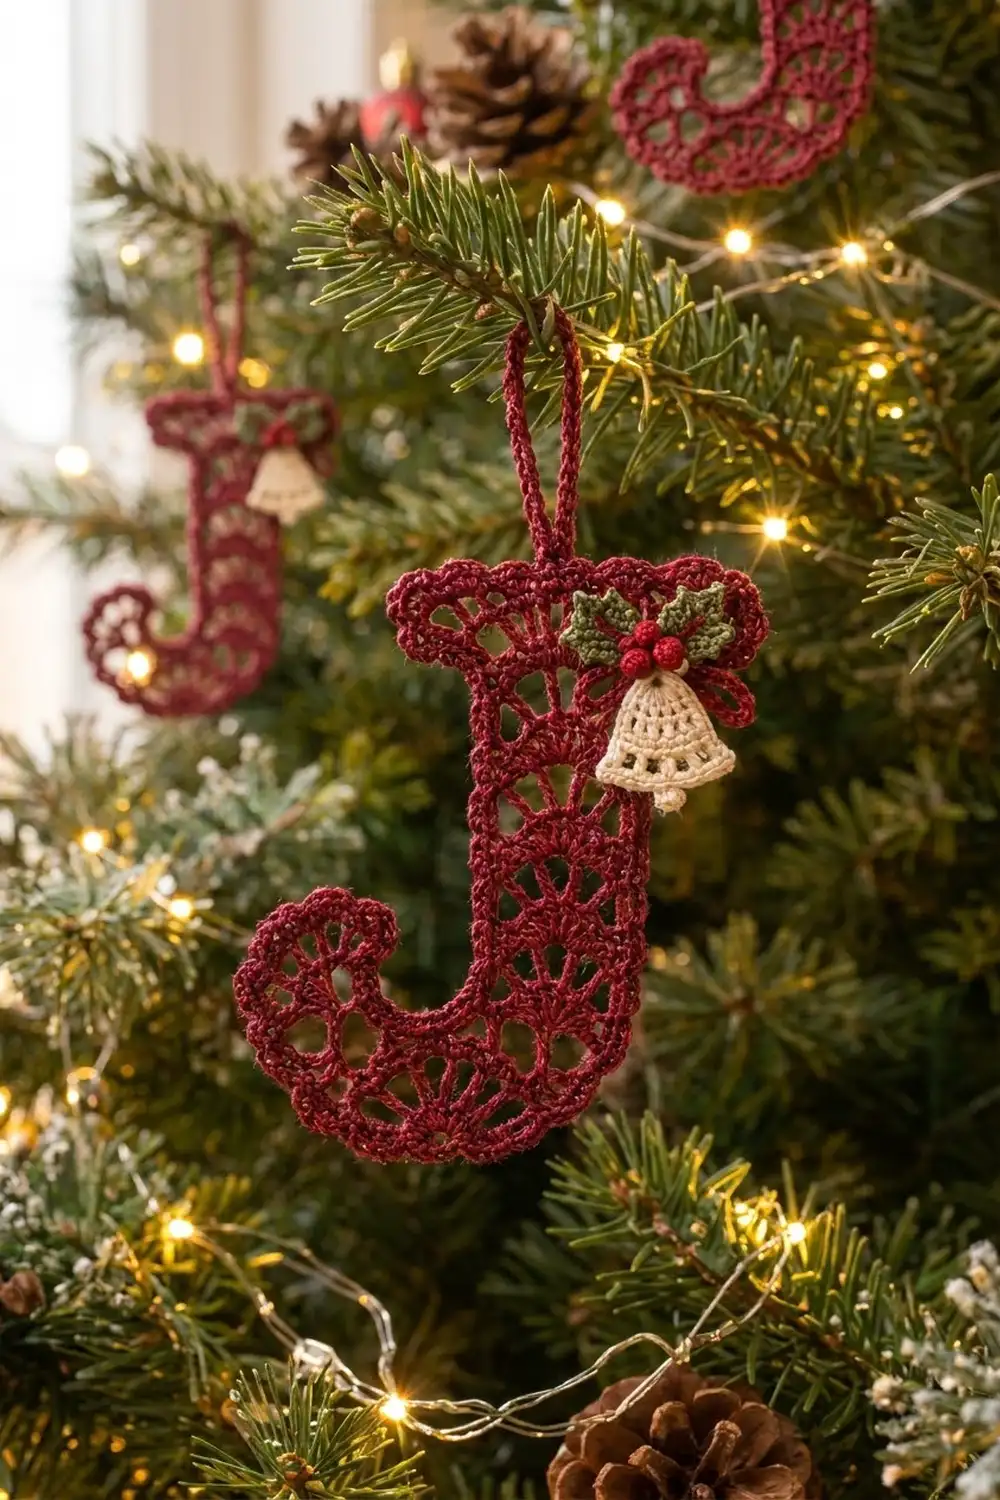
This lacy letter J is a small heirloom-style ornament for the tree, a gift tag, or a personalized stocking charm. It is made in rich burgundy cotton thread. The stem is stacked fan shells, the bowl is a round of radiating spokes, and a fine scalloped edge runs all the way around.
A small holly cluster sits at the top right corner and gives it a festive look. It has two green leaves, three red berries, a cream bell, and a little burgundy bow. The style is vintage lace with a cheerful Christmas palette.
The pattern uses US crochet terms. The finished ornament is 4.75 in (12.1 cm) tall and 2.5 in (6.4 cm) wide. With the hanging loop it is 6.25 in (15.9 cm) tall.
The construction is simple. Start with the half-circle bowl. Next, work the stem straight up from its flat edge, then widen it into the top bar. Then add a small fan curl at the tip of the J. Finally, work the scalloped edging in one continuous round and sew on the appliqués.
Finished Size and Construction
- Finished size: 4.75 in (12.1 cm) tall × 2.5 in (6.4 cm) wide
- With hanging loop: 6.25 in (15.9 cm) tall
- Skill level: Intermediate
- Terminology: US
- Yarn weight: Size 3 cotton crochet thread (Super Fine / 1)
- Hook: 2.25 mm (B-1)
- Number of pieces: 1 ornament body plus small sewn-on appliqués (bell, 2 leaves, 3 berries, bow)
- Layout: Single letter shape, no assembly of motifs
- Body size before edging: 4.25 in (10.8 cm) tall × 2 in (5.1 cm) wide
- Edging depth: 0.25 in (0.6 cm) on every side
Materials
Use a mercerized cotton thread in size 3. It gives crisp stitch definition and blocks well. Avoid fuzzy or acrylic threads, because the fan shells will lose their shape.
- Burgundy (main color): 10 g / 30 m, for the body, edging, hanging loop, and bow
- Cream: 3 g / 9 m, for the bell and clapper
- Green: 3 g / 9 m, for 2 holly leaves
- Bright red: 2 g / 6 m, for 3 berries
These amounts include a safety margin of about 30%.
Tools:
– 2.25 mm (B-1) crochet hook
– Tapestry needle with a sharp tip
– Rustproof pins
– Blocking board or folded towel
– Spray bottle
– Scissors
– Optional: fabric stiffener
Abbreviations (US Terms)
- ch – chain
- sl st – slip stitch
- sc – single crochet
- hdc – half double crochet
- dc – double crochet
- sk – skip
- st(s) – stitch(es)
- sp – space
- tch – turning chain
- rep – repeat
- RS – right side
Special stitches:
– Picot: Ch 3, sl st in 3rd ch from hook.
– Mini scallop: 5 hdc worked in one st.
Gauge and Checkpoints
Gauge: 18 dc × 8 rows = 2 in (5.1 cm), which is 9 dc and 4 rows per 1 in (2.5 cm).
Gauge matters more here than usual, because the stem and the bowl have to meet exactly. Make the bowl first and measure it before you go on.
Checkpoints:
– Bowl Row 2: The flat edge measures 1 in (2.5 cm) across.
– Bowl Row 4: The flat edge measures 2 in (5.1 cm), and the height is 1 in (2.5 cm).
– Stem Row 1: 1 in (2.5 cm) wide. It should exactly cover the right half of the bowl’s flat edge.
– Stem Row 11: The total body height is 3.75 in (9.5 cm).
– Top bar Row 13: About 1.7 in (4.3 cm) wide. The total body height is 4.25 in (10.8 cm).
– After edging: 4.75 in (12.1 cm) × 2.5 in (6.4 cm).
If your bowl is too big, go down to a 2.0 mm hook. If it is too small, go up to a 2.5 mm hook. Change the hook, not the stitch counts. The counts are what keep the shape correct.
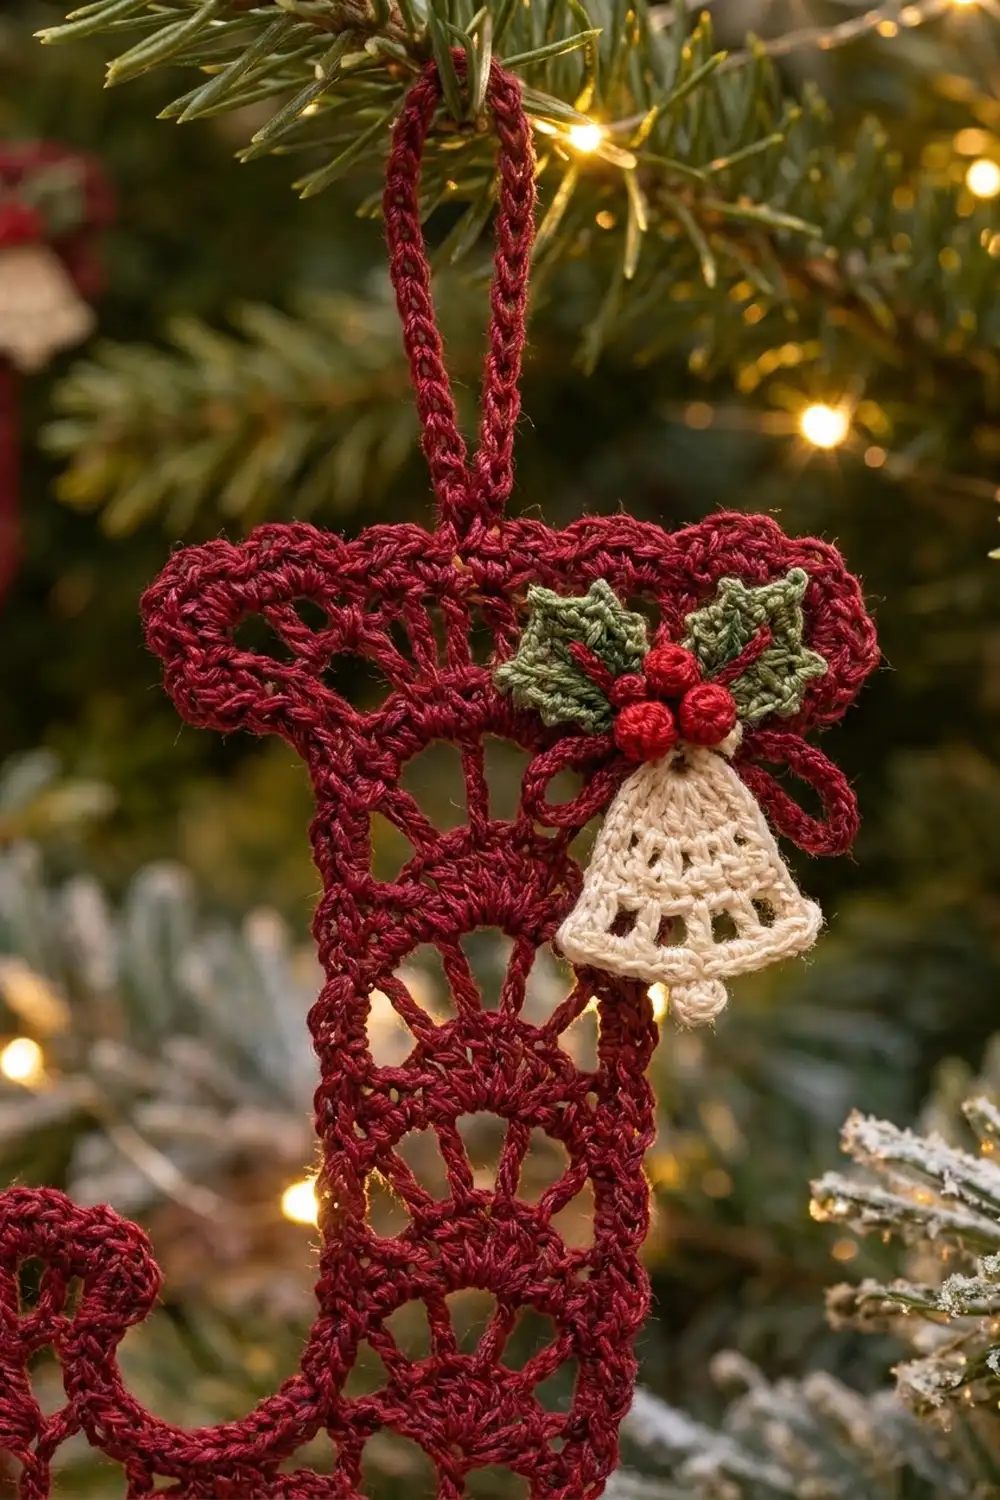
Part 1: The Bowl (Half Circle)
Use burgundy. The bowl is worked in turned rows. The row ends form the straight top edge, which later becomes the base of the stem and the curl.
Ch 4.
Row 1: Work 7 dc in the 4th ch from hook. The skipped 3 ch count as the first dc. (8 sts) Turn. The chain where these sts sit is the center point.
Row 2: Ch 3 (counts as dc), dc in the same st, then 2 dc in each st across. (16 sts) Turn.
Row 3: Ch 4 (counts as dc + ch 1). Dc in next dc, ch 1; rep from * 14 times. Dc in top of tch. (16 dc and 15 ch-1 sps) Turn.
These are the radiating spokes.
Row 4: Ch 1, sc in first dc. 3 dc in next ch-1 sp, sc in next ch-1 sp; rep from * 7 times. Work 3 dc in the last ch-1 sp, then sc in the 3rd ch of tch. (33 sts: 8 fans of 3 dc + 9 sc)
Fasten off. Check that the flat edge is 2 in (5.1 cm) wide. Each side of the center point has 4 row ends, and each one measures about 0.25 in (0.6 cm).
Part 2: The Stem
Lay the bowl RS up with the flat edge at the top and the curve below. The stem is worked on the right half of the flat edge, from the center point out to the right corner.
Row 1: Join burgundy at the center point. Ch 3 (counts as dc). Work 2 dc in each of the 4 right-hand row ends. (1 + 8 = 9 sts) Turn.
Row 2 (fan row): Ch 3 (counts as dc). Sk next 3 sts, work 7 dc in the next st (the 5th st), sk next 3 sts, dc in top of tch. (1 + 7 + 1 = 9 sts) Turn.
This row leaves an open triangle on each side of the fan, which gives the stem its lace look.
Row 3 (solid row): Ch 3 (counts as dc). Dc in each of the 7 fan dc, then dc in top of tch. (9 sts) Turn.
Rows 4–11: Rep Rows 2 and 3 four more times. (9 sts in every row)
You now have 5 fan rows (Rows 2, 4, 6, 8, and 10), and you end on a solid row. The stem is 2.75 in (7.0 cm) tall, and the total body height is 3.75 in (9.5 cm). Do not fasten off.
Part 3: The Top Bar
Row 12 (conversion row): Ch 3 (counts as dc). Work 2 dc in the same st, dc in each of the next 7 sts, then 3 dc in top of tch. (9 sts worked 1-per-st + 4 extra = 13 sts) Turn.
Row 13: Ch 3 (counts as dc). Dc in the same st, dc in each of the next 11 sts, then 2 dc in top of tch. (13 sts worked 1-per-st + 2 extra = 15 sts)
Fasten off. The bar is about 1.7 in (4.3 cm) wide and 0.5 in (1.3 cm) deep. It is centered over the stem, so it flares out on both sides.
Part 4: The Curl
The curl is the raised fan on the left tip of the J. It sits on the left half of the bowl’s flat edge.
Row 1: With RS facing, join burgundy at the outer left corner of the bowl. Ch 1. Work 2 sc in each of the 4 left-hand row ends, then 1 sc in the center point at the base of the stem. (8 + 1 = 9 sc) Turn.
Row 2: Ch 1, sc in first sc. Sk next 3 sc, work 9 dc in the next sc (the 5th sc), sk next 3 sc, sc in last sc. (1 + 9 + 1 = 11 sts)
Fasten off. The fan stands up beside the base of the stem. It is about 0.4 in (1.0 cm) tall and 1 in (2.5 cm) wide.
Part 5: The Scalloped Edging
Border gauge: Work about 9 sc per 1 in (2.5 cm) across stitch tops and 2 sc per dc row end, which is 8 sc per 1 in. The bowl curve takes 33 sc over about 3.1 in (7.9 cm) of arc. That is slightly denser, which keeps the fans flat instead of ruffled.
Round 1: With RS facing, join burgundy in the first st of Row 13 at the top left corner of the bar. Ch 1, then sc around in this order:
- Top edge: 3 sc in the corner st, 1 sc in each of the next 13 sts, 3 sc in the last corner st. (19 sc)
- Right end of bar: 2 sc in each of the 2 row ends. (4 sc)
- Right side of stem: 2 sc in each of the 11 row ends. (22 sc)
- Bowl curve: 1 sc in each of the 33 sts of Row 4. (33 sc)
- Curl: 1 sc in the left row end of Curl Row 1, 2 sc in the left row end of Curl Row 2, 1 sc in each of the 11 sts of Curl Row 2, then 1 sc in each of its 2 right row ends. (1 + 2 + 11 + 1 + 1 = 16 sc)
- Left side of stem: 2 sc in each of the 11 row ends. (22 sc)
- Left end of bar: 2 sc in each of the 2 row ends. (4 sc)
Sl st to the first sc. (19 + 4 + 22 + 33 + 16 + 22 + 4 = 120 sc)
Round 2: Do not turn. Sl st in next sc, sk next sc, work 5 hdc in next sc (mini scallop), sk next sc; rep from * around. (30 scallops) Sl st at the base of the first sl st. Fasten off.
Why the math works: Each repeat uses exactly 4 sc, and 120 ÷ 4 = 30, so the round closes evenly with no partial repeat. The scallops will not always land exactly on the corners. That is expected, and the scallops make the outline look softer. The two rounds together add 0.25 in (0.6 cm) on every side. That takes the body from 4.25 in × 2 in (10.8 × 5.1 cm) to 4.75 in × 2.5 in (12.1 × 6.4 cm).
Part 6: Hanging Loop
Join burgundy in the center sc at the top of the bar (the 10th sc of the top edge’s 19). Ch 30, then sl st in the same st to form a loop. Work 36 sc into the loop and sl st at the base. Fasten off.
The loop stands 1.5 in (3.8 cm) tall.
Part 7: Appliqués
Bell (Cream)
Ch 4.
- Row 1: Sc in 2nd ch from hook and in the next 2 ch. (3 sc) Turn.
- Row 2: Ch 1, 2 sc in first st, sc in next st, 2 sc in last st. (5 sc) Turn.
- Row 3: Ch 1, sc in each st. (5 sc) Turn.
- Row 4: Ch 1, 2 sc in first st, sc in next 3 sts, 2 sc in last st. (7 sc) Turn.
- Row 5: Ch 1, sc in each st. (7 sc) Turn.
- Row 6: Ch 3 (counts as dc), dc in the same st, dc in next 5 sts, 2 dc in last st. (9 sts) Turn.
- Row 7 (rim): Ch 1, sc in first st. (Hdc, dc, hdc) in next st, sc in next st; rep from * 4 times. (4 scallops; 17 sts)
Fasten off. Make a ch-3 loop at the top for the crown. The bell is about 1.1 in (2.8 cm) tall and 1 in (2.5 cm) wide.
Clapper: Make a magic ring and work 5 sc into it. Pull the ring tight and sl st to join. Sew it below the center of the rim.
Holly Leaves (Green, make 2)
Ch 8.
- Work along one side of the chain, starting in the 2nd ch from hook: sl st, sc, hdc, picot, dc, dc, picot, hdc, sc. You have worked into 7 ch.
- Ch 2 at the tip.
- Turn the work and continue along the free loops on the other side: sc, hdc, picot, dc, dc, picot, hdc, sc, sl st.
Fasten off. Each leaf is 0.75 in (1.9 cm) long and has 2 points on each side.
Berries (Red, make 3)
Make a magic ring and work 6 sc into it. Sl st to join and cut a long tail. Weave the tail around the outer edge, cinch it into a ball, and knot it. Each berry is 0.25 in (0.6 cm).
Bow (Burgundy)
Ch 40, which is about 4 in (10.2 cm) long. Tie it into a small bow and trim the tails to 0.5 in (1.3 cm).
Stacking Order
Work at the top right, where the bar meets the stem. Sew the pieces in this order, from back to front:
- Bow
- Leaves, set in a V that opens upward
- Three berries in a cluster at the point of the V
- Bell, with its crown tucked under the berries so it hangs down over the upper stem
Final Blocking
- Wet the ornament and press out the water in a towel. Do not wring it.
- Pin it to the board RS up. Measure 4.75 in (12.1 cm) from the top edge to the bottom of the bowl.
- Pin the width to 2.5 in (6.4 cm) across the bowl.
- Pin each bowl spoke so that it radiates straight out from the center point.
- Open each stem fan, then open the curl fan into a neat half circle.
- Pin out every fifth mini scallop, then ease the ones between them into shape.
- If you like, brush on diluted fabric stiffener for a firmer ornament.
- Let it dry completely before you sew on the appliqués.
Final Quality-Control Checklist
- The stem has 9 sts in every row and 5 fan rows.
- The top bar has 15 sts and flares out evenly on both sides.
- The bowl has 16 spokes and 8 fans.
- The curl fan has 9 dc and stands beside the base of the stem.
- Edging Round 1 has 120 sc, and Round 2 has 30 scallops.
- The ornament measures 4.75 in × 2.5 in (12.1 × 6.4 cm).
- The hanging loop is 1.5 in (3.8 cm) and centered, so the ornament hangs straight.
- The appliqués are sewn securely, and all tails are hidden on the back.
Troubleshooting
- The bowl cups: Your tension is too tight on Row 2. Re-work it with a looser tension, or go up half a hook size.
- The bowl ruffles: Your fans are too loose. Make the 3-dc groups shorter, or go down a hook size.
- The stem is wider than half the bowl: Your stem gauge is loose. Re-work the stem with a smaller hook.
- The scallops pucker in the inner corners: Block those spots firmly, and do not pull the sl sts tight.
- The ornament hangs crooked: Move the loop to the true center sc and check that the appliqué weight is balanced.
Care
Hand wash in cool water with mild soap, then reshape and dry flat. Store it flat in tissue paper between seasons.
Final Notes
The measurement chain is the whole design:
- A 2 in (5.1 cm) bowl provides a 1 in (2.5 cm) right half.
- That half carries a 9-stitch stem that is 1 in (2.5 cm) wide.
- The stem grows 2.75 in (7.0 cm) tall and flares into a 15-stitch bar.
- A 120-stitch edging round adds 0.25 in (0.6 cm) on every side, for a finished 4.75 in × 2.5 in (12.1 × 6.4 cm).
Check each of these numbers as you go, and the letter will come out right.
Happy crocheting!