

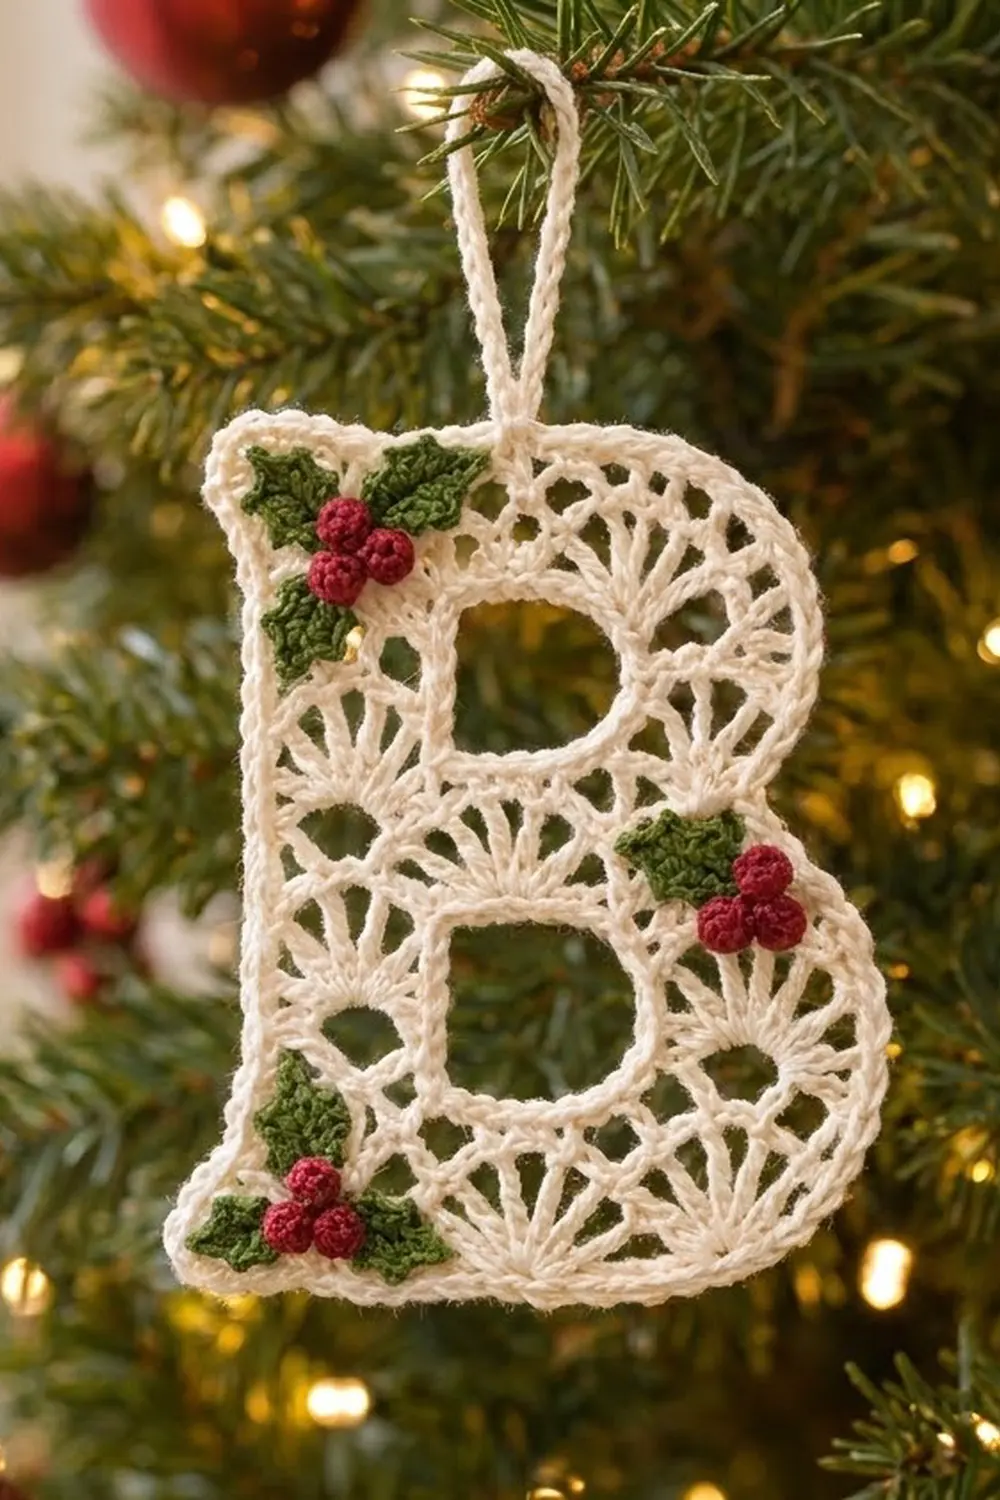
This Holly Lace Letter B Ornament is a lacy, heirloom-style monogram for the Christmas tree. It is worked in ivory cotton thread in rows of open fan shells, so light shows through the whole letter, and it finishes with a corded crab-stitch edge.
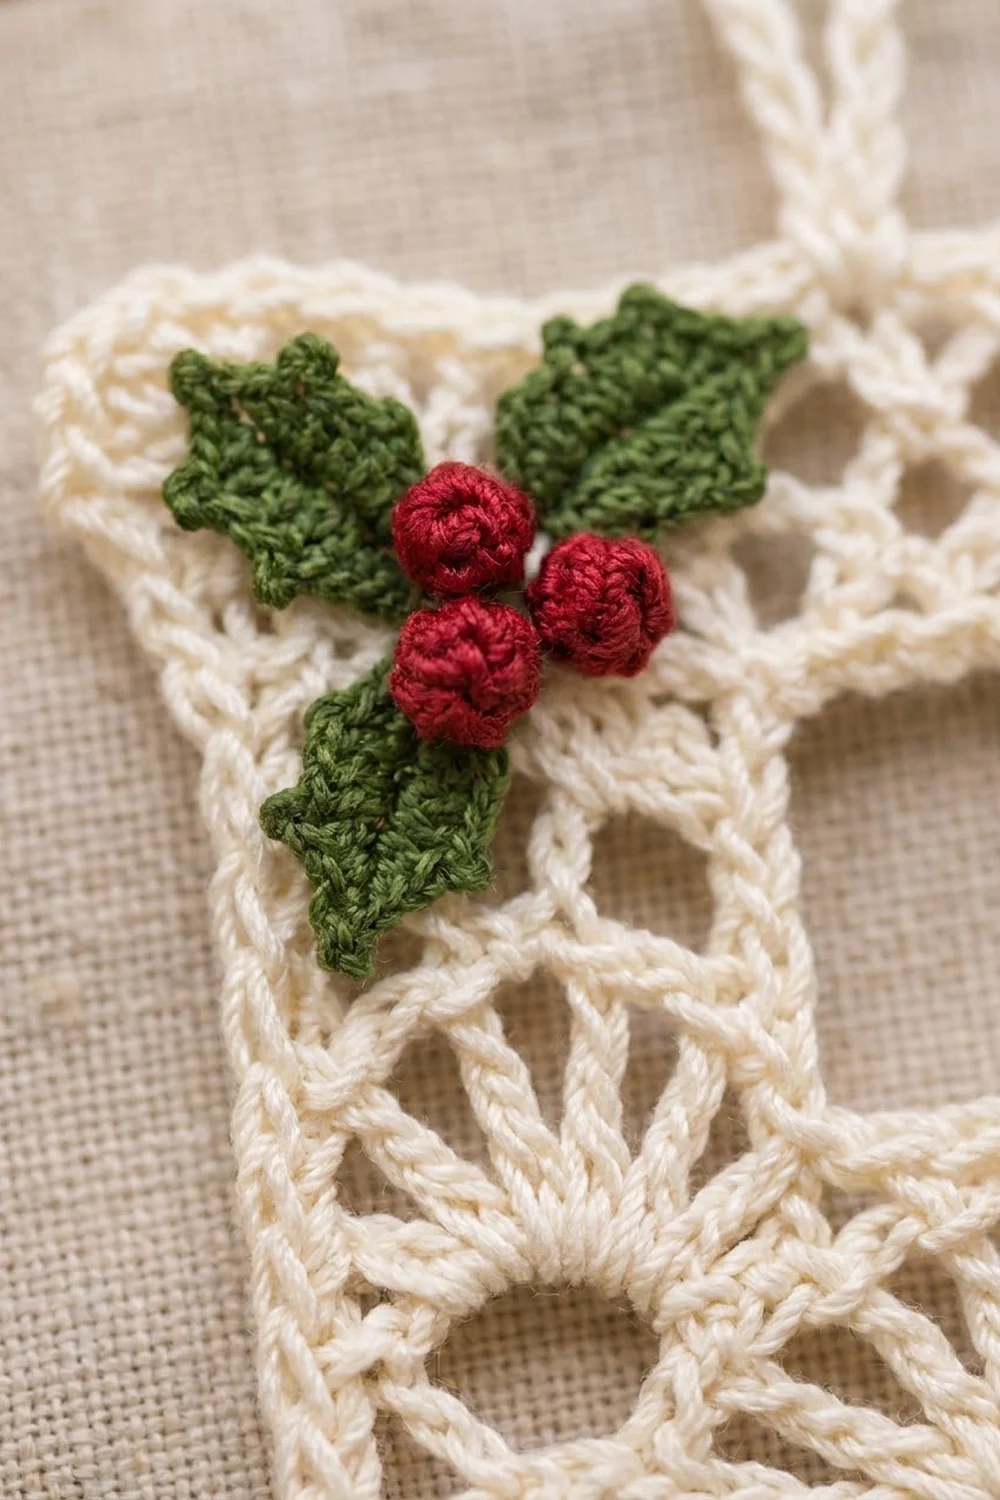
Three small holly sprigs add the color. Each sprig has two dark green picot leaves and three round red berries. They sit at the top-left corner, at the right side of the upper bowl, and at the bottom-left corner.
The pattern uses US crochet terms. The finished ornament measures 3 5/8 in (9.2 cm) wide at the lower bowl and 5 1/4 in (13.3 cm) tall, plus a 1 1/2 in (3.8 cm) hanging loop.
Construction is simple once you see it. The letter is worked bottom to top as one flat piece on a grid of fan columns. The two counters are made by working the stem and the bowl separately for two rows, then bridging across with a chain. A two-round border, counter edgings, a hanging loop, and sewn-on holly finish the piece.
Finished Size and Construction
- Finished size: 3 5/8 in (9.2 cm) wide x 5 1/4 in (13.3 cm) tall, plus loop
- Skill level: Intermediate
- Terminology: US crochet terms
- Yarn weight: Size 3 cotton crochet thread
- Hook: 2.25 mm (US B-1)
- Number of pieces: 1 lace letter, plus 6 leaves and 9 berries sewn on
- Layout: Grid of fan columns, 6 stitches (3/4 in / 1.9 cm) wide each; 4 columns in the lower bowl, 3 in the upper bowl
- Piece size before border: 3 1/8 in (7.9 cm) wide at the bottom, 2 3/8 in (6.0 cm) wide at the top, 4 3/4 in (12.1 cm) tall
- Border depth: 1/4 in (0.6 cm) on every edge
Materials
Choose a mercerized cotton thread in size 3. It holds lace shapes crisply and takes starch well. The numbers below assume about 2.8 m per gram.
- Ivory (main color): 15 g, about 42 m
- Holly green: 3 g, about 8 m
- Berry red: 2 g, about 6 m
Quantities include a margin for a test swatch and tails.
Tools:
- 2.25 mm (US B-1) crochet hook
- Tapestry needle with a small eye
- Scissors
- Blocking mat and rustproof pins
- Spray starch or a fabric stiffener
- Stitch markers
Abbreviations (US Terms)
- ch – chain
- sl st – slip stitch
- sc – single crochet
- hdc – half double crochet
- dc – double crochet
- tr – treble crochet
- rev sc – reverse single crochet (crab stitch)
- sp(s) – space(s)
- st(s) – stitch(es)
- RS / WS – right side / wrong side
Special stitches:
- Fan: (dc, ch 1) 4 times, dc, all in the same stitch. Each fan has 5 dc and 4 ch-1 sps.
- Picot: ch 3, sl st in 3rd ch from hook.
- Rev sc: working left to right, insert hook in the next st to the right, yarn over, pull up a loop, yarn over, pull through both loops.
Gauge and Checkpoints
Gauge: 8 sc = 1 in (2.5 cm). One fan column (6 sts) = 3/4 in (1.9 cm) wide. One fan row plus one net row = 3/4 in (1.9 cm) tall.
The ornament is small, so make it once as your test piece and measure as you go:
- After Row 3: 3 1/8 in (7.9 cm) wide and 1 in (2.5 cm) tall
- After Row 7: 2 1/2 in (6.4 cm) tall
- After Row 13: 4 3/4 in (12.1 cm) tall; the top is 2 3/8 in (6.0 cm) wide
- After the border: 3 5/8 in (9.2 cm) x 5 1/4 in (13.3 cm)
If Row 3 is wider than 3 1/4 in (8.3 cm), go down to a 2.0 mm hook. If it is narrower than 3 in (7.6 cm), go up to a 2.5 mm hook. If only the height is off, change how tall you pull up your dc and tr loops. Don’t change the stitch counts.
Pattern Notes
- Stitch positions are counted from the right (bowl) edge with the RS facing. Stitch 1 is always on the bowl side.
- RS rows are fan rows and begin at the bowl edge. WS rows are net rows and begin at the stem edge.
- In net rows, ch 4 counts as the first tr. Ch-2 sps count as 2 sts each.
- A full width of 25 sts holds 4 fan columns. The boundaries fall on sts 1, 7, 13, 19 and 25, and the fans sit on sts 4, 10, 16 and 22.
Lace Letter
Lower Bowl
With ivory, ch 26.
Row 1 (WS): Sc in 2nd ch from hook and in each ch across. Turn. (25 sc)
Row 2 (RS): Ch 1, sc in first sc, *skip 2 sc, fan in next sc, skip 2 sc, sc in next sc; rep from * 3 more times. Turn. (4 fans, 5 sc)
Row 3 (WS): Ch 4, *ch 2, sc in center dc of next fan, ch 2, tr in next sc; rep from * 3 more times. Turn. (5 tr, 4 sc, 8 ch-2 sps = 25 sts)
Lower Counter (Split Rows)
Row 4, bowl section (RS): Ch 1, sc in first tr, *skip 2 ch, fan in next sc, skip 2 ch, sc in next tr; rep from * once more, ending in st 13. Turn. Leave sts 14–25 unworked. (2 fans, 3 sc)
Row 5, bowl section (WS): Ch 4, *ch 2, sc in center dc of next fan, ch 2, tr in next sc; rep from * once more. (3 tr, 2 sc, 4 ch-2 sps = 13 sts) Do not fasten off. Remove the hook and put a marker in the loop.
Row 4, stem section (RS): With RS facing, join a new strand of ivory with a sl st in the tr at st 19 of Row 3. Ch 1, sc in same st, skip 2 ch, fan in next sc, skip 2 ch, sc in top of ch-4. Turn. (1 fan, 2 sc)
Row 5, stem section (WS): Ch 4, ch 2, sc in center dc of fan, ch 2, tr in last sc. Fasten off. (2 tr, 1 sc, 2 ch-2 sps = 7 sts)
The 5 unworked sts of Row 3 (sts 14–18) now form the bottom of the lower counter.
Row 6 (RS, bridge row): Put the marked loop back on the hook. Ch 1, sc in first tr, *skip 2 ch, fan in next sc, skip 2 ch, sc in next tr; rep from * once more. Then ch 5 for the bridge and sc in the first tr of the stem section. Skip 2 ch, fan in next sc, skip 2 ch, sc in top of ch-4. Turn. (3 fans, 4 sc, one ch-5 bridge = 25 sts)
Row 7 (WS): Ch 4, ch 2, sc in center dc of fan, ch 2, tr in next sc, ch 2, sc in 3rd ch of bridge, ch 2, tr in next sc, *ch 2, sc in center dc of next fan, ch 2, tr in next sc; rep from * once more. Turn. (5 tr, 4 sc, 8 ch-2 sps = 25 sts)
Checkpoint: the piece is 2 1/2 in (6.4 cm) tall.
Waist
Row 8 (RS): Sl st in each of first 7 sts. Ch 1, sc in same st as last sl st (st 7), *skip 2 ch, fan in next sc, skip 2 ch, sc in next tr; rep from * 2 more times, with the last sc in top of ch-4. Turn. (3 fans, 4 sc = 19 sts wide)
The middle fan sits on the sc in the bridge, so the column flows straight up. The 6 exposed sl sts form the waist notch.
Row 9 (WS): Ch 4, *ch 2, sc in center dc of next fan, ch 2, tr in next sc; rep from * 2 more times. Turn. (4 tr, 3 sc, 6 ch-2 sps = 19 sts)
From here on, count positions on these 19 sts. The bowl column is sts 1–7, the counter column is sts 7–13, and the stem is sts 13–19.
Upper Counter (Split Rows)
Row 10, bowl section (RS): Ch 1, sc in first tr, skip 2 ch, fan in next sc, skip 2 ch, sc in next tr (st 7). Turn. (1 fan, 2 sc)
Row 11, bowl section (WS): Ch 4, ch 2, sc in center dc, ch 2, tr in last sc. (2 tr, 1 sc, 2 ch-2 sps = 7 sts) Put a marker in the loop.
Row 10, stem section (RS): Join ivory with a sl st in the tr at st 13 of Row 9. Ch 1, sc in same st, skip 2 ch, fan in next sc, skip 2 ch, sc in top of ch-4. Turn. (1 fan, 2 sc)
Row 11, stem section (WS): Ch 4, ch 2, sc in center dc, ch 2, tr in last sc. Fasten off. (7 sts)
Row 12 (RS, bridge row): Pick up the marked loop. Ch 1, sc in first tr, skip 2 ch, fan in next sc, skip 2 ch, sc in next tr, ch 5, sc in first tr of the stem section, skip 2 ch, fan in next sc, skip 2 ch, sc in top of ch-4. Turn. (2 fans, 3 sc, one ch-5 bridge = 19 sts)
Row 13 (WS): Ch 4, ch 2, sc in center dc, ch 2, tr in next sc, ch 2, sc in 3rd ch of bridge, ch 2, tr in next sc, ch 2, sc in center dc, ch 2, tr in last sc. (4 tr, 3 sc, 6 ch-2 sps = 19 sts) Do not fasten off.
Checkpoint: 4 3/4 in (12.1 cm) tall, 3 1/8 in (7.9 cm) wide at the bottom and 2 3/8 in (6.0 cm) wide at the top.
Border
Border gauge: 8 sc per inch on every edge. Each row end is 3/8 in (1.0 cm), so it takes 3 sc. Row 1 is 1/4 in (0.6 cm), so it takes 2 sc.
Round 1 (RS): Turn so the RS faces you. Work down each edge in this order:
- Top edge: Ch 1. Work 3 sc in first tr (top-right corner) and sc in each of next 17 sts. Work 3 sc in top of ch-4 (top-left corner). (23 sc)
- Stem edge: Work 3 sc in each row end of Rows 13–2 and 2 sc in the row end of Row 1. (38 sc)
- Bottom edge: Working in the free loops of the foundation chain, work 3 sc in first ch (corner) and sc in each of next 23 ch. Work 3 sc in last ch (corner). (29 sc)
- Lower bowl edge: Work 2 sc in the row end of Row 1 and 3 sc in each row end of Rows 2–7. (20 sc)
- Waist notch: Work 3 sc in first sl st of Row 8 and sc in each of next 5 sl sts. Skip the 7th sl st. (8 sc)
- Upper bowl edge: Work 3 sc in each row end of Rows 8–13. (18 sc)
Sl st in first sc to join. (136 sc)
Round 2 (RS): Ch 1, rev sc in each sc around. Sl st in first st and fasten off. (136 rev sc)
Why the math works: The letter’s edges are 3 1/8 in (7.9 cm) along the bottom and 4 3/4 in (12.1 cm) up the stem. At 8 sc per inch, those edges need 25 sc and 38 sc. The bottom gets 23 sc plus two 3-sc corners. Those corners add 4 extra sts of ease to turn the curve. Skipping the 7th sl st stops the inner notch corner from ruffling. The crab stitch adds no sts, so it lies flat when Round 1 is flat.
Counter Edgings
With RS facing, join ivory in the lower counter at the stem-side corner of its bottom edge. Work these sc, then sl st in first sc and fasten off:
- 5 sc along the unworked sts of Row 3
- 6 sc up the bowl-side row ends of Rows 4–5
- 5 sc in the bridge chain
- 6 sc down the stem-side row ends
(22 sc)
Edge the upper counter the same way. Its bottom edge is sts 8–12 of Row 9, and it takes 22 sc. The finished openings are about 3/8 in x 1/2 in (1.0 cm x 1.3 cm).
Hanging Loop
Join ivory in the rev sc directly above the center of the stem column. Ch 30 and sl st in the same st. Then sl st in each ch around the loop and sl st in the base. Fasten off. The loop stands 1 1/2 in (3.8 cm) tall.
Holly Appliqués
Leaf (make 6 in green): Ch 8.
- First side: Work in the chains, starting in the 2nd ch from the hook: sc, hdc, dc, picot, dc, dc, picot, hdc, sc. You now have 7 sts and 2 picots.
- Tip: Work a picot.
- Second side: Working in the free loops of the same chains: sc, hdc, picot, dc, dc, picot, dc, hdc, sc.
- Sl st in first sc and fasten off, leaving a 6 in (15.2 cm) tail.
Each leaf has 14 sts and 5 picots and is about 3/4 in (1.9 cm) long and 3/8 in (1.0 cm) wide.
Berry (make 9 in red): Make a magic ring. Ch 1 and work 7 sc in the ring. Pull the ring tight and sl st in first sc. Fasten off with a 6 in (15.2 cm) tail. Weave the tail around the edge and pull it so the berry cups into a ball about 1/4 in (0.6 cm) across.
Assembly: Each cluster takes 2 leaves and 3 berries.
- Set the 2 leaves in a V, with their bases touching.
- Stack 3 berries over the point of the V: two side by side and one above them.
- Sew the cluster down through the border and the fan stitches. Keep your stitches on the leaf centers so the picots stay free.
Place one cluster at the top-left corner, one on the upper bowl just above the waist notch, and one at the bottom-left corner.
Final Blocking
- Wet the ornament, then roll it in a towel to press out extra water.
- Pin it RS up to 3 5/8 in (9.2 cm) x 5 1/4 in (13.3 cm). Put pins at the four corners first.
- Pin out the bowl curves and the waist notch. Put one pin in each counter to open it.
- Ease each fan open so its spokes radiate evenly.
- Spray starch onto the lace. Keep the berries out of the spray if you can.
- Let the ornament dry completely, then remove the pins.
Final Quality-Control Checklist
- [ ] Height is 5 1/4 in (13.3 cm) and lower width is 3 5/8 in (9.2 cm)
- [ ] Every fan has 5 dc and 4 ch-1 sps
- [ ] Each fan column stacks straight up
- [ ] Both bridges are 5 ch, with no twist
- [ ] Border Round 1 has 136 sc
- [ ] The corners and notch lie flat
- [ ] Each counter edging has 22 sc
- [ ] Both counters are open
- [ ] The loop is secure and 1 1/2 in (3.8 cm) tall
- [ ] 3 holly clusters are sewn on firmly, with no tails showing
Troubleshooting
- Fans lean sideways: You worked a fan into a ch-2 sp instead of the sc. Each fan goes into a sc.
- Bridge sags: You chained too loosely. Redo it with firmer tension, or ch 4 instead and work the Row 7 sc into the 2nd ch.
- Border ruffles: Check that each row end has 3 sc, not 4.
- Border cups: Your Round 1 is too tight. Go up a hook size for the border only.
- Counter has closed up: Work the counter edging more loosely, then pin the opening wide during blocking.
- Berries are flat: Pull the gathering tail tighter before you sew the berry down.
Care
Hand wash in cool water with mild soap and lay flat to dry. Re-starch as needed. Store the ornament flat between tissue paper so it keeps its shape.
Final Notes
The whole ornament depends on one measurement chain. At 8 sc per inch, 6 sts make a 3/4 in (1.9 cm) column. Four columns plus 1 st give 3 1/8 in (7.9 cm), and six row pairs plus the foundation row give 4 3/4 in (12.1 cm). The 1/4 in (0.6 cm) border brings the letter to 3 5/8 in x 5 1/4 in (9.2 cm x 13.3 cm). Check each step and the B will come out crisp, open, and ready for the tree.
Happy crocheting!