

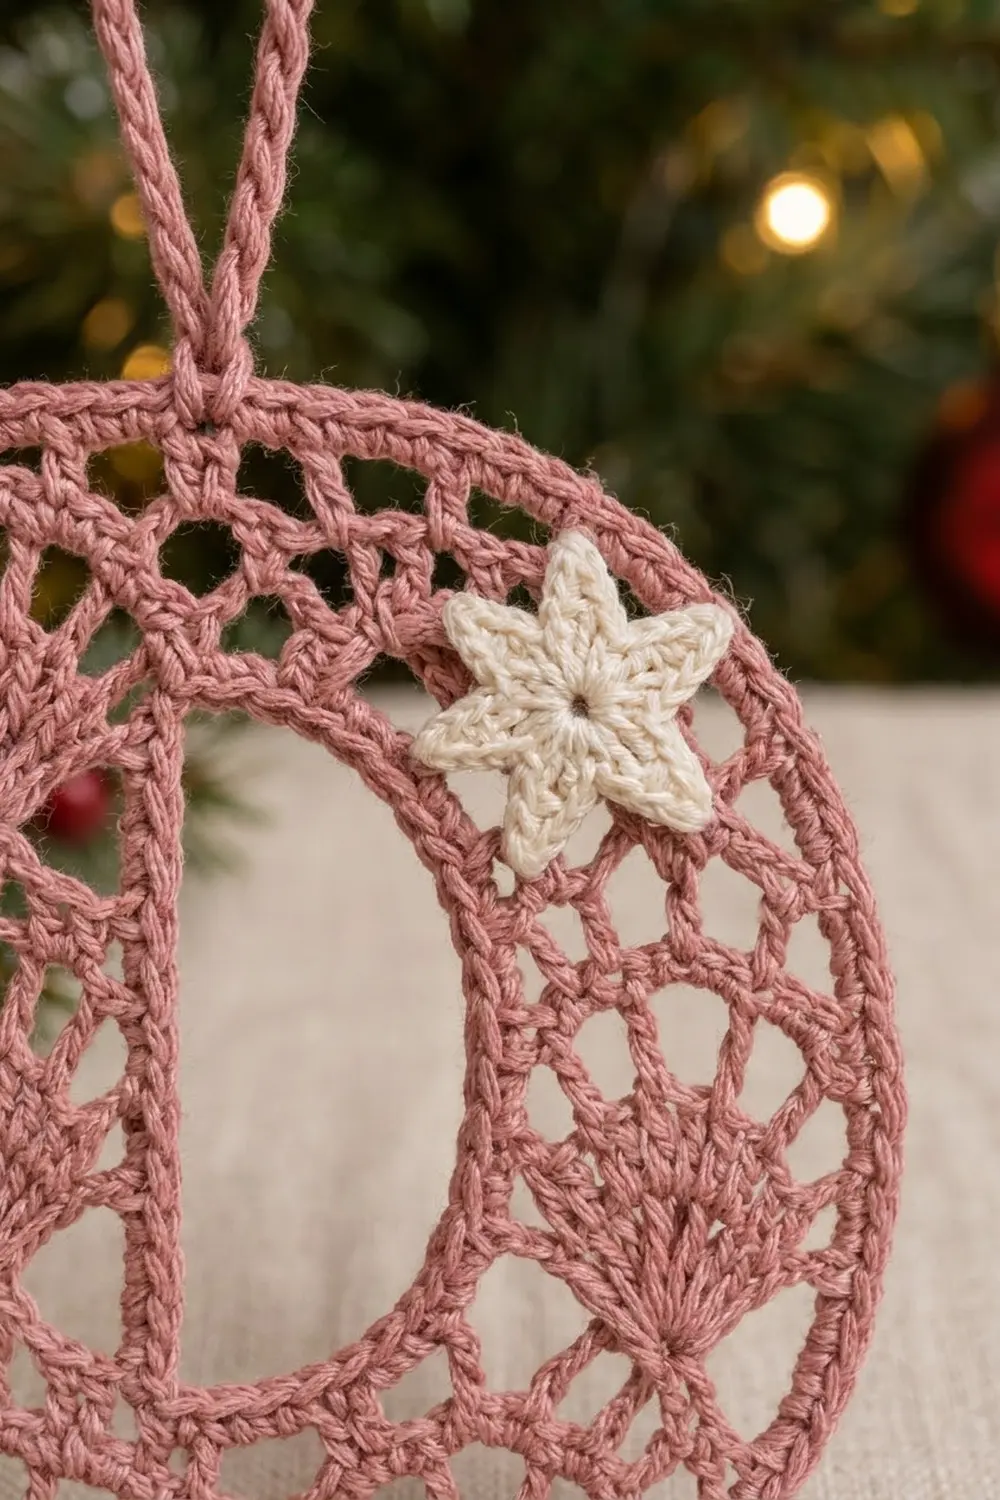
This lace letter D ornament is light and delicate, and it’s made to hang on a tree, a doorknob or a gift. The band of the letter is filled with radiating fans in dusty rose cotton, each topped with a row of small chain arches. A firm corded edge outlines the letter inside and out, so it keeps its shape.
A small cream star sits on the upper curve of the D. It adds contrast without hiding the lace. The rose loop at the top is covered with single crochet, so it’s strong enough for regular use.
The pattern uses US crochet terms. The finished ornament is 5 in (12.7 cm) tall and 4 in (10.2 cm) wide, not counting the loop. With the loop, it’s 6.25 in (15.9 cm) tall.
You crochet the letter as one lace strip, worked lengthwise in five rows. You then sew the ends of the strip together into a ring and shape the ring into a D. Border rounds on the outer and inner edges fix the shape. Last, you add the hanging loop and sew on the star.
Finished Size and Construction
- Finished size: 5 in x 4 in (12.7 cm x 10.2 cm); 6.25 in (15.9 cm) tall with the loop
- Skill level: Intermediate
- Terminology: US crochet terms
- Yarn weight: #1 Super Fine (fingering-weight cotton)
- Hook: 2.25 mm (B-1)
- Number of pieces: 1 lace D (one strip joined into a ring), plus 1 small star appliqué
- Layout: a single letter; no grid
- Strip size: 1 in (2.5 cm) wide; inner edge 8.125 in (20.6 cm), outer edge 15.125 in (38.4 cm)
- Size before border: 4.75 in x 3.75 in (12.1 cm x 9.5 cm)
- Border depth: 0.125 in (0.3 cm) on each edge, so the band ends up 1.25 in (3.2 cm) wide
- Center opening (finished): about 2.5 in x 1.5 in (6.4 cm x 3.8 cm)
Materials
Use a smooth, mercerized fingering-weight cotton, about 170 m per 50 g. Mercerized cotton shows the fans clearly and holds its shape well after blocking. Avoid fuzzy or very stretchy fibers, because they blur the arches.
- Color A, dusty rose: 9 g (31 m), for the strip, border and loop
- Color B, cream: 2 g (7 m), for the star
Both amounts include a safety margin of roughly 30%.
Tools:
– 2.25 mm (B-1) crochet hook
– Tapestry needle
– 4 locking stitch markers
– Rustproof pins
– Blocking board or folded towel
– Spray bottle
– Scissors
– Ruler or tape measure
Abbreviations (US Terms)
- ch = chain
- sl st = slip stitch
- sc = single crochet
- hdc = half double crochet
- tr = treble crochet
- sc2tog = single crochet 2 together
- sp = space
- st(s) = stitch(es)
- RS / WS = right side / wrong side
Special stitch: Fan. Work 9 tr into the same stitch. All nine treble stitches come out of one point and open into a semicircle.
Gauge and Checkpoints
Gauge: 16 sc = 2 in (5.1 cm), which is 8 sc per inch. One fan repeat is 8 sts wide on the inner edge.
Test swatch. Before you start the full strip, make a mini strip of two repeats:
1. Ch 18.
2. Work Rows 1–5 below, using 2 repeats where the pattern says 8.
The swatch should measure as follows:
– Row 1: 17 sc, 2.125 in (5.4 cm)
– Row 5: 31 sc, 3.875 in (9.8 cm), lightly curved
– Height: 1 in (2.5 cm)
Checkpoints on the real piece:
– After Row 1: 65 sc, 8.125 in (20.6 cm)
– After Row 3: the strip is 0.625 in (1.6 cm) tall
– After Row 5: the strip is 1 in (2.5 cm) wide, and the outer edge is 15.125 in (38.4 cm) when laid in an arc
– After the borders: the D measures 5 in x 4 in (12.7 cm x 10.2 cm)
If your swatch is too big, go down to a 2.0 mm hook. If it’s too small, go up to a 2.5 mm hook. Don’t fix the size by changing stitch counts, because the fan math depends on them.
The Lace Strip
The strip is worked lengthwise in Color A. Row 1 becomes the inner edge of the D and Row 5 becomes the outer edge. The fans open outward, so the outer edge comes out almost twice as long as the inner edge. That difference is what lets the strip curve into a letter.
Foundation: Ch 66.
Row 1 (RS): Sc in the 2nd ch from the hook and in each ch across. Turn. (65 sc)
Row 2 (WS): Ch 1. Sc in the first sc. [Ch 3, skip 3 sc, sc in the next sc] 16 times. Turn.
(17 sc, 16 ch-3 sps)
Check: 1 + (16 x 4) = 65 sts used.
Row 3 (RS): Ch 1. Sc in the first sc. Ch 2, skip the next ch-3 sp, work a Fan (9 tr) in the next sc, ch 2, skip the next ch-3 sp, sc in the next sc. Repeat from * 7 more times. Turn.
(8 Fans of 9 tr each = 72 tr, plus 9 sc and 16 ch-2 sps)
The Fans sit in every other sc of Row 2. The sc between them pin the fan bases down, which gives the radiating look.
Row 4 (WS): Ch 4 (counts as tr). Ch 3, skip the next ch-2 sp and the first tr of the Fan, sc in the next tr, [ch 3, skip the next tr, sc in the next tr] 3 times, ch 3, skip the last tr of the Fan and the next ch-2 sp, tr in the next sc. Repeat from * 7 more times. Turn.
This row puts an sc in the 2nd, 4th, 6th and 8th tr of each Fan, making 5 small arches over every Fan.
(9 tr including the turning ch, 32 sc, 40 ch-3 sps)
Row 5 (RS): Ch 1. Sc in the first tr. [2 sc in the next ch-3 sp, sc in the next sc] 4 times, 2 sc in the next ch-3 sp, sc in the next tr. Repeat from * 7 more times. The last tr is the top of the turning ch.
Each repeat adds 15 sts: (4 x 3) + 2 + 1. Total: 1 + (8 x 15) = 121 sc.
Fasten off, leaving a 10 in (25.4 cm) tail.
Checkpoint: The strip is 1 in (2.5 cm) wide. It curls naturally because the outer edge is longer than the inner edge.
Join the Strip into a Ring
- Bring the two short ends of the strip together. Keep the RS facing out and make sure the strip isn’t twisted.
- Whipstitch the short ends together with the long tail, going through the row-end stitches of all five rows. Keep the stitches snug but flat.
- Fasten off and weave in the tail.
This seam becomes the middle of the D’s straight stem.
Mark the corners before you start the border:
- Outer edge (Row 5 sts): Count 18 sts from each side of the seam. Place markers in st 19 and st 103. These are the two outer corners of the stem. The stem section is then sts 1–18 plus sts 104–121, which is 36 sts. The curved section (sts 20–102) is 83 sts. Check: 36 + 83 + 2 corners = 121.
- Inner edge (Row 1 sts): Place markers in st 10 and st 55. These are where the inner corners start.
Border
The border uses the same gauge as the body, 8 sc per inch. It adds 0.125 in (0.3 cm) to each edge.
Outer Border
Outer Rnd 1: With the RS facing, join Color A in st 1 of Row 5, right next to the seam. Ch 1.
1. Sc in each st up to the first corner marker (18 sts).
2. Work 3 sc in the marked st.
3. Sc in each of the next 83 sts.
4. Work 3 sc in the marked st.
5. Sc in each of the remaining 18 sts.
6. Sl st to the first sc.
Count: 121 sts worked one into each existing st, plus 4 added at the corners = 125 sc.
Per side:
– Stem: 36 sc
– Corners: 3 sc each
– Curved side: 83 sc
Total: 36 + 83 + 6 = 125. Move each marker up to the center sc of its corner.
Outer Rnd 2: Ch 1. Sl st loosely in each sc around. Join. (125 sl st)
This round makes the corded edge. Fasten off.
Why the math works: At 8 sts per inch, 125 sts is 15.625 in (39.7 cm). That matches the outer edge of a D that is 5 in x 4 in, with a 5 in stem, two 1.5 in straight sections and a half-circle curve. The corners need only 2 extra sts each, because the curve itself doesn’t need any increases.
Inner Border
Inner Rnd 1: With the RS facing, join Color A in the free loop of the foundation chain under Row 1 st 1, next to the seam. Ch 1. Then work into the free loops as follows:
1. Sc in sts 1–9.
2. Sc2tog over sts 10–11 (first inner corner).
3. [Sc in the next 7 sts, sc2tog] 4 times, covering sts 12–47.
4. Sc in sts 48–54.
5. Sc2tog over sts 55–56 (second inner corner).
6. Sc in sts 57–65.
7. Sl st to the first sc.
Count: 65 sts used. 53 of them get one sc each, and the other 12 become 6 sc2tog. Total: 53 + 6 = 59 sc.
Per side:
– Stem: 18 sc
– Corners: 1 sc2tog each
– Curve: 39 sc
Total: 18 + 2 + 39 = 59.
Inner Rnd 2: Ch 1. Sl st loosely in each sc around. Join. (59 sl st) Fasten off.
Why the math works: 59 sts at 8 per inch is 7.375 in (18.7 cm). That’s the edge of the 2.5 in x 1.5 in (6.4 cm x 3.8 cm) opening. The decreases pull in the extra length of the inner edge, and the corner decreases keep the inside corners of the stem crisp.
Checkpoint: The D lies flat and measures 5 in x 4 in (12.7 cm x 10.2 cm).
Hanging Loop
- With Color A, join in the 6th sc of Outer Rnd 2 to the right of the top-left corner.
- Ch 24, then sl st in the same st to form a loop.
- Work 32 sc into the loop, covering the chain completely.
- Sl st in the next st of the border. Fasten off.
Checkpoint: The loop rises 1.25 in (3.2 cm) above the top edge.
Star Appliqué
Use Color B.
Rnd 1: Make a magic ring. Ch 1, work 6 sc in the ring, then sl st to the first sc. Pull the ring closed. (6 sc)
Rnd 2: Ch 4, sl st in the 2nd ch from the hook, sc in the next ch, hdc in the next ch, sl st in the next sc of Rnd 1. Repeat from * 5 more times. The last sl st goes into the first sc. (6 points)
Fasten off, leaving a 6 in (15.2 cm) tail.
Checkpoint: The star is 1 in (2.5 cm) across from point to point.
Wait until after blocking to sew the star on.
Final Blocking
- Wet the ornament in cool water, then press it gently in a towel. Don’t wring it.
- Lay it RS up on the blocking board.
- Pin the straight stem first: 5 in (12.7 cm) from the top corner to the bottom corner, with one pin at each outer corner.
- Pin the top and bottom edges out straight, to 4 in (10.2 cm) total width.
- Ease the curve into a smooth half-circle. Use one pin every 0.75 in (1.9 cm) or so along the outer edge.
- Open each Fan with a pin tip so the arches sit evenly.
- Lightly shape the center opening to 2.5 in x 1.5 in (6.4 cm x 3.8 cm).
- Mist with water and let it dry completely. For a crisper ornament, use a light spray starch.
- Unpin. Sew the star onto the upper right of the curve, about 0.75 in (1.9 cm) below the top edge and centered on the band. Tack down the center and each point.
Final Quality-Control Checklist
- [ ] The strip has 8 complete Fans with 5 arches over each.
- [ ] The outer border has 125 sts and the inner border has 59 sts.
- [ ] Both outer corners are square; the curve is smooth with no points.
- [ ] The seam lies flat in the middle of the stem.
- [ ] The finished size is 5 in x 4 in (12.7 cm x 10.2 cm).
- [ ] The loop is secure and 1.25 in (3.2 cm) tall.
- [ ] The star is stitched flat at all 6 points.
- [ ] All tails are woven in and trimmed.
Troubleshooting
- The strip twists when you join it: Undo the seam and line up the RS of both ends before you sew again.
- The curve ruffles: Your outer border is too loose. Redo Outer Rnd 2 with a 2.0 mm hook.
- The inner opening puckers: Your sl st round is too tight. Work it looser or with a larger hook.
- The Fans lean to one side: Check Row 2. Every Fan must sit in an alternating sc.
- The D comes out narrow: Block the curve wider, and check your gauge.
- The star curls: Block it flat before sewing, and tack every point down.
Care
Hand wash in cool water and dry flat, re-pinning if needed. Store the ornament flat between tissue so the arches don’t crush.

Final Notes
The measurements build on each other:
1. Gauge of 8 sc per inch
2. Row 1: 65 sc, 8.125 in (20.6 cm)
3. Row 5: 121 sc, 15.125 in (38.4 cm)
4. The strip joined into a ring with a stem seam
5. Outer border of 125 sc, 15.625 in (39.7 cm); inner border of 59 sc, 7.375 in (18.7 cm)
6. A finished D of 5 in x 4 in (12.7 cm x 10.2 cm)
If each checkpoint matches, the finished letter will too. Happy crocheting!