

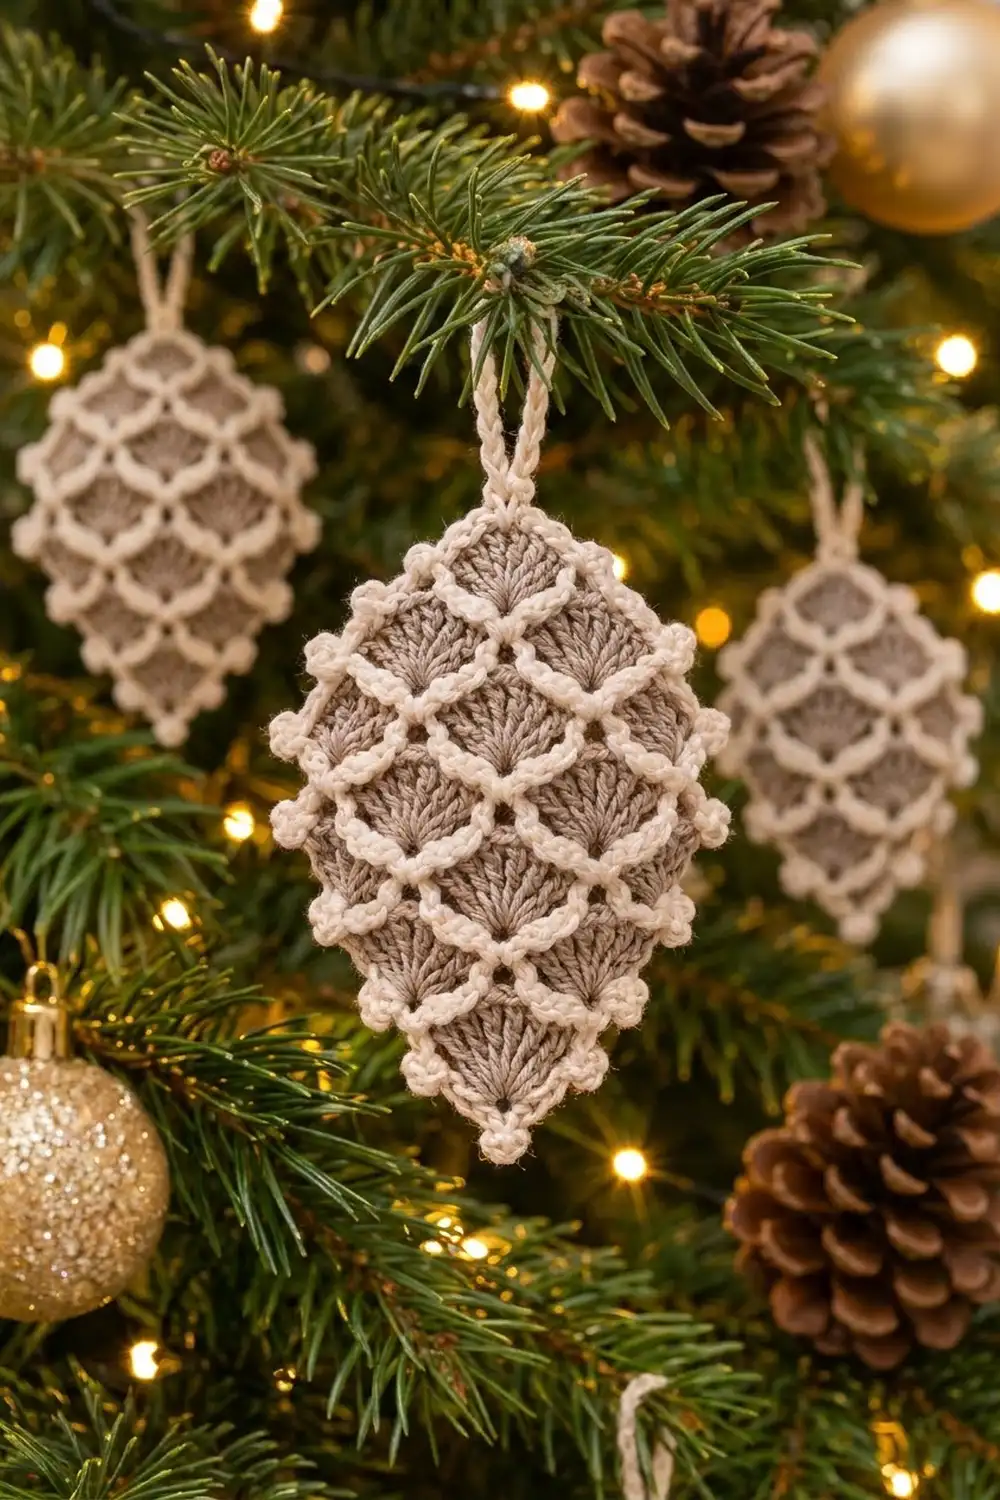
This little pinecone ornament gets its texture from rows of taupe shell stitches stacked like scales. A cream chain lattice is worked over the top and outlines every fan, so the surface looks like a frosted net. A cream picot border finishes the edge, and a firm cream loop at the top makes it ready to hang.
The colors are soft and neutral: warm taupe for the scales and creamy off-white for the lattice, border and loop. It suits a rustic, Scandinavian or farmhouse tree, and it also works as a gift tag or package topper.
The pattern uses US crochet terms. The finished ornament measures about 3 3/4 in (9.5 cm) wide and 4 5/8 in (11.7 cm) tall without the loop. With the loop, it is about 6 1/8 in (15.6 cm) tall.
You make it as one flat piece in three stages. First, you work the taupe base in rows from the bottom tip up. It grows to three shells wide, then narrows to one shell at the top. Next, you work a continuous cream overlay on the surface, with chain arcs anchored around the base’s single crochet stitches. Last, two cream border rounds add the picot edge and the hanging loop.
Finished Size and Construction
- Finished size: 3 3/4 in (9.5 cm) wide x 4 5/8 in (11.7 cm) tall, plus a 1 1/2 in (3.8 cm) hanging loop
- Skill level: Intermediate
- Terminology: US crochet terms
- Yarn weight: Sport weight (#2) cotton
- Hook: 3.25 mm (US D/3)
- Number of pieces: 1 (single flat ornament)
- Layout: One pinecone shape, worked from the bottom tip to the top
- Piece size before border: 3 1/4 in (8.3 cm) wide x 4 1/8 in (10.5 cm) tall
- Border depth: 1/4 in (0.6 cm) on every edge
Materials
Choose a smooth, mercerized sport weight cotton or cotton blend. Clear stitch definition matters here, because the cream chains need to stand out on top of the taupe fans. Avoid fuzzy or very splitty yarns.
- Color A, taupe (base): about 10 g / 34 m
- Color B, cream (overlay, border and loop): about 8 g / 27 m
These amounts include a margin of roughly 20 percent for measuring gauge and weaving in ends.
Tools:
- 3.25 mm (US D/3) crochet hook
- Tapestry needle
- Scissors
- Rustproof pins and a foam blocking mat
- Spray bottle with clean water
- Ruler or tape measure
Abbreviations (US Terms)
- ch: chain
- sl st: slip stitch
- sc: single crochet
- dc: double crochet
- sk: skip
- st(s): stitch(es)
- tch: turning chain
- RS: right side
- FPsc: front post single crochet
- p: picot
Special stitches:
- Shell: 7 dc worked into the same stitch.
- Half shell: 4 dc worked into the same stitch. At the start of a row, the ch 3 counts as the first dc.
- Picot (p): Ch 3, sl st in the 3rd ch from the hook.
- FPsc: Insert the hook from front to back to front around the post of the stitch named. Yarn over and pull up a loop, then yarn over and pull through both loops.
Gauge and Checkpoints
Work the whole taupe base (Rows 1–11) first, and measure it before you start the cream overlay. The base is only 11 rows, so it serves as your gauge piece.
Gauge: 8 rows = 3 in (7.6 cm) tall. Row 5 (3 shells, 25 sts) = 3 1/4 in (8.3 cm) wide, measured across the fan tops.
Checkpoints:
- After Row 3: 1 1/8 in (2.9 cm) tall and about 3 in (7.6 cm) wide
- After Row 9: 3 3/8 in (8.6 cm) tall and 3 1/4 in (8.3 cm) wide
- After Row 11: 4 1/8 in (10.5 cm) tall
- After the border: 3 3/4 in (9.5 cm) x 4 5/8 in (11.7 cm)
If your base is too big, go down half a hook size. If it is too small, go up half a hook size. Get the gauge right in the base, because the overlay and border follow its size.
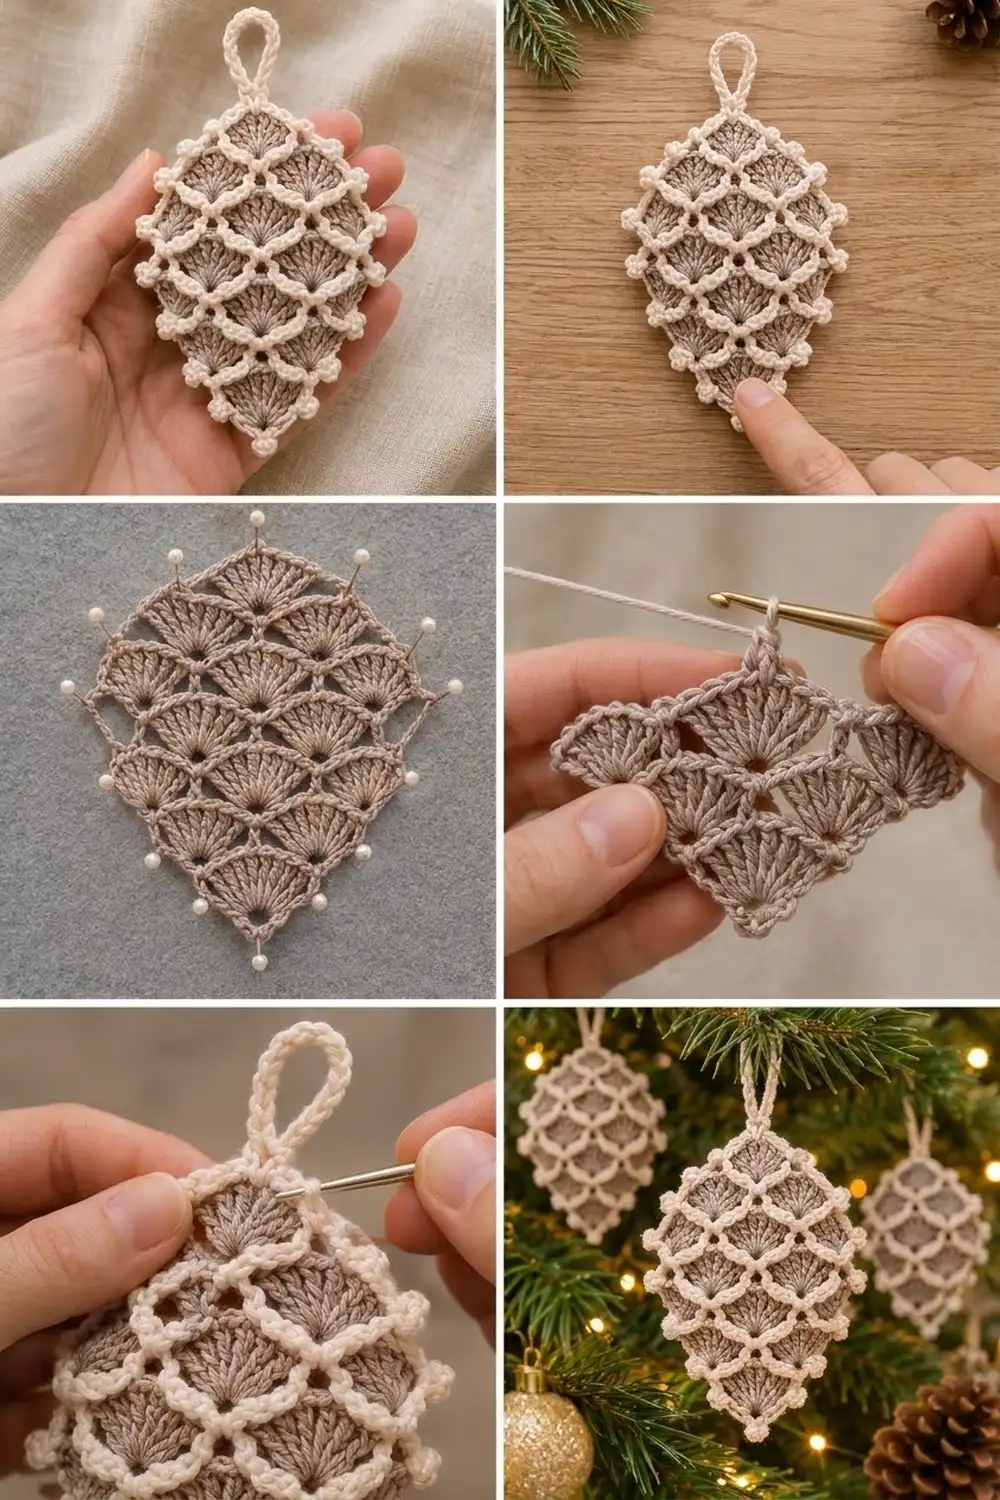
Taupe Base
With Color A, work in rows. A ch 3 at the start of a row counts as a dc. A ch 1 does not count as a stitch. When the piece is finished, choose the neater side as the RS.
Row 1: Ch 4, 6 dc in 4th ch from hook. Turn. (7 sts: 1 shell)
Row 2: Ch 3, 3 dc in first st (half shell made), sk 2 sts, sc in next st (center dc), sk 2 sts, 4 dc in top of tch. Turn. (9 sts: 2 half shells, 1 sc)
Row 3: Ch 3, 6 dc in first st (edge shell made), sk 2 sts, sc in next dc, shell in next sc, sc in next dc, sk 2 sts, 7 dc in last st. Turn. (23 sts: 3 shells, 2 sc)
This is the only row that adds whole shells. The edge shells fan outward and set the full width.
Row 4: Ch 3, 3 dc in first st, sk 2 sts, sc in next st (center dc of first shell), *shell in next sc, sc in center dc of next shell; rep from * once more, 4 dc in last st. Turn. (25 sts: 2 half shells, 2 shells, 3 sc)
Row 5: Ch 1, sc in first st, *shell in next sc, sc in center dc of next shell; rep from * once more, shell in next sc, sc in last st. Turn. (25 sts: 3 shells, 4 sc)
Row 6: Ch 3, 3 dc in first sc, *sc in center dc of next shell, shell in next sc; rep from * once more, sc in center dc of last shell, 4 dc in last sc. Turn. (25 sts: 2 half shells, 2 shells, 3 sc)
Rows 7–9: Repeat Rows 5, 6 and 5. Row 9 ends with 25 sts: 3 shells and 4 sc.
Row 10 (decrease): Sl st in each of first 5 sts, ch 1, sc in same st (center dc of first shell), shell in next sc, sc in center dc of next shell, shell in next sc, sc in center dc of last shell. Leave the last 4 sts unworked. Turn. (17 sts: 2 shells, 3 sc)
Row 11 (decrease): Sl st in each of first 5 sts, ch 1, sc in same st, shell in next sc, sc in center dc of next shell. Leave the last 4 sts unworked. (9 sts: 1 shell, 2 sc)
Fasten off and weave in ends. Measure against the checkpoints. The shells should now look like staggered pinecone scales: 1 at the bottom tip, 3 across the body and 1 at the top.
Cream Lattice Overlay
The overlay is one continuous strand of Color B worked on the RS. Each pass lays chain arcs across the tops of one base row’s fans. The arcs are anchored with FPsc around the sc stitches between the shells. The sc stitches in neighboring rows are offset, so the arcs form a diamond lattice that outlines every fan. Between passes, a short chain climbs the side edge to the next row. Keep all chains relaxed so the base does not pucker.
Climb (used between passes): Ch 2, sl st in or around the end st of the next row on the same side.
Pass 1: With RS facing, join B with sl st in the top of the last st of Row 1. Ch 7, sl st in the top of the first st of Row 1. Climb. (1 arc)
Pass 2: Ch 4, FPsc around the sc, ch 4, sl st in the end st on the opposite edge. Climb. (2 arcs)
Pass 3: *Ch 7, FPsc around next sc; rep from * once more, ch 7, sl st in end st. Climb. (3 arcs)
Passes 4, 6 and 8: Ch 4, FPsc around next sc, *ch 7, FPsc around next sc; rep from * once more, ch 4, sl st in end st. Climb. (2 short arcs, 2 long arcs)
Passes 5, 7 and 9: Start from the edge sc. *Ch 7, FPsc around next sc; rep from * once more, ch 7, sl st around the edge sc at the opposite end. Climb after Passes 5 and 7 only. (3 arcs)
Pass 10: Ch 3, sl st around the nearest end sc of Row 10 (this steps inward), ch 7, FPsc around next sc, ch 7, sl st around the last sc of Row 10. (2 arcs)
Pass 11: Ch 3, sl st around the nearest end sc of Row 11, ch 7, sl st around the other sc of Row 11. (1 arc)
Fasten off and weave in ends. The border will cover the climbing chains.
Border
Border gauge: 2 sc per row end. This matches the height of a dc row and keeps the edge flat. Both rounds use Color B.
Round 1: With RS facing, join B in the foundation ch at the bottom tip. Ch 1, 3 sc in the same place (tip). Work up the first side, going through each row end and the overlay climb chain together where there is one:
- 2 sc in each row end of Rows 1–9 (18 sc)
- 4 sc evenly along the stepped edge of Row 10 and 4 sc along the stepped edge of Row 11 (8 sc)
That makes 26 sc on the first side. Across the top, sc in each of the 9 sts of Row 11 (9 sc). On the second side, work 4 sc along the Row 11 step, 4 sc along the Row 10 step, then 2 sc in each row end of Rows 9–1 (26 sc). Sl st to first sc. (64 sc: 3 tip + 26 side + 9 top + 26 side)
Round 2: Ch 1, sc in each of first 2 sc, p, sc in next sc (tip complete: 3 sc, 1 p).
- Side: *Sc in each of next 2 sc, p; rep from * 12 more times. (26 sc, 13 p)
- Top: Sc in each of next 4 sc. In the next sc (top center), make the hanging loop: sc, ch 18, sl st in same sc. Work 26 sc into the ch-18 loop, then sl st in the same sc again. Sc in each of next 4 sc. (9 sc plus loop)
- Second side: *Sc in each of next 2 sc, p; rep from * 12 more times. (26 sc, 13 p)
- Sl st to first sc. Fasten off. (64 sc, 27 p, 1 loop)
Why the math works: Each side has 9 full-height rows at 2 sc each (18) and 2 stepped rows at 4 sc each (8), for 26 sc. Because 26 divides evenly by 2, Round 2 fits exactly 13 picots per side with no stitch left over. The 3 tip sc and the 9 top sc are separate groups, so no corner is counted twice: 3 + 26 + 9 + 26 = 64. Packing 26 sc over the ch-18 loop covers the chain completely, so the loop stays firm and round.
Final Blocking
- Weave in any remaining ends on the wrong side, through stitches of the same color.
- Lay the ornament RS up on a blocking mat.
- Pin the bottom tip, the top center, and each side at Rows 3, 6 and 9.
- Check that it measures 3 3/4 in (9.5 cm) x 4 5/8 in (11.7 cm) and that the two sides match.
- Use a pin tip to open each picot so it points outward.
- Mist evenly with water until damp but not soaked.
- Nudge each cream arc so it sits centered over its taupe fan.
- Shape the hanging loop into a neat teardrop while it is still damp.
- Let it dry completely, for at least 6 hours, before you remove the pins.
Final Quality-Control Checklist
- The base has 11 rows, with 25 sts in each of Rows 4–9.
- The shells are evenly staggered, with no doubled or missing fans.
- Every fan has a cream arc over its top, and the lattice forms clean diamonds.
- No overlay chain pulls the base inward.
- Each side has 13 picots, and there is 1 at the bottom tip.
- The hanging loop is centered over the top shell and fully covered.
- The finished size is 3 3/4 in (9.5 cm) x 4 5/8 in (11.7 cm).
- All ends are hidden and trimmed.
Troubleshooting
The base cups or ruffles. The shells are loose compared with the sc stitches. Tighten your dc stitches or go down half a hook size.
The base curls at the edges. The edge sc stitches in Rows 5, 7 and 9 are too tight. Work them a little looser.
The lattice puckers the fans. The overlay chains are too short or too tight. Chain more loosely, or use ch 8 for the long arcs.
The arcs droop or flop. The chains are too loose. Use ch 6 for the long arcs and ch 3 for the short arcs.
The border ripples. There are too many sc per row end. Use 2 sc per full row and no more than 4 per stepped row.
The border pulls in. The sc stitches are too tight. Work Round 1 with slightly looser tension.
The loop twists. Spread the 26 sc evenly and block the loop flat.
Care
Hand wash in cool water with mild soap, press out the water in a towel, and dry flat. Store the ornament flat or hanging, out of direct sunlight, so the cream stays bright.
Final Notes
The measurement chain is simple. The base is 3 1/4 in (8.3 cm) x 4 1/8 in (10.5 cm). Adding a 1/4 in (0.6 cm) border on every edge brings it to 3 3/4 in (9.5 cm) x 4 5/8 in (11.7 cm), with a 1 1/2 in (3.8 cm) loop on top. If the base gauge is right, the overlay and border will fit. Make your first one in taupe and cream, then try other colors for the scales and fill your tree with a little forest of pinecones.
Happy crocheting!