

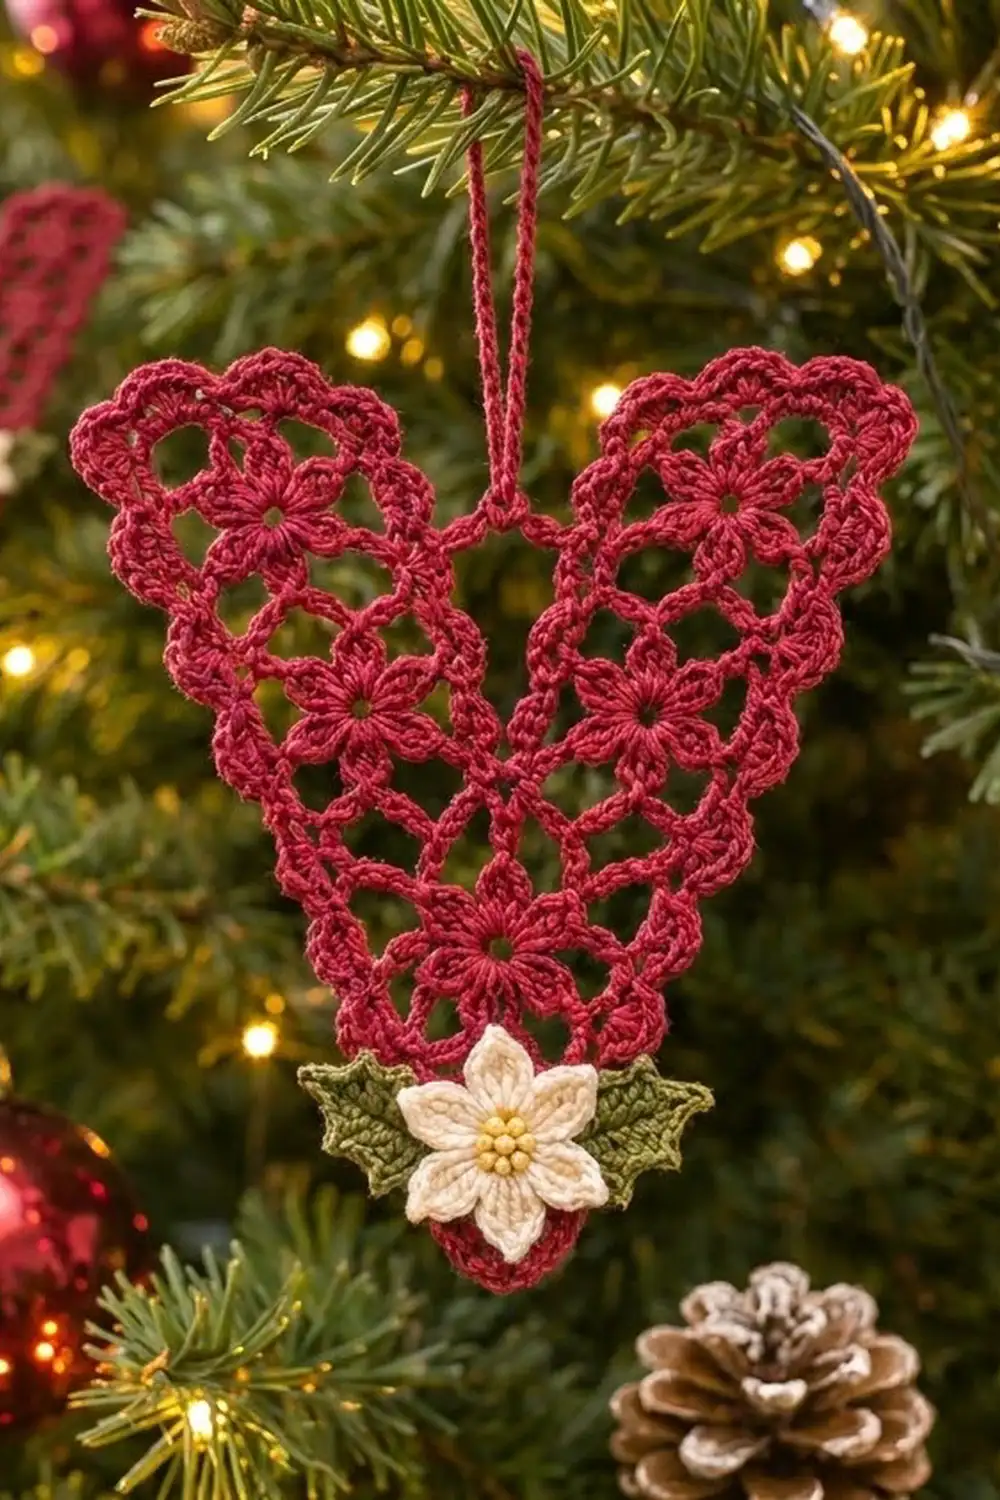
This little ornament is a lace letter V in deep cranberry thread. Seven small six-petal flower motifs form two slim arms that meet at a pointed base. A scalloped edge softens the outline and rounds the top of each arm into a lobe.
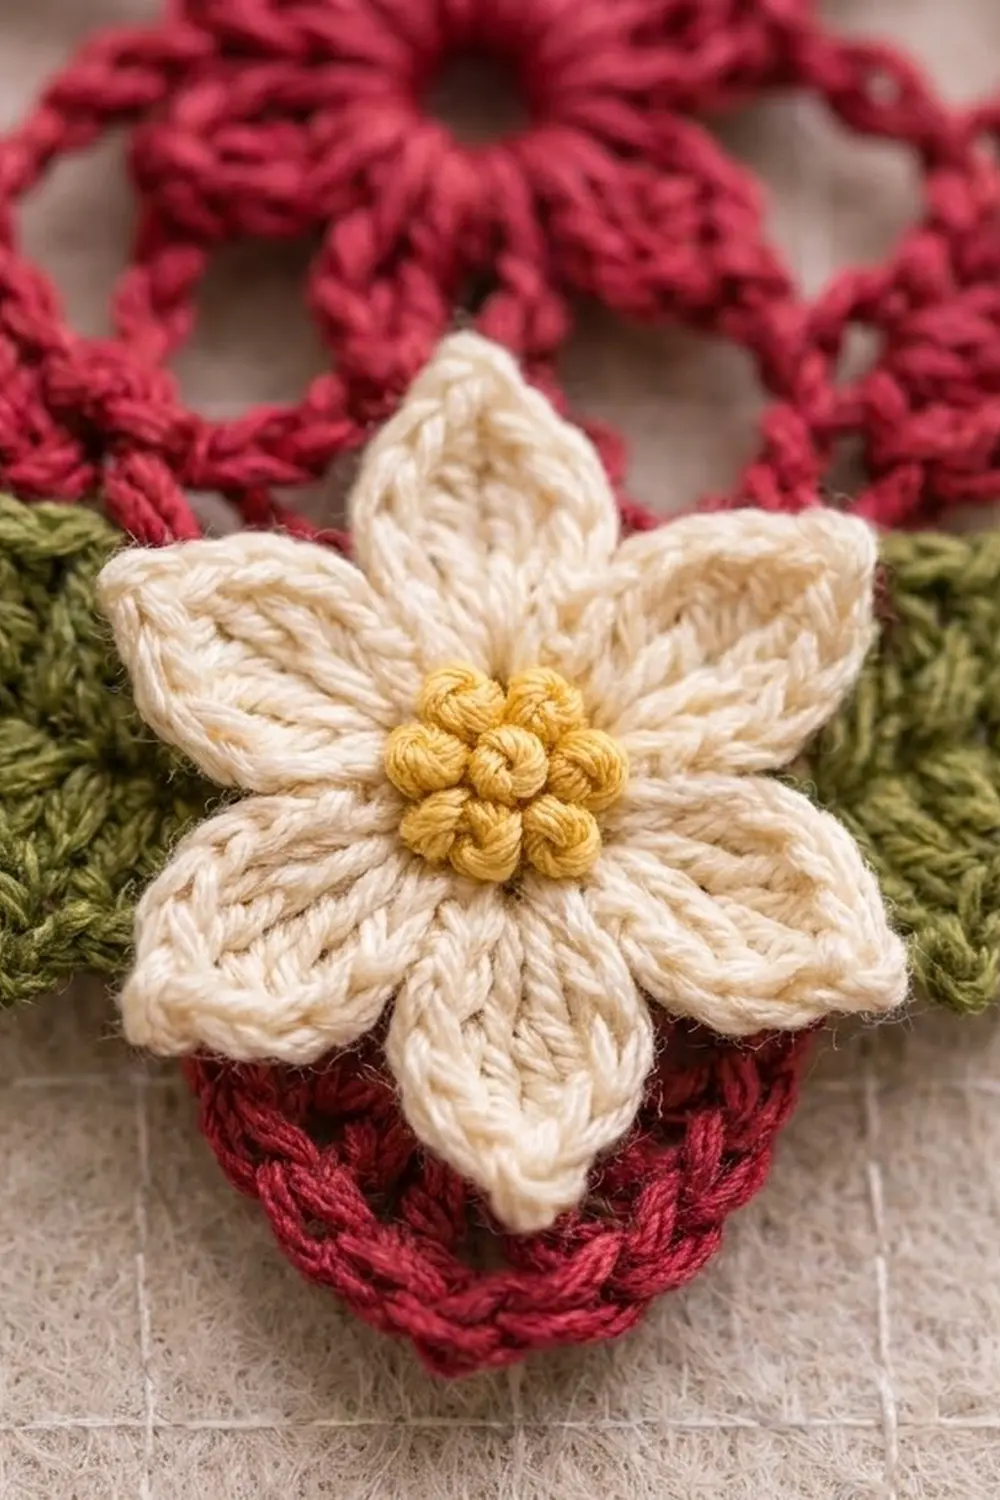
At the base sits a cream five-petal flower with a golden French-knot center, framed by two olive-green holly leaves. A fine chain hanger rises from the notch between the arms, so the ornament hangs straight on a branch.
The pattern uses US crochet terms. The finished ornament measures about 4.5 in (11.4 cm) wide and 4.25 in (10.8 cm) tall, not counting the hanger.
Here is how it goes together. You crochet seven hexagonal flower motifs and sew them into a V. Next you work a two-round scallop border all the way around. Last, you make the flower, leaves and hanger and attach them.
Finished Size and Construction
- Finished size: 4.5 in (11.4 cm) wide x 4.25 in (10.8 cm) tall, not counting the hanger
- Skill level: Intermediate
- Terminology: US crochet terms
- Yarn weight: Size 10 cotton crochet thread (Lace, weight 0)
- Hook: 1.5 mm steel hook
- Number of pieces: 7 lace motifs, 1 flower, 2 leaves, 1 hanger
- Layout: two diagonal arms of 3 motifs each, sharing 1 base motif
- Motif size: 1 in (2.5 cm) flat side to flat side; 1.15 in (2.9 cm) point to point
- Size before border: 4 in (10.2 cm) wide x 3.75 in (9.5 cm) tall
- Border depth: 0.25 in (0.6 cm)
Materials
Use mercerized cotton thread in size 10. It holds a crisp shape after blocking and shows the open petals clearly. Avoid fuzzy or very soft threads, because the lace will lose definition.
- Cranberry red: 12 g (about 60 m) for the motifs, border and hanger
- Cream: 2 g (about 10 m) for the flower
- Olive green: 2 g (about 10 m) for the holly leaves
- Golden yellow: 1 g (about 3 m) for the flower center
All quantities include a comfortable margin for a test motif and tails.
Tools:
- 1.5 mm steel crochet hook
- Fine tapestry needle
- Sharp scissors
- Blocking board or foam mat and rustproof pins
- Spray bottle with water; light fabric stiffener (optional)
Abbreviations (US Terms)
- ch: chain
- sl st: slip stitch
- sc: single crochet
- hdc: half double crochet
- dc: double crochet
- tr: treble crochet
- sc2tog: single crochet 2 stitches together
- st(s): stitch(es)
- sp: space
- cl: 3-dc cluster
3-dc cluster (cl): *Yarn over, insert hook in stitch, pull up a loop, yarn over, pull through 2 loops; repeat from * 2 more times in the same stitch (4 loops on hook), yarn over, pull through all 4 loops.
Picot: Ch 3, sl st in 3rd ch from hook.
Gauge and Checkpoints
Gauge matters more than usual here because the motifs have to fit together neatly into the V. Make one test motif and measure it before going further.
- After Round 2: the flower measures 0.75 in (1.9 cm) across, from petal tip to petal tip.
- After Round 4: the motif measures 1 in (2.5 cm) flat side to flat side and 1.15 in (2.9 cm) point to point.
- Stitch gauge: about 10 sc = 1 in (2.5 cm) along a motif edge.
If your motif is too big, change to a 1.25 mm hook. If it is too small, change to a 1.75 mm hook. Measure again after a light spray of water, because thread relaxes a little once it is wet.
Hexagon Flower Motif (make 7)
Use cranberry red.
Round 1: Ch 6, sl st in first ch to form a ring. Ch 1, 12 sc in ring, sl st to first sc. (12 sc)
The ring leaves a small open hole at the center of each flower.
Round 2 (petals): Ch 1, sc in first st, ch 3, cl in next st, ch 3, *sc in next st, ch 3, cl in next st, ch 3; repeat from * 4 more times, sl st to first sc. (6 cl, 6 sc, 12 ch-3 sps)
You now have six petals. Each petal is a cluster with a ch-3 on either side.
Round 3 (frame): Sl st in each of the next 3 ch and in the top of the first cl. Ch 1, (sc, ch 2, sc) in top of same cl, ch 4, *(sc, ch 2, sc) in top of next cl, ch 4; repeat from * 4 more times, sl st to first sc. (12 sc, 6 ch-2 corner sps, 6 ch-4 side sps)
The tip of each cluster becomes a corner of the hexagon.
Round 4 (edge): Sl st in first ch-2 sp. Ch 1, 3 sc in same ch-2 sp, 3 sc in next ch-4 sp, *3 sc in next ch-2 sp, 3 sc in next ch-4 sp; repeat from * 4 more times, sl st to first sc. Fasten off, leaving an 8 in (20.3 cm) tail for sewing. (36 sc)
Stitch count logic: Each repeat has 3 corner sc + 3 side sc = 6 sts, and 6 repeats = 36 sc. In each 3-sc corner group, the middle sc is the corner center. Counted from one corner center to the next, each side has 7 sts:
- 1 corner center
- 1 corner sc
- 3 side sc
- 1 corner sc
- 1 corner center (the next corner)
That gives 6 sides x 7 sts = 42, minus the 6 corner centers that are counted twice = 36. So each side has 5 stitches between its two corner centers. When joining, you will match corner centers exactly.
Make All Pieces
| Piece | Color | Quantity |
|---|---|---|
| Hexagon flower motif | Cranberry red | 7 |
| Five-petal flower | Cream + golden yellow | 1 |
| Holly leaf | Olive green | 2 |
| Hanger | Cranberry red | 1 (worked onto the ornament) |
Layout grid (hexagons point up and down; L = left arm, R = right arm, B = base):
 L3           R3
    L2     R2
       L1 R1
         B
L1 and R1 sit side by side directly above B. From there, each arm climbs diagonally outward, one motif at a time. The open space between L2 and R2 forms the notch where the hanger attaches.
Joining
Join the motifs with a flat whipstitch in cranberry red. Work from the wrong side through the back loops only, so the front loops form a neat raised line on the right side.
Stitch-to-stitch logic: Hold two motifs right sides together and match corner center to corner center. Sew the 7 sts of one side to the 7 sts of the other, one stitch to one stitch. Don’t skip or double up any stitches.
Join order (7 seams):
- B to L1 (B’s upper-left side to L1’s lower-right side)
- B to R1 (B’s upper-right side to R1’s lower-left side)
- L1 to R1 (the upright sides between them)
- L1 to L2
- L2 to L3
- R1 to R2
- R2 to R3
Three motifs meet at the point just above B. Pull that spot snug but not tight.
Tension: Sew firmly enough that the seam lies flat, but loosely enough that it doesn’t pucker. A rippling seam is too loose; motifs that cup are sewn too tight.
Size checkpoint: Lay the joined V flat. It should measure 4 in (10.2 cm) across, from the outer flat side of L3 to the outer flat side of R3. It should be 3.75 in (9.5 cm) tall, from the bottom point of B to the top points of L3 and R3.
Border
Use the same thread and hook. Border gauge is about 10 sc = 1 in (2.5 cm), the same as the motif edge.
Count the outline first. The seven motifs have 42 sides in total. The 7 seams use up 14 of them, which leaves 28 exposed sides. The outline also has 28 corners:
- 17 outer corners, where a motif point sticks out
- 11 inner junctions, where a seam meets the edge
Round 1 (sc): With the right side facing, join cranberry red in the corner center at the bottom point of B. Ch 1, 3 sc in the same st. Work clockwise around the whole V:
- On every exposed side: 1 sc in each of the 5 sts between the two corner centers.
- At every outer corner: 3 sc in the corner center.
- At every inner junction: sc2tog over the two corner centers, one from each motif.
Sl st to first sc. (202 sts)
Why the math works: 28 sides x 5 sc = 140. 17 outer corners x 3 sc = 51. 11 inner junctions x 1 sc2tog = 11. Total: 140 + 51 + 11 = 202. The 2 extra sts at each outer corner let the points turn without curling. The sc2tog at each junction keeps the inward corners from bunching.
Round 2 (scallops): Ch 1. Work one scallop on every exposed side, with a sc anchoring every corner:
- At each outer corner: sc in the middle sc of the 3-sc group.
- At each inner junction: sc in the sc2tog.
- On each side: 5 dc in the middle (3rd) of that side’s 5 sc. Skip the 2 sc before it and the 2 sc after it. Where the side ends at an outer corner, also skip the extra corner sc at that end.
Sl st to first sc. Fasten off and weave in. (28 sc + 140 dc = 168 sts; 28 scallops)
Why the math works: There is one scallop per side and one anchor per corner, and 28 sides = 28 corners. At the tops of L3 and R3, the scallops crowd around the points and read as rounded lobes. The single scallop at the bottom of B keeps the base pointed.
Border checkpoint: The ornament now measures 4.5 in (11.4 cm) wide and 4.25 in (10.8 cm) tall. Each arm is about 1.5 in (3.8 cm) wide.
Holly Leaf (make 2)
Use olive green. Ch 9.
Side 1: Sl st in 2nd ch from hook (this is the leaf tip), sc in next ch, picot, hdc in next ch, dc in next ch, picot, dc in next ch, hdc in next ch, picot, sc in next ch, 3 sc in last ch (this is the leaf base).
Side 2: Turn the work and continue along the free loops on the other side of the foundation chain: sc in next ch, picot, hdc in next ch, dc in next ch, picot, dc in next ch, hdc in next ch, picot, sc in next ch, sl st in next ch. Make 1 picot for the tip, then sl st to first sl st. Fasten off, leaving an 8 in (20.3 cm) tail. (17 sts, 7 picots)
The picots make the spiky holly edge. Each leaf is about 1 in (2.5 cm) long and 0.5 in (1.3 cm) wide.
Five-Petal Flower
Use cream.
Round 1: Make a magic ring. Ch 1, 10 sc in ring, pull the ring closed, sl st to first sc. (10 sc)
Round 2 (petals): *(Hdc, dc, tr, picot, dc, hdc) in next st, sl st in next st; repeat from * 4 more times. The last sl st lands in the first st of the round. Fasten off, leaving an 8 in (20.3 cm) tail. (5 petals; 25 petal sts + 5 sl st = 30 sts, plus 5 picots)
The picot at the top of each petal gives it a pointed tip. The flower is about 1.25 in (3.2 cm) across.
Center: With golden yellow, embroider 7 small French knots in the center ring, which is about 0.35 in (0.9 cm) across. Place one knot in the middle and six around it.
Assembly and Hanger
- Lay the leaves behind the flower with their bases together. Point one leaf left and one right, each tilted slightly upward.
- Center the flower over B. Place it so the bottom point of B and its scallop still show below the flower.
- Sew the leaves to the lace with the green tails. Then sew the flower on top with the cream tail, stitching between the petals so the stitches are hidden.
Hanger:
- Join cranberry red in the sc at the inner junction at the bottom of the notch.
- Ch 36 (about 3 in or 7.6 cm), then ch 20 more.
- Sl st in the 36th ch counted from the base to form the loop.
- Sl st back down each of the 36 stem chains, then sl st into the starting sc. Fasten off and weave in.
The loop is about 0.75 in (1.9 cm) tall and rises about 1.5 in (3.8 cm) above the tops of the arms.
Final Blocking
- Spray the ornament until it is damp, or dip it in water and press out the excess in a towel.
- Pin the bottom point of B to the board.
- Pin the top points of L3 and R3 so the ornament measures 4.5 in (11.4 cm) wide and 4.25 in (10.8 cm) tall.
- Check that the two arms are straight and match each other in angle.
- Pin the scallops lightly so they open into even curves.
- If you want a crisp tree ornament, brush on a light fabric stiffener.
- Let it dry completely, at least 6 hours, before unpinning.
Final Quality-Control Checklist
- Every motif has 36 sc in Round 4 and measures 1 in (2.5 cm) flat side to flat side.
- All 7 seams join 7 sts to 7 sts.
- Border Round 1 has 202 sts, and Round 2 has 28 scallops.
- The finished size is 4.5 in x 4.25 in (11.4 cm x 10.8 cm).
- Both arms are the same length and angle.
- The flower has 5 evenly spaced pointed petals and 7 gold knots in the center.
- Each leaf has 3 picots per side plus a tip picot.
- The hanger is centered in the notch and the ornament hangs level.
- All ends are woven in invisibly.
Troubleshooting
Motifs won’t lie flat: The Round 3 chains are too tight. Use ch 5 for the side spaces and still work 3 sc into each one.
Petals look flat: Make sure each cl is worked into a sc, not into a chain.
There is a gap where three motifs meet above B: Add one extra whipstitch through all three corner centers.
The border ruffles: You probably worked 3 sc at an inner junction. Work sc2tog there instead.
The border pulls in: Check that every outer corner has 3 sc.
The ornament hangs crooked: Move the hanger to the exact center junction, or block again so both arms match.
Care
Hand wash in cool water with mild soap, roll in a towel to remove water, and block flat again to dry. Store flat in tissue paper between seasons.
Final Notes
Each stage sets up the next. A 0.75 in (1.9 cm) flower after Round 2 becomes a 1 in (2.5 cm) hexagon after Round 4. Seven hexagons sewn stitch to stitch make a 4 in x 3.75 in (10.2 cm x 9.5 cm) V. The 0.25 in (0.6 cm) scallop border brings it to 4.5 in x 4.25 in (11.4 cm x 10.8 cm). Check your measurements at each stage and the ornament will come out the right size.
Happy crocheting!