

The Cinnamon Lattice Bauble is a lacy 3D ornament with a warm, vintage feel. Four rust-colored panels of stacked fan shells are framed in cream and joined with an open ladder seam. A row of tiny picots runs down each seam, so the ornament catches the light from every side when it hangs on the tree.
Two colors do all the work. Spice-rust is used for the lace panels, and soft cream is used for the edging, the seams, the picot trim, the top ring and the hanging loop. The style suits a farmhouse or heirloom tree and looks lovely in a group of three.
This pattern uses US crochet terms. The finished ornament measures about 3¼ in (8.3 cm) wide and 4 in (10.2 cm) tall without the loop, or 6 in (15.2 cm) tall including the 2 in (5.1 cm) hanging loop.
Construction is simple and done in stages. You crochet four flat panels in rows from the bottom tip up, edge each one in rust and then cream, and block them. Next you join them with a cream zigzag ladder seam, add the picot border along each seam, gather the tips, and finish with a top ring and loop.
Finished Size and Construction
- Finished size: 3¼ in (8.3 cm) wide × 4 in (10.2 cm) tall; 6 in (15.2 cm) tall with the loop
- Skill level: Intermediate
- Terminology: US
- Yarn weight: Super fine (#1) / fingering-weight mercerized cotton
- Hook: 2.25 mm (B-1)
- Number of pieces: 4 identical panels, plus a top ring
- Layout: 4 panels in a circle, side by side, tips meeting at the top and bottom
- Piece size: 2¼ in (5.7 cm) × 4½ in (11.4 cm) after the cream edging, blocked flat
- Size before border: 3 in (7.6 cm) wide when joined
- Border depth: about ⅛ in (0.3 cm) per side, bringing the width to 3¼ in (8.3 cm)
Materials
Choose a smooth, mercerized cotton in fingering weight. It gives crisp fans and holds its shape after blocking. Avoid fuzzy or very stretchy fibers, because they blur the eyelets and picots.
- Color A, Rust: 14 g / 48 m
- Color B, Cream: 8 g / 27 m
These quantities include a margin of about 25% for gauge swatches and weaving in ends.
Tools:
– 2.25 mm (B-1) crochet hook
– Tapestry needle
– Blocking board or foam mat and rust-proof pins
– Spray bottle
– Optional: 2¾ in (7.0 cm) shatterproof ball insert, to hold the shape
– Scissors and stitch markers
Abbreviations (US Terms)
- ch – chain
- sl st – slip stitch
- sc – single crochet
- dc – double crochet
- sp – space
- st(s) – stitch(es)
- tch – turning chain
- BLO / FLO – back loop only / front loop only
- RS / WS – right side / wrong side
Special stitches:
– V-st: (dc, ch 3, dc) in the same stitch.
– Fan: 9 dc in the stated space (7 dc for the top fan).
– Picot: ch 3, sl st in the first ch.
Gauge and Checkpoints
Make one complete panel before you commit to all four. Lace gauge is all about height and fan width.
- Fan width: one 9-dc fan = ¾ in (1.9 cm) across.
- Checkpoint 1: Rows 1–7 measure 2 in (5.1 cm) tall.
- Checkpoint 2: after Rust Edging, the panel is 2 in (5.1 cm) × 4¼ in (10.8 cm), lightly stretched.
- Checkpoint 3: after Cream Round 1 and blocking, the panel is 2¼ in (5.7 cm) × 4½ in (11.4 cm).
If your panel is too big, go down 0.25 mm in hook size. If it’s too small, go up 0.25 mm. Changing the hook is better than changing the chain counts, because the arc lengths control the leaf shape.
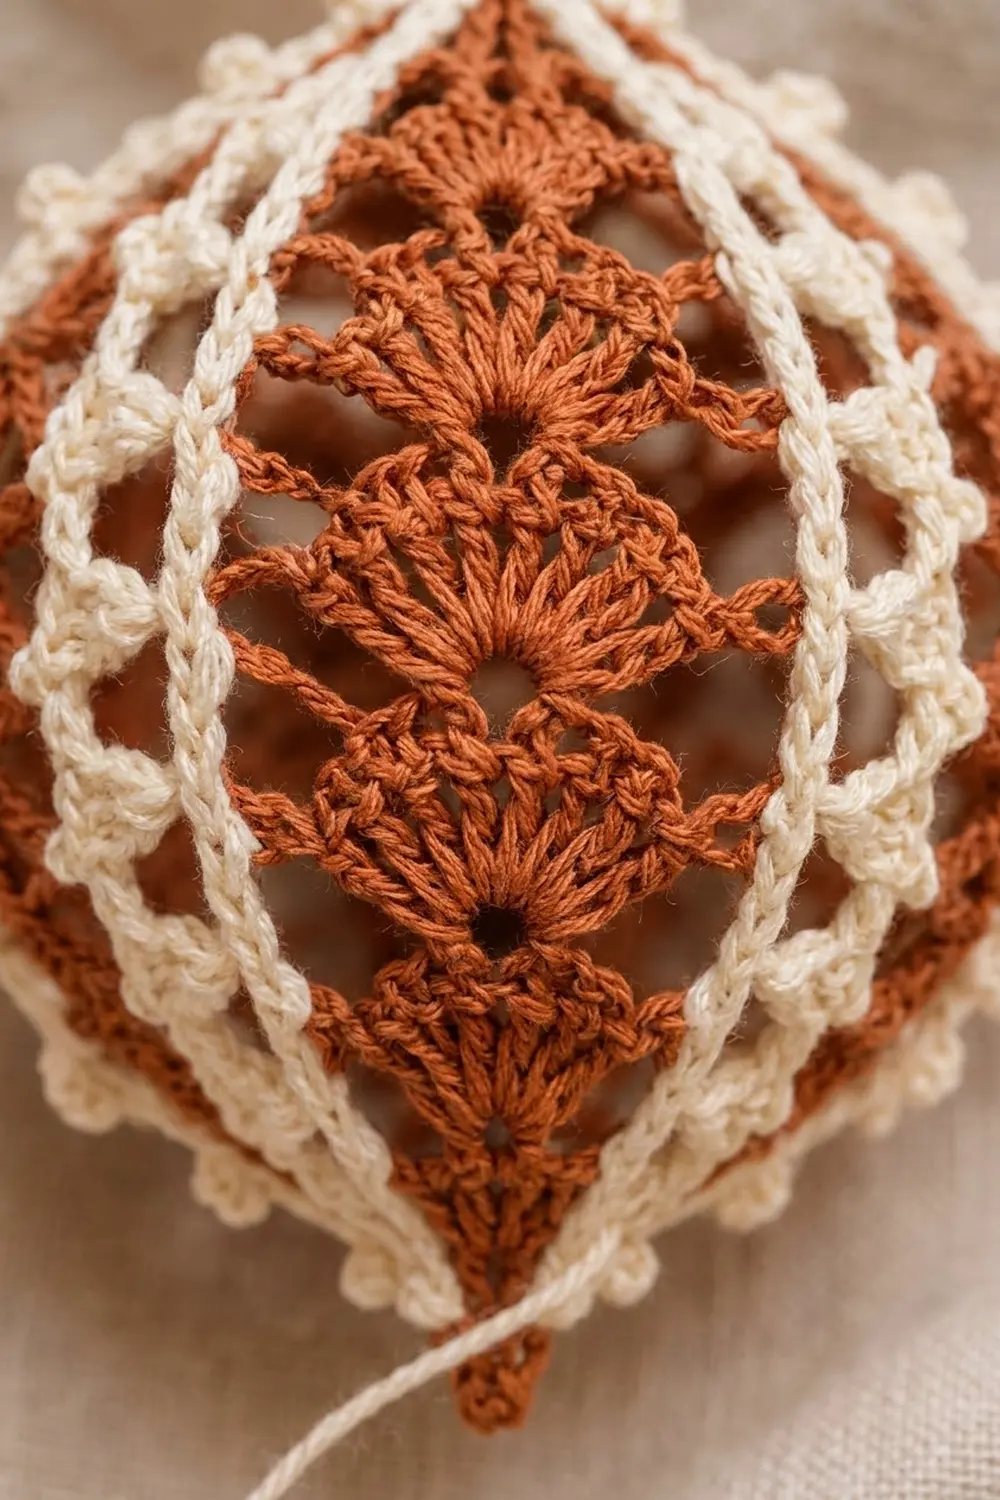
Panel (Make 4)
Use Color A. Every fan row is centered on the ch-3 space of the V-st below it. All rows are turned.
Row 1 (RS): Ch 4, 8 dc in 4th ch from hook. Turn. (9 dc, counting the skipped ch as 1 dc) This is the bottom tip fan.
Row 2: Ch 4 (counts as dc + ch 1), sc in 3rd dc, ch 2, V-st in 5th (center) dc, ch 2, sc in 7th dc, ch 1, dc in top of beginning ch. Turn. (4 dc, 2 sc, 2 ch-1 sps, 2 ch-2 sps, 1 ch-3 sp)
Row 3: Ch 4 (counts as dc + ch 1), sc in next ch-1 sp, ch 1, fan in ch-3 sp of V-st, ch 1, sc in next ch-1 sp, ch 1, dc in 3rd ch of tch. Turn. (11 dc, 2 sc, 4 ch-1 sps)
Row 4: Ch 5 (counts as dc + ch 2), sc in 3rd dc of fan, ch 2, V-st in 5th dc of fan, ch 2, sc in 7th dc of fan, ch 2, dc in 3rd ch of tch. Turn. (4 dc, 2 sc, 4 ch-2 sps, 1 ch-3 sp)
Row 5: Ch 5 (counts as dc + ch 2), sc in next ch-2 sp, ch 2, fan in ch-3 sp, ch 2, sc in last side ch-2 sp, ch 2, dc in 3rd ch of tch. Turn. (11 dc, 2 sc, 4 ch-2 sps)
The ch-2 spaces next to the V-st are skipped in fan rows. Each fan row works only into the outer side arc, the V-st, and the tch.
Row 6: Ch 6 (counts as dc + ch 3), sc in 3rd dc of fan, ch 2, V-st in 5th dc of fan, ch 2, sc in 7th dc of fan, ch 3, dc in 3rd ch of tch. Turn. (4 dc, 2 sc, 2 ch-2 sps, 3 ch-3 sps)
Row 7: Ch 6 (counts as dc + ch 3), sc in next side ch-3 sp, ch 3, fan in V-st ch-3 sp, ch 3, sc in last side ch-3 sp, ch 3, dc in 3rd ch of tch. Turn. (11 dc, 2 sc, 4 ch-3 sps)
Checkpoint 1: Rows 1–7 should measure 2 in (5.1 cm).
Rows 8–9: Repeat Rows 6–7. This is the widest tier.
Rows 10–11: Repeat Rows 4–5.
Row 12: Ch 4 (counts as dc + ch 1), sc in 3rd dc of fan, ch 2, V-st in 5th dc of fan, ch 2, sc in 7th dc of fan, ch 1, dc in 3rd ch of tch. Turn. (4 dc, 2 sc, 2 ch-1 sps, 2 ch-2 sps, 1 ch-3 sp)
Row 13: Ch 3 (counts as dc), 7 dc in ch-3 sp of V-st, dc in 3rd ch of tch. Turn. (9 dc) This is the top fan. Skipping the side arcs pulls the panel in toward the tip.
Row 14: Ch 1, sc in first dc, ch 3, skip 3 dc, sc in next dc (5th, center), ch 3, skip 3 dc, sc in top of tch. Do not turn. (3 sc, 2 ch-3 sps)
The panel now has 7 fans: the tip fan, 5 full fans, and the smaller top fan.
Rust Edging (Round E)
Continue with Color A, working around the whole panel.
Round E: Ch 1. Work (sc, ch 2, sc) in the center sc of Row 14 for the top tip.
- Side A: 3 sc in next ch-3 sp, sc in end sc of Row 14, then 2 sc around each row-end post of Rows 13 down to 1 (26 sc).
- Bottom tip: (sc, ch 2, sc) in the foundation ch at the base of Row 1.
- Side B: 2 sc around each row-end of Rows 1 up to 13 (26 sc), sc in first sc of Row 14, 3 sc in ch-3 sp.
Sl st to the first sc. Fasten off.
Count: 64 sc + 2 ch-2 tip sps. Each side has 30 sc between the tips, plus 1 tip sc at each end, for 32 sc per side, including its 2 tip stitches.
Checkpoint 2: 2 in (5.1 cm) × 4¼ in (10.8 cm).
Cream Round 1
Round C1: Join Color B in the top tip ch-2 sp. Ch 1, (sc, ch 2, sc) in the same sp, sc in each sc around, and (sc, ch 2, sc) in the bottom tip sp. Sl st to the first sc. Fasten off, leaving a 6 in (15.2 cm) tail at the bottom tip.
Count: 68 sc + 2 ch-2 tip sps. Each side has 34 sc including the 2 new tip sc. The 32 interior sts per side (the former Round E side) are used for joining and the border.
Pin each panel flat to 2¼ in (5.7 cm) × 4½ in (11.4 cm). Place pins at both tips and at 3 points along each side, mist with water, and let it dry fully. This is Checkpoint 3.
Make All Pieces
- Panels: 4 total, each with Color A for Rows 1–14 and Round E, and Color B for Round C1.
- Color A use: about 2.8 g per panel.
- Color B use: about 1 g per panel for C1. The rest goes into joining, the border, the ring and the loop.
Layout (seen from the top, looking down at the ring):
        [Panel 1]
[Panel 4]   ring   [Panel 2]
        [Panel 3]
Seams: 1|2, 2|3, 3|4, 4|1
Label the panels 1–4 with stitch markers so the RS of every panel faces out.
Joining
Method: cream zigzag ladder join, worked in BLO from top tip to bottom tip.
Number the 32 interior sts on each side from top to bottom. Place Panel 1 (left) and Panel 2 (right) side by side, RS up, top tips together.
Seam: Join Color B with a sl st in BLO of st 1 on the right edge of Panel 1. Then work:
ch 2, sl st in BLO of st 1 of Panel 2, ch 2, sl st in BLO of st 3 of Panel 1, ch 2, sl st in BLO of st 3 of Panel 2
Continue alternating between the panels, always using odd stitches (1, 3, 5 … 31). Each side gets 16 attachment points, and each seam has 31 ch-2 rungs. Fasten off.
Stitch logic: 32 interior sts ÷ every 2nd st = 16 attachment points per side. The counts are identical on both panels, so the seam can’t twist or creep.
Tension: keep the ch-2 rungs relaxed. If they’re tight, the seam puckers and the bauble goes square. If they’re loose, the cream lines drift apart. The gap between the two cream lines should be about ⅛ in (0.3 cm).
Join 2 to 3 and 3 to 4 the same way. Before you work the fourth seam (4 to 1), place the optional 2¾ in (7.0 cm) insert inside, then close the seam.
Size checkpoint: the joined body measures about 3 in (7.6 cm) across at its widest point.
Border: Picot Seam Trim
The border is a raised picot line worked into the free front loops on the right edge of each panel, one line beside each seam. That gives 4 picot lines on the ornament.
Border gauge: 4 sts = ½ in (1.3 cm) along the edge, which puts one picot every ½ in (1.3 cm).
Border row (each seam): With RS facing, join Color B in FLO of interior st 1 at the top. Work:
[sc in FLO of next 3 sts, picot, sc in FLO of next st] 8 times.
Fasten off.
Count per seam: 32 sc and 8 picots. The edge has 32 interior sts, and 32 ÷ 4 = 8 repeats with no leftover stitches. The first and last picots therefore sit an equal distance from the tips. No stitches are added or skipped, so the border lies flat without rippling. Across the 4 seams you get 128 sc and 32 picots.
The picots add about ⅛ in (0.3 cm) on each side of the silhouette. That takes the width from 3 in (7.6 cm) to 3¼ in (8.3 cm).
Top Ring and Hanging Loop
Ring: With Color B, ch 6 and sl st to form a ring.
- Round 1: Ch 1, 12 sc in the ring, sl st to the first sc. (12 sc)
- Round 2: Ch 1. Work sc in next 2 sc, sl st through the top tip ch-2 sp of the next panel, sc in next sc 4 times. Sl st to the first sc. (12 sc + 4 tip joins)
The ring is about ½ in (1.3 cm) across.
Loop: Ch 36, then sl st in the same sc to make a 2 in (5.1 cm) loop. Fasten off.
Bottom tip: Thread one bottom tail through all 4 bottom tip ch-2 sps twice, pull tight, and knot. Weave the tail up inside a fan.
Final Blocking
- Weave in all ends along the dc posts. Trim them close.
- If you didn’t use an insert, slip in a small balloon and inflate it to 3 in (7.6 cm).
- Mist the whole ornament until it is evenly damp, not dripping.
- Smooth each fan upward with your fingertips and open the eyelets.
- Straighten each seam so the two cream lines run parallel from ring to tip.
- Pinch each picot into a round bobble.
- Hang to dry for 12–24 hours. Then deflate and remove the balloon, if used.
- Optional: for extra firmness, mist with a light fabric stiffener and dry again.
Final Quality-Control Checklist
- Each panel has 7 fans, centered and stacked in a straight line.
- Round E has 32 sc per side and Round C1 has 34 sc per side.
- Every seam has 16 attachment points per side and 31 rungs.
- Each picot line has 8 picots, evenly spaced.
- The ornament is 3¼ in (8.3 cm) wide and 4 in (10.2 cm) tall without the loop.
- All 4 tips meet neatly at the ring and at the bottom.
- The hanging loop is 2 in (5.1 cm) and the ornament hangs straight.
Troubleshooting
- Fans lean to one side: you worked the fan into a side ch-2 sp instead of the V-st ch-3 sp. Rip back to the V-st row.
- Panel too narrow at the middle: check that Rows 6–9 use ch-3 arcs, not ch-2.
- Side edges ruffle: Round E has too many sc. Use exactly 2 sc per dc row-end.
- Seam twists: the stitch counts on the two sides don’t match. Recount the interior sts and restart from st 1.
- Picots crowded at the bottom: your border count is off. You must finish with exactly 8 repeats.
- Bauble looks square: the ladder rungs are too tight. Loosen them, or rework with ch 3 rungs.
- Ornament leans when hanging: the ring tip joins are uneven. Space them every 3 sc.
Care
Hand wash in cool water with a mild soap, press out the water in a towel, and reshape over a balloon to dry. Store flat or loosely wrapped in tissue so the picots don’t crush.

Final Notes
The measurement chain is short and easy to check:
- Rows 1–7 measure 2 in (5.1 cm).
- Each panel measures 2 in × 4¼ in (5.1 × 10.8 cm) after the rust edging.
- Each panel measures 2¼ in × 4½ in (5.7 × 11.4 cm) after the cream round and blocking.
- The joined body is 3 in (7.6 cm) wide.
- The finished bauble is 3¼ in (8.3 cm) wide with the picot border and 6 in (15.2 cm) tall with the loop.
If each stage matches its checkpoint, the next stage will match too. Make one, then make a set in rust, cream or any spice tone you love.
Happy crocheting!