

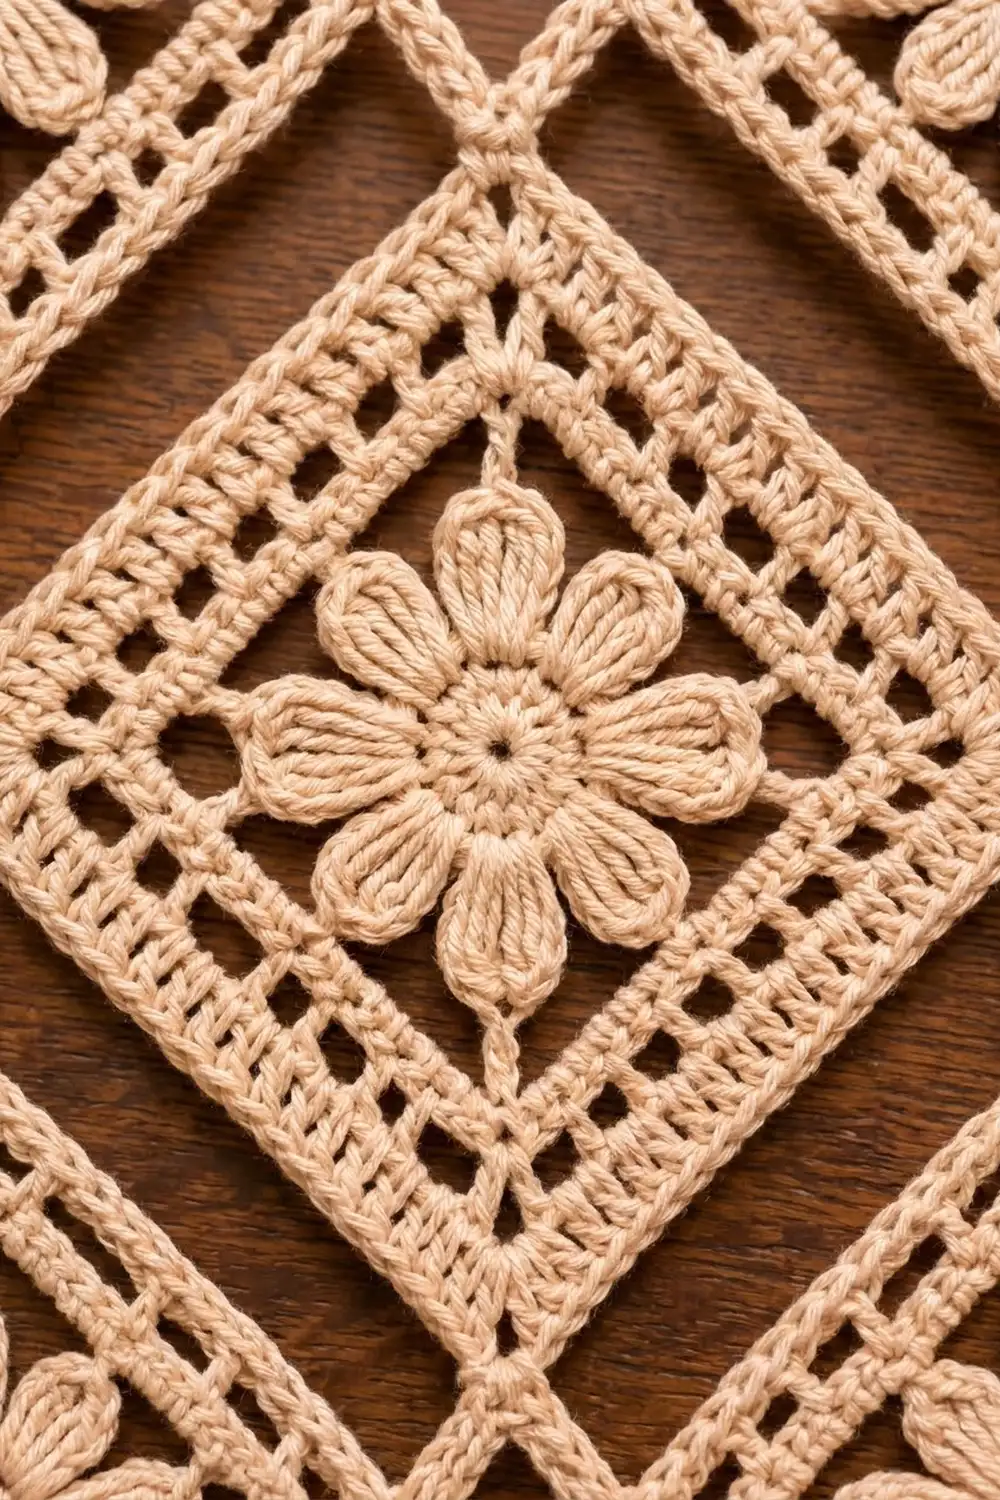
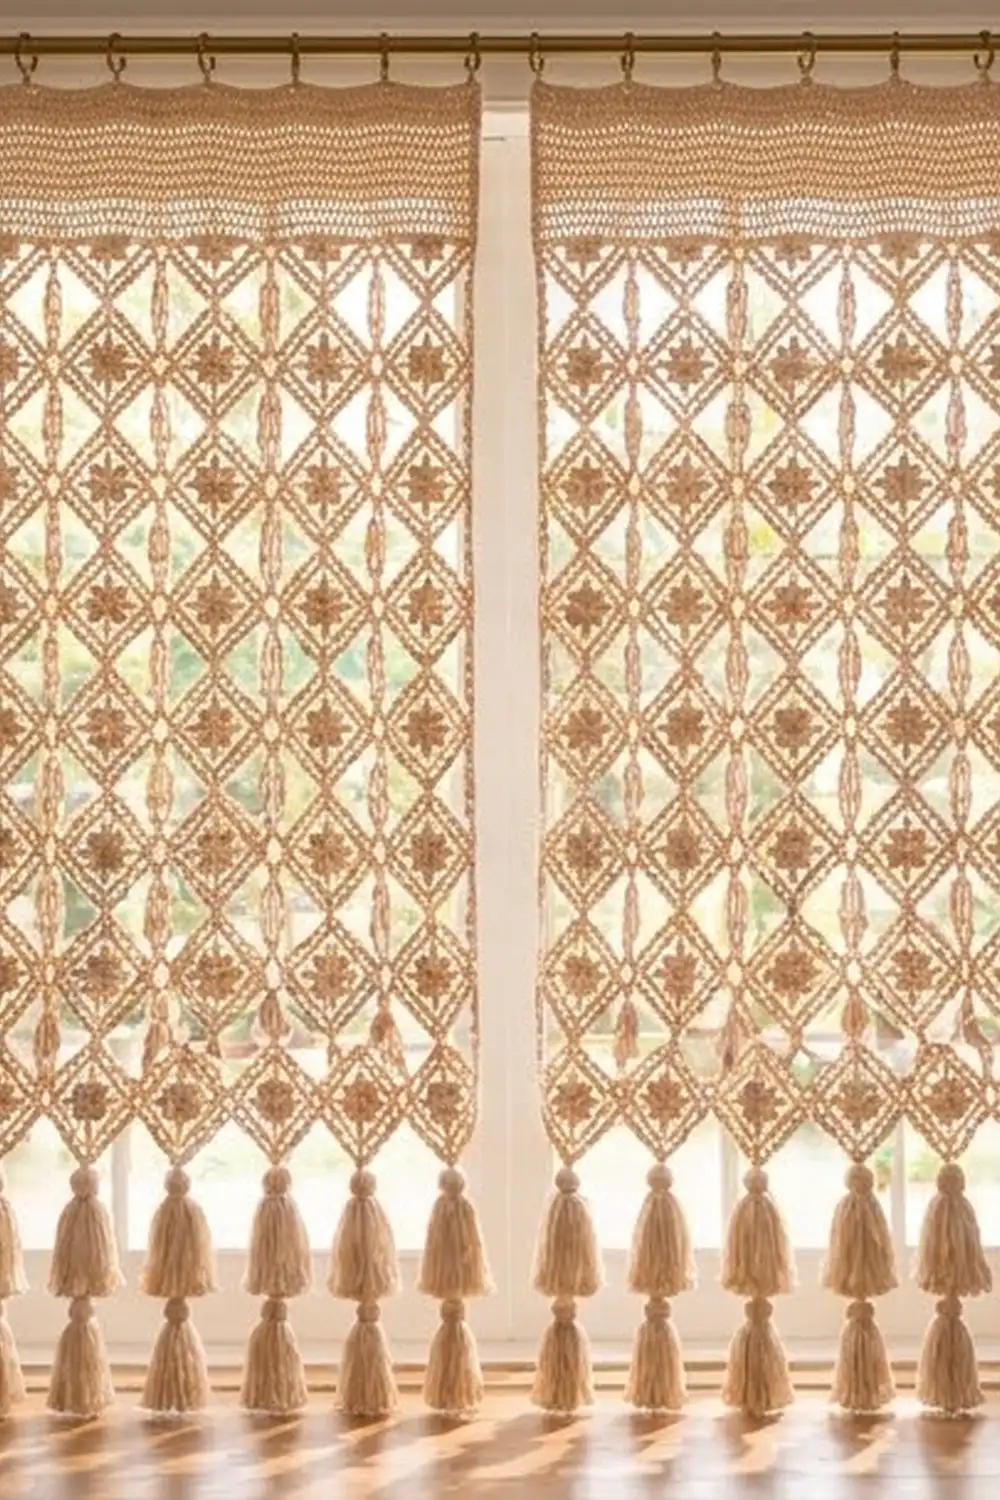
The Sandstone Lattice Curtain is a light, lacy window panel built from small diamond motifs. Each diamond has a raised eight-petal flower in the middle and two square frames around it. The motifs touch only at their points, so the gaps between them form a second set of open diamonds. When light comes through the window, the whole panel looks like carved screenwork.
The sample uses one color, a warm sand-beige cotton, so the texture does all the work. A solid band across the top carries the curtain rings, and tassels hang from the lowest points. The style is calm and neutral and suits boho or classic rooms.
This pattern uses US crochet terms. One panel measures 40.6 in (103.1 cm) wide and 77.4 in (196.6 cm) tall including the top band, plus tassels about 5 in (12.7 cm) long. The photo shows two panels hung as a pair.
You crochet each motif in the round, and from the second motif on you join it to its neighbors in the last round (join-as-you-go). After all 91 motifs are joined, you work the top band across the top points, block the panel, and add the tassels.
Finished Size and Construction
- Finished panel size: 40.6 in (103.1 cm) wide × 77.4 in (196.6 cm) tall, not including tassels
- Skill level: Intermediate
- Terminology: US
- Yarn weight: DK (#3) cotton
- Hook: 3.5 mm (E-4)
- Number of pieces: 91 motifs per panel (182 for a pair)
- Layout: 7 columns × 13 rows, diamonds joined point to point
- Motif size: 4.1 in (10.4 cm) per side; 5.8 in (14.7 cm) point to point
- Size before border: 40.6 in (103.1 cm) × 75.4 in (191.5 cm)
- Border: top band only, 2 in (5.1 cm) deep
Materials
Use a smooth, mercerized or combed DK cotton. It shows the stitches clearly and hangs without stretching. Avoid fuzzy yarns, because they blur the open spaces.
- Sand Beige: 600 g (approx. 1,380 m) per panel; 1,200 g (approx. 2,760 m) for a pair
These amounts include about a 15% margin. One panel needs roughly 455 g for the motifs, 20 g for the top band and 21 g for the tassels.
Tools:
– 3.5 mm (E-4) crochet hook
– Tapestry needle
– Stitch markers
– Scissors
– Cardboard rectangle 5 in (12.7 cm) tall, for the tassels
– Blocking mats, rustproof pins and a spray bottle
– 9 curtain clip rings per panel
Abbreviations (US Terms)
- ch – chain
- sl st – slip stitch
- sc – single crochet
- hdc – half double crochet
- dc – double crochet
- sk – skip
- sp(s) – space(s)
- st(s) – stitch(es)
- MR – magic ring
- BPsc – back post single crochet
Special stitch – BPsc: Insert the hook from back to front to back around the post of the stitch, yarn over, pull up a loop, yarn over and pull through both loops.
Join-as-you-go corner (JAYG corner): 3 dc, ch 1, sl st into the neighbor’s corner ch-3 sp, ch 1, 3 dc. This replaces a normal corner of (3 dc, ch 3, 3 dc).
Gauge and Checkpoints
Base gauge: 20 dc = 4 in (10.2 cm).
Make one test motif before anything else. Block it, then check these sizes:
- After Round 1: 1.25 in (3.2 cm) across
- After Round 3: 2.5 in (6.4 cm) across the petals
- After Round 5: 2.4 in (6.1 cm) per side
- After Round 6: 3.2 in (8.1 cm) per side
- After Round 7: 4.1 in (10.4 cm) per side, 5.8 in (14.7 cm) point to point
If your motif is too big (for example 6 in / 15.2 cm point to point), go down half a hook size. If it’s too small (for example 5.6 in / 14.2 cm), go up half a size. A difference of only 0.25 in (0.6 cm) per motif adds up to 1.75 in (4.4 cm) across the width and 3.25 in (8.3 cm) down the length, so this step is worth the time.
Motif Pattern
Make the first motif complete, then join each later motif as you work its Round 7.
Round 1: MR, ch 3 (counts as dc), 15 dc in ring, sl st to top of ch-3. (16 dc)
Round 2: Ch 1, sc in same st, ch 4, sk 1, sc in next st, ch 4, sk 1; repeat from * 6 more times, sl st to first sc. (8 sc, 8 ch-4 sps)
Round 3 (petals): In each ch-4 sp work (sc, hdc, 3 dc, hdc, sc); sl st to first sc. (8 petals, 7 sts each = 56 sts)
The petals sit up because the ch-4 loop gives them a rounded base.
Round 4: Working behind the petals, BPsc around the next Round 2 sc, ch 5; repeat from * 7 more times, sl st to first BPsc. (8 BPsc, 8 ch-5 sps)
The ch-5 loops sit behind the petals and push the flower forward.
Round 5 (inner frame): Sl st into the first ch-5 sp, ch 3 (counts as dc), (2 dc, ch 3, 3 dc) in the same sp, 5 dc in the next sp, (3 dc, ch 3, 3 dc) in the next sp, 5 dc in the next sp; repeat from * 2 more times, sl st to top of ch-3.
(44 dc total: 11 dc per side, counting the 3 dc on each side of the corners; 4 corner ch-3 sps)
Round 6 (mesh gap): Sl st into the corner ch-3 sp, ch 6 (counts as dc + ch 3), dc in the same sp. On each side, number the 11 dc as dc 1 to dc 11:
ch 2, sk dc 1–2, dc in dc 3, ch 2, sk dc 4–5, dc in dc 6, ch 2, sk dc 7–8, dc in dc 9, ch 2, sk dc 10–11, then (dc, ch 3, dc) in the next corner sp. Repeat for all 4 sides, ending with ch 2 and sl st to the 3rd ch of the starting ch-6.
(20 dc total: 5 dc per side including both corner dc; 16 ch-2 sps; 4 corner ch-3 sps)
This round makes the open ladder between the two frames.
Round 7 (outer frame): Sl st into the corner sp, ch 3 (counts as dc), (2 dc, ch 3, 3 dc) in the same sp. Along each side work dc in each dc and 2 dc in each ch-2 sp. That is 5 dc + (4 × 2) dc = 13 dc between the corner groups. Then work (3 dc, ch 3, 3 dc) in the next corner. Repeat around and sl st to the top of ch-3.
(76 dc total: 19 dc per side = 3 + 13 + 3; 4 corner ch-3 sps)
Fasten off and weave in the ends.
Make All Pieces
For one panel, make 91 motifs in Sand Beige. For a pair, make 182.
Turn every motif on point so it hangs as a diamond. Each motif joins its neighbors only at its four points.
Columns:   1  2  3  4  5  6  7
Row 1:     ◇--◇--◇--◇--◇--◇--◇
Row 2:     ◇--◇--◇--◇--◇--◇--◇
Row 3:     ◇--◇--◇--◇--◇--◇--◇
  ...           (repeat)
Row 13:    ◇--◇--◇--◇--◇--◇--◇
Each “–” is a point-to-point join. Every motif also joins the motif directly above and below it at its top and bottom points.
Joining
Join each motif in its Round 7, using the JAYG corner at every point that touches a motif you’ve already made.
Order:
1. Row 1, column 1: Work the full motif with no joins.
2. Row 1, columns 2–7: Join the left point to the right point of the previous motif.
3. Row 2, column 1: Join the top point to the bottom point of the motif above it.
4. Row 2, columns 2–7: Join the top point to the motif above and the left point to the motif on the left.
5. Repeat steps 3 and 4 for rows 3 to 13.
Stitch logic: Each point joins exactly one neighbor, and the JAYG corner keeps all 3 + 3 dc of that corner. Every motif therefore keeps 76 dc and 19 dc per side, and the side counts stay the same whether or not a corner is joined.
Tension: Keep the sl st snug but not tight. If you pull it tight, the points pucker. If it’s loose, the open diamonds sag.
Size checkpoint: Row 1 should measure 40.6 in (103.1 cm), which is 7 × 5.8 in. After 3 rows, the height should be 17.4 in (44.2 cm). Any two motifs joined point to point should measure 11.6 in (29.5 cm).
Border (Top Band)
Only the top edge gets a border. The sides keep their diamond points, and the bottom points carry the tassels.
Border gauge: 5 dc per inch (2 per cm), the same as the motif gauge.
Why the math works: The top points of row 1 are 5.8 in (14.7 cm) apart. At 5 sts per inch that is 29 sts per motif, so the band is 7 × 29 = 203 sts.
Row 1 (foundation): With the right side facing, start at the top right. Ch 14, sc in the top corner ch-3 sp of the first motif, ch 28, sc in the top corner sp of the next motif; repeat from * 5 more times, then ch 14. Turn.
(14 + 7 sc + (6 × 28) + 14 = 203 sts)
The two ch-14 ends each reach half a motif width past the outer points.
Row 2: Ch 3 (counts as dc), dc in each st across. Turn. (203 dc)
Rows 3–4: Repeat Row 2. (203 dc each row)
Row 5: Ch 1, sc in each st across. (203 sc) Fasten off.
The band is 2 in (5.1 cm) deep, which makes the panel 75.4 + 2 = 77.4 in (196.6 cm) tall.
Rings: Clip 9 rings to the top band: at st 1, at st 203, and above each top point at sts 15, 44, 73, 102, 131, 160 and 189. The rings at the ends sit 2.8 in (7.1 cm) from their neighbors. All the others are 5.8 in (14.7 cm) apart.
Final Blocking
- Weave in all ends first.
- Lay the panel flat on blocking mats, right side up.
- Pin the top band straight to 40.6 in (103.1 cm).
- Pin every point of every diamond so each motif is 5.8 in (14.7 cm) point to point.
- Shape the petals with your fingers so they sit up.
- Mist the panel thoroughly, until damp but not dripping.
- Let it dry completely, at least 24 hours, before unpinning.
Tassels
Make 7 per panel. Wrap yarn 25 times around the 5 in (12.7 cm) card. Tie the top with a 12 in (30.5 cm) strand, cut the bottom loops, and wrap 0.5 in (1.3 cm) below the top. Tie one tassel to the bottom point of each motif in row 13, then trim the ends evenly.
Final Quality-Control Checklist
- [ ] All 91 motifs have 76 dc and 19 dc per side
- [ ] Every point join is a single sl st with ch 1 on each side
- [ ] Every open diamond between motifs is the same size
- [ ] Each band row has 203 sts
- [ ] The panel measures 40.6 × 77.4 in (103.1 × 196.6 cm)
- [ ] The 7 tassels are the same length
- [ ] No loose ends show on the front
Troubleshooting
- Petals lie flat: Check that you worked Round 4 behind the petals with BPsc.
- Motif cups: The Round 4 chains are too tight. Try ch 6 instead.
- Motif ruffles: Your tension is loose. Go down a hook size.
- Points pull apart: Your JAYG chains are too loose. Use ch 1, not ch 2.
- Top band waves: Too many sts, or the chains are too loose. Recount to 203 and use your gauge chain tension.
- Top band pulls the points up: The chains are too tight. Go up a hook size for Row 1 only.
- Panel is too long: Block it again with less length, or leave off one row of motifs.
Care
Hand wash in cool water with mild soap, press out the water without wringing, and dry flat, pinning the points if needed. Keep it out of the dryer.
Final Notes
Everything in this panel depends on one test motif. A 5.8 in (14.7 cm) motif gives a 40.6 in (103.1 cm) width across 7 columns. Thirteen rows give 75.4 in (191.5 cm), and the 2 in (5.1 cm) top band brings the panel to 77.4 in (196.6 cm). At 29 sts per motif, the band comes to exactly 203 sts. If you check your motif against these numbers, the joins, band and blocking will all come out right.
Happy crocheting!