

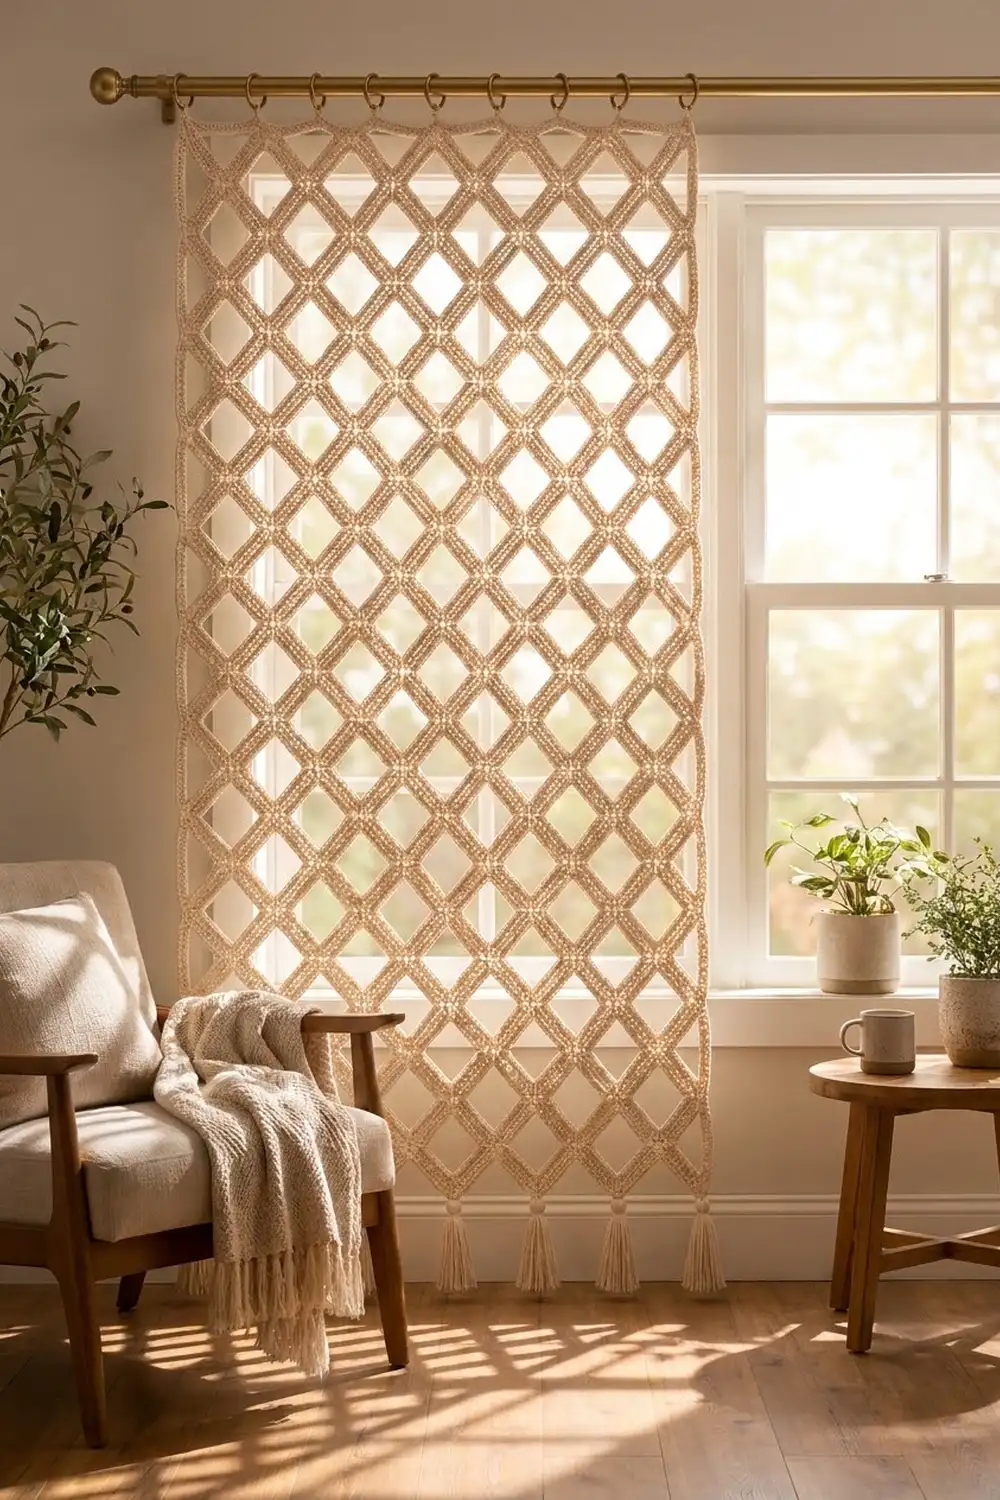
The Ivory Lattice Diamond Curtain is an open, airy panel made from small hollow square frames. You turn each frame on point so it reads as a diamond, then join the frames edge to edge into a diagonal trellis. Light shines through every square window, and soft tassels hang from the lowest points.
The whole panel is worked in one color, a warm cream or ivory cotton. That keeps the look calm and natural, a bit like macramé or carved wooden screens, and it suits boho, coastal, and neutral rooms. Each frame has a dense sc–dc–sc texture with mitered corners, so the lattice bars look solid and neat from both sides.
This pattern uses US crochet terms. One finished panel measures about 38.9 in (98.8 cm) wide across the side points and 77.3 in (196.3 cm) tall from top point to bottom point, plus the hanging loops and tassels. For a pair like the one in the room photo, make two panels.
You’ll make 127 identical frame motifs, each 4.5 in (11.4 cm) square. You join them with slip-stitch seams in a diagonal grid, add one round of single crochet edging with hanging loops at the top points, and finish with 6 tassels along the bottom.
Finished Size and Construction
- Finished panel size: 38.9 in (98.8 cm) wide x 77.3 in (196.3 cm) tall, not counting loops and tassels
- Skill level: Easy+ (simple stitches, long joining)
- Terminology: US
- Yarn weight: worsted (#4) cotton
- Hook: 5.0 mm (H-8)
- Number of pieces: 127 motifs per panel
- Layout: 12 long rows of 6 diamonds, plus 11 offset rows of 5 diamonds that sit between them
- Piece size: 4.5 in (11.4 cm) per side, about 6.4 in (16.3 cm) point to point
- Size before border: 38.4 in (97.5 cm) x 76.8 in (195.1 cm)
- Border depth: 1 round of sc, about 0.25 in (0.6 cm) on every edge
Materials
Yarn: Choose a smooth, firm worsted-weight cotton or cotton blend. Cotton holds the crisp square shape and hangs straight without stretching. Avoid fuzzy or very stretchy acrylics, because they blur the open windows and can sag over a long drop.
- Cream / Ivory: 850 g (about 1,360 m), for example 17 balls of 50 g / 80 m
That total includes 127 motifs (about 5 g / 7.5 m each), the seams, the edging, and the 6 tassels. The quantity includes a margin of about 15%, so dye-lot differences and a slightly looser tension won’t leave you short. Buy everything from one dye lot.
Tools:
– 5.0 mm (H-8) crochet hook
– Tapestry needle
– Stitch markers
– Scissors
– Measuring tape
– 5.5 in (14.0 cm) piece of cardboard for the tassels
– Blocking mats or a clean towel-covered floor, plus rust-proof pins
– Curtain rod with rings or clips (optional)
Abbreviations (US Terms)
- ch – chain
- sl st – slip stitch
- sc – single crochet
- dc – double crochet
- sc2tog – single crochet 2 together
- sp – space
- st(s) – stitch(es)
- RS / WS – right side / wrong side
- rep – repeat
Special stitch – sc2tog across a valley: Insert hook in the first corner ch-2 sp, yarn over, pull up a loop. Insert hook in the next corner ch-2 sp (on the neighboring motif), yarn over, pull up a loop. Yarn over and draw through all 3 loops on hook.
Gauge and Checkpoints
Gauge: 16 sc = 4 in (10.2 cm). One finished motif = 4.5 in (11.4 cm) per side.
Make one motif and measure it before you go on. With 127 motifs, a small error grows quickly. If every motif is 0.125 in (0.3 cm) too big, the panel gains almost 1 in (2.5 cm) in width and more than 1.5 in (3.8 cm) in height.
Checkpoints, measured flat along one outer side:
– After Round 1: about 3 in (7.6 cm)
– After Round 2: about 4 in (10.2 cm)
– After Round 3: 4.5 in (11.4 cm), with a center window of about 2.5 in (6.4 cm)
Too big (4.75 in / 12.1 cm or more): go down half a hook size. Too small (4.25 in / 10.8 cm or less): go up half a hook size. Change the hook, not the stitch counts, because the joining and edging math depend on exactly 16 sts per side.
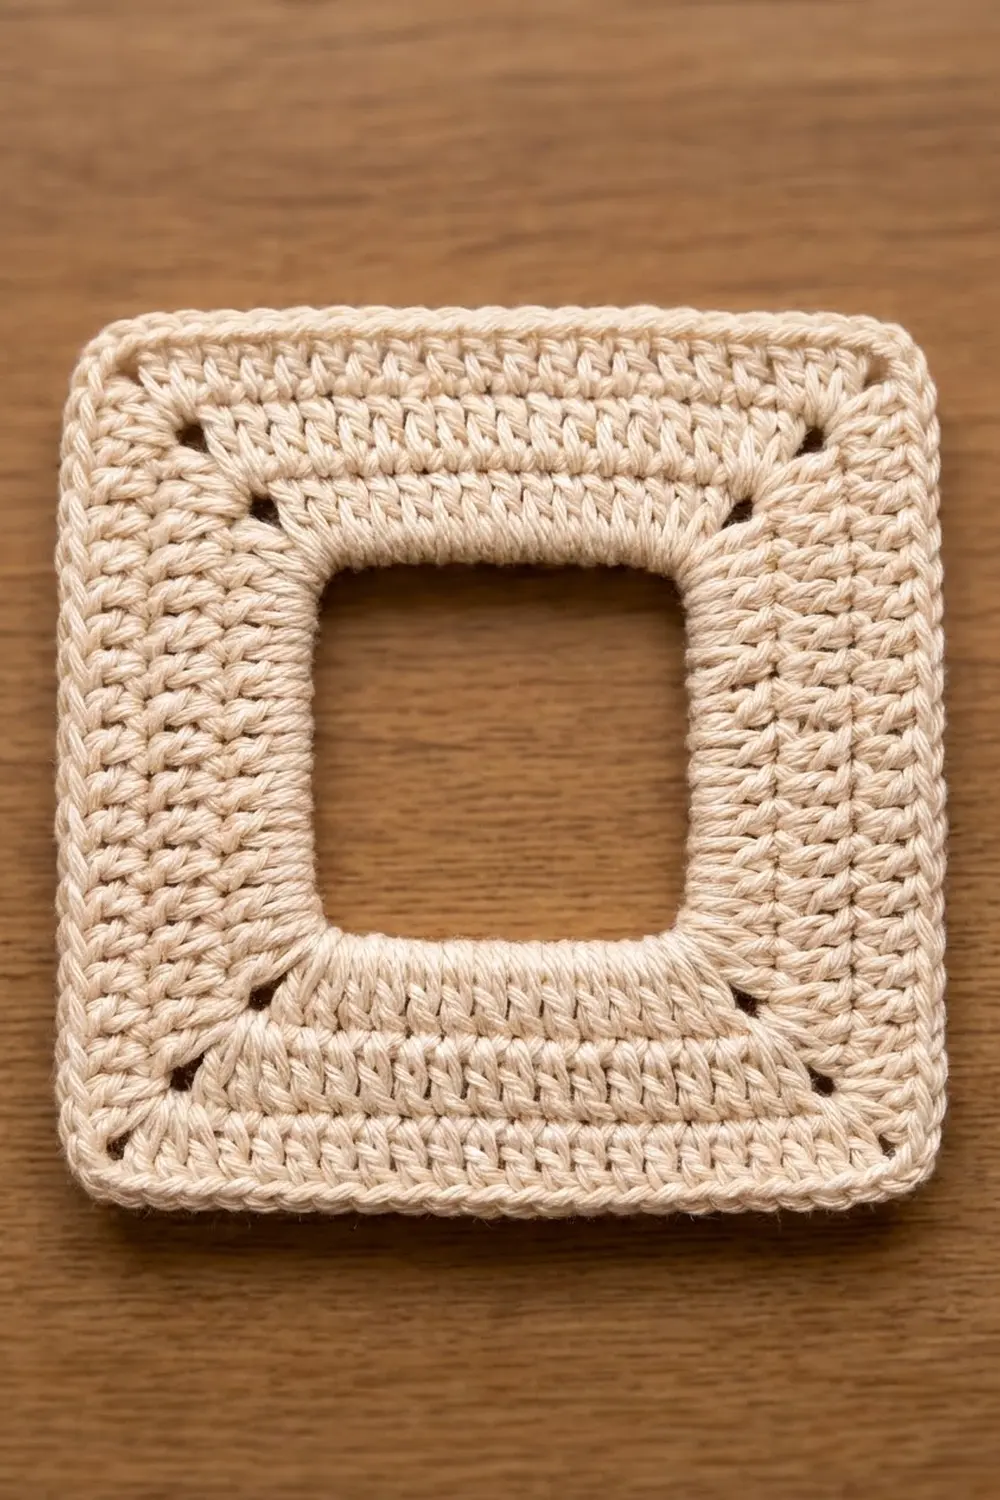
Lattice Frame Motif (make 127)
Each motif starts as a chain ring that forms the open center window. Three rounds build outward, and a corner increase on every round gives the frame its sharp mitered corners. Work with the RS facing and do not turn.
Foundation: Ch 44. Sl st in the first ch to form a ring, making sure the chain isn’t twisted. (44 ch, which is 11 ch for each side of the window.)
Round 1 (sc): Ch 1, (sc, ch 2, sc) in next ch, sc in each of next 10 ch; rep from * 3 more times. Sl st in first sc.
(48 sc: 12 sc per side between corner ch-2 sps, plus 4 ch-2 sps)*
Place a marker in each corner ch-2 sp if it helps. The window should look like a square, not a circle.
Round 2 (dc): Sl st in next ch-2 sp. Ch 3 (counts as dc), (ch 2, dc) in same sp, dc in each of next 12 sc, (dc, ch 2, dc) in next ch-2 sp; rep from * 2 more times, dc in each of next 12 sc. Sl st in top of beginning ch-3.
(56 dc: 14 dc per side between corner ch-2 sps, plus 4 ch-2 sps)*
This taller round makes the wide middle band of the frame.
Round 3 (sc): Sl st in next ch-2 sp. Ch 1, (sc, ch 2, sc) in same sp, sc in each of next 14 dc, (sc, ch 2, sc) in next ch-2 sp; rep from * 2 more times, sc in each of next 14 dc. Sl st in first sc.
(64 sc: 16 sc per side between corner ch-2 sps, plus 4 ch-2 sps)*
Fasten off and weave in the ends. In this pattern, “per side” means the stitches between two corner ch-2 sps. The corner sps are counted separately and are never part of the 16.
Make All Pieces
Make 127 motifs in Cream / Ivory: 72 for the long rows (A) and 55 for the offset rows (B). They are all identical. The letters just tell you where each one goes.
Lay the motifs out on point (as diamonds). Each B diamond fits into the V between two A diamonds, so its upper sides touch the A diamonds above and its lower sides touch the A diamonds below.
Row A1:   ◇ ◇ ◇ ◇ ◇ ◇      (6)
Row B1:    ◇ ◇ ◇ ◇ ◇       (5)
Row A2:   ◇ ◇ ◇ ◇ ◇ ◇      (6)
Row B2:    ◇ ◇ ◇ ◇ ◇       (5)
  ... continue alternating ...
Row B11:   ◇ ◇ ◇ ◇ ◇       (5)
Row A12:  ◇ ◇ ◇ ◇ ◇ ◇      (6)
12 A rows x 6 = 72, and 11 B rows x 5 = 55, for 127 motifs. Every row steps down by half a diagonal, 3.2 in (8.1 cm).
Joining
Method: sl st seams through the outer loops. Hold two neighboring motifs with RS together and their edges lined up. Work each sl st through the loop nearest the edge on both motifs at once.
Stitch-to-stitch logic: Each seam joins one 16-st side to one 16-st side.
– 1 sl st through both matching corner ch-2 sps
– 16 sl sts, one through each matching pair of sc
– 1 sl st through the next matching pair of corner ch-2 sps
That makes 18 sl sts per seam. You never skip or add a stitch, so the bars stay straight.
Order: The seams in this grid form long diagonal lines. Join all the seams that run from upper left to lower right first. Work along a whole diagonal without cutting the yarn, and carry over each junction with the sl st in the corner sps. Then turn the panel and join every diagonal in the other direction the same way. Altogether there are 220 seams, because each of the 55 B motifs touches 4 A motifs.
Tension: Keep the sl sts as loose as your normal sc. If the seams are tight, the panel will pucker and the windows will turn into rhombuses. If you tend to slip-stitch tightly, use a 5.5 mm (I-9) hook for the joins.
Size checkpoint: Lay the panel flat. Across row A1 from side point to side point, it should measure 38.4 in (97.5 cm), which is 6 x 6.4 in (16.3 cm). From top point to bottom point, it should measure 76.8 in (195.1 cm), which is 12 x 6.4 in (16.3 cm).
Border: Edging, Hanging Loops and Tassels
Border gauge: One round of sc, worked at the motif gauge (16 sc = 4 in / 10.2 cm), adds about 0.25 in (0.6 cm) on every edge.
The outer edge zigzags. It is made of 68 exposed motif sides, with 36 outward points and 32 inward valleys in between. A valley is where two neighboring motifs meet at the edge.
Edging round: With RS facing, join yarn in the top point of the top-left motif and work clockwise:
– Each exposed side: sc in each of the 16 sc
– Each outward point: (sc, ch 2, sc) in the corner ch-2 sp
– Each top point: instead of ch 2, work (sc, ch 12, sc) in the corner ch-2 sp to make a hanging loop
– Each valley: sc2tog across the two corner ch-2 sps that meet there
Sl st in the first sc and fasten off.
Counts per edge:
– Top: 12 sides x 16 = 192 sc, + 6 points x 2 sc = 12, + 5 valley sc2tog = 209 sts and 6 ch-12 loops
– Right side: 22 sides x 16 = 352 sc, + 12 points x 2 sc = 24, + 11 sc2tog = 387 sts and 12 ch-2 sps
– Bottom: 12 sides x 16 = 192 sc, + 12 + 5 = 209 sts and 6 ch-2 sps
– Left side: 387 sts and 12 ch-2 sps, the same as the right side
– Total: 1,192 sts
Why the math works: Each edge starts from (exposed sides) x 16, which is exactly each motif’s own per-side count. No stitches are added at the seams. At each point you use the same (sc, ch 2, sc) increase as Round 3, so the points stay sharp and flat. At each valley, the sc2tog uses up the two corner spaces as one stitch, so the inward angle doesn’t ruffle.
Tassels (make 6): Wrap yarn 30 times around the 5.5 in (14.0 cm) card. Slide a 12 in (30.5 cm) strand under the wraps at the top and tie it tight. Cut the loops at the bottom. Wrap another strand around the bundle 0.75 in (1.9 cm) below the top, knot it, and hide the ends inside. Trim the tassel to 5 in (12.7 cm). Tie one tassel into the ch-2 sp at each of the 6 bottom points.
Final Blocking
- Weave in any loose ends you have left.
- Soak the panel in cool water, then gently press the water out. Don’t wring it.
- Roll it in towels to take out more water.
- Lay it flat on mats or a towel-covered floor, in sections if needed.
- Pin the top points in a straight line, 6.4 in (16.3 cm) apart.
- Pin the bottom points to match, 76.8 in (195.1 cm) below the top points, measured before the edging.
- Pin each window square, checking that every motif side lies straight along the seam lines.
- Comb out the tassels and let everything dry completely before unpinning.
- Hang the panel on the rod and steam lightly if any windows still look uneven.
Final Quality-Control Checklist
- [ ] All 127 motifs have 16 sc per side and 4 sharp corner ch-2 sps
- [ ] Each window is about 2.5 in (6.4 cm) and square
- [ ] Every seam has 18 sl sts, with no gaps at the junctions
- [ ] Panel is 38.9 in x 77.3 in (98.8 cm x 196.3 cm) after edging
- [ ] All 6 hanging loops are the same length and evenly spaced
- [ ] All 6 tassels are 5 in (12.7 cm) and hang evenly
- [ ] All ends are woven in on the WS
Troubleshooting
Window looks round: Make sure Round 1 has its 4 corners spaced exactly 11 ch apart, and block the motif square.
Corners curl or cup: Your dc may be tight. Work Round 2 a little looser, or go up half a hook size.
Motifs vary in size: Count every round. A missing stitch on one side shrinks that side and skews the lattice.
Seams pucker: Pull out the seam and redo it more loosely, or use the larger hook.
Edging ruffles at the points: Check that you worked (sc, ch 2, sc), not 3 sc, and that you didn’t add extra sc along the sides.
Edging pulls in at the valleys: Work the sc2tog loosely, and make sure both legs go into corner sps, not into the side stitches.
Panel drops after hanging: This is normal for cotton. Re-block it, and keep the tassels light.
Care
Hand wash in cool water with mild detergent and dry flat. To refresh the panel between washes, give it a gentle shake and a light steam while it hangs.
Final Notes
The whole panel depends on one measurement chain. 16 sts per side gives a 4.5 in (11.4 cm) motif. A 4.5 in motif is 6.4 in (16.3 cm) from point to point. Six diamonds across and twelve rows down give 38.4 in x 76.8 in (97.5 cm x 195.1 cm). One round of sc edging brings the panel to 38.9 in x 77.3 in (98.8 cm x 196.3 cm). Check your first motif and every stitch count after that will line up. Make a second panel for a pair, and enjoy the soft patterned light.
Happy crocheting!