

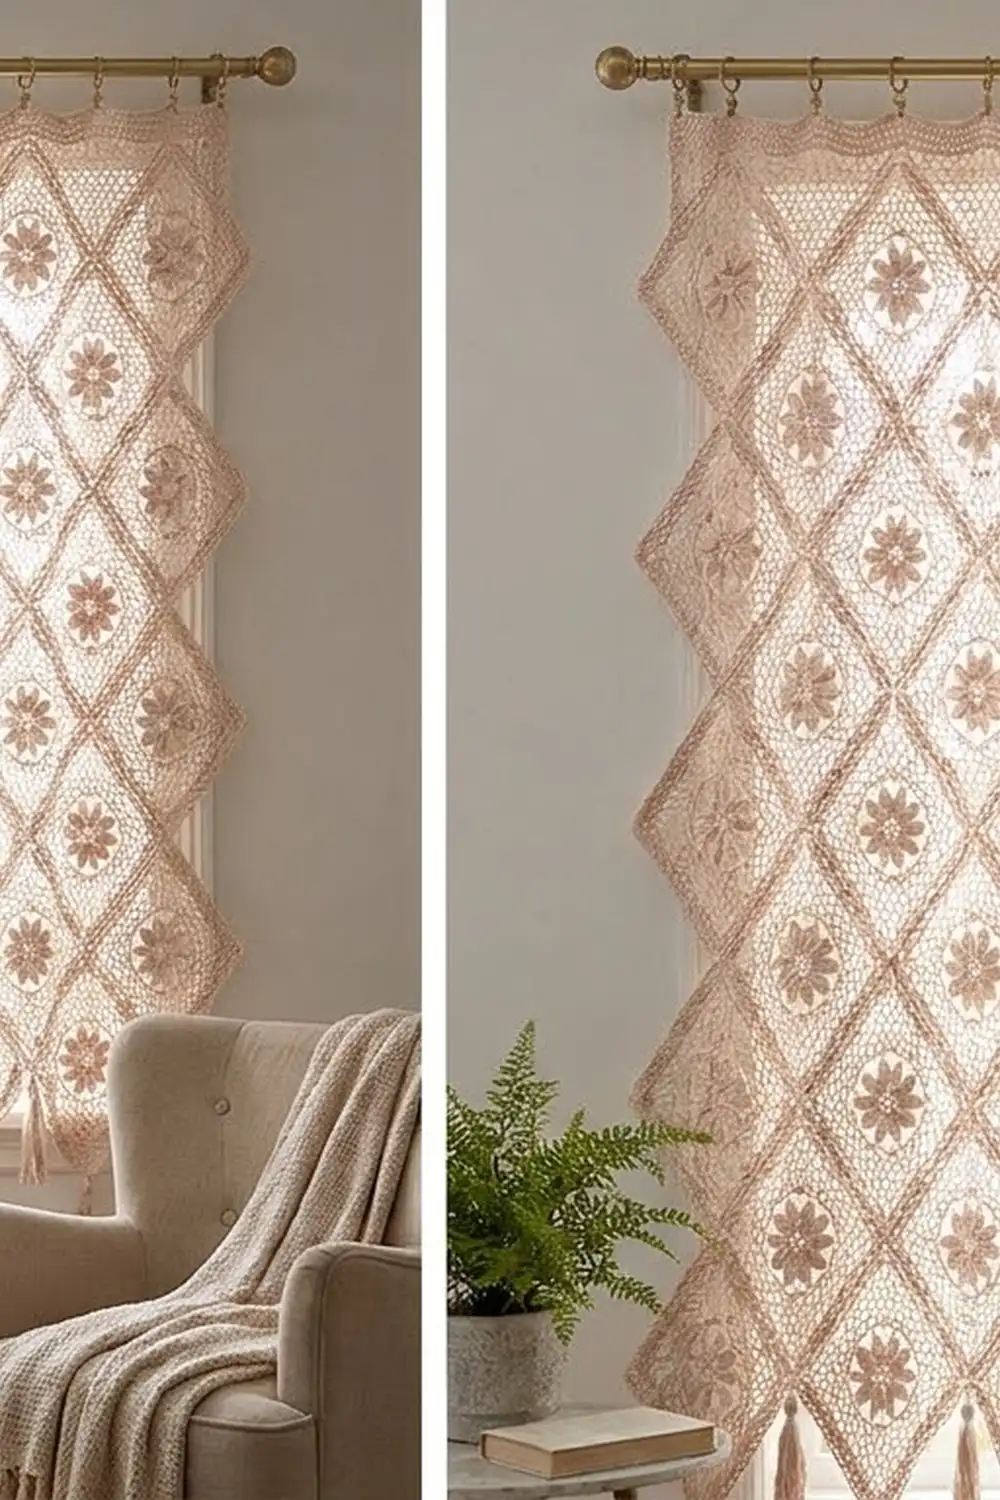
This curtain is a lattice of lacy diamonds. Each diamond has a raised eight-petal flower in the middle, a ring of open chain loops around it, and a double-line frame. When you join the diamonds point to point, the open spaces make a second diamond pattern that lets light through.
The sample uses one soft blush-beige cotton, which gives the curtain a warm, calm look. It also shows off the texture of the petals and frames. The pattern uses US crochet terms throughout.
One panel measures 42.9 in (109.0 cm) wide by 61.6 in (156.5 cm) long, not counting the tassels. With the tassels it measures 66.6 in (169.2 cm). To make a pair like the one in the photo, make two panels.
Construction is simple and modular. First you work 88 square motifs in rounds and 6 half-motif triangles in rows. Then you join them on point and work one edging round, followed by a few rows that build a straight header. Last, you add 11 tassels along the bottom.
Finished Size and Construction
- Finished panel size: 42.9 in x 61.6 in (109.0 cm x 156.5 cm), plus 5 in (12.7 cm) tassels
- Skill level: Intermediate
- Terminology: US
- Yarn weight: Worsted (#4) cotton
- Hook: 4.5 mm (US 7)
- Number of pieces: 88 square motifs + 6 triangles per panel
- Layout: On point; 1 row of triangles, then 16 rows of diamonds that alternate 5 and 6 across
- Piece size: 5 in (12.7 cm) per side; 7.1 in (18.0 cm) point to point
- Size before border: 42.4 in x 60.1 in (107.7 cm x 152.7 cm)
- Border depth: 0.25 in (0.6 cm) on the sides and bottom; 1.25 in (3.2 cm) at the top, including the header
Materials
Choose a smooth, mercerized or combed worsted-weight cotton. Cotton holds the petals crisp and hangs straight in a window. Avoid fuzzy blends, because they hide the lace.
- Blush beige (one color): 1,150 g / approx. 1,955 m per panel (based on 50 g = 85 m). Double this for a pair.
These quantities include a margin of about 10% for gauge swatches and tassel trimming.
Tools:
– 4.5 mm (US 7) crochet hook
– Tapestry needle
– Locking stitch markers
– Scissors
– A 5.5 in (14.0 cm) piece of stiff card for tassels
– Blocking mats and rust-proof pins
– Spray bottle
– About 15 curtain clip rings
Abbreviations (US Terms)
- ch: chain
- sl st: slip stitch
- sc: single crochet
- dc: double crochet
- tr: treble crochet
- sc2tog: single crochet 2 together
- sk: skip
- sp(s): space(s)
- st(s): stitch(es)
- RS / WS: right side / wrong side
Petal (special stitch): Work (dc, 3 tr, dc) all in the same stitch. The center tr of the three is the “petal tip.”
Gauge and Checkpoints
Make one complete motif and block it before you start the full set. This one piece is your gauge swatch.
- After Round 2: The flower measures 2.75 in (7.0 cm) across.
- After Round 4: Each side measures 3.25 in (8.3 cm).
- After Round 5: Each side measures 3.75 in (9.5 cm).
- After Round 7 (blocked): Each side measures 5 in (12.7 cm), and the motif measures 7.1 in (18.0 cm) point to point.
If your motif is too big, go down 0.5 mm in hook size. If it is too small, go up 0.5 mm. Being off by 0.25 in (0.6 cm) per side adds up to 2.1 in (5.3 cm) across 6 diamonds, so match the gauge before you continue.
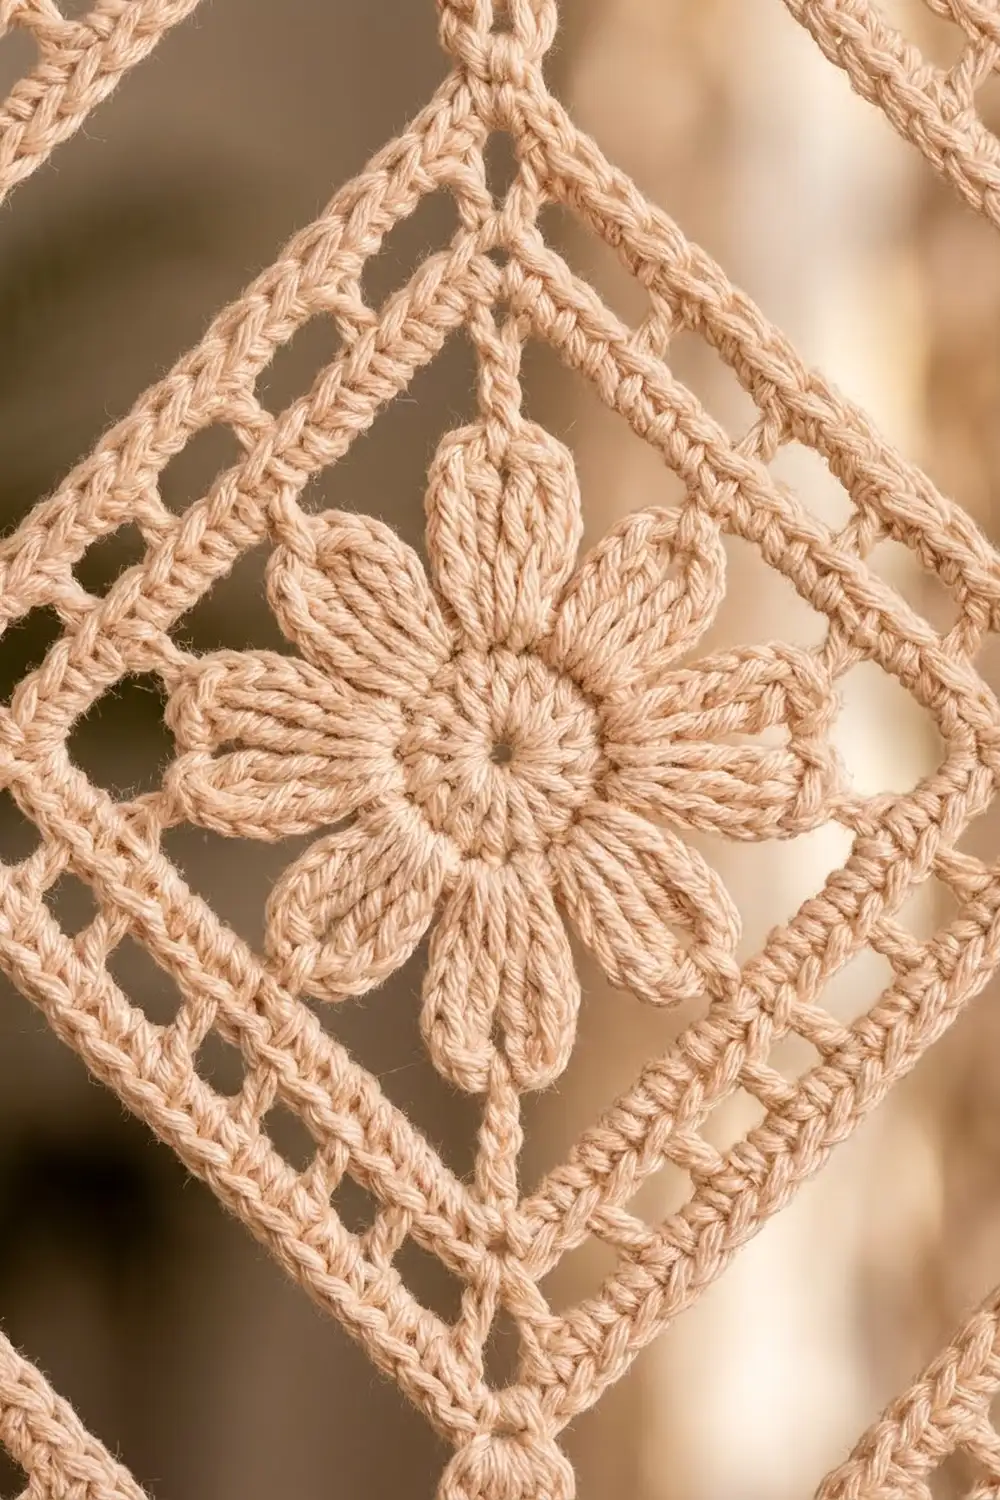
Square Motif (make 88)
Round 1: Make a magic ring. Ch 3 (counts as dc), then work 15 dc in the ring. Sl st to the top of ch-3. Pull the ring closed. (16 dc)
Round 2: Ch 1. Work a petal in the same st, then sl st in the next st. [Petal in next st, sl st in next st] 7 times. (8 petals)
Round 3: Sl st up to the tip of the first petal. Ch 1, sc in the same st. [Ch 5, sc in the tip of the next petal] 7 times, ch 5, sl st to the first sc. (8 sc, 8 ch-5 sps)
Mark every other ch-5 sp, starting with the first one. The marked spaces are your corners.
Round 4: Sl st into the first ch-5 sp, which is a corner. Ch 3 (counts as dc), then work (2 dc, ch 3, 3 dc) in the same sp. Work 5 dc in the next side sp, then (3 dc, ch 3, 3 dc) in the next corner sp. Repeat from * to * 2 more times. Work 5 dc in the last side sp and sl st to the top of ch-3. (44 dc: 11 per side between the corner ch-3 sps)
Round 5: Sl st to the corner sp. Ch 3 (counts as dc), then work (dc, ch 2, 2 dc) in the same sp. Dc in each of the 11 dc along the side, then (2 dc, ch 2, 2 dc) in the corner sp. Repeat around, leaving out the last corner. Sl st to join. (60 dc: 15 per side = 2 + 11 + 2)
Round 6: Sl st to the corner sp. Ch 6 (counts as dc + ch 3), then dc in the same sp. [Ch 1, sk 1 dc, dc in next dc] 7 times, ch 1, sk 1 dc, then (dc, ch 3, dc) in the corner sp. Repeat around, leaving out the last corner. Sl st to the 3rd ch of ch-6. (36 dc: 9 per side including both corner dc, plus 8 ch-1 sps per side)
Round 7: Sl st into the corner sp. Ch 1, then work (sc, ch 2, sc) in the same sp. Sc in each dc and each ch-1 sp along the side (17 sc), then (sc, ch 2, sc) in the corner sp. Repeat around, leaving out the last corner. Sl st to the first sc and fasten off. (76 sc: 19 per side = 1 corner sc + 17 + 1 corner sc, plus 4 ch-2 corner sps)
The solid band from Round 5 and the sc edge from Round 7 make the double-line frame. Round 6 makes the open mesh between them.
Half-Motif Triangle (make 6)
The triangle is half a motif, cut corner to corner. You work it in rows from the center of the long edge, and turn at the end of every row.
Row 1: Make a magic ring. Ch 3 (counts as dc), then 7 dc in the ring. Turn. (8 dc)
Row 2: Ch 1. [Petal in next st, sl st in next st] 4 times, ending in the top of ch-3. Turn. (4 petals)
Row 3: Ch 4 (counts as tr), ch 2, sc in the tip of the first petal. [Ch 5, sc in the next petal tip] 3 times. Ch 2, tr in the base of the last petal. Turn. (2 half-corner ch-2 sps, 3 ch-5 sps) The middle ch-5 sp is the apex corner.
Row 4: Ch 3 (counts as dc). Work 2 dc in the ch-2 sp and 5 dc in the next ch-5 sp. Work (3 dc, ch 3, 3 dc) in the apex sp. Work 5 dc in the next ch-5 sp, 2 dc in the ch-2 sp, and dc in the 4th ch of the turning ch. Turn. (22 dc: 11 per leg)
Row 5: Ch 3 (counts as dc), then 2 dc in the same st. Dc in each dc to the apex. Work (2 dc, ch 2, 2 dc) in the apex sp. Dc in each dc to the last st, then 3 dc in the last st. Turn. (30 dc: 15 per leg = 3 + 10 + 2)
Row 6: Ch 4 (counts as dc + ch 1). Sk 1 st, dc in the next st, ch 1. Repeat from * to * to the apex. Work (dc, ch 3, dc) in the apex sp. Ch 1, then dc in the first st of the second leg. [Ch 1, sk 1 st, dc in next st] 7 times, ending in the top of the turning ch. Turn. (9 dc and 8 ch-1 sps per leg)
Row 7: Ch 1, then 2 sc in the first dc. Sc in each ch-1 sp and dc to the apex. Work (sc, ch 2, sc) in the apex sp. Sc in each sp and dc to the last st, then 2 sc in the last st. Fasten off. (38 sc: 19 per leg = 2 + 16 + 1)
Each leg has exactly 19 sc, the same as a motif side, so the seams match 1 to 1.
Make All Pieces
For one panel, make 88 motifs and 6 triangles, all in blush beige. Weave in the ends as you go. Key: T = triangle, D = diamond motif.
Top:     T   T   T   T   T   T        (6 triangles)
Row 1:     D   D   D   D   D          (5)
Row 2:   D   D   D   D   D   D        (6)
Row 3:     D   D   D   D   D          (5)
Row 4:   D   D   D   D   D   D        (6)
...continue alternating...
Row 15:    D   D   D   D   D          (5)
Row 16:  D   D   D   D   D   D        (6)
That gives 8 rows of 5 and 8 rows of 6, for a total of 88 diamonds.
Joining
Lay the pieces out RS up and on point. Each Row 1 diamond nests between two triangle apexes, and its upper sides join the inner legs of those triangles. Each 6-across row nests under the 5-across row above it.
With RS together, whipstitch through the back loops of matching sides, one stitch to one stitch. Corner sc meets corner sc, and all 19 sts on each side are joined with no skips or extras. Where four corners meet, catch the four ch-2 sps together with one firm stitch.
Keep the tension even and only as firm as your stitches. If the seams are tight, the lattice puckers. If they are loose, the diamonds sag apart. Join in diagonal strips first, then join the strips together.
Size checkpoint: The joined panel should measure 42.4 in (107.7 cm) across the top. It should measure 60.1 in (152.7 cm) from the top to the lowest points. A difference of up to 1 in (2.5 cm) is fine.
Border
Border gauge: 19 sc and 20 rows = 5 in (12.7 cm). That is the same stitch density as the motif edges.
Round 1 (RS): Join at the top right corner and work along the top edge first.
- Top: Work 27 sc along the long edge of each triangle. On the first half, work 1 sc at the end of Row 7, 2 sc around each of Rows 6, 5 and 4, 3 sc around Row 3, 2 sc around Row 2, and 1 sc at the end of Row 1. Work 1 sc in the ring, then repeat the same counts in reverse down the second half. That makes 162 sc across the top (6 x 27).
- Top corners: Ch 2 at each corner.
- Zigzag sides and bottom: Work 19 sc along each free side, one in each st. There are 44 free sides: 16 on the left edge, 12 along the bottom and 16 on the right edge.
- Outer points (22): Work (sc, ch 2, sc) in the corner ch-2 sp.
- Valleys (21): Sc2tog over the last corner sc of one side and the first corner sc of the next side. This keeps the inner corners flat.
Sl st to the first sc.
Rows 2–5 (header): Turn and work across the top only. Ch 1, then work 1 sc in each of the 162 sc. Turn. (162 sc each row) Fasten off.
Why the math works: A triangle’s long edge is 7.1 in (18.0 cm). At the border gauge of 3.8 sc per inch, that holds 27 sc. Because 6 x 27 = 162, the header matches the joined width exactly. Each motif side already has 19 sts, including its corner sts, so the edging takes 19 per side with nothing added at the seams. The only changes are +2 at each point and −1 at each valley.
Clip the rings to the header about every 3 in (7.6 cm), starting and ending at the corners.
Tassels (make 11)
Wrap the yarn 40 times around the 5.5 in (14.0 cm) card. Tie the top, cut the bottom, and wrap the neck 0.5 in (1.3 cm) below the tie. Trim the tassel to 5 in (12.7 cm). Attach one tassel to each of the 6 bottom points and one to each of the 5 bottom valleys.
Final Blocking
- Pin the panel RS up to a 42.4 in x 60.1 in (107.7 cm x 152.7 cm) outline, plus the border allowance.
- Pin the header straight first, then pin each zigzag point.
- Pin each flower center and each corner sp so the diamonds sit square.
- Spray until damp but not dripping.
- Let it dry completely, which takes about 24 hours.
- Unpin it, steam the tassels, and comb them straight.
Final Quality-Control Checklist
- 88 motifs and 6 triangles, each 5 in (12.7 cm) per side
- 19 sts per side on every piece, all joined 1 to 1
- 162 sc in every header row
- Panel is 42.9 in x 61.6 in (109.0 cm x 156.5 cm)
- 11 tassels, all 5 in (12.7 cm) long
- All ends woven in securely
Troubleshooting
- Petals curl forward: Your tension is too tight. Loosen the tr stitches or go up one hook size for Round 2 only.
- Motif cups: Check that Round 3 uses ch 5, not fewer.
- Corners look rounded: Pin the corners firmly while blocking.
- Header ruffles: Recount the stitches, which should be 162. Then recheck the 27 sc per triangle.
- Valleys pucker: Make sure you worked an sc2tog at each valley, not 2 sc.
- Panel leans: Make sure the 5-across and 6-across rows alternate correctly.
Care
Hand wash in cool water and roll the panel in towels to remove water. Dry it flat, or hang it damp on the rod so it straightens under its own weight.
Final Notes
Each measurement leads to the next. A 5 in (12.7 cm) motif gives a 7.1 in (18.0 cm) diamond. Six diamonds across give a 42.4 in (107.7 cm) width, and 16 offset rows give a 60.1 in (152.7 cm) length. The border then brings the panel to 42.9 in x 61.6 in (109.0 cm x 156.5 cm). If you check your gauge at every stage, the rest falls into place.
Happy crocheting!