

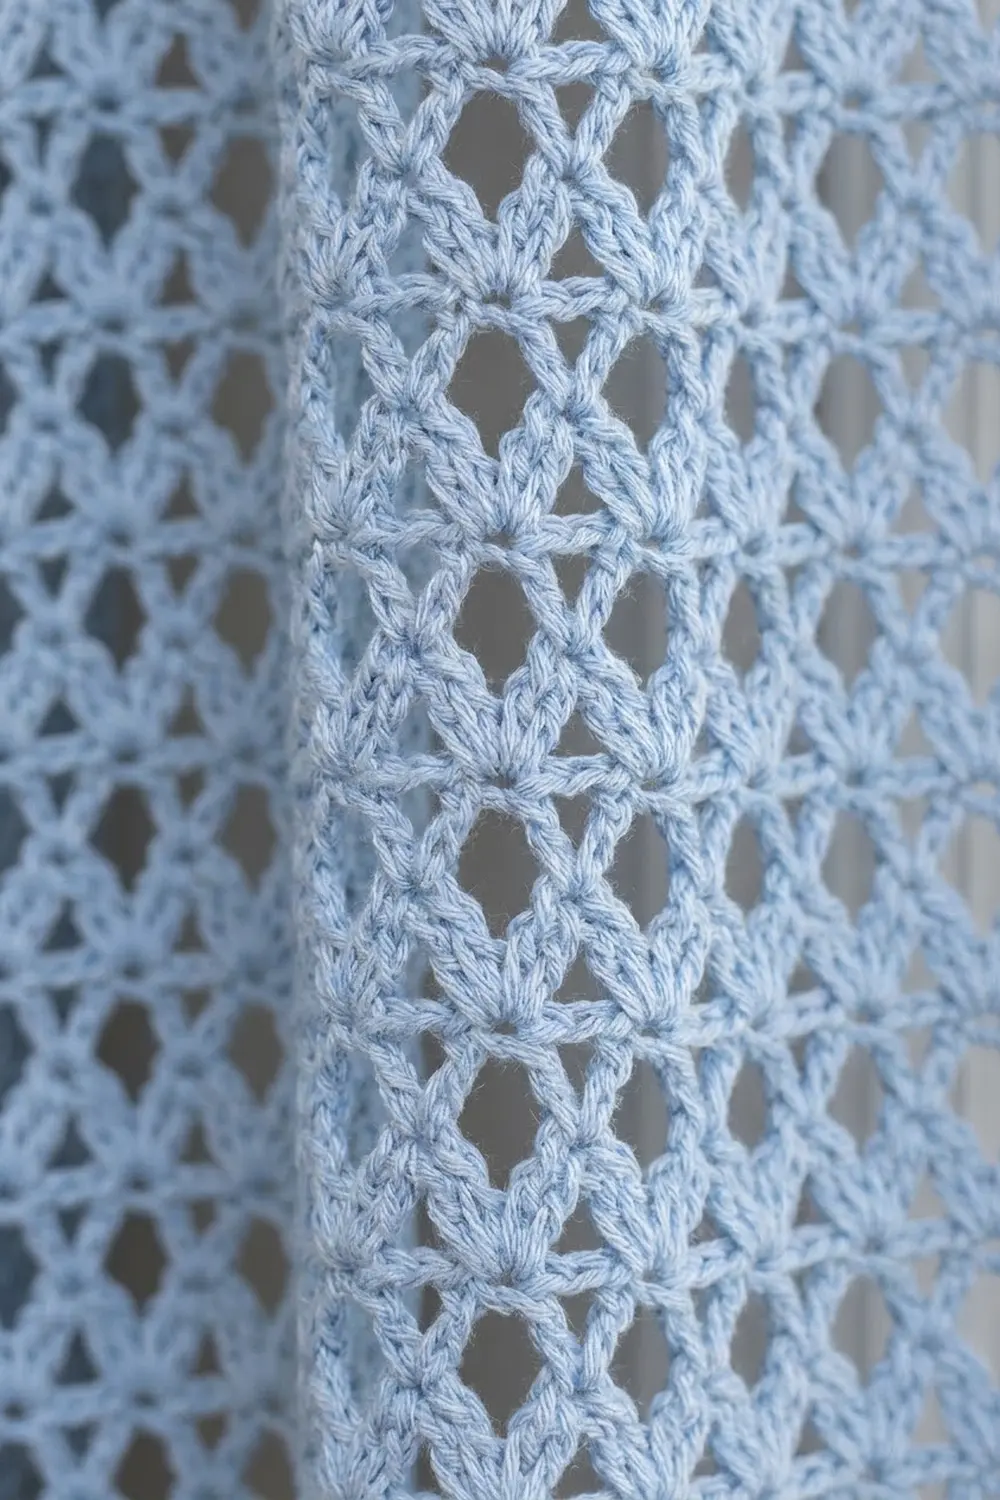
The Bluebell Lattice Curtain is a light, airy tab-top panel worked in soft sky-blue cotton. Rows of small fan-shaped shells stack straight up the panel with a single double crochet post between them. Together they make a neat grid of diamond-shaped openings that let daylight through without leaving the window bare.
The style is calm and cottage-fresh. It uses one solid color, with a crisp solid band along the bottom hem, a deeper solid band along the top and six sturdy rectangular tabs that slide straight over a curtain rod. It suits laundry rooms, kitchens, bathrooms and any window where you want soft privacy and plenty of light.
This pattern uses US crochet terms. One finished panel measures 35.75 in (90.8 cm) wide by 81 in (205.7 cm) long, or 83.5 in (212.1 cm) including the tab loops.
You work the panel flat, in one piece, from the bottom up: first a solid single crochet hem band, then the shell lattice, then a solid top band. Next you work two rows of single crochet edging along each long side. Last, you work the tabs straight off the top edge, fold them to the back and sew them down. For a pair of curtains, make a second identical panel.
Finished Size and Construction
- Finished size: 35.75 in x 81 in (90.8 cm x 205.7 cm); 83.5 in (212.1 cm) tall including tabs
- Skill level: Intermediate (simple stitches, but a large piece that needs careful counting)
- Terminology: US crochet terms
- Yarn weight: Worsted (#4), cotton or cotton blend
- Hook: 5.0 mm (US H-8)
- Number of pieces: 1 panel (tabs are worked directly onto it)
- Layout: single rectangular panel, worked bottom to top
- Piece size before border: 34.75 in x 81 in (88.3 cm x 205.7 cm)
- Border depth: 0.5 in (1.3 cm) on each long side only
Materials
Choose a smooth worsted-weight cotton or cotton blend. Cotton keeps the open shells crisp, drapes straight and washes well. Avoid fuzzy, loosely plied or very stretchy yarns. They blur the diamond openings, and a long panel made from them can stretch under its own weight.
Pick a light color if you want the lattice to glow when the sun shines through it. Sky blue, as shown, gives a fresh, clean look against white walls and cabinets.
- Light sky blue: about 900 g / 1,710 m (1,870 yd), based on a cotton of roughly 190 m (208 yd) per 100 g
These amounts include a margin of roughly 10% to cover your swatch and small gauge differences. Double them for a pair of panels. Buy all your skeins from the same dye lot, because a color shift is easy to see on a large single-color panel.
Tools:
- 5.0 mm (US H-8) crochet hook
- Tapestry needle
- Stitch markers (at least 12)
- Measuring tape
- Rust-proof pins and a large flat blocking surface (a bed or a clean floor covered with towels works)
- Spray bottle
- Curtain rod, up to about 1.25 in (3.2 cm) in diameter
Abbreviations (US Terms)
- ch – chain
- sc – single crochet
- dc – double crochet
- sk – skip
- sp – space
- st(s) – stitch(es)
- RS / WS – right side / wrong side
Special stitch – Shell: (2 dc, ch 1, 2 dc) all in the same stitch or space. Each shell contains 4 dc and 1 ch-1 sp.
Gauge and Checkpoints
Single crochet gauge: 16 sc and 16 rows = 4 in (10.2 cm).
Pattern gauge: 1 repeat (shell + dc) = 1.5 in (3.8 cm) wide; 4 pattern rows = 3 in (7.6 cm) tall. Each pattern row is 0.75 in (1.9 cm) tall.
Make a test swatch first. Before you commit 900 g of yarn, make a small sample. Ch 26 and work Rows 1–4 as written below, but with 25 sc instead of 139. Then work 8 pattern rows, which gives 4 repeats across. After blocking, the swatch should measure 6.25 in (15.9 cm) wide, with 1 in (2.5 cm) of solid band plus 6 in (15.2 cm) of lattice. Always block the swatch before measuring, because cotton relaxes when it is wet.
Checkpoints during the panel:
- After Row 4: width 34.75 in (88.3 cm), band height 1 in (2.5 cm).
- After Row 44 (40 pattern rows): total length 31 in (78.7 cm).
- After Row 108: total length 79 in (200.7 cm).
- After Row 116: total length 81 in (205.7 cm).
If your piece is too big, go down 0.5 mm in hook size. If it is too small, go up 0.5 mm. You can also change the length in 0.75 in (1.9 cm) steps by adding or removing pattern rows. If you do, recalculate the side border count, which uses 3 sc per pattern row.
Panel Pattern
Bottom Hem Band
Foundation: Ch 140.
Row 1 (RS): Sc in 2nd ch from hook and in each ch across, turn. (139 sc)
Rows 2–4: Ch 1 (does not count as a st), sc in each sc across, turn. (139 sc)
Checkpoint: the band is 34.75 in (88.3 cm) wide and 1 in (2.5 cm) tall. This is the solid hem along the bottom edge.
Lattice Body
Row 5 (set-up row): Ch 3 (counts as dc), sk 2 sc, shell in next sc, sk 2 sc, dc in next sc; repeat from * across, turn. (23 shells and 24 dc, counting the turning ch)*
Each repeat uses 6 sc of the band: skip 2, shell in 1, skip 2, dc in 1. Twenty-three repeats plus the first stitch use 23 x 6 + 1 = 139 sc, so the row ends exactly on the last sc.
Row 6: Ch 3 (counts as dc), shell in ch-1 sp of next shell, dc in next dc; repeat from * across, working the last dc in the top of the turning ch, turn. (23 shells and 24 dc)*
Each new shell sits directly on the shell below it, and each dc post sits on the post below it. This stacking builds the straight columns of fans, with a diamond opening on each side of every post.
Rows 7–108: Repeat Row 6. (23 shells and 24 dc in every row)
That makes 104 pattern rows (Rows 5–108), measuring 78 in (198.1 cm).
Stitch tally for every pattern row: 23 shells x 4 dc = 92 dc, plus 24 single dc posts = 116 dc, plus 23 ch-1 sps.
Tips for a long panel: Put a stitch marker in the row end every 20 rows so you can count rows quickly. Every 10 rows or so, lay the work flat and check that the posts still run in straight vertical lines. Wind on a new skein at the start of a row so that every join lands in a side edge, where the border will hide the ends.
Top Band
Row 109 (conversion row): Ch 1, sc in first dc, sc in each of next 2 dc, sc in ch-1 sp, sc in each of next 2 dc, sc in next dc; repeat from * across, working the last sc in the top of the turning ch, turn. (116 sc worked 1 per dc + 23 sc worked 1 per ch-1 sp = 139 sc)*
Rows 110–116: Ch 1, sc in each sc across, turn. (139 sc)
The top band is 8 rows, or 2 in (5.1 cm), tall. Fasten off.
Checkpoint: the panel now measures 34.75 in x 81 in (88.3 cm x 205.7 cm).
Border
The border is two rows of single crochet along each long side only. The bottom and top already have solid bands built in, so they need no extra edging. Top and bottom border count: 0 sts.
Border gauge: 4 sc = 1 in (2.5 cm), the same as the sc gauge of the body.
Why the counts work: Each sc row end is 0.25 in (0.6 cm) tall, so it gets 1 sc. Each pattern row end is 0.75 in (1.9 cm) tall, so it gets 3 sc. Each long side has 12 sc rows (Rows 1–4 and 109–116) and 104 pattern rows:
12 x 1 + 104 x 3 = 12 + 312 = 324 sc
At 4 sc per inch, 324 sc = 81 in (205.7 cm), exactly the length of the panel, so the edge will neither ruffle nor pull in.
Right side edge, Row 1: With RS facing, join yarn at the top corner of the right edge. Ch 1, then work down to the bottom corner: 1 sc in each sc row end and 3 sc around the post of each dc or turning-ch row end. Turn. (324 sc)
Right side edge, Row 2: Ch 1, sc in each sc across. Fasten off. (324 sc)
Left side edge, Rows 1–2: With RS facing, join yarn at the bottom corner of the left edge. Work the same two rows, this time toward the top corner. (324 sc in each row)
Each border adds 0.5 in (1.3 cm), so the panel is now 34.75 + 0.5 + 0.5 = 35.75 in (90.8 cm) wide.
Tabs
You work six tabs, each 9 sc wide, directly into the 139 sts of Row 116. The side borders run beside the outer tabs at each end. The spacing is the same from either end, so count from whichever end you like and mark these stitches:
- Tab 1: sts 1–9
- Tab 2: sts 27–35
- Tab 3: sts 53–61
- Tab 4: sts 79–87
- Tab 5: sts 105–113
- Tab 6: sts 131–139
Math check: 6 tabs x 9 sts = 54 sts, plus 5 gaps x 17 sts = 85 sts, for a total of 139. Each tab is 2.25 in (5.7 cm) wide, and each gap is 4.25 in (10.8 cm).
For each tab: With RS facing, join yarn in the first marked st. Ch 1, sc in the same st and in the next 8 sts, turn. (9 sc) Work 23 more rows of 9 sc. (24 rows total, 6 in / 15.2 cm long) Fasten off, leaving a 12 in (30.5 cm) tail.
Attach: Fold each tab to the WS. Whipstitch its last row across the back of the top band, 1 in (2.5 cm) below the top edge, keeping it level with the base of the tab. This makes a loop that stands (6 in – 1 in) / 2 = 2.5 in (6.4 cm) above the panel.
Weave in all ends inside the solid bands and borders, never through the open lattice where they would show.
Final Blocking
- Measure the dry panel and write down its size.
- Soak it for 15 minutes in cool water with a little gentle wash.
- Press the water out gently, then roll the panel in large towels to remove more. Do not wring it.
- Lay it flat on a padded surface long enough for 81 in (205.7 cm).
- Pin the bottom band straight first, at 35.75 in (90.8 cm) wide.
- Smooth the lattice upward, keeping the dc posts in straight vertical lines, and pin the side borders every 4 in (10.2 cm).
- Pin the top band to 35.75 in (90.8 cm) and the overall length to 81 in (205.7 cm).
- Open each diamond gently with your fingertips so the shells sit as even fans.
- Let the panel dry completely, then hang it for a day so gravity evens out the fabric.
Final Quality-Control Checklist
- Every pattern row has 23 shells and 24 dc.
- The dc posts form unbroken vertical lines from the bottom band to the top band.
- Both solid bands have 139 sc and lie flat.
- Each side border has 324 sc per row, with no ruffles or puckers.
- The panel measures 35.75 in x 81 in (90.8 cm x 205.7 cm).
- There are six evenly spaced tabs, each sewn at the same depth.
- All ends are woven into solid sections and trimmed.
Troubleshooting
The lattice leans to one side. You are probably working the last dc into the wrong place. Always end each row in the top of the turning ch.
The shell count drifts. Count the shells every few rows. A missed ch-1 sp shows up as two posts side by side; rip back to that row.
The bands are wider than the lattice. Your sc is looser than your dc rows. Work the bands with a hook 0.5 mm smaller.
The side edges ruffle. You placed more than 3 sc in some pattern row ends. Rework them with exactly 3.
The side edges pull in. You placed only 2 sc in some pattern row ends. Rework them with 3.
The panel grows after hanging. Cotton stretches a little under its own weight. Measure after it has hung for a day, and remove one or two pattern rows if needed. Take 3 sc off the border count for each row you remove.
The tabs tilt. The fold seam is uneven. Unpick it and sew it again so the last row lies parallel to the top edge.
Care
Machine wash cold on a gentle cycle inside a large laundry bag, or wash by hand. Lay flat to dry, or hang while damp and pull gently to shape.

Final Notes
Here is how the measurements fit together. 139 sc gives 34.75 in (88.3 cm) of width, and 23 lattice repeats fill that width exactly. 104 pattern rows at 0.75 in (1.9 cm) each, plus 3 in (7.6 cm) of solid bands, give 81 in (205.7 cm) of length. The side border adds 0.5 in (1.3 cm) per side, for 35.75 in (90.8 cm) of width. The tabs add a 2.5 in (6.4 cm) loop, for a total height of 83.5 in (212.1 cm). Check your gauge at each stage and the panel will hang straight and true.
Happy crocheting!