

This curtain is built from one simple shape repeated many times: a thick, hollow teardrop with a pointed top and a rounded bottom. The teardrops are joined point-to-bottom into hanging strands. Because every other strand hangs half a motif lower, the panel reads as a soft diagonal lattice that filters light.
Everything is worked in one warm terracotta-peach cotton. The look is boho and calm, and the solid stitches give each teardrop a sculpted, rope-like outline. All instructions use US crochet terms.
One finished panel is 36 in (91.4 cm) wide. It is 82 in (208.3 cm) long on the odd strands and 84 in (213.4 cm) long on the staggered even strands, including the 2 in (5.1 cm) header band. The photo shows two panels on one rod, so make two for a matching pair.
How it’s built: you crochet each teardrop in 3 rounds and join each new motif to the strand as you finish it. Once all 12 strands are done, you work a solid single-crochet header band across their tops, catching each strand into the first row.
Finished Size and Construction
- Panel size: 36 in (91.4 cm) wide × 82–84 in (208.3–213.4 cm) long
- Skill level: Easy-intermediate
- Terminology: US
- Yarn weight: DK (#3) cotton
- Hook: 4.0 mm (G-6)
- Pieces: 240 teardrop motifs per panel (480 for the pair)
- Layout: 12 strands × 20 motifs, with even strands dropped 2 in (5.1 cm)
- Single motif: 3 in (7.6 cm) wide × 4 in (10.2 cm) tall
- Size before border: 36 in (91.4 cm) wide × 80 in (203.2 cm) of strand length
- Border (header band) depth: 2 in (5.1 cm)
Materials
Yarn: Use a smooth, matte DK cotton or cotton blend. Cotton keeps the teardrops crisp and hangs straight without stretching much. Avoid fuzzy yarns, because they blur the openings.
- Terracotta Peach: 550 g / 1,100 m per panel, or 1,100 g / 2,200 m for the pair (about 22 balls of 50 g / 100 m)
Each motif uses about 3.5 m (about 1.7 g). The header band uses about 50 m per panel. These quantities already include a margin of roughly 10% for swatching and joins.
Tools:
– 4.0 mm (G-6) crochet hook
– Removable stitch markers (at least 2)
– Tapestry needle
– Scissors and measuring tape
– Blocking mat, rust-proof pins, spray bottle
– 10 curtain ring clips per panel and a curtain rod
Abbreviations (US Terms)
- ch – chain
- sl st – slip stitch
- sc – single crochet
- hdc – half double crochet
- dc – double crochet
- rev sc – reverse single crochet (crab stitch)
- sp – space
- st(s) – stitch(es)
Special stitch – Joined sc: Insert the hook through the strand’s top loop and then into the next chain of the band foundation. Yarn over, pull up a loop through both, then yarn over and pull through 2 loops. This counts as 1 sc.
Gauge and Checkpoints
Gauge: 16 sc and 18 rows = 4 in (10.2 cm) in sc worked in rows.
Test one motif first. Make a full motif and block it before you commit to 240 of them. Check these sizes as you go:
- After Rnd 1: The ring measures about 6 in (15.2 cm) around.
- After Rnd 2: About 2.5 in (6.4 cm) wide × 3.5 in (8.9 cm) tall.
- After Rnd 3: 3 in (7.6 cm) wide × 4 in (10.2 cm) tall, with an opening about 1.5 in (3.8 cm) wide × 2.25 in (5.7 cm) tall.
Motif too big? Go down to a 3.75 mm hook. A motif that’s 0.25 in (0.6 cm) too tall adds 5 in (12.7 cm) over 20 motifs.
Motif too small? Go up to a 4.5 mm hook.
Your band gauge must match too: 144 sc should equal 36 in (91.4 cm), the width of 12 motifs side by side.
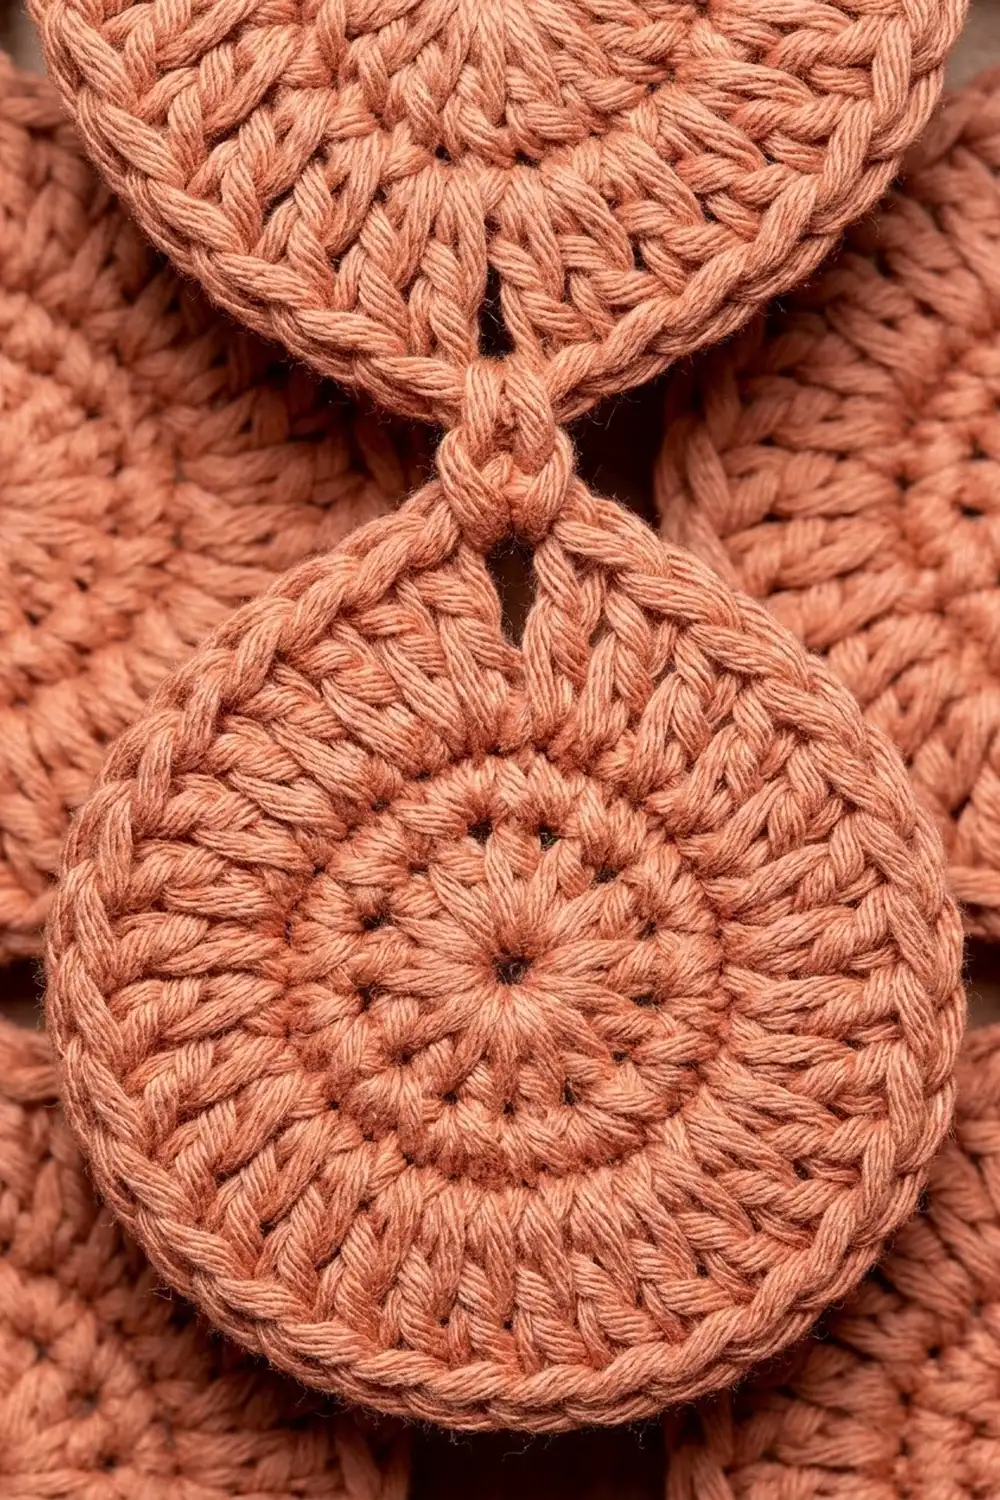
Teardrop Motif (make 240 per panel)
The point of the teardrop sits at the join of each round. Short stitches near the point and tall, increased stitches around the bottom create the shape.
Rnd 1 (base ring): Ch 24 and sl st to the first ch to form a ring, taking care not to twist it. Ch 1 (does not count as a st), then sc in each ch around. Sl st to the first sc. (24 sc)
Rnd 2 (shaping, growth round): Ch 1. Then work in this order:
– Sc in the same st as the join and in the next st (2 sc).
– Hdc in each of the next 3 sts.
– Dc in each of the next 3 sts.
– Dc in the next st, 2 dc in the next st; repeat from * 3 more times (12 dc over 8 sts).
– Dc in each of the next 3 sts.
– Hdc in each of the next 3 sts.
– Sc in each of the last 2 sts.
– Ch 2 and sl st to the first sc. This ch-2 sp is the tip.
(28 sts: 2 sc, 3 hdc, 3 dc, 12 bottom dc, 3 dc, 3 hdc, 2 sc; plus 1 ch-2 tip sp)
The point now sits at the ch-2 sp, and the stitches get taller as they go around the bottom curve. Rnd 2 already includes the 4 increases, so check that you have 28 stitches.
Rnd 3 (outline, trim round): Ch 1. Then work in this order:
– Sc in each of the first 8 sts.
– Across the 12 bottom dc: sc in the next st, 2 sc in the next st, sc in each of the next 2 sts, 2 sc in the next st; repeat from * 2 more times, then sc in the next st (16 sc).
– Sc in each of the next 8 sts.
– Work the tip: in the ch-2 sp, make (sc, ch 3, sc). Sl st to the first sc.
(28 sts worked 1-per-stitch + 4 increase sts + 2 sc in tip sp = 34 sc, plus 1 ch-3 tip loop)
Place a marker in the 16th sc of Rnd 3. This marks the bottom center, where the next motif joins. Fasten off and weave in the ends.
Tip variations:
– Top motif of an odd strand: Keep the ch-3 tip loop as written.
– Top motif of an even strand: In the tip sp, work (sc, ch 18, sc) instead of (sc, ch 3, sc). The 18-ch loop folds in half into a hanger about 2 in (5.1 cm) long, which creates the half-motif drop.
– Every other motif: Use the joining tip described in the Joining section.
Make All Pieces
Per panel:
– 6 top motifs with a ch-3 loop (odd strands)
– 6 top motifs with a ch-18 hanger (even strands)
– 228 joined motifs (19 per strand × 12 strands)
Total: 240 motifs per panel, all in Terracotta Peach. Double everything for the pair.
Layout (each “V” is one teardrop; strands S1–S12, left to right):
Band: [==========================================]
       S1  S2  S3  S4  S5  S6  S7  S8  S9  S10 S11 S12
       V   |   V   |   V   |   V   |   V   |   V   |
       V   V   V   V   V   V   V   V   V   V   V   V
       V   V   V   V   V   V   V   V   V   V   V   V
       ... 20 motifs per strand ...
       V   V   V   V   V   V   V   V   V   V   V   V
           V       V       V       V       V       V
The “|” marks the 2 in (5.1 cm) hanger on the even strands.
Joining
Method: Join as you go, at the tip of Rnd 3.
Stitch-to-stitch logic: Work Rnd 3 of the new motif as normal until you reach the tip. In the ch-2 sp, make 1 sc and ch 1. Then sl st into the marked 16th sc at the bottom center of the motif above. Ch 1, make 1 sc in the same ch-2 sp, and sl st to the first sc. Fasten off.
This replaces the ch-3 loop with a ch-1, sl st, ch-1 knot, so the count is still 34 sc. Each join connects one tip to one bottom stitch, so the strands hang straight with the point up.
Tension: Keep the ch 1 on each side of the sl st snug. A loose join adds length to every motif, and over 20 motifs the strand grows noticeably. Move the marker down to the newest motif’s 16th sc each time.
Size checkpoint: After 5 motifs, hang the strand and measure. It should be 20 in (50.8 cm) from the top tip to the bottom of motif 5. Every finished strand should be 80 in (203.2 cm), plus the hanger on even strands.
Lay all 12 strands side by side, alternating odd and even, before you start the band.
Border (Header Band)
Band gauge: 16 sc = 4 in (10.2 cm), so 4 sc = 1 in (2.5 cm). Each strand gets a 12-stitch segment, which is 3 in (7.6 cm), exactly one motif width.
Row 1 (foundation and attach): Ch 145. Sc in the 2nd ch from the hook and in each of the next 5 ch. Work a Joined sc in the next ch, catching the tip loop of S1. Sc in each of the next 5 ch. That finishes segment 1 (12 sc).
For each remaining segment: sc in each of the next 6 ch, work a Joined sc in the next ch catching the next strand’s loop or hanger, then sc in each of the next 5 ch. Repeat for S2–S12.
(144 sc = 12 strands × 12 sc)
Rows 2–8: Ch 1 and turn. Sc in each st across. (144 sc per row)
Row 9 (trim): Ch 1; do not turn. Rev sc in each st across. (144 sts worked 1-per-stitch + 0 extra = 144 rev sc) Fasten off.
Counts per side:
– Top edge: 144 rev sc
– Bottom edge: 144 sc (Row 1)
– Each short end: 9 rows
Why the math works: 144 sc ÷ 4 sc per in = 36 in (91.4 cm), and 12 motifs × 3 in = 36 in (91.4 cm). The band is exactly as wide as the strands, so it doesn’t ripple or pull. Each strand hangs from stitch 7 of its 12-stitch segment, close to the center. Nine rows at 18 rows per 4 in = 2 in (5.1 cm) deep. No stitches are added between strands, so the band starts and ends at 144.
Final Blocking
- Weave in any remaining ends along the inside of the rings.
- Lay the band flat and pin it to 36 in (91.4 cm) × 2 in (5.1 cm).
- Lay each motif out with its point up and its opening open. Pin outer tips and bottoms to 3 in (7.6 cm) × 4 in (10.2 cm), working in sections.
- Mist evenly until damp, not soaked.
- Let it dry flat, then hang it on the rod for 24 hours so gravity evens out the strands.
- Clip on the 10 ring clips evenly, 4 in (10.2 cm) apart, with one at each end of the band.
Final Quality-Control Checklist
- Every motif has 34 sc in Rnd 3 and a clean point.
- Every join goes into the 16th sc, centered under the motif above.
- All strands have exactly 20 motifs.
- Even strands sit 2 in (5.1 cm) lower than odd strands.
- The band has 144 sts in every row and measures 36 in (91.4 cm).
- No twisted motifs; all points face up.
- All ends are secured inside stitches, not on the openings.
Troubleshooting
- Bottom curve ruffles: Your Rnd 2 is too loose. Go down a hook size for Rnd 2 only.
- Point looks blunt: Keep the tip ch-2 tight and work the 2 sc on each side snugly.
- Strands twist when hung: Check that each join goes into the same 16th sc, and steam the strand while it hangs.
- Band narrower than the strands: Your band gauge is tight. Remake Row 1 with a larger hook.
- Strands uneven in length: Measure every 5 motifs, and redo any loose joins.
- Opening closes up: Rnd 1 is too tight. Chain more loosely or use a larger hook for the ch-24.
Care
Hand wash cold or machine wash on a delicate cycle in a mesh bag, and reshape while damp. Dry flat or hang to dry. Don’t tumble dry.

Final Notes
The measurement chain is simple:
– 1 motif = 3 in (7.6 cm) × 4 in (10.2 cm)
– 20 motifs = an 80 in (203.2 cm) strand
– 12 strands = 36 in (91.4 cm) wide
– 144 band sc at 4 sc per in = the same 36 in (91.4 cm)
– 2 in (5.1 cm) of band on top gives a panel of 82–84 in (208.3–213.4 cm)
Check your first motif, keep your joins snug, and the lattice will hang straight and even.
Happy crocheting!