

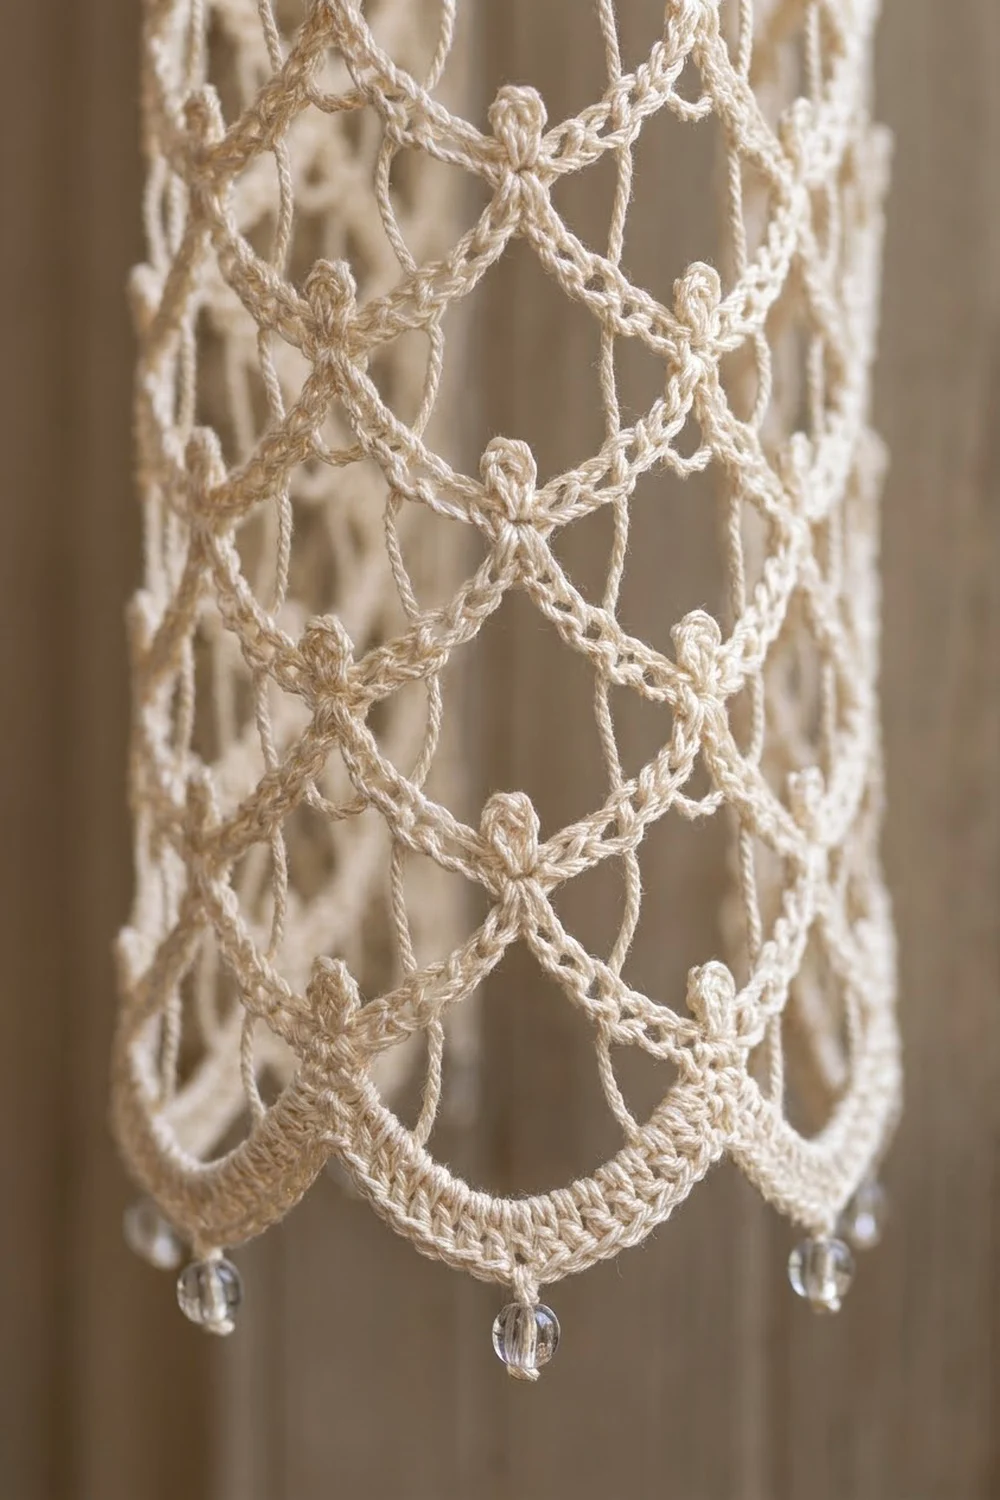
The Ivory Trellis curtain is a tall, airy lace panel that filters light without blocking it. Chain arches stack in offset rows to build a soft diamond trellis. A tiny three-loop picot trefoil marks every point where the arches meet.
The panel uses a single color, a warm cream or ivory mercerized cotton. Clear glass beads at the scalloped hem add weight, help the panel hang straight, and catch the light. The look is vintage and romantic, and it suits a bedroom, dressing room, or any window that gets soft daylight.
This pattern uses US crochet terms. The finished panel measures 36.5 in (92.7 cm) wide by 81 in (205.7 cm) long from the top of the band to the scallop points, not counting the tabs or beads.
You work the panel in one piece from the top down. First comes a solid double crochet band, then 105 rows of picot-arch mesh, with beads added in the last row. A single crochet border runs down both sides and across the bottom scallops. The tab loops are worked last, into the foundation chain.
Finished Size and Construction
- Finished size: 36.5 in (92.7 cm) wide × 81 in (205.7 cm) long, plus tabs about 1.7 in (4.3 cm) above the band
- Skill level: Intermediate
- Terminology: US
- Yarn weight: Sport (2) mercerized cotton
- Hook: 3.5 mm (E-4), plus a 0.75 mm steel hook for placing beads
- Number of pieces: 1 panel (tabs worked directly onto it)
- Layout: one vertical panel; 24 arch repeats across, 105 mesh rows down
- Piece size before border: 36 in (91.4 cm) × 81 in (205.7 cm)
- Border depth: about 0.25 in (0.6 cm) on each side
All quantities below are for one panel. For a pair like the one in the photo, make two panels and double the materials.
Materials
Yarn: Use a smooth, tightly plied mercerized cotton in sport weight. Mercerized cotton holds the picots crisply and drapes well. Avoid fuzzy blends, which blur the trellis lines.
- Cream/ivory: 450 g, about 1,350 m (based on about 150 m per 50 g)
Tools and notions:
- 3.5 mm (E-4) crochet hook
- 0.75 mm steel hook (or a dental-floss threader) for placing beads
- 24 clear glass beads, 8 mm, with a hole of at least 2 mm (buy 2–3 spares)
- Tapestry needle
- Stitch markers
- Rust-proof pins, blocking mats or a clean sheet on a large floor area, and a spray bottle
- Measuring tape
The yarn amount includes a margin of about 15% for gauge differences and the swatch.
Abbreviations (US Terms)
- ch – chain
- sl st – slip stitch
- sc – single crochet
- dc – double crochet
- tr – treble crochet
- sk – skip
- st(s) – stitch(es)
- RS / WS – right side / wrong side
- rep – repeat
Special stitches
Picot trefoil (PT): After finishing a ch-5 leg, the last chain made is the base ch. [Ch 4, sl st in base ch] 3 times. This makes three ch-4 loops coming from one point. The second loop is the center loop.
Beaded picot trefoil (BPT): Ch 4, sl st in base ch (first loop). For the center loop, ch 2, then take the hook out of the loop. Slide a bead onto the steel hook, catch the loop with it, and pull the loop through the bead. Put the 3.5 mm hook back in the loop, ch 2, sl st in base ch. Ch 4, sl st in base ch (third loop). The bead sits locked at the tip of the center loop.
Gauge and Checkpoints
Gauge (after blocking):
- Band: 16 dc = 3 in (7.6 cm); 4 dc rows = 2.25 in (5.7 cm)
- Mesh: 1 arch repeat (8 sts) = 1.5 in (3.8 cm) wide; 2 mesh rows = 1.5 in (3.8 cm) tall, so each row = 0.75 in (1.9 cm)
- Border: 16 sc = 3 in (7.6 cm)
Test swatch first. Ch 35. Dc in 4th ch from hook and in each ch across (33 dc). Work 3 more dc rows. Then work Rows 5–8 of the pattern with 4 repeats instead of 24. Wet block the swatch and let it dry. It should measure 6 in (15.2 cm) wide, and the 4 mesh rows should measure 3 in (7.6 cm).
Checkpoints on the panel:
- After Row 4: band is 36–36.25 in (91.4–92.1 cm) wide and 2.25 in (5.7 cm) tall.
- After Row 12 (8 mesh rows): 6 in (15.2 cm) of mesh, gently stretched.
- After Row 56 (52 mesh rows): total length 41.25 in (104.8 cm).
- After Row 108: total length 80.25 in (203.8 cm).
- After Row 109: total length 81 in (205.7 cm).
Unblocked lace measures shorter and narrower. Pin a section flat before you check it.
If the swatch is too big, go down 0.25–0.5 mm in hook size. If it is too small, go up by the same amount. If the width is right but the rows are too short, chain a little more loosely on the ch-5 legs. Don’t add chains, because that changes the stitch math.
The Pattern
Part 1: Top Band
Foundation: Ch 195.
Row 1 (RS): Dc in 4th ch from hook (the skipped ch count as 1 dc) and in each ch across. (193 dc)
Rows 2–4: Ch 3 (counts as dc), turn, dc in each st across, with the last dc in the top of the turning ch. (193 dc in each row)
Check Checkpoint 1 before you go on.
Part 2: Picot-Arch Mesh
The mesh uses two row types. Type A rows have 24 full arches. Type B rows have 23 full arches with a half arch at each edge, which offsets the trellis.
Row 5 (Type A, first mesh row): Ch 1, turn, sc in first dc. Ch 5, PT, ch 5, sk 7 dc, sc in next dc; rep from * 23 more times. The last sc goes in the top of the turning ch. (24 arches, 24 PT, 25 sc)*
Check: 1 sc + (24 × 8 sts) = 193 sts used, which matches the band.
Row 6 (Type B): Ch 8 (counts as tr + ch 4), turn, sc in center loop of first PT. Ch 5, PT, ch 5, sc in center loop of next PT; rep from * 22 more times. Ch 4, tr in last sc. (23 full arches, 23 PT, 24 sc, 2 edge tr counting the turning ch)*
Row 7 (Type A): Ch 1, turn, sc in first tr. Ch 5, PT, ch 5, sc in center loop of next PT; rep from * 22 more times. Ch 5, PT, ch 5, sc in 4th ch of turning ch-8. (24 arches, 24 PT, 25 sc)*
Rows 8–107: Rep Rows 6 and 7 fifty more times.
Row 108: Work as Row 6. (23 full arches, 23 PT, 24 sc, 2 edge tr)
Check Checkpoints 2–4 as you go. Count the PTs every few rows. Type A rows always have 24 and Type B rows always have 23.
Row 109 (Type A, beaded): Work as Row 7, but make a BPT in place of every PT. (24 arches, 24 BPT, 25 sc; 24 beads used)
Working top-down means each arch hangs downward, so the beaded trefoils of Row 109 form the low points of the hem scallops. Fasten off.
The mesh is 105 rows deep (Rows 5–109): 105 × 0.75 in = 78.75 in (200.0 cm). Add the 2.25 in (5.7 cm) band to get 81 in (205.7 cm).
Part 3: Tabs
Turn the panel so the foundation chain is at the top, with the RS facing. The foundation chain has 193 working points: the base of the turning ch from Row 1 counts as the first one, and the 192 chains holding dc stitches are the rest. Place markers so you have 9 groups of 9 sts with 14 sts skipped between them. The tabs start at sts 1, 24, 47, 70, 93, 116, 139, 162, and 185.
Check: (9 tabs × 9 sts) + (8 gaps × 14 sts) = 81 + 112 = 193.
Each tab:
- Row 1: Join yarn in the first st of the group. Ch 3 (counts as dc), dc in next 8 sts. (9 dc)
- Rows 2–8: Ch 3, turn, dc in each st across. (9 dc)
Fasten off and leave a 12 in (30.5 cm) tail. Fold the tab to the WS. Whipstitch Row 8 across the top of band Row 2, lining it up with the tab’s own base stitches.
Each tab is 4.5 in (11.4 cm) long before folding and 1.7 in (4.3 cm) wide. That leaves a loop about 1.7 in (4.3 cm) high above the band, which fits rods up to 1 in (2.5 cm) in diameter. Each gap between tabs is about 2.6 in (6.6 cm).
Border
Border gauge: 16 sc = 3 in (7.6 cm), the same as the band. The border is one row worked down the first side, across the bottom, and up the second side. The top edge is left unbordered because the tabs finish it.
In the side counts below, the corner stitches are not included. They are counted in the bottom total.
Border row: With RS facing, join yarn at the top corner of the right-hand side edge (the side of band Row 1).
- Side 1: Work 3 sc in the side of each of the 4 band rows (12 sc). Then, down the mesh, work 2 sc in the side of each edge sc (Type A rows) and 6 sc around the post of each edge tr or turning-ch (Type B rows). Rows 5–108 make 52 A/B pairs, and each pair gets 8 sc, so the mesh adds 416 sc. (Side 1 total: 428 sc)
- Bottom-left corner: 3 sc in the edge sc of Row 109.
- Bottom: 6 sc in next ch-5 leg, sk the BPT so it hangs free, 6 sc in next ch-5 leg, sc in next anchor sc; rep from * 22 more times. Then 6 sc in next ch-5 leg, sk BPT, 6 sc in next ch-5 leg, and 3 sc in the last edge sc of Row 109 (corner). (Bottom total: 3 + (23 × 13) + 12 + 3 = 317 sc)*
- Side 2: Work up the second side as for Side 1, in reverse order. (428 sc)
Fasten off. (Border total: 428 + 317 + 428 = 1,173 sc)
Why the math works: The sides run from the top of the band to the top of Row 109. That is 2.25 in (5.7 cm) of band plus 104 mesh rows × 0.75 in = 78 in (198.1 cm), for 80.25 in (203.8 cm) in all. At 16 sc per 3 in, 80.25 in needs 428 sc, which is exactly 12 + 416. On the bottom, each ch-5 leg gets 6 sc, so every scallop is covered evenly. The bead dangles below because the trefoil is skipped.
Final Blocking
- Weave in all ends along chain legs or the border, and split the yarn as you go so the ends hold in cotton.
- Soak the panel in lukewarm water for 15 minutes. Squeeze the water out gently; don’t wring.
- Roll the panel in towels to remove more water.
- Lay a clean sheet on the floor and spread the panel flat in sections.
- Pin the band straight at 36–36.25 in (91.4–92.1 cm). Pin the side borders straight down to 81 in (205.7 cm).
- Open the mesh by pinning each Type A row’s PTs into a straight line, 1.5 in (3.8 cm) apart.
- Pin each bottom scallop into a smooth curve, with the bead hanging below the point.
- If floor space is short, hang the panel damp on its rod and pin the bottom corners to a towel to keep it square. Let it dry completely.
Final Quality-Control Checklist
- Band has 193 dc and is level across the top.
- Every Type A row has 24 PTs and every Type B row has 23.
- Each anchor sc sits in a center picot loop, not a side loop.
- All 24 beads are locked and evenly spaced along the hem.
- Side borders lie flat, with no ruffling or pulling.
- Nine tabs, evenly spaced, are all folded to the WS and sewn securely.
- Blocked size is 36.5 in (92.7 cm) × 81 in (205.7 cm).
Troubleshooting
- Trellis leans to one side: You probably anchored in a side loop of the PT. Rip back to the error and anchor in the center loop.
- PT count is off by one: Check your row type. Type B rows start with ch 8 and end with ch 4 and a tr.
- Mesh pulls narrower than the band: Your ch-5 legs are too tight. Chain more loosely, or go up a hook size for the chains only.
- Side border ruffles: Use 5 sc around each edge tr instead of 6, and note the change on both sides.
- Side border puckers: Use 7 sc around each edge tr.
- Bead slides around: Make sure you work ch 2 after placing the bead, so the bead is locked.
- Panel too short after blocking: Hang it for 24 hours with light clips at the hem. Cotton lace lengthens slightly once it hangs.
Care
Hand wash in cool water with a mild detergent, then lay flat or hang damp to dry. Don’t tumble dry, and avoid hot irons on the beads.

Final Notes
The whole panel follows one measurement chain. The band is 193 dc and 2.25 in (5.7 cm) tall. That gives 24 mesh repeats of 1.5 in (3.8 cm) each across 36 in (91.4 cm). The 105 mesh rows of 0.75 in (1.9 cm) each bring the panel to 81 in (205.7 cm). A 428-sc side border matches those 80.25 in (203.8 cm) of side edge, and 317 sc wrap the beaded scallops. If your swatch matches gauge, every count falls into place.
Happy crocheting!