

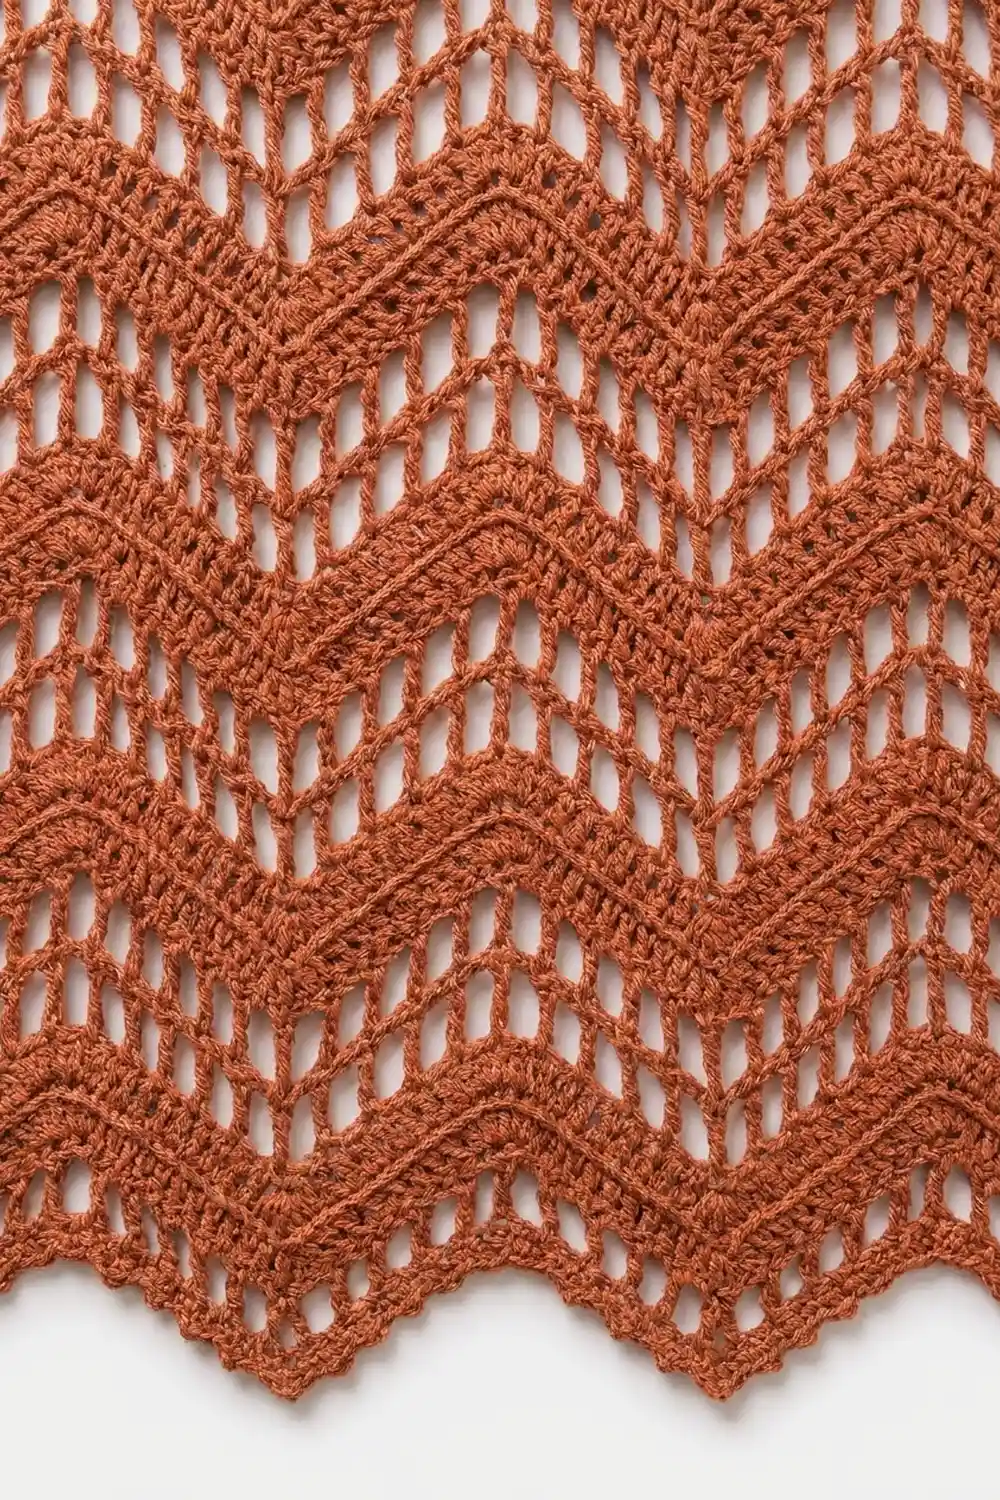
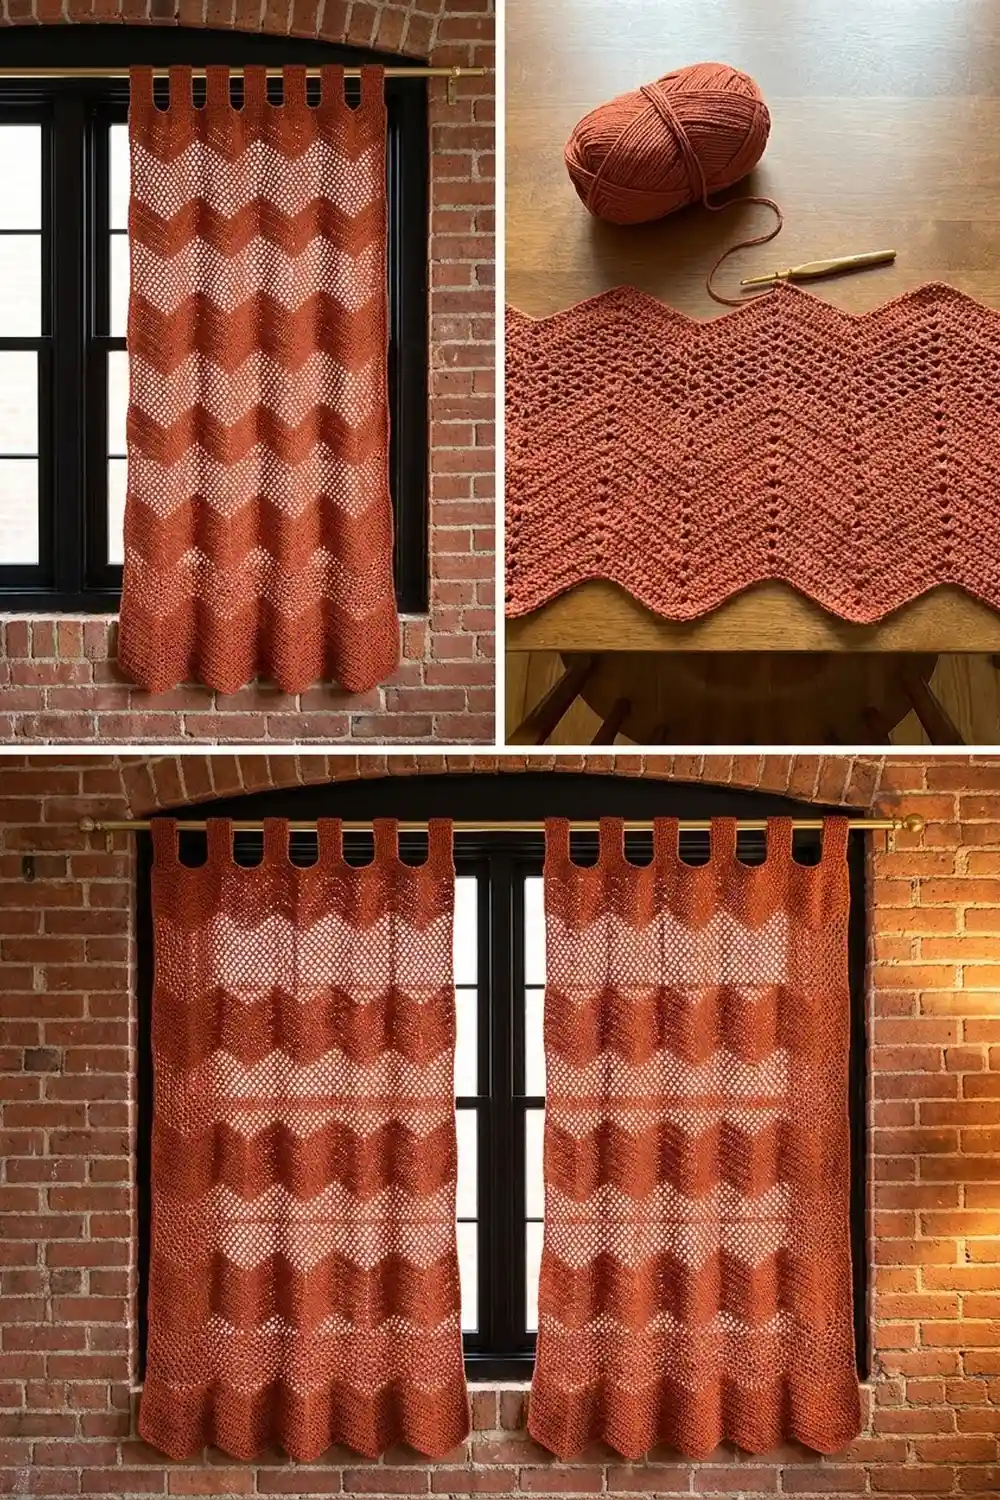
This curtain panel adds warm texture to a window without blocking the light. Bands of solid double-crochet chevrons alternate with open mesh chevrons, and the sun comes through as soft zigzag shadows. The bottom edge keeps the natural points of the ripple. At the top, a solid heading band with seven tabs slides straight onto a curtain rod.
The panel uses one color, a warm terracotta or rust. With a single color, the texture is what you notice. It also suits brick, wood, brass, and natural linen. The look is relaxed and a little vintage, but the lines are clean enough for a modern room.
The pattern uses US crochet terms. One panel measures 41 in (104.1 cm) wide and 81.25 in (206.4 cm) from the top of the heading band to the lowest bottom point. The tabs add a 3 in (7.6 cm) loop, for a total hanging length of 84.25 in (214.0 cm) from the top of the rod.
The panel is one piece, worked flat from the bottom up. Chain the full width and work a 4-row ripple repeat until the body is long enough. Level the top with graduated stitches, add a single crochet heading band, and work the tabs straight up from it. One row of edging finishes each long side. For a pair, make a second panel exactly the same way.
Finished Size and Construction
- Finished size: 41 in (104.1 cm) wide x 81.25 in (206.4 cm) long, plus 3 in (7.6 cm) tab loops
- Skill level: Easy-intermediate
- Terminology: US crochet terms
- Yarn weight: Worsted (#4)
- Hook: 5.5 mm (I-9)
- Number of pieces: 1 panel (make 2 for a pair; the panels are not joined)
- Layout: One rectangular panel, with the chevron rows running across the width
- Size before border: 40.5 in (102.9 cm) wide; 80.5 in (204.5 cm) along each side edge
- Border depth: 1 row of sc on each long side, about 0.25 in (0.6 cm)
- Chevron depth: about 0.75 in (1.9 cm) from peak to valley
Materials
Choose a worsted-weight cotton or cotton blend. Cotton hangs straight, holds the chevron shape, and washes well. Avoid fuzzy yarns, which blur the mesh, and slippery yarns, which stretch under their own weight.
- Terracotta / rust: about 1,500 g / 2,750 m per panel, based on a yarn of about 183 m per 100 g. A pair takes about 3,000 g / 5,500 m.
These quantities include a margin of about 10% for swatching and differences in tension. Buy all the yarn from one dye lot. On a long panel against a window, a change in color shows clearly.
Tools:
- 5.5 mm (I-9) crochet hook
- Tapestry needle
- Stitch markers (at least 10)
- Measuring tape
- Rustproof pins and a large flat surface for blocking
- Curtain rod up to 1.5 in (3.8 cm) in diameter
Abbreviations (US Terms)
- ch – chain
- sc – single crochet
- hdc – half double crochet
- dc – double crochet
- tr – treble crochet
- sp – space
- st(s) – stitch(es)
- RS / WS – right side / wrong side
Special stitch – dc3tog (double crochet 3 together): *Yarn over, insert hook in next st, yarn over and pull up a loop, yarn over and pull through 2 loops; repeat from * 2 more times (4 loops on hook), yarn over and pull through all 4 loops. It is worked over 3 sts and makes 1 st. This stitch forms each valley.
Stitch counting: In every ripple row, the beginning ch 3 counts as a dc and each ch-1 counts as 1 st. Every ripple row has 145 sts.
Gauge and Checkpoints
Ripple gauge: One 16-st repeat measures 4.5 in (11.4 cm) wide, peak to peak. 4 rows measure 3 in (7.6 cm) tall, measured along a straight column of stitches.
Single crochet gauge: 18 sc = 5 in (12.7 cm), and 4 sc rows = 1 in (2.5 cm).
Test a swatch first. Ch 52. Work Row 1, then Rows 2–5 twice. In each row, repeat from * 1 more time instead of 7 more times. That gives 9 rows of 49 sts. Block the swatch lightly. It should measure 13.5 in (34.3 cm) wide and 6.75 in (17.1 cm) tall along a stitch column.
- Swatch too big: Go down to a 5 mm (H-8) hook.
- Swatch too small: Go up to a 6 mm (J-10) hook.
Width matters most. The foundation chain sets the width, but you can always add or remove repeats in length.
Checkpoints on the panel:
- After Row 1: 40.5 in (102.9 cm) wide.
- After Row 25: 18.75 in (47.6 cm) tall.
- After Row 53: 39.75 in (101.0 cm) tall.
- After Row 105: 78.75 in (200.0 cm) tall.
- After Row 112: 80.5 in (204.5 cm) along each side edge.
Measure with the work flat and unstretched. If you hang it to measure, the reading will be too long.
Panel Body
Each repeat is 16 sts: 6 sts going down, a valley (dc3tog), 6 sts going up, and a peak (3 sts in 1 st). Both side edges sit at half-peaks.
Foundation: Ch 148.
Row 1 (solid row): Dc in 4th ch from hook (the skipped ch count as the first dc, so the edge now has 2 sts), dc in next 6 ch, dc3tog over next 3 ch, dc in next 6 ch, 3 dc in next ch; repeat from * 7 more times, dc in next 6 ch, dc3tog over next 3 ch, dc in next 6 ch, 2 dc in last ch. Turn. (145 sts)*
Place a marker in the center dc of each 3-dc peak. Move the markers up every few rows to keep the repeats lined up.
Row 2 (mesh row): Ch 3 (counts as dc), dc in first st, (ch 1, skip next st, dc in next st) 3 times, dc3tog over next 3 sts, (dc in next st, ch 1, skip next st) 3 times, (dc, ch 1, dc) in next st; repeat from * 7 more times, (ch 1, skip next st, dc in next st) 3 times, dc3tog over next 3 sts, (dc in next st, ch 1, skip next st) 3 times, 2 dc in top of turning ch. Turn. (145 sts: 2 at each edge, and 6 + 1 + 6 + 3 per repeat)*
Row 3 (mesh row): Work as for Row 2. Wherever it says “st,” work into the next stitch or ch-1 sp, whichever comes next. Work each peak (dc, ch 1, dc) into the ch-1 sp at the center of the peak below. The spaces stagger slightly, which makes the taller, brick-like holes in the open bands. Turn. (145 sts)
Row 4 (solid row): Ch 3 (counts as dc), dc in first st, dc in next 6 sts and sps, dc3tog over next 3 sts, dc in next 6 sts and sps, 3 dc in next ch-1 sp (peak center); repeat from * 7 more times, dc in next 6 sts and sps, dc3tog over next 3 sts, dc in next 6 sts and sps, 2 dc in top of turning ch. Turn. (145 sts)*
Row 5 (solid row): Ch 3 (counts as dc), dc in first st, dc in next 6 sts, dc3tog over next 3 sts, dc in next 6 sts, 3 dc in next st; repeat from * 7 more times, dc in next 6 sts, dc3tog over next 3 sts, dc in next 6 sts, 2 dc in top of turning ch. Turn. (145 sts)*
Rows 6–105: Repeat Rows 2–5 twenty-five more times, for 26 repeats in total. The last row is a solid row. (145 sts; 78.75 in / 200.0 cm tall)
If a row doesn’t come to 145, look first for a missed ch-1 sp or a peak worked into the wrong stitch.
Leveling the Top
The top of Row 105 is still a zigzag. This row fills in the valleys so the heading band sits straight.
Row 106 (leveling row): Ch 1 (does not count), sc in first 2 sts, hdc in next 2 sts, dc in next 2 sts, tr in next 2 sts, tr in next st (valley), tr in next 2 sts, dc in next 2 sts, hdc in next 2 sts, sc in next 3 sts; repeat from * 7 more times, hdc in next 2 sts, dc in next 2 sts, tr in next 2 sts, tr in next st, tr in next 2 sts, dc in next 2 sts, hdc in next 2 sts, sc in last 2 sts. Turn. (145 sts: 2 + 16 x 8 + 15)*
The tr at each valley is about 1 in (2.5 cm) tall, and the sc at each peak is about 0.25 in (0.6 cm). The difference is about 0.75 in (1.9 cm), the same as the chevron depth, so the top comes out level.
Heading Band
Rows 107–112: Ch 1 (does not count), sc in each st across. Turn. (145 sc in each of 6 rows)
The band is 1.5 in (3.8 cm) deep. At 18 sc per 5 in (12.7 cm), 145 sc measure 40.3 in (102.4 cm). That is close enough to the 40.5 in (102.9 cm) ripple width that the band lies flat without pulling in.
Tabs
There are 7 tabs. Each is 7 sts wide, with 16 sts between tabs: 7 x 7 + 6 x 16 = 49 + 96 = 145. The first and last tabs sit at the side edges.
First tab: With Row 112 just finished, don’t fasten off. Row 1: Ch 1, sc in first 7 sts. Turn. (7 sc) Rows 2–24: Ch 1, sc in each st. Turn. (7 sc) Fasten off, leaving a 12 in (30.5 cm) tail.
Remaining tabs: Skip the next 16 sts of Row 112. Join the yarn in the next st and work Rows 1–24 over 7 sts. Repeat until you have 7 tabs. The last tab ends on the last st of Row 112.
Each tab strip is 6 in (15.2 cm) long and about 1.9 in (4.8 cm) wide. Each gap between tabs is about 4.4 in (11.2 cm).
Border
The border is one row of sc along each long side. The bottom keeps its ripple points with no edging, and the heading band and tabs already finish the top.
Border gauge: Work the side edging slightly looser than the sc gauge. A hanging panel stretches downward, so a long vertical edge needs fewer stitches. Aim for about 3.35 sc per 1 in (2.5 cm).
Right side edge: With RS facing, join the yarn at the bottom corner (Row 1). Work into the row-ends: 3 sc in the first dc row-end, 2 sc in the next. Keep alternating 3 sc and 2 sc up all 105 dc row-ends. Then work 1 sc in each of the 7 sc-height row-ends (Rows 106–112). Fasten off.
- Dc rows: 53 row-ends x 3 sc = 159, plus 52 row-ends x 2 sc = 104, for 263 sc.
- Sc rows: 7 row-ends x 1 sc = 7 sc.
- Total: 270 sc.
Left side edge: With RS facing, join the yarn at the top corner of the heading band and work down the edge. Work 1 sc in each of the 7 sc row-ends, then alternate 2 sc and 3 sc down the dc row-ends, ending with 3 sc in Row 1. Total: 270 sc.
Top and bottom edges: No stitches are added.
Why the math works: Each dc row is 0.75 in (1.9 cm) tall, so 2.5 sc per row averages 3.33 sc per 1 in (2.5 cm). Each sc row is 0.25 in (0.6 cm) tall, so 1 sc per row gives 4 sc per 1 in, which matches the sc gauge. The side edge measures 78.75 in + 1.75 in = 80.5 in (204.5 cm). 270 sc over that length is about 3.35 sc per 1 in, just under the 3.6 sc per 1 in of the sc gauge. That keeps the edge from waving without pulling it in. The edging adds about 0.25 in (0.6 cm) per side, so the width goes from 40.5 in (102.9 cm) to 41 in (104.1 cm).
Finishing the tabs: Fold each tab to the WS so its last row lies against the WS of Row 107. Use the tail to whipstitch the last row of the tab across the 7 sts of Row 107 behind it. Each folded tab makes a 3 in (7.6 cm) loop, which fits a rod up to 1.5 in (3.8 cm) in diameter. Weave in all ends along stitch columns. Ends woven across the mesh spaces would show.
Final Blocking
- Soak the panel in cool water with a little gentle wash for 15 minutes.
- Press the water out gently. Don’t wring it. Roll the panel in towels to take out more water.
- Lay the panel flat, RS up, on a clean floor or on blocking mats.
- Pin the side edges straight, 41 in (104.1 cm) apart.
- Pin the heading band straight across.
- Pin the 9 bottom points 4.5 in (11.4 cm) apart, each 0.75 in (1.9 cm) below the side corners.
- Check that each side edge measures 80.5 in (204.5 cm) and the length to the lowest point is 81.25 in (206.4 cm).
- Ease the mesh holes open with your fingers so they sit evenly.
- Leave the panel pinned until it is completely dry, which can take 24–48 hours.
Final Quality-Control Checklist
- Every ripple row has 145 sts, in 9 full repeats with a half-peak at each side edge.
- There are 105 ripple rows, ending on a solid row.
- Solid and mesh bands alternate, two rows each.
- Row 106 is level across the top.
- The heading band has 6 rows of 145 sc.
- There are 7 tabs, each 7 sts by 24 rows, with 16 sts between them.
- Each side edge has 270 sc.
- The panel measures 41 in (104.1 cm) wide, 80.5 in (204.5 cm) along each side, and 81.25 in (206.4 cm) to the lowest point.
Troubleshooting
The stitch count drifts. A ch-1 sp was probably skipped or worked twice. Count each repeat between markers; it should be 16 sts.
The peaks wander. A peak was worked one stitch off. Each peak goes into the center st or ch-1 sp of the peak below.
The panel gets narrower toward the top. Your tension has tightened. Check the width every 20 rows, and change hooks if it drifts by more than 0.5 in (1.3 cm).
The side edges wave. There are too many sc. Work 2 sc in every dc row-end over that section.
The side edges pull in. There are too few sc. Work 3 sc in every dc row-end over that section.
The heading band cups. Rework Rows 107–112 with a hook one size larger.
Care
Hand wash, or machine wash on a gentle cool cycle in a mesh bag. Reshape and dry flat; don’t hang the panel while it is wet, or it will stretch.
Final Notes
Every measurement in this pattern builds on the one before it. One 16-st repeat is 4.5 in (11.4 cm) wide, so 9 repeats (145 sts) give 40.5 in (102.9 cm). Each row is 0.75 in (1.9 cm) tall, so 105 rows give 78.75 in (200.0 cm). The leveling row and 6 sc rows add 1.75 in (4.4 cm), for an 80.5 in (204.5 cm) side edge. The 270-sc side edging brings the width to 41 in (104.1 cm). The bottom points hang 0.75 in (1.9 cm) lower, for 81.25 in (206.4 cm), and the 3 in (7.6 cm) tab loops bring the total hanging length to 84.25 in (214.0 cm). If your swatch matches the gauge, every checkpoint will match too.
Happy crocheting!