

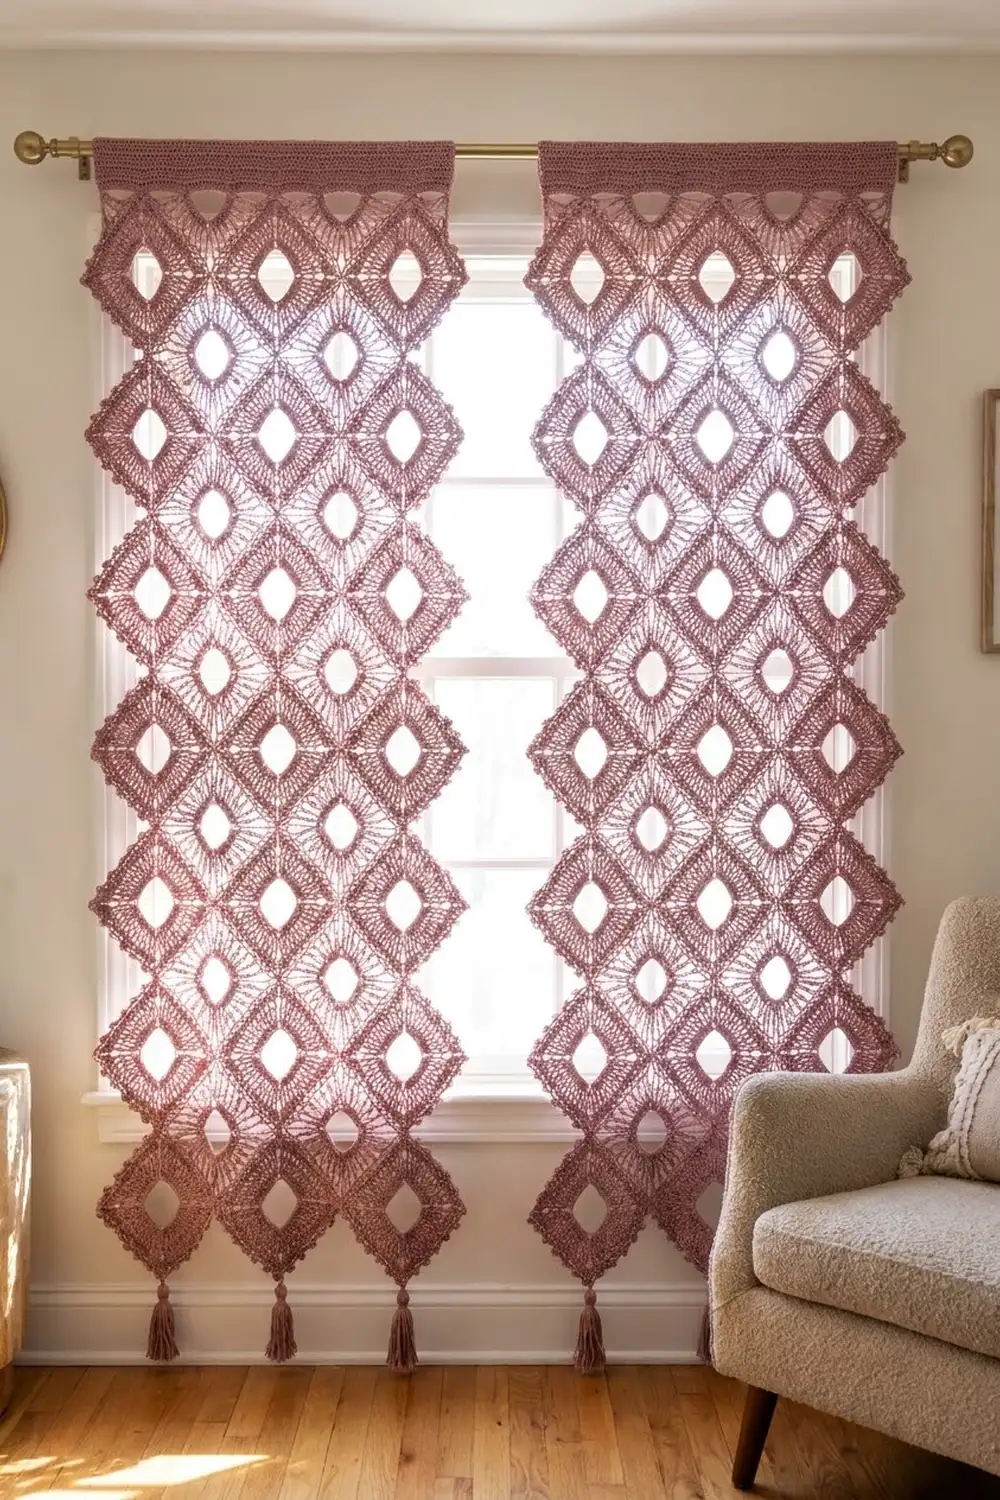
The Rosewood Lattice Curtain is a light, airy pair of curtain panels built from small on-point motifs. Each motif is an open square with a fan of treble stitches at every corner, finished with a beaded picot edge. The motifs touch only at their tips, so the finished fabric is a clean diamond lattice that lets daylight through while still framing the window.
The whole project uses one color, a soft dusty mauve-rose cotton. A single shade keeps the lattice calm and lets the shapes stand out: hollow centers, fanned corners and open diamonds. A solid band at the top gives each panel structure for hanging, and a tassel at every bottom tip adds a little weight and swing.
The pattern uses US crochet terms. Each finished panel measures 35 in (88.9 cm) wide by 72 in (182.9 cm) long including the top band, and the tassels hang about 4 in (10.2 cm) below that.
You’ll make 98 motifs per panel (196 in total) and join them as you go on the last round. After that, you’ll work a straightening row and a solid band across the top of each panel, then add the tassels.
Finished Size and Construction
- Finished panel size: 35 in x 72 in (88.9 cm x 182.9 cm), plus 4 in (10.2 cm) tassels
- Skill level: Intermediate
- Terminology: US
- Yarn weight: DK / light (#3) cotton
- Hook: 3.5 mm (E-4)
- Number of pieces: 196 motifs (98 per panel), 2 panels
- Layout per panel: 7 motifs across x 14 motifs down, set on point
- Motif size: 5 in (12.7 cm) tip to tip
- Panel size before the band: 35 in x 70 in (88.9 cm x 177.8 cm)
- Band depth: 2 in (5.1 cm), top edge only
Materials
Yarn: Use a smooth mercerized or matte DK cotton, or a cotton blend, at about 115 m per 50 g. Cotton holds the fans crisp and hangs straight. Avoid fuzzy fibers, because they blur the picots.
- Dusty Mauve (one color): 1,200 g / about 2,760 m (twenty-four 50 g balls)
These quantities include a margin of about 10%. The 196 motifs use roughly 980 g, the bands about 40 g and the tassels about 45 g.
Tools:
– 3.5 mm (E-4) crochet hook
– Tapestry needle
– Scissors
– Stitch markers
– 5 in (12.7 cm) cardboard for the tassels
– Rust-proof pins and a large blocking surface
– Spray bottle or steamer
– 16 curtain clip rings (8 per panel)
Abbreviations (US Terms)
- ch – chain
- sl st – slip stitch
- sc – single crochet
- dc – double crochet
- tr – treble crochet
- sp – space
- st(s) – stitch(es)
- P (picot) – ch 3, sl st in the 3rd ch from the hook
- trtr (triple treble): Yarn over 4 times, insert the hook, yarn over and pull up a loop (6 loops on hook). Then [yarn over, draw through 2 loops] 5 times.
- Fan: In the same space, work 9 tr in total, with ch 1 between them: (tr, ch 1) 8 times, tr. You get 9 tr and 8 ch-1 sps.
Gauge and Checkpoints
Make one complete motif before starting the project, then block it lightly and measure it.
- Motif gauge: 5 in (12.7 cm) tip to tip after blocking
- Band gauge: 24 sts = 5 in (12.7 cm); 4 sc rows = 1 in (2.5 cm)
Checkpoints:
– After Rnd 2: the frame measures 2 in (5.1 cm) per side.
– After Rnd 3: the motif measures about 4.5 in (11.4 cm) from fan tip to fan tip.
– After Rnd 4: the motif measures 5 in (12.7 cm) tip to tip, measured through the center to the far ends of the ch-5 tip loops.
If your motif is too big, go down to a 3.25 mm hook. If it’s too small, go up to a 3.75 mm hook. A difference of 1/4 in (0.6 cm) per motif adds up to 1.75 in (4.4 cm) across a panel and 3.5 in (8.9 cm) down its length, so it’s worth getting this right.
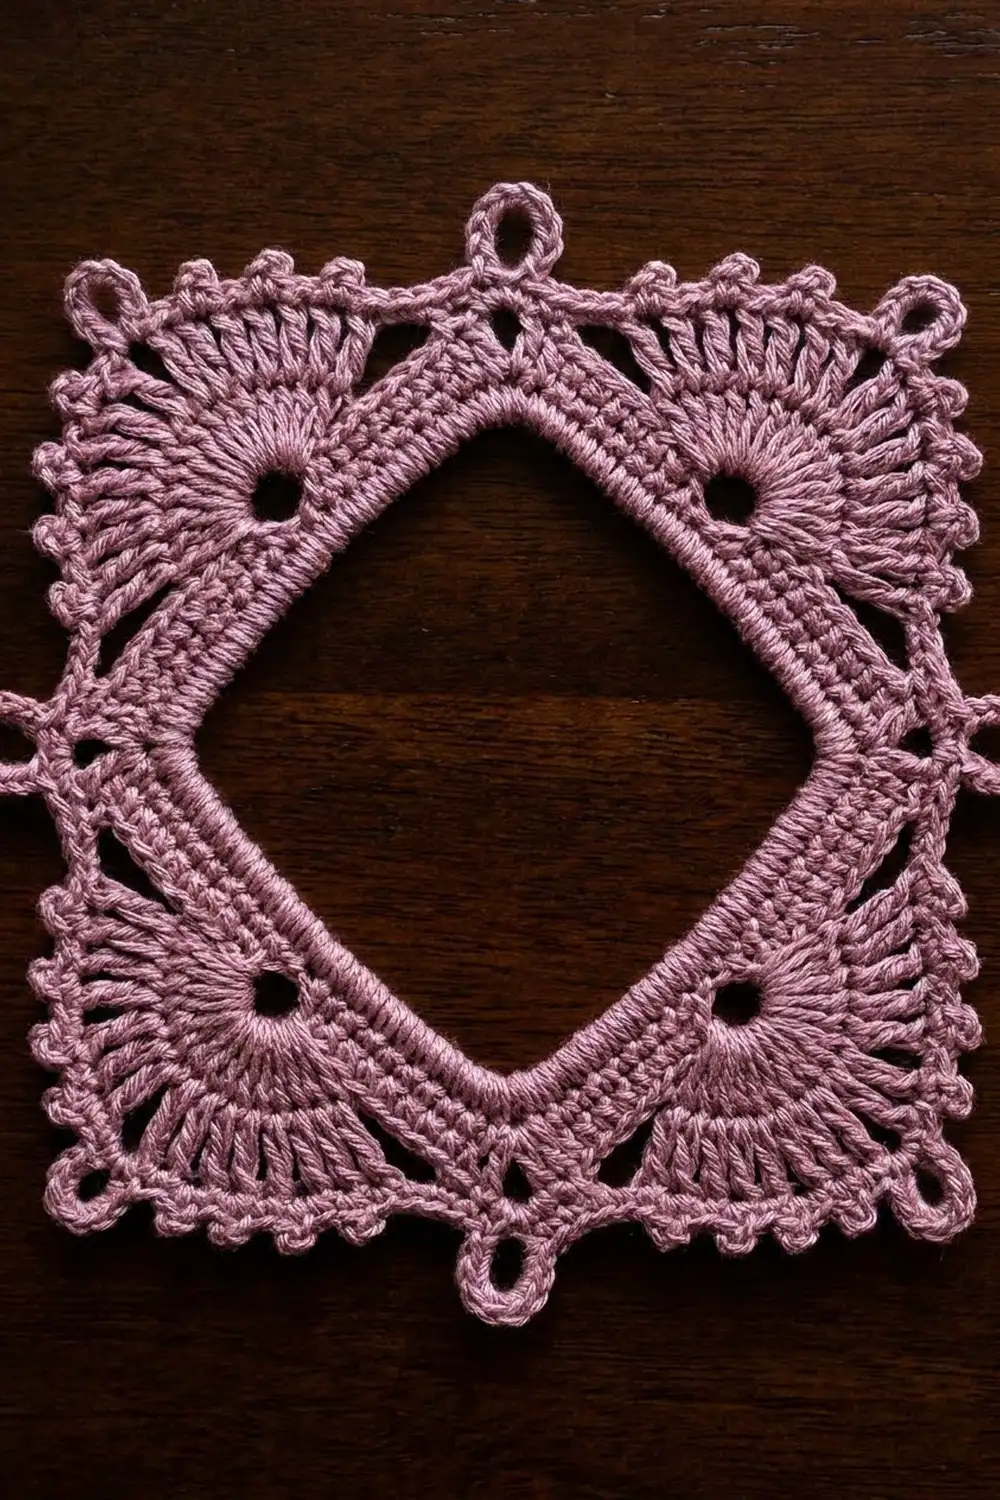
Motif Pattern
Make 196. Work the first motif completely. From the second motif onward, join on Rnd 4 as described in Joining.
Rnd 1: Ch 36 and sl st in the first ch to form a ring, without twisting it. Ch 1, then sc in each ch around. Sl st to the first sc. (36 sc)
Rnd 2 (square frame): Ch 1. (Sc, ch 2, sc) in the next sc (corner), sc in the next 8 sc. Repeat from * 3 more times. Sl st to the first sc. (40 sc, 4 corner ch-2 sps; 10 sc per side between the corner sps)
The extra sc at each corner turns the round ring into a square with a large open center.
Rnd 3 (corner fans): Sl st into the first corner ch-2 sp. Ch 4 (counts as the first tr), then (ch 1, tr) 8 times in the same sp. That makes the first fan.
Next, skip 4 sc, sc in the next 2 sc, skip 4 sc, and work a Fan in the next ch-2 sp. Repeat this skip-sc-skip-Fan sequence 2 more times. Finish with: skip 4 sc, sc in the next 2 sc, skip 4 sc, and sl st to the top of the beginning ch-4.
(36 tr in 4 fans of 9, 32 ch-1 sps, 8 sc)
Side check: Each side of Rnd 2 has 10 sc. Rnd 3 uses all of them: 4 skipped + 2 worked + 4 skipped = 10. Each side stays plain, and only the corners fan out.
Rnd 4 (picot edge and tip loops): Ch 1. Work the following for each fan:
- Sc in the first tr. [P, sc in the next ch-1 sp, sc in the next tr] 3 times. P, then sc in the next ch-1 sp.
- Tip: (sc, ch 5, sc) in the center (5th) tr.
- Sc in the next ch-1 sp, P. [Sc in the next tr, sc in the next ch-1 sp, P] 3 times. Sc in the last tr.
- Sl st in each of the next 2 sc between the fans.
Repeat steps 1–4 for the remaining 3 fans, then sl st to the first sc and fasten off.
Per fan: 18 sc, 8 picots and 1 ch-5 tip loop.
Per motif: 72 sc, 32 picots, 4 ch-5 tip loops and 8 sl sts.
The picots sit symmetrically, 4 on each side of the tip loop, so you get the beaded fan edge. The four ch-5 loops become the join points and the top tips.
Make All Pieces
- Panel A: 98 motifs in Dusty Mauve
- Panel B: 98 motifs in Dusty Mauve
- Total: 196 motifs
Layout for each panel, set on point. Each ◇ is one motif, and neighbors meet at their side tips and at their top and bottom tips.
Row 1:  ◇ ◇ ◇ ◇ ◇ ◇ ◇   <- top band goes above this row
Row 2:  ◇ ◇ ◇ ◇ ◇ ◇ ◇
Row 3:  ◇ ◇ ◇ ◇ ◇ ◇ ◇
 ...    (rows 4–13 identical)
Row 14: ◇ ◇ ◇ ◇ ◇ ◇ ◇   <- one tassel on each bottom tip
That gives 7 motifs across and 14 rows down per panel: 7 × 14 = 98.
Joining (Join-As-You-Go)
Join each new motif while you work its Rnd 4, at the ch-5 tip loops only.
Method: When you reach a tip that has to connect to a neighbor, work the first sc of the tip into the center tr. Then ch 2, sl st through the neighbor’s ch-5 tip loop, ch 2, and work the second sc in the same center tr.
The ch 2 + sl st + ch 2 replaces the ch 5, so the stitch counts don’t change. Every motif still has 72 sc, 32 picots and 4 tip loops, and no stitches are added at the seams.
Order:
– Row 1: Join each motif’s left tip to the right tip of the motif before it.
– Rows 2–14: Join each motif’s top tip to the bottom tip of the motif directly above it. From the second motif in each row onward, also join its left tip to its left-hand neighbor.
Each new motif needs at most 2 joins.
Tension: Keep the joining chains the same tension as your normal ch-5 loops. If they’re tight, the lattice puckers. If they’re loose, the diamonds sag and lose their square shape.
Size checkpoint:
– After Row 1, the strip should measure 35 in (88.9 cm) from the left tip to the right tip.
– After 4 rows, the panel should measure 20 in (50.8 cm) long.
– The full panel should measure 35 in x 70 in (88.9 cm x 177.8 cm).
Border: Top Band
Only the top edge gets a band. The sides keep their natural zigzag of tips, and the bottom edge gets tassels.
Border gauge: 24 sts = 5 in (12.7 cm), so each motif along the top edge gets 24 sts.
Row 1 (straightening row): With the right side facing, join the yarn at the left tip of the first motif in Row 1. Ch 6 (counts as the first trtr). Then, for each of the 7 motifs:
- Ch 9.
- Work 5 sc in that motif’s top tip loop.
- Ch 9.
- Work 1 trtr through the joined side tips on its right. On the last motif, work it in the right tip instead.
Count: For each motif, ch 9 + 5 sc + ch 9 + 1 trtr = 24 sts. The opening ch-6 sits at the left edge, so Row 1 has 1 + (7 × 24) = 169 sts. Turn.
Why the trtr works: Each top tip sits 2.5 in (6.4 cm) above the side-tip joins. A loosely worked trtr reaches up to that height, which fills each V-shaped gap and levels the edge. The ch 9 spans run across the top of each V, and the 5 sc sit on the tips.
Row 2: Ch 1, then sc in each st and ch across. (169 sc) Turn.
Row 3: Ch 3 (counts as a dc), then dc in each st across. (169 dc) Turn.
Row 4: Ch 1, sc in each st across. (169 sc) Turn.
Row 5: Ch 3 (counts as a dc), dc in each st across. (169 dc) Turn.
Rows 6–7: Ch 1, sc in each st across. (169 sc) Turn after each row. Fasten off at the end of Row 7.
Depth: 4 sc rows at 0.25 in (0.6 cm) each + 2 dc rows at 0.5 in (1.3 cm) each = 2 in (5.1 cm).
Width: 169 sts ÷ 4.8 sts per inch = 35.2 in (89.4 cm). That’s within 1/4 in (0.6 cm) of the 35 in (88.9 cm) lattice, and it blocks flush.
Tassels (7 per panel):
1. Wrap the yarn 30 times around the 5 in (12.7 cm) cardboard.
2. Tie the wraps together at the top through one bottom tip loop of a Row 14 motif.
3. Wrap the neck 0.5 in (1.3 cm) below the top.
4. Cut the loops and trim the tassel to 4 in (10.2 cm).
Final Blocking
- Weave in all ends, running them along the sc of Rnd 4 and never across the open centers.
- Soak the panel in cool water, then press out the water gently in a towel. Don’t wring it.
- Lay the panel flat and pin it to 35 in x 72 in (88.9 cm x 182.9 cm). Pin each side tip and the band corners first.
- Pin each fan tip outward so every motif opens into a square that’s 5 in (12.7 cm) from tip to tip.
- Open the picots with a pin tip.
- Let the panel dry completely, then repeat steps 1–5 for Panel B.
- Clip 8 rings evenly along each band, about every 5 in (12.7 cm).
Final Quality-Control Checklist
- [ ] Every motif has 4 fans of 9 tr and 32 picots.
- [ ] Each panel has 98 motifs in a grid of 7 × 14.
- [ ] Every interior tip is joined, and no joins have been skipped.
- [ ] Band Row 1 has 169 sts, and every band row after it also has 169.
- [ ] The band is 2 in (5.1 cm) deep and lies straight.
- [ ] Each panel measures 35 in x 72 in (88.9 cm x 182.9 cm).
- [ ] There are 7 tassels per panel, each 4 in (10.2 cm) long.
- [ ] Both panels match in length to within 1/2 in (1.3 cm).
Troubleshooting
- The fans cup or ruffle. Your trebles are too loose. Go down a hook size for Rnd 3 only.
- The center isn’t square. Recount Rnd 2: you should have 10 sc per side between the corner sps.
- The fans lean to one side. Check that you skipped exactly 4 sc on both sides of each fan.
- The lattice puckers at the joins. Your joining chains are too tight. Rework them with relaxed ch 2s.
- The band flares. Go down to a 3.25 mm hook for Rows 2–7.
- The band pulls in. Pull the trtr loops up taller and loosen the ch 9 spans.
- One panel is longer than the other. Block the shorter panel to the target length. Most of the length difference comes from the treble rounds.
Care
Hand wash in cool water and dry flat, re-pinning if needed. Steam lightly to refresh the shape, and don’t put the panels in the tumble dryer.
Final Notes
The measurements build up in a chain:
– Each motif is 5 in (12.7 cm) tip to tip.
– Seven motifs across make a panel 35 in (88.9 cm) wide.
– Fourteen rows make it 70 in (177.8 cm) long.
– A 169-st band adds 2 in (5.1 cm) of depth, for a finished length of 72 in (182.9 cm).
– Tassels add 4 in (10.2 cm) below that.
If your first motif is the right size, everything after it will come out right as well. Hang the panels in a sunny window and enjoy the play of light through the lattice.
Happy crocheting!