

The Clover Lace Window Curtains are a pair of airy, ecru lace panels made from heart-leaf shamrock motifs. Each shamrock is framed by an open mesh, and the motifs are joined into a light lattice that lets sunlight through. Picot scallops finish the hem and simple tabs slide onto a curtain rod.
Everything is worked in a single natural off-white cotton. The style is classic cottage lace with a slight Irish-crochet feel, made in today’s sport-weight cotton so each block works up quickly. All instructions use US crochet terms.
One finished panel is 31″ (78.7 cm) wide and 85.75″ (217.8 cm) long from the top edge to the scallop points. The tabs add about 3.75″ (9.5 cm) above the top edge. The pattern makes two matching panels.
Construction is modular. You crochet 6″ (15.2 cm) square shamrock blocks, join 70 of them into a 5 x 14 grid for each panel, and add a two-round border. Then you work picot scallops along the bottom and seven tabs along the top.
Finished Size and Construction
- Finished panel size: 31″ x 85.75″ (78.7 x 217.8 cm), plus tabs
- Skill level: Intermediate
- Terminology: US crochet terms
- Yarn weight: Sport (2), mercerized cotton
- Hook: 3.25 mm (US D-3)
- Number of pieces: 140 blocks (70 per panel), two panels
- Layout per panel: 5 blocks wide x 14 blocks tall
- Block size: 6″ x 6″ (15.2 x 15.2 cm)
- Panel size before border: 30″ x 84″ (76.2 x 213.4 cm)
- Border depth: 0.5″ (1.3 cm) on all sides, plus 0.75″ (1.9 cm) scallops on the bottom edge
Materials
Yarn: Use a smooth, mercerized sport-weight cotton, around 155 m per 50 g. Mercerized cotton shows off stitch definition, keeps its shape when hanging, and stands up to sunlight and washing better than acrylic. Buy all your yarn from one dye lot. Small shade differences in off-white show clearly against a window.
- Ecru / natural off-white: 2,000 g (about 6,200 m / 6,780 yd), which is 40 balls of 50 g
This amount includes a margin of about 10% for gauge swatches, a test block, and differences in tension.
Tools:
- 3.25 mm (US D-3) crochet hook
- Tapestry needle
- Stitch markers (at least 8)
- Rust-proof pins and a blocking board or foam mats
- Spray bottle
- Tape measure and a 6″ (15.2 cm) square cardboard template
Abbreviations (US Terms)
- ch – chain
- sl st – slip stitch
- sc – single crochet
- hdc – half double crochet
- dc – double crochet
- st(s) – stitch(es)
- sp – space
- sk – skip
- RS / WS – right side / wrong side
- beg – beginning
Special stitch – Picot: Ch 3, sl st in 3rd ch from hook.
Special stitch – Shell: (3 dc, picot, 3 dc) in the same st.
Gauge and Checkpoints
Gauge: 22 sc and 24 rows = 4″ (10.2 cm) in sc worked in rows.
Make one complete test block before anything else. One block contains every stitch used in the curtain, so it is the most accurate gauge check. Check these measurements as you go:
- After Round 4: about 3.25″ (8.3 cm) from leaf tip to leaf tip
- After Round 7: about 5.5″ (14.0 cm) from side to side, not corner to corner
- After Round 9: 6″ x 6″ (15.2 x 15.2 cm) after blocking
Every block side has 33 sts. At 5.5 sts per inch, 33 sts measure 6″ (15.2 cm).
If your block is too big, go down to a 3.0 mm hook. If it is too small, go up to a 3.5 mm hook. A small error grows fast: a block that is only 1/8″ (0.3 cm) off adds up to 1.75″ (4.4 cm) over the 14 blocks of a panel’s length.
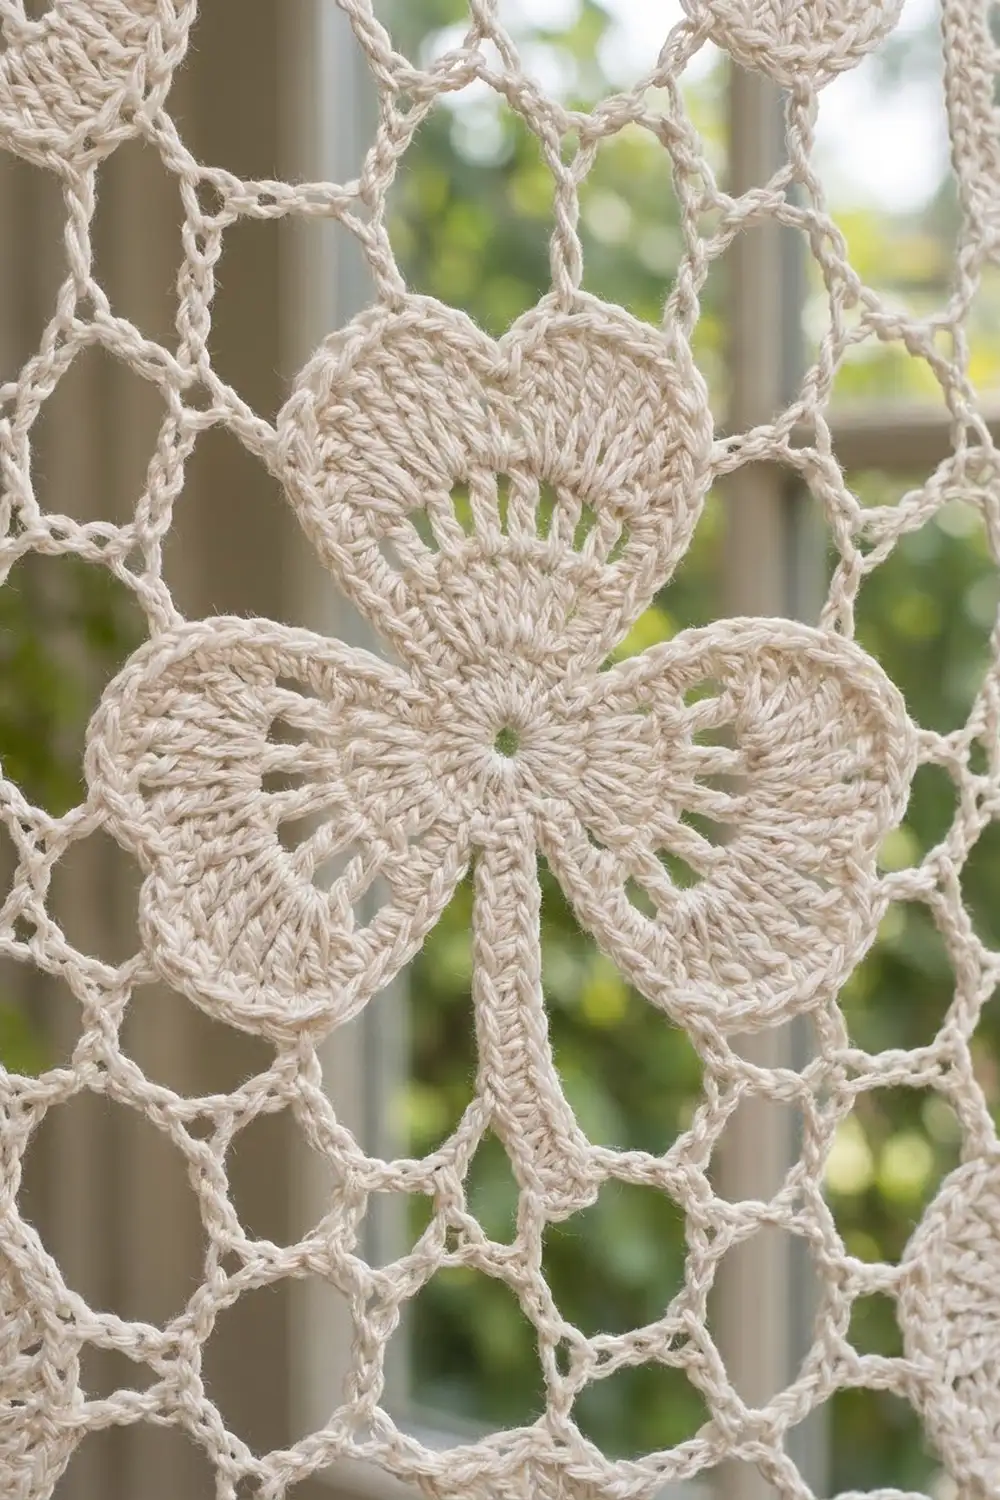
Shamrock Block (make 140)
Shamrock Center
Round 1: Make a magic ring, ch 1, 12 sc in ring, sl st to first sc. Pull ring closed. (12 sc)
Round 2: Ch 1, sc in same st, ch 6, sk 3 sts, sc in next st, ch 6, sk 3 sts; repeat from * once more, sl st to first sc. (3 sc, 3 ch-6 loops)
Round 3: Sl st into first ch-6 loop, ch 3 (counts as dc), 12 dc in same loop, sc in next sc, 13 dc in next ch-6 loop, sc in next sc; repeat from * once more, sl st to top of beg ch-3. (39 dc, 3 sc = 42 sts)
The three dc fans become the ribbed leaves.
Round 4 (heart-shaped leaves): Ch 1. Working across the 13 dc of one fan: sc in first dc, hdc in next dc, 2 dc in each of next 4 dc, sl st in next dc (7th dc, the notch), 2 dc in each of next 4 dc, hdc in next dc, sc in next dc, sl st in next sc between leaves; repeat from * 2 more times. Each leaf has 21 sts. (63 leaf sts, 3 sl sts = 66 sts)
The sl st in the center of each fan pulls in to make the notch at the top of the heart. The dc increases on each side round out into two lobes.
Stem: You are now at the last sl st between leaves, which becomes the stem base. Ch 9, sc in 2nd ch from hook and in each of next 7 ch, sl st in stem base. (8 sc) Turn the stem so the free loops of the foundation chain face up. Sl st in each of the 8 free loops to bring the hook back to the stem tip.
The stem measures about 1.5″ (3.8 cm).
Mesh Frame
Number the 21 sts of each leaf from 1 to 21 in working order. The lobe tips are sts 6 and 16, and the notch is st 11.
Round 5: Ch 1, sc in stem tip. Ch 7, sc in next anchor point; repeat from * 10 more times, ch 7, sl st to first sc. (12 ch-7 loops)
Work the 11 anchor points in this order, moving from the stem toward the first leaf: Leaf A sts 6, 11, 16; the sl st between A and B; Leaf B sts 6, 11, 16; the sl st between B and C; Leaf C sts 6, 11, 16.
Round 6 (squaring): Sl st into first loop, ch 3 (counts as dc), (2 dc, ch 3, 3 dc) in same loop for the corner. [Ch 3, 3 dc in next loop] twice, ch 3, (3 dc, ch 3, 3 dc) in next loop; repeat from * 2 more times, [ch 3, 3 dc in next loop] twice, ch 3, sl st to top of beg ch-3. (48 dc, 4 corner ch-3 sps, 12 side ch-3 sps)
Each side now has 12 dc and three ch-3 sps between the corners. Place a marker in each corner sp.
Round 7: Sl st in next 2 dc and into corner sp, ch 3 (counts as dc), (2 dc, ch 3, 3 dc) in same sp. [Ch 3, 3 dc in next ch-3 sp] 3 times, ch 3, (3 dc, ch 3, 3 dc) in corner sp; repeat from * 2 more times, [ch 3, 3 dc in next ch-3 sp] 3 times, ch 3, sl st to top of beg ch-3. (60 dc: 15 dc per side; 16 side ch-3 sps; 4 corner ch-3 sps)
Round 8: Ch 1, sc in same st. Sc in each dc around, working 3 sc in each side ch-3 sp and 3 sc in each corner ch-3 sp. Sl st to first sc. The total is 60 sc over dc, 48 sc in side sps, and 12 sc in corners. (120 sc; 31 sts per side, counting both corner center sts)
Move the markers to the center sc of each corner.
Round 9: Ch 1, sc in same st. Sc in each st around, working 3 sc in each corner center st. Sl st to first sc. The total is 120 sc plus 8 added at the corners. (128 sc; 33 sts per side, counting both corner center sts) Fasten off and weave in ends.
Counting note: Neighboring sides share each corner center st, so 4 x 33 − 4 = 128.
Before joining, pin each block to your 6″ (15.2 cm) template, spray it lightly, and let it dry.
Make All Pieces
All 140 blocks are in ecru. Make 70 blocks for each panel.
Text layout for one panel (B = block), 5 columns x 14 rows:
B B B B B   row 1 (top)
B B B B B   row 2
B B B B B   row 3
  ...         rows 4-13
B B B B B   row 14 (bottom)
Turn every block the same way, with the stem pointing toward the lower left. That keeps the shamrocks lined up in neat diagonal rows across the panel.
Joining
Method: Flat slip stitch seam through the back loops only.
Hold two blocks with RS facing up, edge to edge. Starting at a matching pair of corner center sts, insert the hook through the back loop of the st on one block, then the back loop of the facing st on the other block, and sl st. Work one sl st for each matched pair of sts. A full seam uses 33 sl sts, from corner center to corner center, with no extra chains.
- Join the 14 blocks of each column, end to end.
- Join the 5 columns with long seams of 14 x 33 = 462 sl sts each.
- Where four corners meet, work one sl st into each matched pair of corner sts, the same as everywhere else.
Tension: Keep your slip stitches as loose as the sc they join. Tight seams pull in and make the lace pucker. If the seams pull, go up one hook size for joining only.
Size checkpoint: The joined panel should measure 30″ x 84″ (76.2 x 213.4 cm). Fix any problem now, before you start the border.
Border
Border gauge: The same as the main gauge, 22 sts = 4″ (10.2 cm). Work into both loops.
Starting counts: The top and bottom edges each have 5 blocks x 33 = 165 sts. Each long side has 14 blocks x 33 = 462 sts. These counts already include the corner sts of every block, so do not add any sts at the seams.
Round 1 (RS): Join yarn in the top-right corner center st. Ch 1, 3 sc in the same st, then sc in each st around, working 3 sc in each panel corner center st. Sl st to first sc. (Top and bottom 167 sts each, sides 464 sts each, counting corner centers; 1,258 sts total)
Round 2: Ch 3 (counts as dc). Dc in each st around, working 3 dc in each corner center st. Sl st to top of beg ch-3. (Top and bottom 169 sts each, sides 466 sts each; 1,266 sts total) Do not fasten off.
Why the math works: Each 3-st corner adds 2 sts to each side that meets there, so every round adds 2 sts per side. The bottom edge now has 169 sts, and 169 = 1 + (28 x 6). That gives exactly 28 scallop repeats. The top edge also has 169 sts, and 7 tabs of 13 sts plus 6 gaps of 13 sts = 169.
Round 3 (Scallop Hem, bottom edge only): Sl st across to the bottom-left corner center st. Working along the bottom edge, sc in corner center st. Sk 2 sts, shell in next st, sk 2 sts, sc in next st; repeat from * 27 more times. The last sc lands in the bottom-right corner center st. (28 shells) Fasten off.
The scallops are about 0.75″ (1.9 cm) deep and about 1.1″ (2.8 cm) wide. A picot sits at each point.
Tabs (top edge, make 7): Number the 169 top-edge sts from right to left. Each tab starts at st 1, 27, 53, 79, 105, 131, or 157.
- Row 1: With RS facing, join yarn in the starting st, ch 1, sc in same st and next 12 sts, turn. (13 sc, about 2.4″ / 6.1 cm wide)
- Rows 2–42: Ch 1, sc in each st across, turn. (13 sc)
The tab should measure 7″ (17.8 cm). Fasten off and leave a 12″ (30.5 cm) tail. Fold the tab to the WS and whipstitch the last row to the base of Border Round 1. Each loop rises about 3.75″ (9.5 cm) above the top edge.
Repeat the scallops and tabs on the second panel.
Final Blocking
- Weave in all remaining ends along seams, never through open mesh.
- Soak the panel in cool water for 15 minutes, then press the water out gently. Do not wring.
- Roll the panel in towels to remove extra water.
- Lay it flat on mats and pin it to 31″ x 85.75″ (78.7 x 217.8 cm).
- Pin every scallop point and open each picot.
- Pin the long seams straight, checking them against a tape measure.
- Let the panel dry completely. Hang it by its tabs for 24 hours so it relaxes evenly.
Final Quality-Control Checklist
- Every block measures 6″ (15.2 cm) square, with 33 sts per side.
- All stems point the same way.
- Every seam has 33 sl sts per block side.
- The panel measures 30″ x 84″ (76.2 x 213.4 cm) before the border.
- Border Round 2 has 169 sts on the top and bottom.
- There are 28 complete shells, with the last sc in the corner center.
- All 7 tabs are evenly spaced, the same length, and sewn securely.
- The finished panel measures 31″ x 85.75″ (78.7 x 217.8 cm).
- Both panels match in length to within 1/4″ (0.6 cm).
Troubleshooting
- Leaves look round instead of heart-shaped: Make sure the sl st in Round 4 goes into the 7th dc, and pull it snug.
- Blocks cup: The Round 5 loops are too short or too tight. Loosen your chains or use ch 8.
- Blocks ruffle: Your chains are too loose. Use ch 6 loops in Round 5.
- Wrong count in Round 8: Count 3 sc in every ch-3 sp. Missing sts are usually in the side spaces.
- Panel too long: Measure each block. Re-block or remake any that are over 6″ (15.2 cm), and keep the 5 x 14 layout.
- Scallops don’t end in the corner: Recount the bottom edge. It must be 169 sts.
- Tabs twist: Line up the edges carefully before you sew the fold.
Care
Hand wash in cool water with a mild detergent and dry flat. Re-block if needed. To keep the ecru from fading, avoid harsh direct sun or turn the panels from time to time.

Final Notes
The measurement chain is simple. A gauge of 22 sts per 4″ (10.2 cm) gives 6″ (15.2 cm) blocks with 33 sts per side. Five blocks make 30″ (76.2 cm) across, and fourteen make 84″ (213.4 cm) long. The border adds 0.5″ (1.3 cm) on each edge, and the scallops add 0.75″ (1.9 cm) to the hem. That gives a finished panel of 31″ x 85.75″ (78.7 x 217.8 cm). If you check your block size early, the rest follows.
Happy crocheting!