
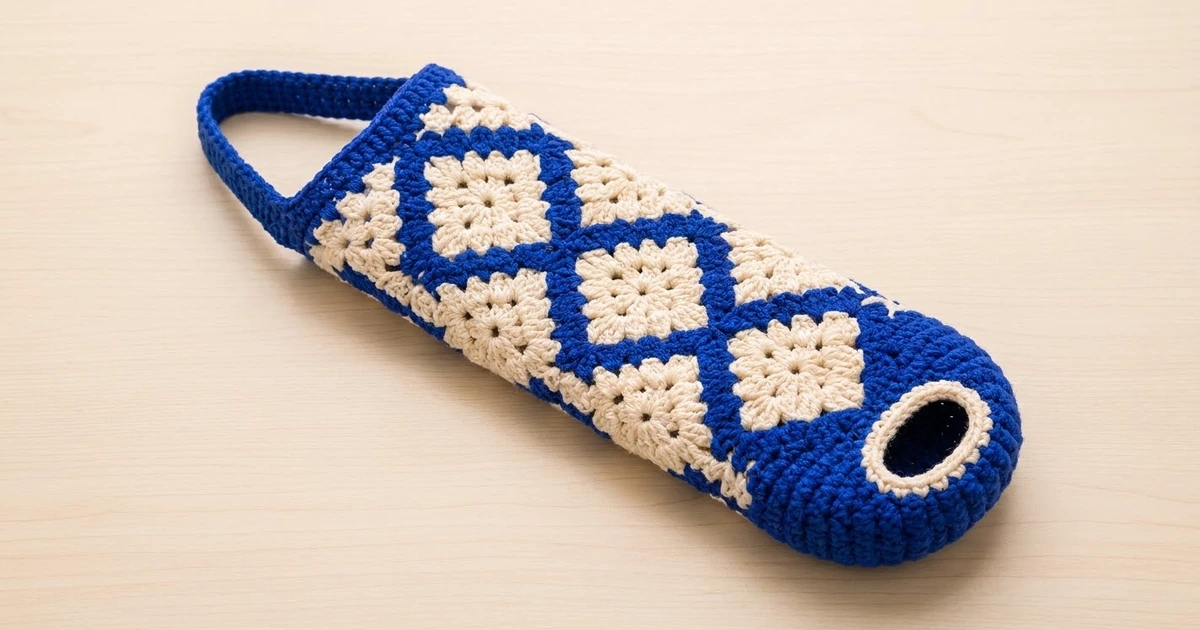
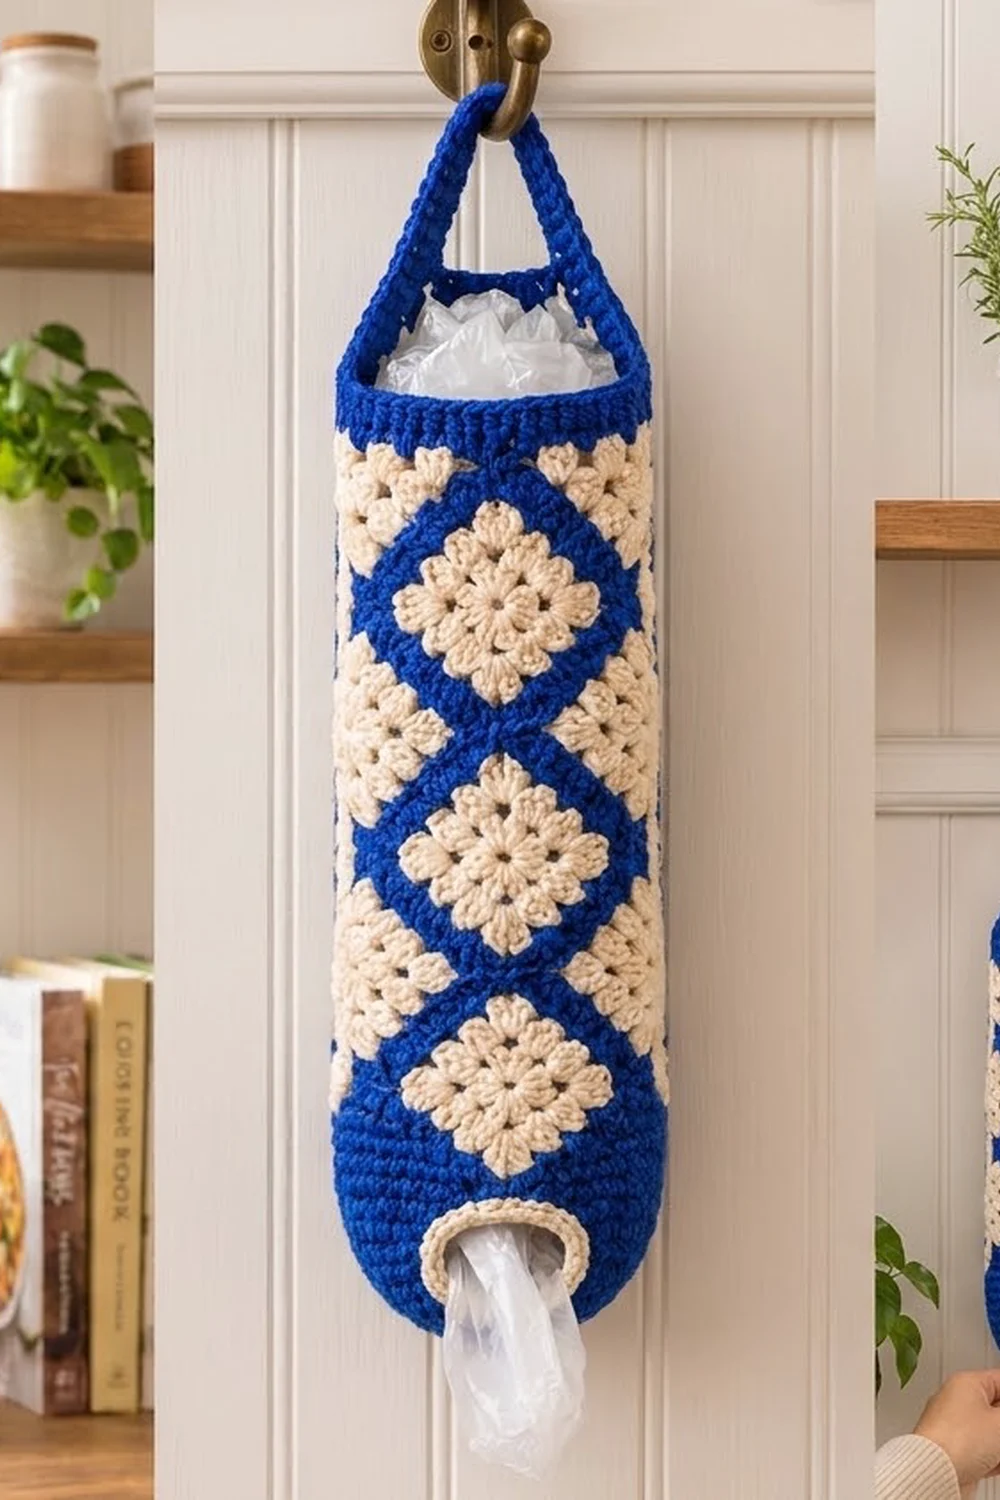
This bag holder turns classic granny squares into a crisp diamond lattice. Cream granny centers sit inside thin royal-blue frames. The squares are turned on point, so the blue edges line up into a continuous lattice running around the tube.
The blue top band keeps the opening firm, and a flat strap handle hangs it from a hook or doorknob. At the bottom, a solid blue base closes the tube, and a cream-edged oval opening on the front lets you pull out one bag at a time.
The finished holder is about 6.4 in (16.3 cm) wide when flat and 20.6 in (52.3 cm) long without the handle. Hanging from its strap, it is about 23.6 in (59.9 cm) long. This pattern uses US crochet terms.
To make it, you crochet 21 granny squares and 6 half-square triangles, then sew them together into a diamond-lattice tube. Next, you work the top band and handle onto one end and the bottom section, opening, and base onto the other end.
Finished Size and Construction
- Finished size: 6.4 in (16.3 cm) wide when flat × 20.6 in (52.3 cm) long, plus a handle about 3 in (7.6 cm) high
- Skill level: Intermediate
- Terminology: US
- Yarn weight: DK (weight 3) cotton or cotton blend
- Hook: 3.5 mm (E-4)
- Number of pieces: 21 squares + 6 half-square triangles
- Layout: 7 alternating rows of 3 diamonds around the tube, with 3 triangles at the top and 3 at the bottom
- Piece size: squares are 3 in (7.6 cm) per side and 4.25 in (10.8 cm) across the diagonal
- Size before border: lattice tube is 12.75 in (32.4 cm) around and 17 in (43.2 cm) tall
- Border depth: the top band is 1.6 in (4.1 cm), and the bottom section is about 2 in (5.1 cm) plus a flat base
Materials
Choose a smooth, mercerized or matte DK cotton. Cotton holds its shape when the holder is full of bags, and it shows the lattice lines clearly. Avoid fuzzy or very stretchy yarns, because the tube will sag.
- Cream (Color A): 100 g / about 230 m
- Royal blue (Color B): 100 g / about 230 m
These quantities include a margin of about 15%. Your actual use will probably be closer to 85 g of each color.
Tools:
– 3.5 mm (E-4) hook
– Tapestry needle
– 4 locking stitch markers
– Rust-proof pins and a blocking mat
– Measuring tape
Abbreviations (US Terms)
- ch – chain
- sl st – slip stitch
- sc – single crochet
- dc – double crochet
- sc2tog – single crochet 2 together
- sp(s) – space(s)
- st(s) – stitch(es)
- BLO – back loop only
- rnd – round
- RS – right side
Special stitch – sc2tog over a stitch and a space: Insert the hook into the first stitch and pull up a loop. Insert the hook into the next space and pull up a loop. Yarn over and draw through all 3 loops on the hook. This makes 1 stitch.
Gauge and Checkpoints
Gauge: 19 sc and 20 rows = 4 in (10.2 cm) in blue single crochet.
Make one complete square first and measure it before making the rest.
- After Rnd 1, the square measures about 1.1 in (2.8 cm).
- After Rnd 2, it measures about 1.75 in (4.4 cm).
- After Rnd 3, it measures about 2.4 in (6.1 cm).
- After Rnd 4, it measures 3 in (7.6 cm) per side and 4.25 in (10.8 cm) across the diagonal.
If the square is too big: go down to a 3.25 mm hook.
If the square is too small: go up to a 3.75 mm hook.
A difference of 1/4 in (0.6 cm) on one square adds up to about 1 in (2.5 cm) over the height of the tube, so check carefully.
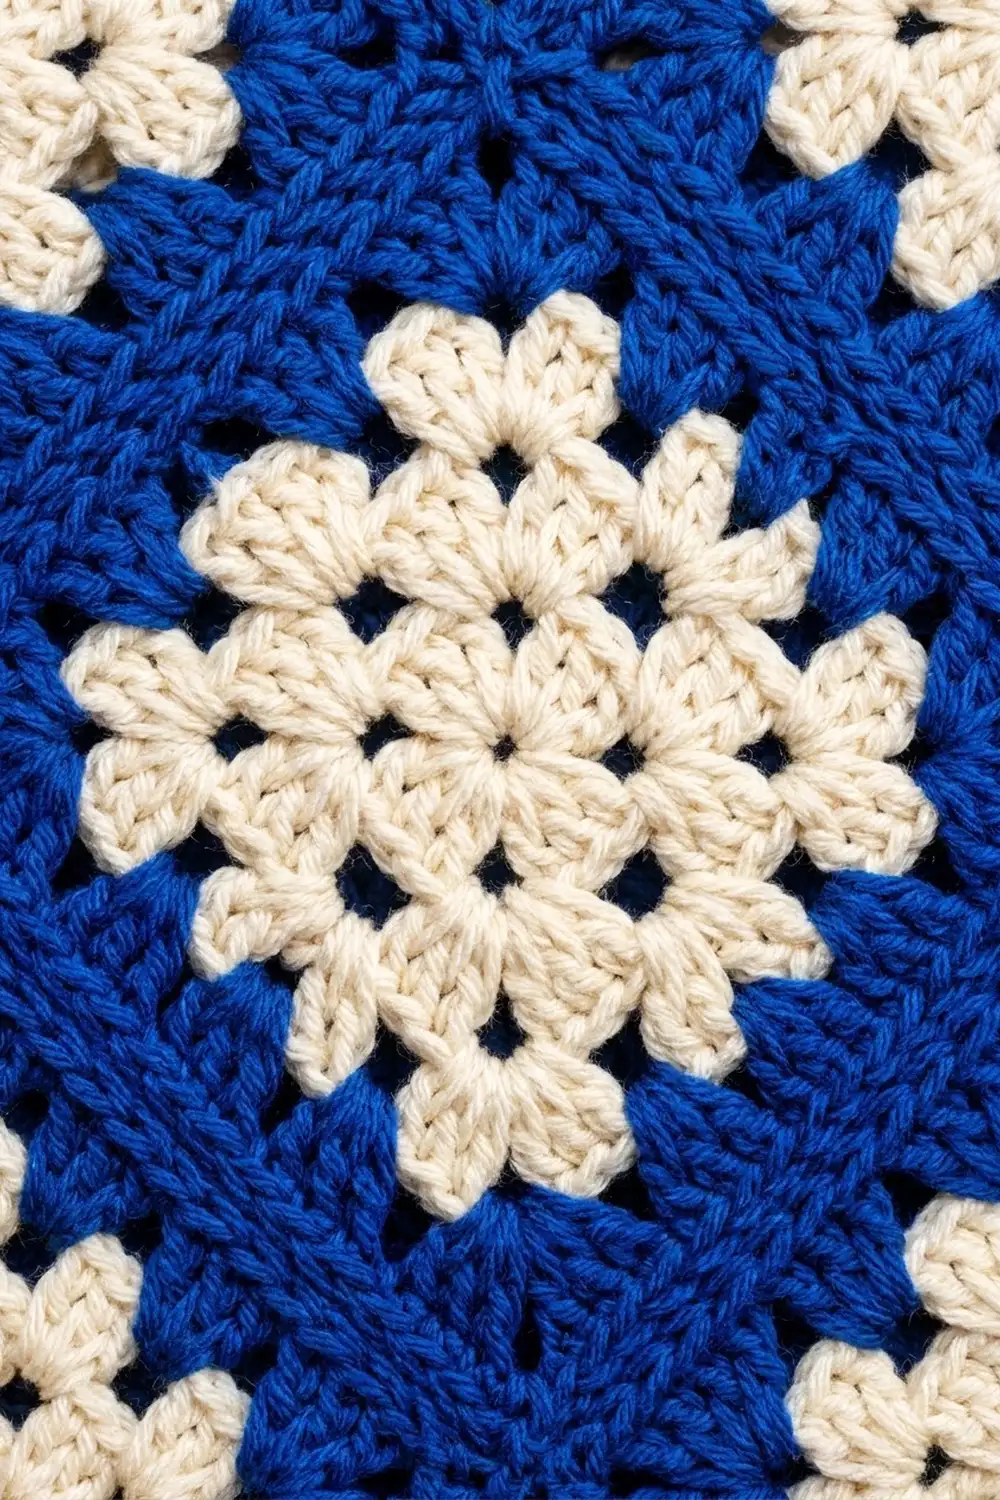
Granny Square (Make 21)
Rnd 1 (Color A): Make a magic ring. Ch 3 (counts as dc), 2 dc in the ring, ch 2. Work (3 dc, ch 2) 3 times. Sl st to the top of the beginning ch-3. (12 dc, 4 ch-2 corner sps)
Rnd 2: Sl st in the next 2 dc and into the ch-2 sp. Ch 3, then work (2 dc, ch 2, 3 dc) in the same sp. Ch 1, (3 dc, ch 2, 3 dc) in the next ch-2 sp. Repeat from * 2 more times. Ch 1, then sl st to the top of the beginning ch-3. (24 dc, 4 ch-1 sps, 4 corner sps)*
Rnd 3: Sl st in the next 2 dc and into the corner sp. Ch 3, then work (2 dc, ch 2, 3 dc) in the same sp. Ch 1, 3 dc in the next ch-1 sp, ch 1, (3 dc, ch 2, 3 dc) in the next corner sp. Repeat from * 2 more times. Ch 1, 3 dc in the last ch-1 sp, ch 1, then sl st to the top of the beginning ch-3. Fasten off. (36 dc; each side has 9 dc and 2 ch-1 sps)*
Rnd 4 (Color B): Join Color B in any corner sp. Ch 1, then work (sc, ch 2, sc) in the same sp. Work 1 sc in each of the next 11 sts and sps along the side (3 dc, ch-1 sp, 3 dc, ch-1 sp, 3 dc), then (sc, ch 2, sc) in the next corner sp. Repeat from * 2 more times. Sc in the next 11 sts and sps, then sl st to the first sc. Fasten off. (52 sc, 4 ch-2 corner sps)*
Per-side count: Each side has 13 sc: 1 corner sc + 11 sc + 1 corner sc. Each corner sc belongs to only one side, so 4 × 13 = 52. Nothing is counted twice.
Half-Square Triangle (Make 6)
The triangle is worked in rows from the middle of its long edge (the hypotenuse) outward. The row ends form the straight long edge, and the last row forms the two short sides (the legs).
Row 1 (Color A): Make a magic ring. Ch 4 (counts as dc + ch 1), then work 3 dc, ch 2, 3 dc, ch 1, dc in the ring. Turn. (8 dc)
Row 2: Ch 4 (counts as dc + ch 1). Work 3 dc in the first ch-1 sp, ch 1, (3 dc, ch 2, 3 dc) in the ch-2 sp, ch 1, and 3 dc in the last ch-1 sp. Ch 1, then dc in the 3rd ch of the turning ch. Turn. (14 dc)
Row 3: Ch 4. Work 3 dc in the first ch-1 sp, ch 1, 3 dc in the next ch-1 sp, ch 1, and (3 dc, ch 2, 3 dc) in the corner sp. Then ch 1, 3 dc in the next ch-1 sp, ch 1, 3 dc in the next ch-1 sp, ch 1, and dc in the 3rd ch of the turning ch. Fasten off. (20 dc; each leg has 13 positions: 10 dc and 3 ch-1 sps)
Row 4 (Color B): With the RS facing, join Color B in the end dc. Ch 1, then sc2tog over the end dc and the next ch-1 sp. Sc in the next 11 sts and sps, then work (sc, ch 2, sc) in the corner sp. Sc in the next 11 sts and sps, then sc2tog over the last ch-1 sp and the end dc. Fasten off. (26 sts, or 13 per leg)
The sc2tog takes up the extra edge position on each leg, so each leg has 13 stitches, the same as one side of a square. Each leg measures 3 in (7.6 cm), and the long edge measures 4.25 in (10.8 cm).
Make All Pieces
- Squares: 21, each with Color A for Rnds 1–3 and Color B for Rnd 4
- Triangles: 6, each with Color A for Rows 1–3 and Color B for Row 4
Lay the pieces out flat in the grid below. Each column is half a diamond-width apart. A = diamond in an A row, B = diamond in a B row, T = triangle, and a dot is an empty position.
Col:      1   2   3   4   5   6
Top:      .   T   .   T   .   T
Row 1:    A   .   A   .   A   .
Row 2:    .   B   .   B   .   B
Row 3:    A   .   A   .   A   .
Row 4:    .   B   .   B   .   B
Row 5:    A   .   A   .   A   .
Row 6:    .   B   .   B   .   B
Row 7:    A   .   A   .   A   .
Bottom:   .   T   .   T   .   T
The diamonds in column 6 wrap around and join the diamonds in column 1 when you close the tube.
Joining
Method: Whipstitch with Color B through the back loops only (BLO), working with the RS facing up. This leaves the front loops of both blue edges visible, so they sit side by side as one neat lattice line.
Stitch-to-stitch logic: Each seam joins 13 stitches to 13 stitches. Start in the matching corner ch-2 sps, whipstitch the 13 sc in pairs, and finish in the next pair of corner sps. That makes 15 whipstitches per seam. Triangle legs join to square sides in the same way, 13 to 13.
Order:
1. Join each B diamond to the A diamonds above and below it on the left (the diagonal seams running down and to the right).
2. Join the seams that run down and to the left.
3. Sew each triangle into the V-shaped notch above Row 1 and below Row 7.
4. Fold the panel into a tube. Join the right-hand edges of the column-6 diamonds and triangles to the left-hand edges of the column-1 diamonds.
Tension: Pull each stitch just snug enough to close the gap. If you pull too hard, the seams will pucker and the lattice will look wavy.
Size checkpoint: Lay the tube flat. It should measure 6.4 in (16.3 cm) wide and 17 in (43.2 cm) tall. The top and bottom edges should be straight lines made of the triangles’ long edges, with diamond points at each junction.
Border: Top Band, Handle, and Bottom
Border gauge: 19 sc = 4 in (10.2 cm), or 4.75 sc per inch.
Edge count: Each of the 3 sections along an edge (one triangle and one diamond point) gets 20 sc: 2 sc in the diamond’s corner ch-2 sp, plus 18 sc along the triangle’s long edge. On each half of that long edge, work 1 sc in the end of Row 4, 3 sc in the end of Row 3, 3 sc in the end of Row 2, and 2 sc in the end of Row 1. That gives 9 sc per half and 18 sc per long edge.
Starting count: 3 sections × 20 = 60 sc. At 4.75 sc per inch, 60 sc measure 12.6 in (32.0 cm). That is very slightly smaller than the 12.75 in (32.4 cm) tube, so the band holds the opening firmly without flaring.
Top Band (Color B)
Choose the diamond point that will be at the center back. All stitch numbers below count from this point.
Rnd 1: Join in the corner sp at the center-back point. Ch 1, then work 2 sc in the same sp. Work 18 sc along the next triangle’s long edge, then 2 sc in the next point. Repeat around, ending with the third triangle. Sl st to the first sc. (60 sc)
Rnds 2–8: Ch 1, sc in each st around, then sl st to the first sc. (60 sc) Do not fasten off.
The band measures 1.6 in (4.1 cm) deep. Stitches 13–18 and 43–48 sit on opposite sides of the tube, 30 stitches apart.
Handle (Color B)
Row 1: Sl st across to st 13. Ch 1, then sc in sts 13–18. Turn. (6 sc)
Rows 2–35: Ch 1, sc in each st across. Turn. (6 sc)
The strap measures 7 in (17.8 cm). Without twisting it, line up Row 35 with sts 43–48. Sc through both layers to join them. (6 sc) Fasten off.
Edging: Join on one long edge of the strap. Work 1 sc in each row end (35 sc), and repeat on the other long edge (35 sc). With the edging, the strap is 1.5 in (3.8 cm) wide. When the holder hangs, the handle rises about 3 in (7.6 cm) above the band.
Bottom Section (Color B)
Rnd 1: Join in the corner sp at the center-back point and work the same 60-sc round you made for the top band. (60 sc)
Rnds 2–4: Sc in each st around. (60 sc)
Rnd 5 (opening): Sc in sts 1–23, ch 14, skip sts 24–37, sc in sts 38–60. (46 sc + 14 ch = 60)
Rnd 6: Sc in each sc and in each ch. (60 sc)
Rnds 7–9: Sc in each st around. (60 sc) The section now measures 1.8 in (4.6 cm). With the rim of the base, it measures about 2 in (5.1 cm).
Base rounds:
– Rnd 10: (Sc 8, sc2tog) 6 times. (54 sts)
– Rnd 11: (Sc 7, sc2tog) 6 times. (48 sts)
– Rnd 12: (Sc 6, sc2tog) 6 times. (42 sts)
– Rnd 13: (Sc 5, sc2tog) 6 times. (36 sts)
– Rnd 14: (Sc 4, sc2tog) 6 times. (30 sts)
– Rnd 15: (Sc 3, sc2tog) 6 times. (24 sts)
– Rnd 16: (Sc 2, sc2tog) 6 times. (18 sts)
– Rnd 17: (Sc 1, sc2tog) 6 times. (12 sts)
– Rnd 18: Sc2tog 6 times. (6 sts)
Fasten off. Thread the tail through the front loops of the last 6 sts, pull tight, and weave in the end.
Losing 6 sts per round matches the rate at which a flat single-crochet circle grows, so the base lies flat and the edge curves neatly.
Opening Edging (Color A)
Rnd 1: Join in the right corner of the opening. Sc in each of the 14 skipped stitches, then 2 sc in the side. Sc in the underside of each of the 14 chains, then 2 sc in the other side. Sl st to the first sc. (32 sc)
Rnd 2: Sc in each st around, then sl st to the first sc. Fasten off. (32 sc)
The opening stretches into an oval about 3 in (7.6 cm) wide and 1.25 in (3.2 cm) tall.
Final Blocking
- Weave in all ends along the blue seams so they don’t show through the cream.
- Mist the holder evenly with water until it is damp but not soaked.
- Slide a rolled towel inside the tube so the holder lies flat at 6.4 in (16.3 cm) wide.
- Pin the tube to 17 in (43.2 cm) for the lattice section and check that the diamond points line up vertically.
- Pin the handle straight, without stretching it.
- Let it dry completely, then remove the towel.
Final Quality-Control Checklist
- All 21 squares measure 3 in (7.6 cm) per side.
- Every seam joins 13 sts to 13 sts, with the corners matched.
- The lattice lines are continuous and are not twisted at the closing seam.
- The top and bottom rounds each have exactly 60 sc.
- The handle is centered over the sides and not twisted.
- The opening is centered on the front and has 32 sc of edging.
- The base lies flat and the center is closed.
Troubleshooting
- The lattice zigzags: A seam was offset by one stitch. Unpick it and match the corners first.
- The top flares: You worked too many sts along a long edge. Count exactly 18 per triangle.
- The tube is too wide: Your squares are oversized. Remake them with a smaller hook.
- The base cups upward: Your tension is tighter on the base. Go up half a hook size for Rnds 10–18.
- The opening gapes: Work Rnd 2 of the edging in sl st instead of sc.
- The cream shows gaps at the seams: Whipstitch through the back loops only, with firmer tension.
Care
Hand wash in cool water or machine wash on a gentle cycle inside a mesh bag. Reshape the holder and dry it flat.
Final Notes
The measurements build on each other in this order:
- Each square is 3 in (7.6 cm) per side, with 13 sc per side.
- Each square is 4.25 in (10.8 cm) across the diagonal.
- 3 diamonds around make a tube 12.75 in (32.4 cm) around and 6.4 in (16.3 cm) wide when flat.
- 4 diagonals of height make 17 in (43.2 cm) of lattice.
- 3 sections × 20 sc give 60 sc for each band.
- 1.6 in (4.1 cm) of top band and 2 in (5.1 cm) of bottom section bring the length to 20.6 in (52.3 cm).
If your first square is the right size, every later step will fit.
Happy crocheting!