

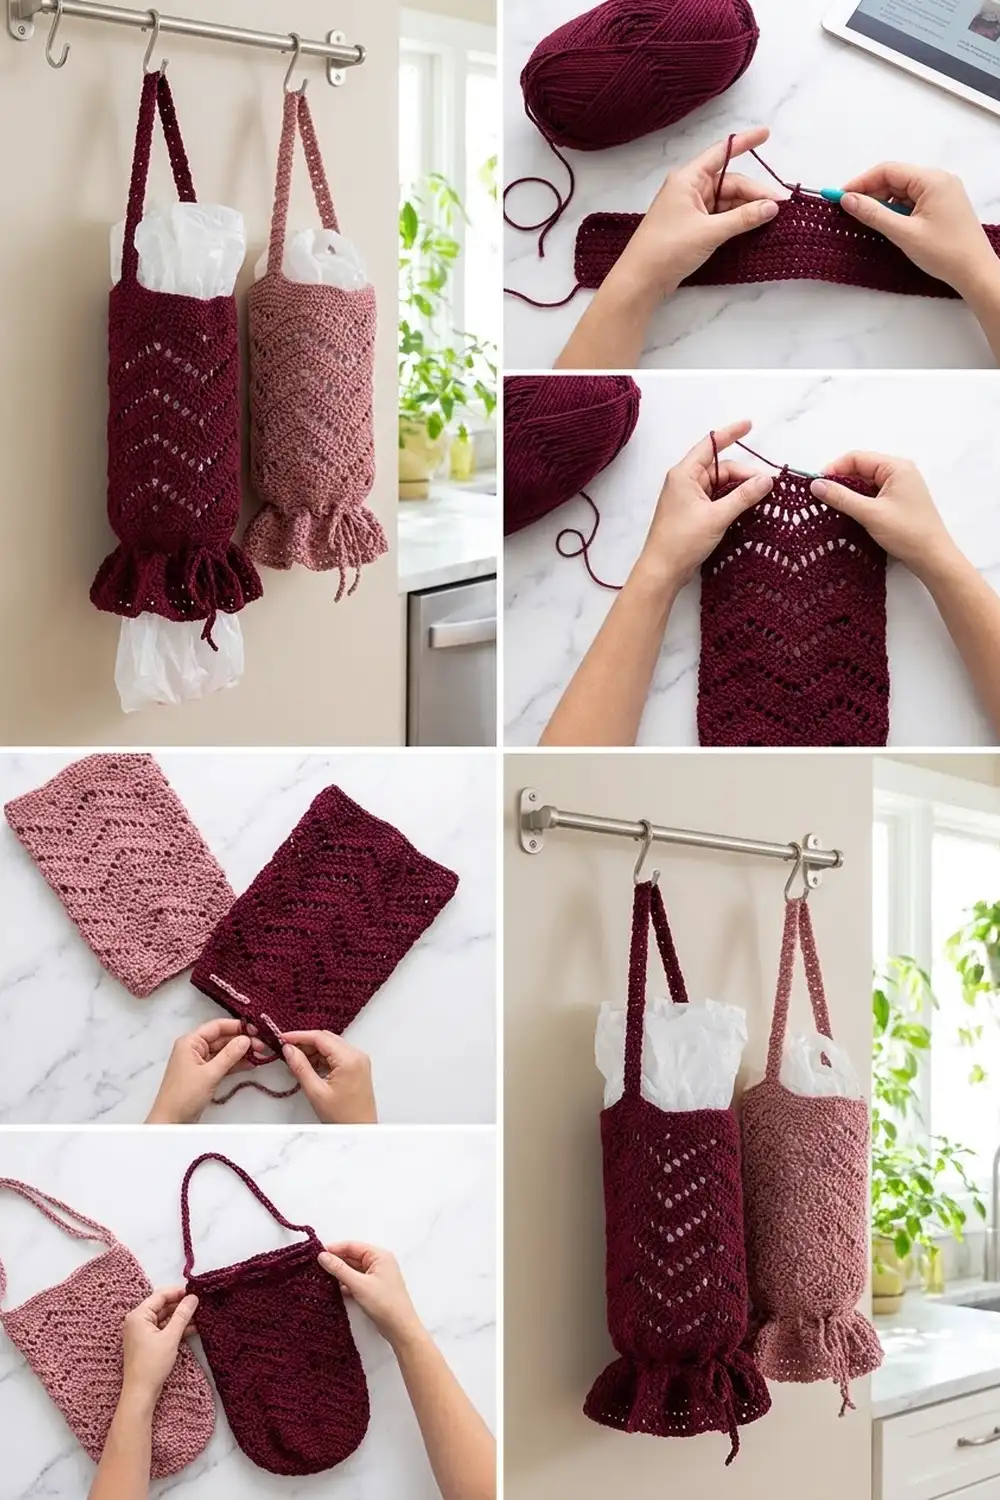
The Mulberry Ripple Bag Holder is a tall crochet tube that keeps plastic grocery bags tidy on a wall hook, a pantry door or the back of a cupboard. You push bags in through the open top and pull them out one at a time through the gathered bottom. It’s a small project that’s useful every day, and it uses up spare cotton well.
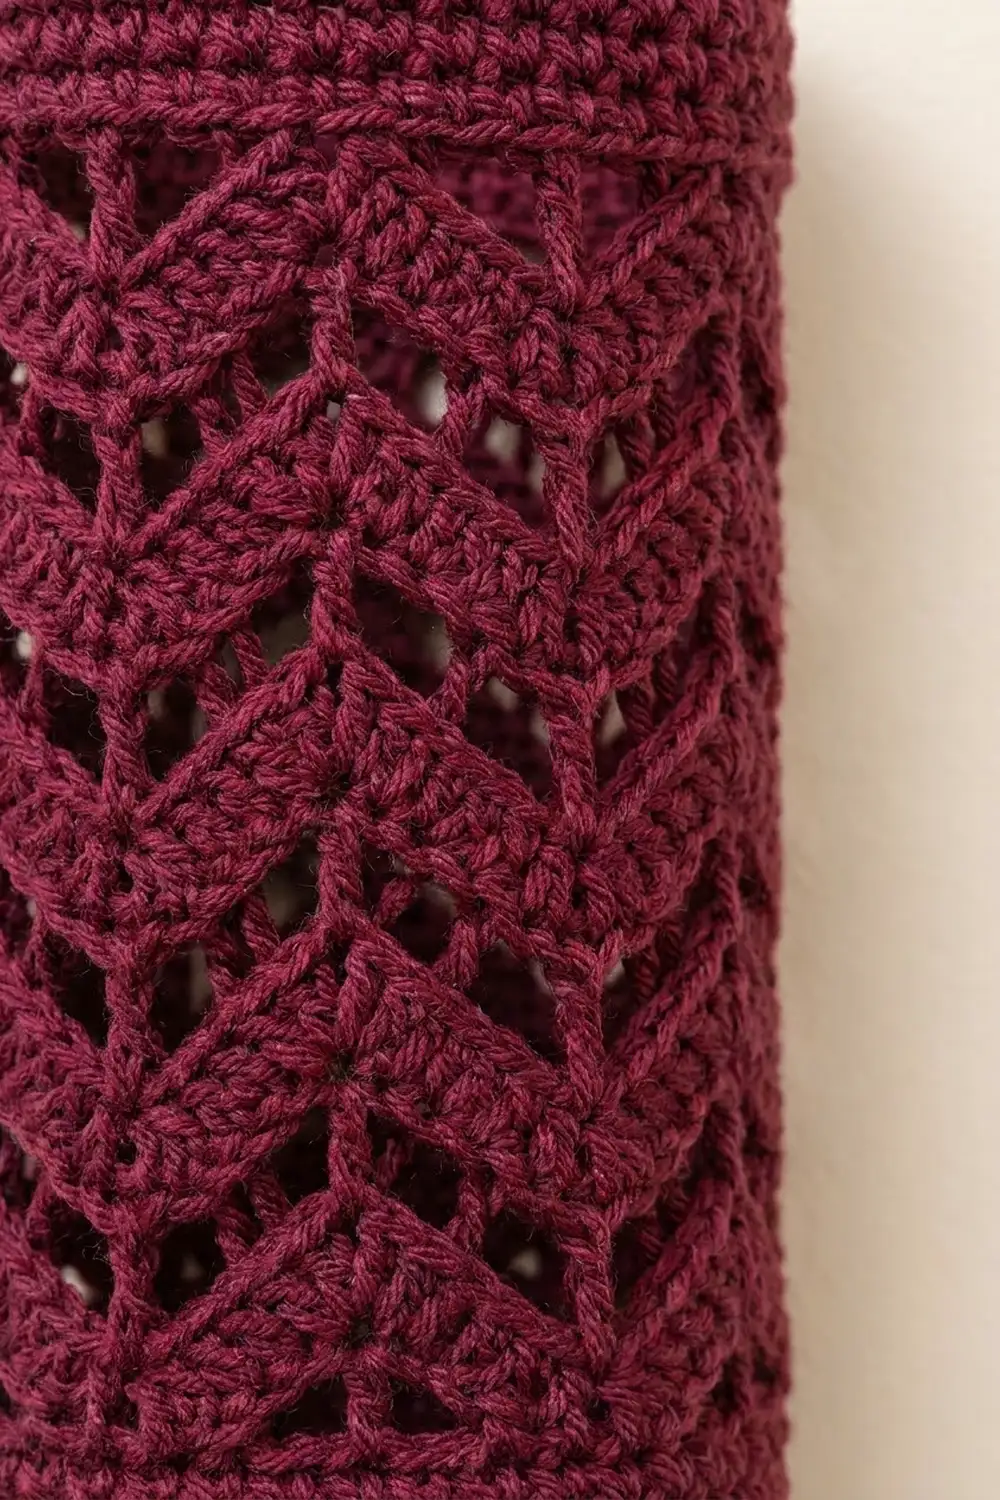
Solid bands at the top and bottom frame a center panel of chevron lace. In the lace, thick zigzag stripes alternate with rows of small open spaces. The open spaces let you see how many bags are left and keep the tube light.
The sample is worked in deep burgundy cotton, with a dusty rose version shown beside it as a second colorway. Each holder uses one color, so a pair in two shades makes a nice housewarming gift. The look is simple and practical: smooth cotton, crisp stitches and a narrow bow at the base.
All instructions use US crochet terms. The finished holder is 5″ (12.7 cm) wide laid flat, 10″ (25.4 cm) around and 14.5″ (36.8 cm) tall, not counting the strap. You work the body as one piece, in joined rounds from the bottom up. The order is: a short frill, an eyelet round, a solid band, the chevron lace, a leveling round and a solid top band. A chain strap is worked straight off the last round, and a separate chain drawstring is threaded through the eyelets.
Finished Size and Construction
- Finished size: 5″ (12.7 cm) wide laid flat x 14.5″ (36.8 cm) tall; 10″ (25.4 cm) around
- Skill level: Easy-Intermediate
- Terminology: US crochet terms
- Yarn weight: Worsted (#4), cotton or cotton blend
- Hook: 5.0 mm (H-8)
- Number of pieces: 1 body (strap attached) plus 1 chain drawstring
- Layout: One vertical tube, worked in joined rounds from the bottom up
- Piece size: 40 stitches around, which is 20 stitches per side laid flat
- Size before border: 5″ x 11″ (12.7 cm x 27.9 cm) after Round 25
- Border depth: 3.5″ (8.9 cm), made of a leveling round plus 9 rounds of hdc
Materials
Choose a smooth worsted weight cotton or cotton blend. Cotton holds its shape and keeps the chevrons crisp. Acrylic also works, but the tube will be softer and may stretch more once it’s full of bags.
- Color A, Burgundy: 100 g (about 160 m / 175 yd) for one holder
- Color B, Dusty Rose (optional second holder): 100 g (about 160 m / 175 yd)
One holder, including the drawstring, uses about 85 g. The amounts above include a margin of about 15% for your gauge test and for differences in tension.
Tools:
- 5.0 mm (H-8) crochet hook
- Locking stitch markers (at least 2)
- Tapestry needle
- Scissors
- Measuring tape
- Rust-proof pins and a towel for blocking
Abbreviations (US Terms)
- ch – chain
- sl st – slip stitch
- sc – single crochet
- hdc – half double crochet
- dc – double crochet
- tr – treble crochet
- sk – skip
- sp – space
- st(s) – stitch(es)
- rep – repeat
- dc3tog – double crochet 3 together
Special stitch – dc3tog: *Yarn over, insert hook in next st, yarn over and pull up a loop, yarn over and pull through 2 loops; rep from * in each of the next 2 sts (4 loops on hook), yarn over and pull through all 4 loops. This uses 3 sts and makes 1 st, and it forms the valley of each chevron.
Notes: Count each ch-1 sp as one stitch. The beginning chain of a round never counts as a stitch. Work each round with the right side facing; don’t turn.
Gauge and Checkpoints
Gauge: 16 hdc and 12 rounds = 4″ (10.2 cm). In the chevron lace, 16 sts and 8 rounds = 4″ (10.2 cm), measured in a straight line.
Check your gauge before you commit to the whole tube. Rounds 1–9 of the body are your test piece. They’re only about 3″ (7.6 cm) tall, and if your gauge is right, you just keep going.
Checkpoints:
- After Round 1: 10″ (25.4 cm) around, or 5″ (12.7 cm) laid flat
- After Round 9: 3″ (7.6 cm) tall
- After Round 25: 11″ (27.9 cm) tall
- After Round 35: 14.5″ (36.8 cm) tall
- Strap: 8″ (20.3 cm) long
- Drawstring: 25″ (63.5 cm) long
If your tube is too big (wider than 5″ or 12.7 cm laid flat), go down 0.5 mm in hook size. If it’s too small, go up 0.5 mm. Keep 40 stitches either way. The chevron repeat needs a multiple of 10 stitches, so you can’t fix the size by adding or removing a few.
Body
Bottom Frill and Eyelets
Foundation: Ch 40. Join with a sl st to the first ch, taking care not to twist the chain. (40 ch)
Round 1: Ch 1, sc in each ch around. Join with a sl st to the first sc. (40 sc)
Round 2: Ch 2, hdc in each st around. Join with a sl st to the first hdc. (40 hdc)
Rounds 1 and 2 hang below the drawstring. When you pull the cord tight, they flare out into the short frill under the bow.
Round 3 (eyelets): Ch 3, dc in same st as join, dc in next st, ch 2, sk next 2 sts, *dc in next 2 sts, ch 2, sk next 2 sts; rep from * 8 more times. Join with a sl st to the first dc. (20 dc + 20 ch = 40 sts; 10 eyelets)
Bottom Band
Round 4: Ch 2, hdc in each dc and 2 hdc in each ch-2 sp around. Join with a sl st to the first hdc. (40 hdc)
Rounds 5–9: Ch 2, hdc in each st around. Join with a sl st to the first hdc. (40 hdc)
Mark the joining st of Round 9. The tube should be 3″ (7.6 cm) tall.
Chevron Lace
The lace uses two kinds of rounds. Round A is a solid chevron. Round B is an open chevron with ch-1 sps along its slopes. Both start and end on a peak, so the zigzags stack straight up the tube without drifting. Each repeat is 10 sts, with 4 repeats around.
Round A (solid chevron): Ch 3, 2 dc in same st as join, dc in next 3 sts, dc3tog over next 3 sts, dc in next 3 sts, *3 dc in next st, dc in next 3 sts, dc3tog over next 3 sts, dc in next 3 sts; rep from * 2 more times, dc in same st as first dc. Join with a sl st to the first dc. (40 sts)
Count check: the first repeat has 2 + 3 + 1 + 3 = 9 sts, the other three repeats have 30, and the closing dc adds 1, for 40. The closing dc and the first 2 dc together make a 3-dc peak centered on the joining st.
Round B (open chevron): Ch 3, 2 dc in same st as join, ch 1, sk next st, dc in next st, ch 1, sk next st, dc3tog over next 3 sts, ch 1, sk next st, dc in next st, ch 1, sk next st, *3 dc in next st, ch 1, sk next st, dc in next st, ch 1, sk next st, dc3tog over next 3 sts, ch 1, sk next st, dc in next st, ch 1, sk next st; rep from * 2 more times, dc in same st as first dc. Join with a sl st to the first dc. (24 dc + 16 ch-1 sps = 40 sts)
Each slope uses 3 sts and makes 3 (ch, dc, ch), so each repeat still has 10 sts. The ch-1 sps leave small holes that form the zigzag lines of open spaces.
Work the lace rounds in this order:
- Rounds 10–11: Round A (40 sts)
- Round 12: Round B (40 sts)
- Rounds 13–14: Round A
- Round 15: Round B
- Rounds 16–17: Round A
- Round 18: Round B
- Rounds 19–20: Round A
- Round 21: Round B
- Rounds 22–23: Round A
- Round 24: Round B
- Round 25: Round A
That’s 11 solid rounds and 5 open rounds, with 40 sts in each. The four peaks should line up in straight columns, and the tube should be 11″ (27.9 cm) tall.
Border: Top Band, Strap and Drawstring
For this tube, the top band is the border. A tube has no corners, so “per side” means the front or the back when you lay the holder flat: 20 sts per side, 40 around. Use the same gauge as the main hdc fabric: 16 sts and 12 rounds = 4″ (10.2 cm).
Leveling Round
Round 26: Ch 1, *sc in next 2 sts, hdc in next 2 sts, dc in next st, tr in next st, dc in next st, hdc in next 2 sts, sc in next st; rep from * 3 more times. Join with a sl st to the first sc. (40 sts; 20 per side)
The first sc goes into the same st as the join, which is a peak. The short stitches sit on the peaks and the tr fills each valley, so the zigzag edge becomes straight. This is a trim round with 1 stitch in each existing stitch: 40 + 0 added = 40.
Top Band
Rounds 27–35: Ch 2, hdc in each st around. Join with a sl st to the first hdc. (40 hdc each round; 20 per side)
Rounds 26–35 add 3.5″ (8.9 cm), so the body is now 14.5″ (36.8 cm) tall. Don’t fasten off.
Why the math works: Every round from the foundation to Round 35 has 40 sts. At 16 sts per 4″ (10.2 cm), that gives 10″ (25.4 cm) around and 5″ (12.7 cm) flat. The count never changes, so the bands are the same width as the lace and the tube hangs straight.
Hanging Strap
Row 1: With the loop still on your hook at the Round 35 join (st 1), ch 32. Sk the next 19 sts and sl st in the next st (st 21, directly opposite). (32 ch)
Row 2: Ch 1, turn, sc in each ch across, sl st in st 1. (32 sc)
Row 3: Turn, sl st in each sc across, sl st in st 21. (32 sl st) Fasten off.
The strap is 8″ (20.3 cm) long and forms a loop about 4″ (10.2 cm) high above the rim. Row 3 firms up the strap so it doesn’t stretch under the weight of the bags.
Drawstring
Ch 100 (about 25″ or 63.5 cm). Fasten off, leaving a 2″ (5.1 cm) tail.
Start at the center front and weave the cord over and under the dc pairs of Round 3, through all 10 eyelets, so both ends come out at the front. Tie an overhand knot about 1″ (2.5 cm) from each end and trim the tails.
Final Blocking
- Weave in all the ends, hiding them in the solid bands rather than the lace.
- Soak the tube in cool water for 10 minutes. Gently press out the water without wringing.
- Roll the tube in a towel to soak up the extra water.
- Stuff the tube with a rolled towel, or slide it over a bottle about 10″ (25.4 cm) around.
- Shape it to 5″ (12.7 cm) wide laid flat and 14.5″ (36.8 cm) tall, with the chevron peaks lined up straight.
- Pin the strap flat so it dries straight.
- Let it dry completely, then take out the filler. Pull the drawstring until the bottom opening is about 1.5″ (3.8 cm) across, then tie a bow.
Final Quality-Control Checklist
- Every round has 40 sts.
- The tube is 5″ (12.7 cm) wide laid flat and 14.5″ (36.8 cm) tall.
- The peaks and valleys line up in four straight columns.
- There are 5 open rounds, each with a clear zigzag line of holes.
- The top edge is level, with no dips over the valleys.
- The strap is 8″ (20.3 cm) long and attached at opposite points.
- All 10 eyelets are threaded, and the drawstring ends are knotted.
- The frill flares evenly below the bow.
Troubleshooting
The chevrons lean or spiral. You probably started a round in the wrong st. Every Round A and Round B starts with 2 dc in the joining st and ends with 1 dc in that same st.
The count is off by 1 or 2. Make sure you worked into every ch-1 sp, and that each dc3tog used exactly 3 sts.
The lace section flares. Your dc stitches are looser than your hdc. Use a hook 0.5 mm smaller for Rounds 10–25 only.
The top edge is wavy. Check Round 26. Each tr must sit in a dc3tog valley and each sc on a peak.
The join seam slants. That’s normal in joined rounds. Pull each joining sl st snug, and don’t let the beginning chain sit loose.
Bags fall out on their own. Pull the drawstring tighter, so the opening is 1.5″ (3.8 cm) or less.
The strap stretches. Work Row 3 more tightly, or add a second row of sl sts.
Care
Hand wash in cool water, or machine wash on a gentle cycle in a mesh bag, with the drawstring removed. Reshape and lay flat to dry.
Final Notes
The whole pattern is built on 40 stitches. At 16 sts per 4″ (10.2 cm), that’s 10″ (25.4 cm) around and 5″ (12.7 cm) flat. The frill and bottom band bring the tube to 3″ (7.6 cm), the lace to 11″ (27.9 cm), and the top band to 14.5″ (36.8 cm). Add the 8″ (20.3 cm) strap and the 25″ (63.5 cm) drawstring, and your holder is ready to hang. If you like, make a second one in dusty rose for a matching pair.
Happy crocheting!