

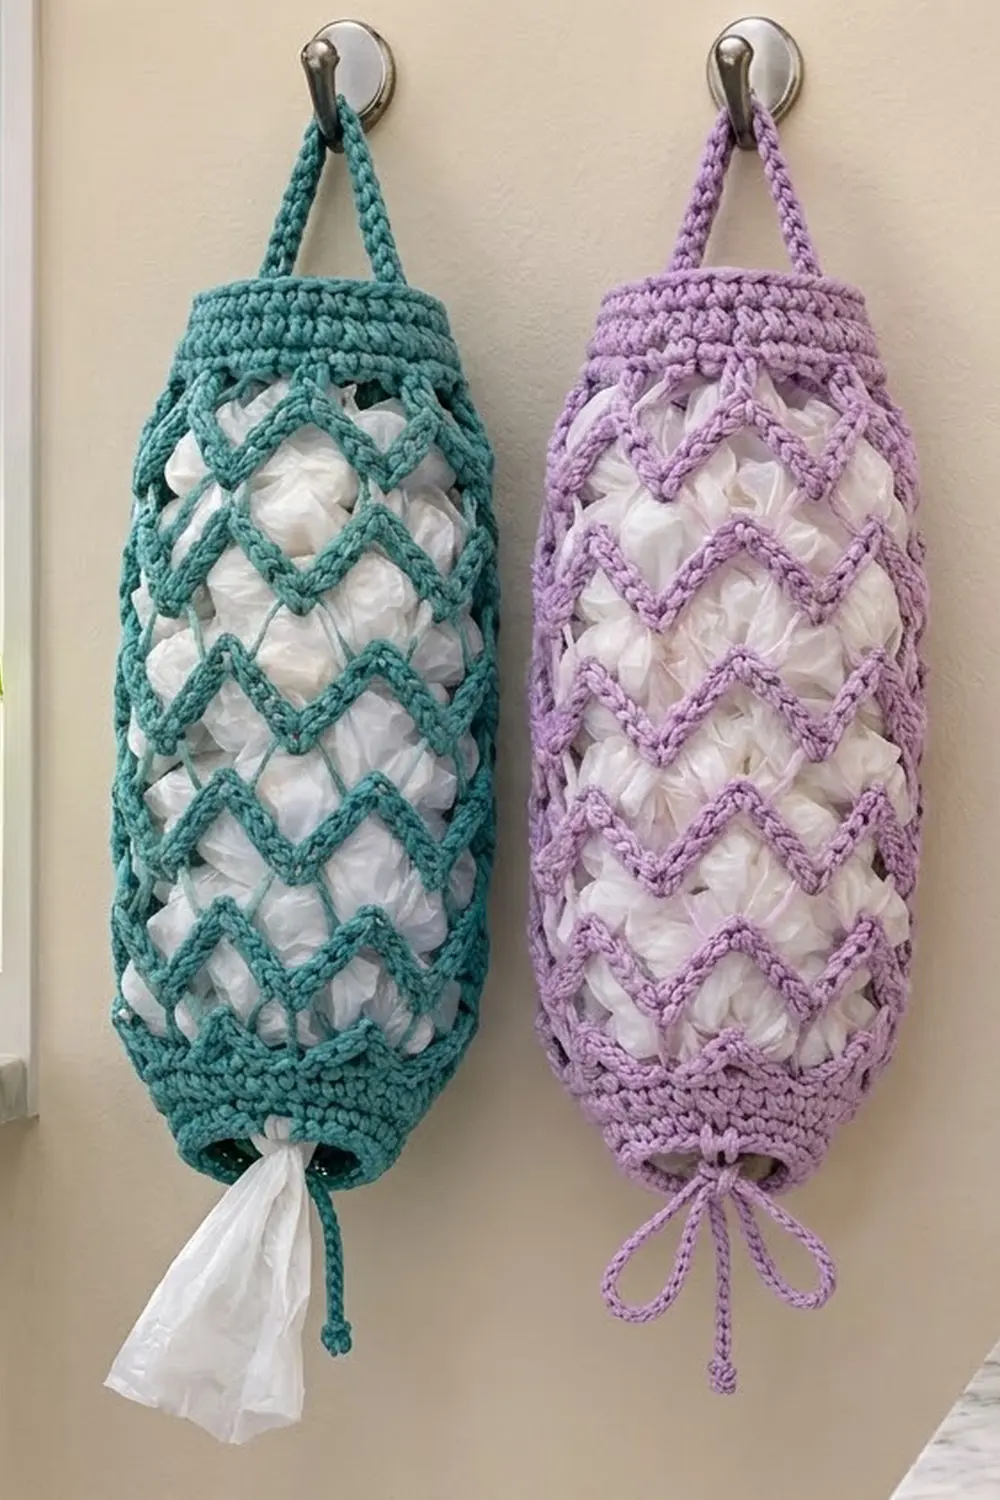
This chevron bag holder is a tall tube that hangs on a hook and keeps your plastic grocery bags tidy. You push bags in at the top and pull them out one at a time from the bottom. Through the mesh body, the white bags look like little clouds behind rows of zigzags.
The holder is shown in two colorways, a deep teal and a soft lavender. Each holder uses one color and the same pattern, so pick whichever suits your kitchen. A solid band at each end keeps the tube in shape. The open chevron mesh in the middle uses very little yarn, and you can see through it when you’re running low on bags.
This pattern uses US crochet terms. The finished holder is about 7 in (17.8 cm) wide at the bands and about 16.75 in (42.5 cm) long, not counting the strap. The strap adds about 5 in (12.7 cm) of hanging height.
You work the holder from the bottom up as one seamless tube. First comes a solid bottom band with an eyelet round, then a setup round and 16 rounds of chevron mesh. A leveling round flattens the zigzag edge, and the solid top band and a strap attached to the opposite side finish the tube. Last, you thread a chain cord through the eyelets to make the drawstring.
Finished Size and Construction
- Finished size: 7 in (17.8 cm) wide at the bands, laid flat. The mesh relaxes to about 8 in (20.3 cm) wide when the holder is full. The holder is 16.75 in (42.5 cm) long, not counting the strap.
- Skill level: Easy to intermediate
- Terminology: US
- Yarn weight: Worsted (#4), cotton or cotton blend
- Hook: 5.0 mm (H-8)
- Number of pieces: 1 tube with the strap attached, plus 1 drawstring cord
- Layout: One seamless tube worked in joined rounds
- Piece size: 14 in (35.6 cm) around at the bands
- Size before border: 12.75 in (32.4 cm) of mesh above a 2 in (5.1 cm) bottom band
- Border depth: The top band is 2 in (5.1 cm) deep
Materials
Use a smooth cotton or cotton blend. Cotton holds its shape when the holder is packed with bags, and it doesn’t fuzz. Avoid very drapey acrylics, because the mesh will stretch long and thin under the weight.
- Main color (teal or lavender): 100 g, about 190 m (208 yd) of worsted cotton for one holder
- 5.0 mm (H-8) crochet hook
- Tapestry needle
- Scissors
- 2 stitch markers
- Tape measure
- A rolled towel or a 4 in (10.2 cm) tube, such as an oatmeal canister, for blocking
The yarn amount includes a margin of about 15% for your gauge check and the drawstring.
Abbreviations (US Terms)
- ch – chain
- sl st – slip stitch
- sc – single crochet
- hdc – half double crochet
- dc – double crochet
- tr – treble crochet
- sp – space
- st(s) – stitch(es)
- rnd – round
Special stitch – dc2tog over two spaces: Yarn over, insert your hook in the first ch-2 sp and pull up a loop, then yarn over and draw through 2 loops. Skip the next dc. Yarn over, insert your hook in the next ch-2 sp and pull up a loop, then yarn over and draw through 2 loops. Yarn over and draw through all 3 loops on the hook. This stitch forms the valley of each chevron.
Gauge and Checkpoints
- Solid gauge: 16 sc and 18 rnds = 4 in (10.2 cm)
- Mesh gauge: 4 mesh rnds = 3 in (7.6 cm), so each mesh round is about 0.75 in (1.9 cm) tall
Use the bottom band as your test piece. When you finish Rnd 8, lay the tube flat and measure it before you start the mesh. If it’s off, it’s quick to pull out and redo.
Checkpoints:
- After Rnd 8, the tube is 7 in (17.8 cm) wide flat, 14 in (35.6 cm) around and about 2 in (5.1 cm) tall.
- After Rnd 12, the mesh measures 3 in (7.6 cm) from the top of the band.
- After Rnd 25, the mesh measures 12.75 in (32.4 cm).
- After Rnd 33, the whole tube measures 16.75 in (42.5 cm).
If your band is too big, go down one hook size, to 4.5 mm. If it’s too small, go up to 5.5 mm. Don’t change the stitch count, because the chevron repeat needs exactly 56 stitches.
Pattern
Bottom Band
Foundation: Ch 56 and join with a sl st to the first ch to form a ring. Make sure the chain isn’t twisted.
Rnd 1: Ch 1, sc in each ch around. Join with a sl st to the first sc. (56 sc)
Rnd 2 (eyelet round): Ch 4 (counts as dc and ch 1), skip the next st. Dc in the next st, ch 1, skip the next st. Repeat from * 26 more times. Join with a sl st to the 3rd ch of the beginning ch-4. (28 dc and 28 ch-1 sps)
Rnd 3 (conversion round): Ch 1, sc in each dc and in each ch-1 sp around. Join. (28 sc in the dc + 28 sc in the spaces = 56 sc)
Rnds 4–8: Ch 1, sc in each st around. Join. (56 sc)
Checkpoint: the band is 7 in (17.8 cm) wide flat and about 2 in (5.1 cm) tall.
Chevron Mesh
The mesh is worked over 8 sections of 7 stitches each (8 × 7 = 56).
Rnd 9 (setup): Ch 5 (counts as dc and ch 2), skip the next st, dc in the next st, ch 2, skip the next st, (dc, ch 3, dc) in the next st, ch 2, skip the next st, dc in the next st, ch 2. Dc in the next st, ch 2, skip the next st, dc in the next st, ch 2, skip the next st, (dc, ch 3, dc) in the next st, ch 2, skip the next st, dc in the next st, ch 2. Repeat from * 6 more times. Join with a sl st to the 3rd ch of the beginning ch-5.
Each section now has a valley dc, a side dc, two peak dc around a ch-3 sp, and a second side dc. (40 dc, 8 ch-3 sps and 32 ch-2 sps)
Rnd 10: Ch 2 (doesn’t count as a st). Dc in the next ch-2 sp; this dc is the first valley. Ch 2, skip the next dc and the next ch-2 sp, then dc in the next dc. Ch 2, (dc, ch 3, dc) in the ch-3 sp, ch 2, dc in the next dc. Ch 2, then skip the next ch-2 sp and the next dc.
Dc2tog over the next 2 ch-2 sps, skipping the valley dc between them. Ch 2, skip the next dc and the next ch-2 sp, dc in the next dc, ch 2, (dc, ch 3, dc) in the ch-3 sp, ch 2, dc in the next dc, ch 2, skip the next ch-2 sp and the next dc. Repeat from * 6 more times. Join with a sl st to the first dc. (40 sts: 8 valleys and 32 dc; 8 ch-3 sps and 32 ch-2 sps)
This round adds one stitch at each peak and takes one away at each valley, so the count stays at 40. Each round raises the peaks and lowers the valleys, which stacks the zigzag lines.
Keep your chains the same length as the height of your dc. If the chains are loose, the mesh gets long and saggy. If they’re tight, the peaks pucker.
Rnds 11–25: Repeat Rnd 10. That gives 16 mesh rounds after the setup round. Each round ends with 40 sts, 8 ch-3 sps and 32 ch-2 sps.
Checkpoint: the mesh is 12.75 in (32.4 cm) tall, measured from the top of Rnd 8 to a peak.
Leveling Round
Rnd 26 (conversion round): Ch 4 (counts as tr) in the first valley, dc in the next ch-2 sp, hdc in the next dc. Skip the next ch-2 sp, sc in the next dc, skip the ch-3 sp, sc in the next dc, skip the next ch-2 sp. Hdc in the next dc, dc in the next ch-2 sp.
Tr in the next valley, dc in the next ch-2 sp, hdc in the next dc, skip the ch-2 sp, sc in the next dc, skip the ch-3 sp, sc in the next dc, skip the ch-2 sp, hdc in the next dc, dc in the next ch-2 sp. Repeat from * 6 more times. Join to the top of the beginning ch-4.
Count: 40 sts worked into the 40 dc tops + 16 sts worked into ch-2 sps = 56 sts. The tall stitches fill the valleys and the short stitches sit on the peaks, so the edge comes out level.
Border: Top Band and Hanging Strap
On this holder, the border is the solid top band plus the strap. It uses the same gauge as the bottom band: 16 sc = 4 in (10.2 cm).
Rnds 27–33: Ch 1, sc in each st around. Join. (56 sc)
When the tube is flat, each side has 28 sts (2 sides × 28 = 56), so each side measures 7 in (17.8 cm). A tube has no true corners: the 2 stitches at the folds are already counted in the 28 for each side.
Why the math works: The bottom band, setup round, leveling round and top band all have 8 sections × 7 sts = 56. The top and bottom match exactly, so the holder hangs straight.
Strap: Place markers in st 1 and st 29 of Rnd 33. These two stitches sit directly opposite each other, 28 sts apart.
- Row 1: With the yarn still attached, ch 1, then sc in st 1, st 2 and st 3. (3 sc)
- Rows 2–54: Ch 1, turn, sc in each st across. (3 sc)
The strap is about 12 in (30.5 cm) long and 0.75 in (1.9 cm) wide. Without twisting the strap, line up its last row with st 29 to st 31 and sl st through both layers. (3 sl sts) Fasten off and weave in the ends.
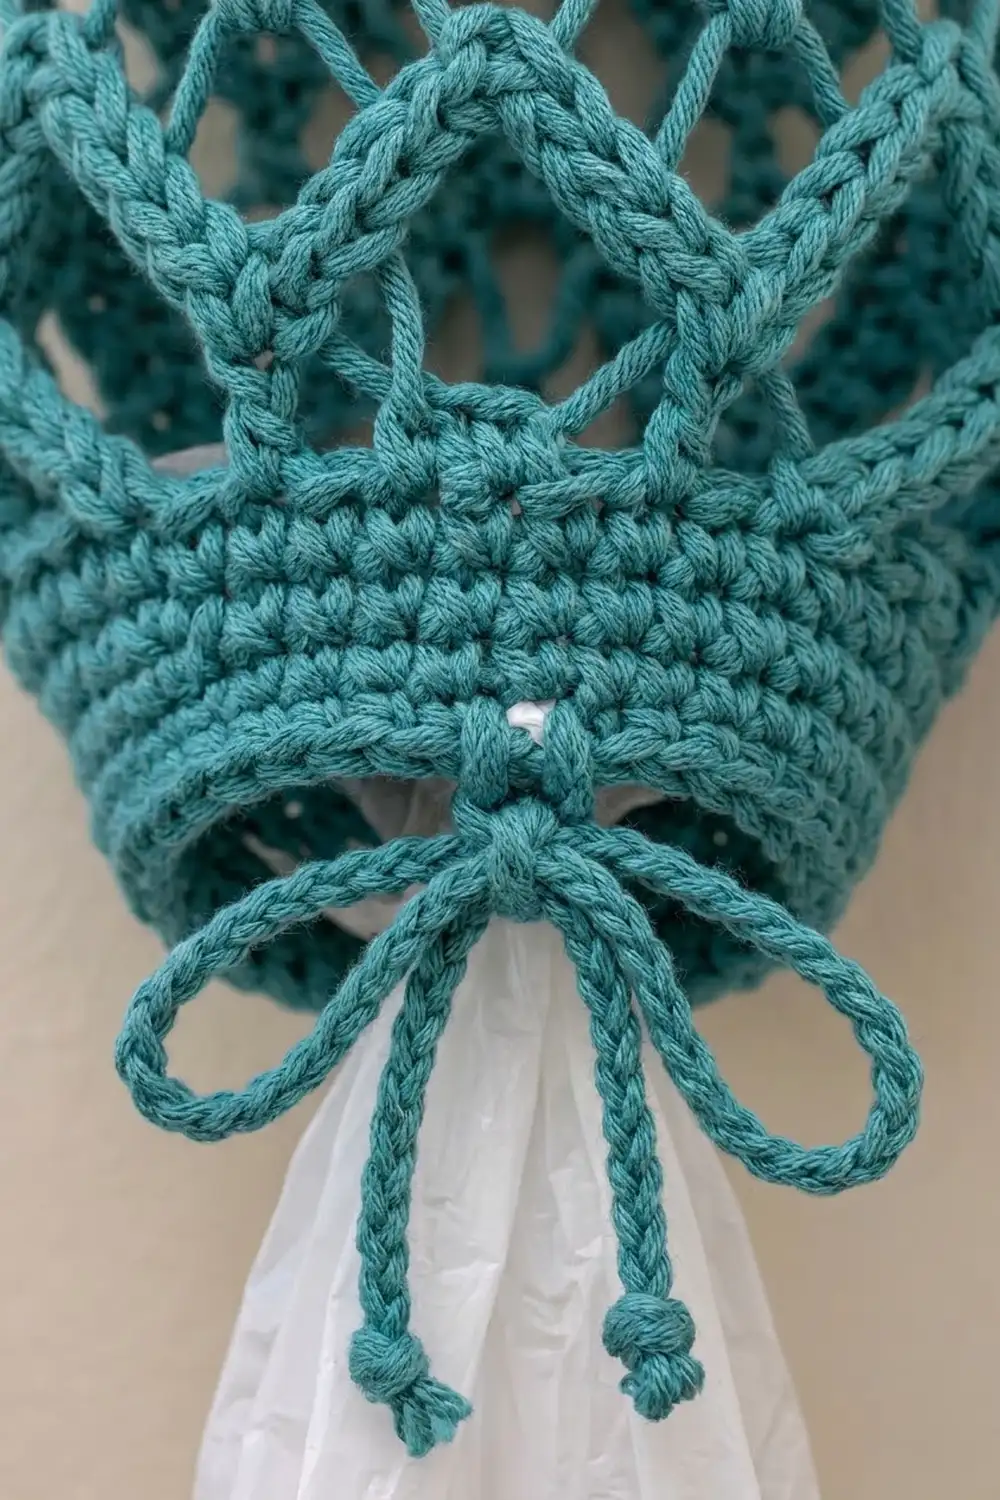
Drawstring: Ch 100, about 26 in (66.0 cm). Sl st in the back bump of each ch and fasten off. Tie an overhand knot at each end. Starting at the front center, weave the cord over and under each dc of Rnd 2. Pull it snug, leaving an opening about 1.75 in (4.4 cm) across, and tie a bow.
Final Blocking
- Soak the holder in cool water and gently squeeze it out. Don’t wring it.
- Roll it in a towel to take out the extra water.
- Slide a rolled towel or a 4 in (10.2 cm) tube inside the holder.
- Gently stretch the mesh lengthwise so the zigzags are even and the peaks line up in 8 columns.
- Check that the bands lie flat at 7 in (17.8 cm) wide.
- Let it dry completely, then take out the form.
Final Quality-Control Checklist
- 56 sts in each band
- 8 peaks in every mesh round
- 16 mesh rounds after the setup round
- Mesh is 12.75 in (32.4 cm) tall
- Total length is 16.75 in (42.5 cm)
- Strap is attached directly opposite where it starts and isn’t twisted
- Drawstring passes through all 28 eyelets
- All ends are woven in securely
Troubleshooting
- The peaks drift sideways: You probably missed a ch-2 skip. Count 40 sts at the end of every round.
- There are fewer than 8 peaks: You may have worked a peak into a ch-2 sp. Peaks go only in ch-3 sps.
- The mesh is long and saggy: Your chains are loose. Use a hook one size smaller for the mesh only.
- The top edge is wavy: Check that you worked a tr in each valley in Rnd 26.
- The bands flare: Use a hook one size smaller for the sc rounds.
- The strap twists: Lay the tube flat before you attach the strap.
- Bags fall out: Pull the drawstring tighter so the opening is smaller.
Care
Machine wash cool on a gentle cycle, then reshape the holder and lay it flat to dry. Cotton may shrink a little in a hot dryer.
Final Notes
The measurements build on each other. The 56-stitch band sets the width at 7 in (17.8 cm). Seventeen mesh rounds, counting the setup round, add 12.75 in (32.4 cm) of chevrons. The leveling round brings you back to 56 stitches, and the two 2 in (5.1 cm) bands bring the total length to 16.75 in (42.5 cm). Check your gauge on the bottom band and the rest follows. Happy crocheting!