

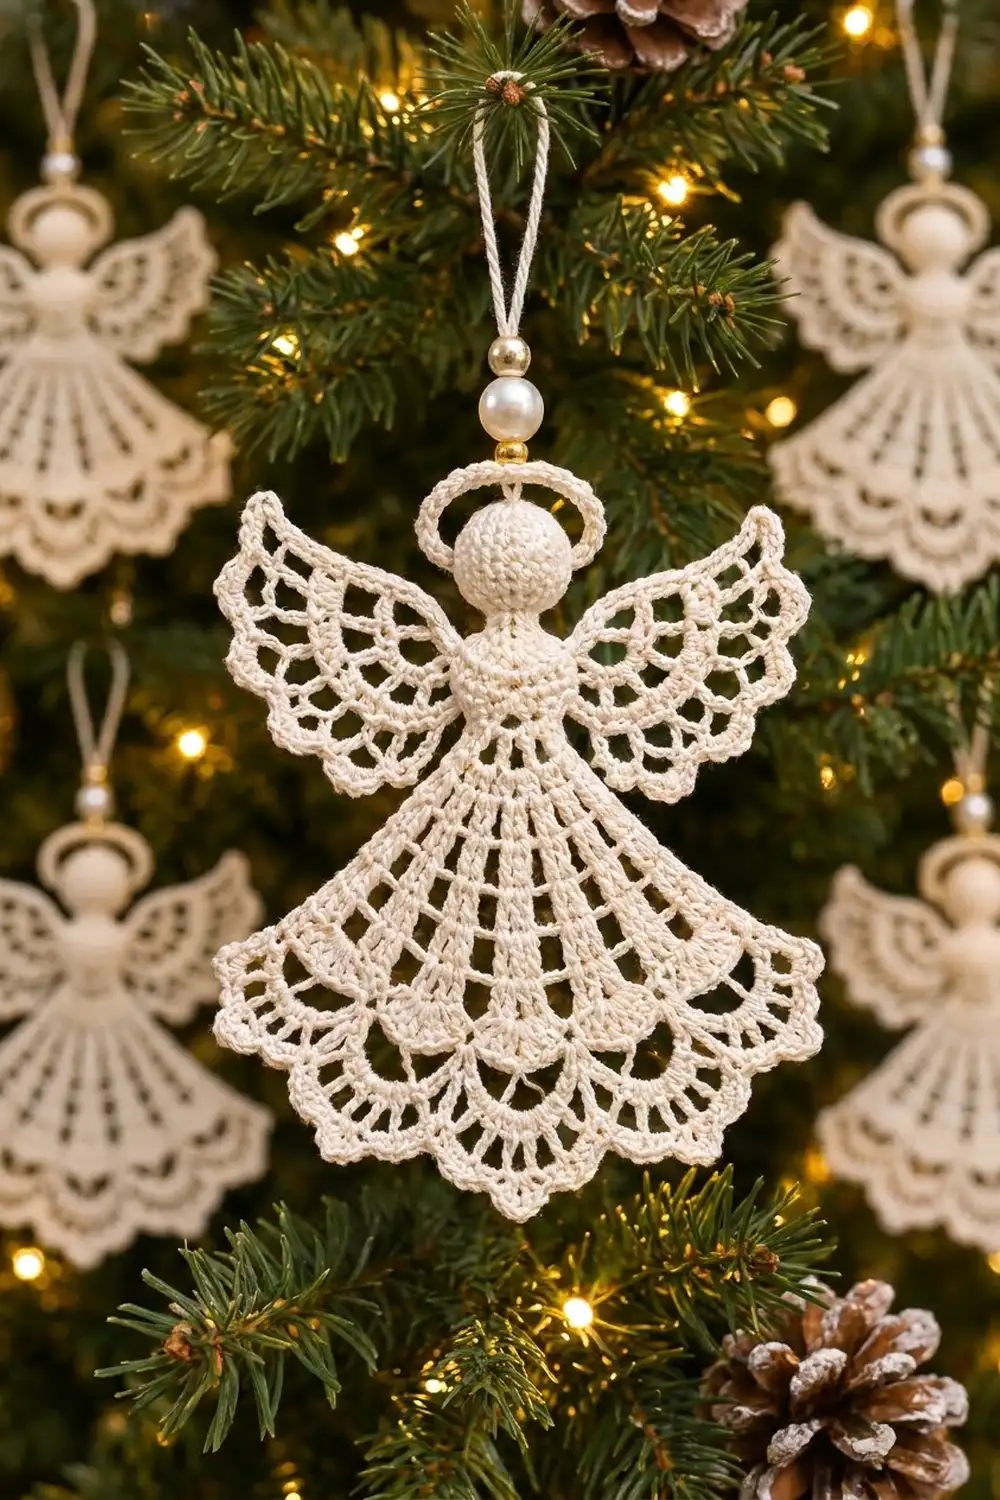
The Ivory Grace Angel is a small, lacy thread ornament that looks like a vintage heirloom. Her fan skirt opens out from a padded bodice in long double-crochet spokes and finishes in two tiers of scallops. A round stuffed head, a halo and a pearl-topped hanging loop finish the design.
She is worked entirely in ivory size 10 cotton thread, so the lace stays crisp and bright against tree lights. The style is classic and traditional, and you can make one in an evening once you know the stitch counts.
This pattern uses US crochet terms. The finished angel is about 4 3/4 in (12.1 cm) tall from the top of the halo to the hem and 4 1/2 in (11.4 cm) wide at the hem. With the beads and loop, the total hanging length is about 6 1/2 in (16.5 cm).
Construction is simple. You make a stuffed head, a halo ring, two wings and a hanging cord. The bodice and skirt are one continuous body piece: the bodice is worked in the round, closed flat, and the skirt is then worked in turned rows, with the scalloped hem as its border. You block and stiffen the flat parts, then sew everything together.
Finished Size and Construction
- Finished size: 4 3/4 in (12.1 cm) tall × 4 1/2 in (11.4 cm) wide at the hem
- Wingspan: about 4 in (10.2 cm)
- Skill level: Intermediate (thread work, small amigurumi shaping)
- Terminology: US
- Yarn weight: Lace (#0), size 10 crochet thread
- Hook: 1.75 mm steel hook
- Number of pieces: 1 ornament, made from small parts (head, body, 2 wings, halo, cord)
- Layout: single standalone ornament; no motif joining
- Skirt size before border: 4 1/4 in (10.8 cm) wide × 3 3/4 in (9.5 cm) total angel height
- Border (hem) depth: 1 in (2.5 cm)
Materials
Choose a mercerized size 10 cotton thread. Mercerized cotton has a slight sheen, holds starch well and shows stitch definition clearly. Avoid matte or very soft thread, which makes the spokes look fuzzy.
- Ivory/cream size 10 cotton thread: 10 g, about 40 m (44 yd)
- One 8 mm ivory pearl bead (hole at least 1.5 mm)
- Two 4 mm gold spacer beads
- A small pinch of polyester fiberfill
- 1.75 mm steel crochet hook
- Fine tapestry needle and a large-eye beading needle
- Rust-proof pins and a foam blocking board
- Spray starch or fabric stiffener
- Scissors and stitch markers
These quantities include a margin of about 30% for your gauge swatch and tails. One angel uses about 7 g.
Abbreviations (US Terms)
- ch – chain
- sl st – slip stitch
- sc – single crochet
- dc – double crochet
- inc – 2 sc in the same stitch
- dec – single crochet 2 together
- sc2tog – single crochet 2 together (used on the hem)
- MR – magic ring
- sp(s) – space(s)
- st(s) – stitch(es)
- tch – turning chain
Special stitch – picot: ch 3, sl st into the 3rd ch from the hook.
Gauge and Checkpoints
Gauge: 10 dc and 4 dc rows = 1 in (2.5 cm); 12 sc = 1 in (2.5 cm).
Test with one wing first. It is small and uses the same spoke and scallop structure as the skirt. After blocking, the wing should measure about 1 1/2 in (3.8 cm) from the ring to the scallop tip.
Checkpoints:
- Head: 5/8 in (1.6 cm) across
- Halo: 3/4 in (1.9 cm) outer diameter
- Bodice, flattened: 3/4 in (1.9 cm) wide × 1/2 in (1.3 cm) tall
- Skirt after Row 10: 4 1/4 in (10.8 cm) wide at the bottom
- After the hem: 4 1/2 in (11.4 cm) wide, 4 3/4 in (12.1 cm) total height
If your pieces are too big, go down to a 1.5 mm hook. If they are too small or stiff, try a 2.0 mm hook. Don’t change the stitch counts, because the spokes and scallops depend on them.
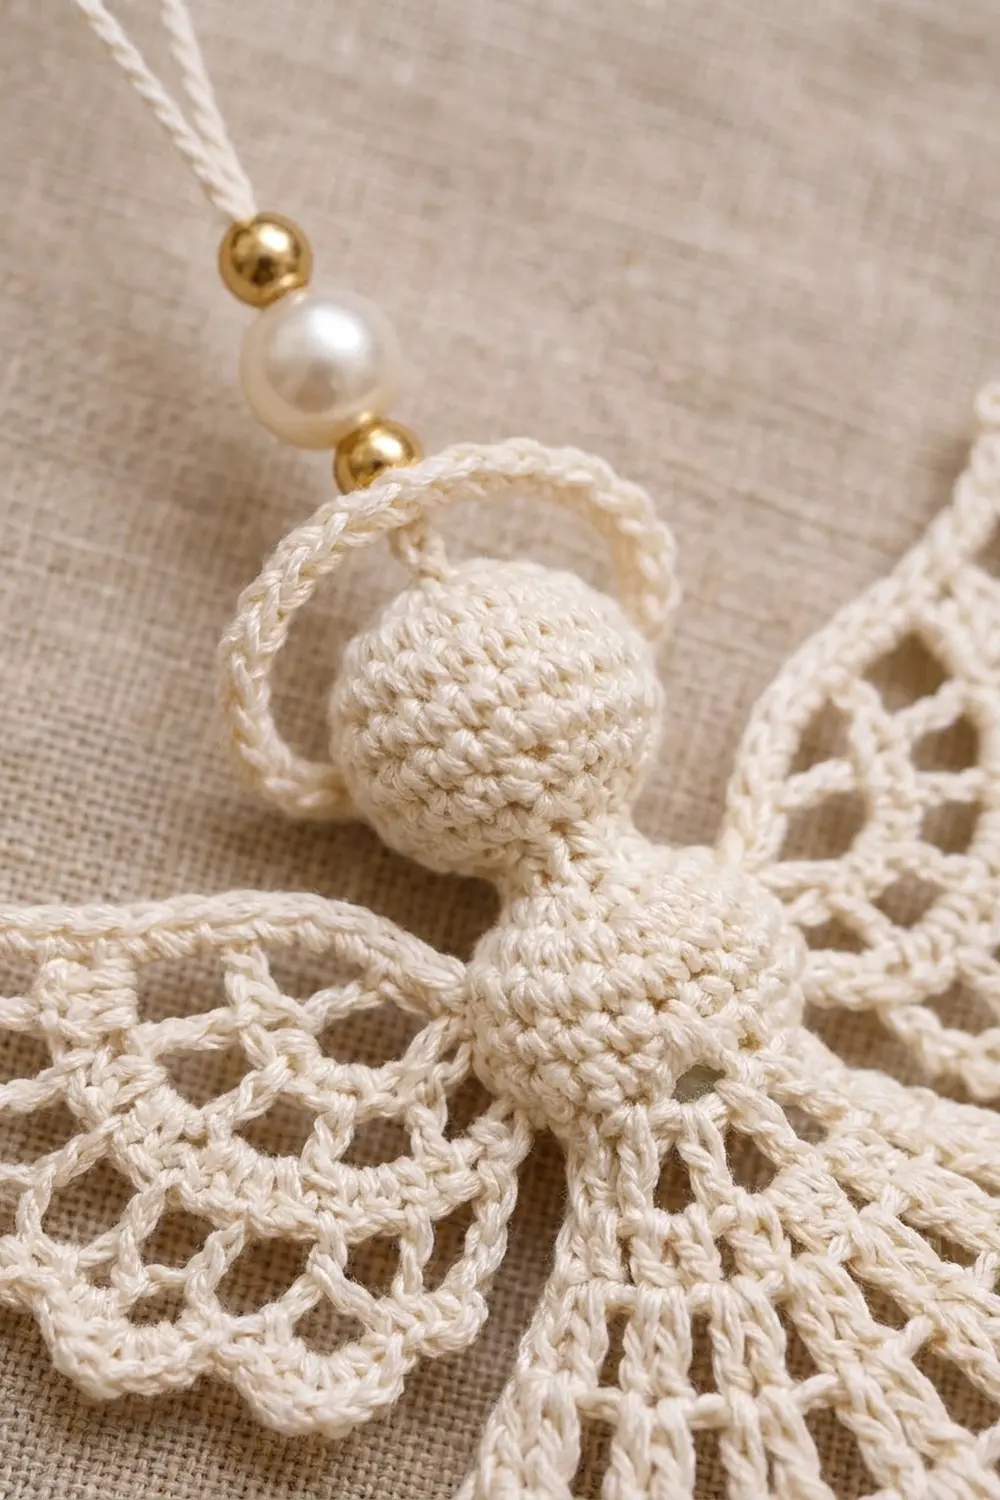
Head
Work in continuous spiral rounds and mark the first stitch of each round.
- Rnd 1: MR, 6 sc in the ring. (6)
- Rnd 2: inc in each st around. (12)
- Rnd 3: [sc, inc] 6 times. (18)
- Rnd 4: [2 sc, inc] 6 times. (24)
- Rnds 5–9: sc in each st around. (24 sts per round, 5 rounds)
- Rnd 10: [2 sc, dec] 6 times. (18)
- Rnd 11: [sc, dec] 6 times. (12)
Stuff firmly, shaping the head into a smooth ball.
- Rnd 12: dec 6 times. (6)
Fasten off, leaving a 6 in (15.2 cm) tail. Weave the tail through the front loops of the last 6 sts and pull it closed. Keep this tail for sewing. Checkpoint: 5/8 in (1.6 cm) across.
Halo
- Foundation: ch 24 and sl st to the first ch to form a ring, taking care not to twist it.
- Rnd 1: ch 1, work 36 sc into the ring, over the chain. Sl st to the first sc. (36 sc)
Packing 36 sc over 24 chains makes the ring firm and slightly rounded. Fasten off, leaving a 6 in (15.2 cm) tail. Checkpoint: 3/4 in (1.9 cm) outer diameter.
Wings (Make 2)
- Foundation: ch 6 and sl st to the first ch to form a ring.
- Row 1: ch 3 (counts as dc), 6 dc in the ring. Turn. (7 dc)
- Row 2: ch 4 (counts as dc + ch 1), [dc in next dc, ch 1] 5 times, dc in top of tch. Turn. (7 dc, 6 ch-1 sps)
- Row 3: ch 3 (counts as dc), dc in the same st, [ch 2, skip the ch-1 sp, 2 dc in next dc] 6 times, placing the last 2 dc in the 3rd ch of the tch. Turn. (14 dc in 7 pairs, 6 ch-2 sps)
- Row 4: ch 3 (counts as dc), dc in next dc, [ch 3, skip the ch-2 sp, dc in each of next 2 dc] 6 times. The last dc goes in the top of the tch. Turn. (14 dc, 6 ch-3 sps)
- Row 5 (scallops): ch 1, sc in each of the first 2 dc, [5 dc in next ch-3 sp, sc in each of next 2 dc] 6 times. Turn. (14 sc + 30 dc = 44 sts, 6 scallops)
- Row 6 (picot edge): ch 1, sl st in each of the first 2 sc, [sl st in each of next 2 dc, (sl st, picot) in center dc, sl st in each of next 2 dc, sl st in each of next 2 sc] 6 times. (44 sl sts, 6 picots)
Fasten off, leaving an 8 in (20.3 cm) tail on one wing and weaving in the ends on both. The pairs of dc stack into 7 radiating spokes, and the 5-dc shells create the scalloped feather edge.
Hanging Cord
- Ch 50.
- Sl st in the back bump of the 2nd ch from the hook and in each ch back to the start. (49 sl sts)
Fasten off, leaving both tails. The cord is about 3 1/2 in (8.9 cm) long.
Body: Bodice and Skirt
Bodice (in the round)
- Rnd 1: MR, 6 sc in the ring. (6)
- Rnd 2: inc in each st around. (12)
- Rnd 3: [sc, inc] 6 times. (18)
- Rnds 4–6: sc in each st around. (18 sts per round, 3 rounds)
Add a very small pinch of fiberfill so the bodice is padded but still flat. Flatten the opening so there are 9 sts on the front and 9 on the back. If needed, work 1–2 extra sc so the hook sits at one folded side edge.
Skirt (turned rows)
- Row 1: ch 1. Working through 1 front st and its matching back st together, sc across. Turn. (9 sc; the bodice is now closed)
- Row 2: ch 3 (counts as dc), dc in the same st, 2 dc in each of the next 8 sts. Turn. (18 dc)
- Row 3: ch 3 (counts as dc), dc in next dc, [ch 1, dc in each of next 2 dc] 8 times. The last dc goes in the top of the tch. Turn. (18 dc in 9 pairs, 8 ch-1 sps)
For Rows 4–10, repeat Row 3. Each time, skip the chain space below and work 2 dc into the dc pair below. Change only the length of the chain between pairs:
- Row 4: ch 1 between pairs. (18 dc, 8 ch-1 sps)
- Row 5: ch 1 between pairs. (18 dc, 8 ch-1 sps)
- Row 6: ch 2 between pairs. (18 dc, 8 ch-2 sps)
- Row 7: ch 2 between pairs. (18 dc, 8 ch-2 sps)
- Row 8: ch 2 between pairs. (18 dc, 8 ch-2 sps)
- Row 9: ch 3 between pairs. (18 dc, 8 ch-3 sps)
- Row 10: ch 3 between pairs. Turn. (18 dc, 8 ch-3 sps)
Row 10 is 18 dc + 24 chains = 42 sts wide. That gives the checkpoint width of 4 1/4 in (10.8 cm), measured gently stretched. The 9 dc pairs form the 9 solid spokes of the skirt, and the widening spaces turn the skirt into a fan. Do not fasten off; go straight to the border.
Border: Two-Tier Scalloped Hem
Border gauge: each 7-dc shell in Row 11 spans about 1/2 in (1.3 cm). The finished hem is 1 in (2.5 cm) deep.
- Row 11 (upper tier): ch 1, sc in each of the first 2 dc, [7 dc in next ch-3 sp, sc in each of next 2 dc] 8 times. Turn. (18 sc + 56 dc = 74 sts, 8 shells)
- Row 12 (loop row): ch 1, sc in first sc, ch 4, sc in the center (4th) dc of the first shell, [ch 7, sc in the center dc of the next shell] 7 times, ch 4, sc in the last sc. Turn. (10 sc, 2 ch-4 loops, 7 ch-7 loops)
- Row 13 (lower tier): ch 1, sc in first sc, 6 dc in the ch-4 loop, sc in next sc, [(3 dc, picot, 3 dc, picot, 3 dc) in next ch-7 loop, sc in next sc] 7 times, 6 dc in the last ch-4 loop, sc in the last sc. (10 sc, 75 dc, 14 picots)
Fasten off and weave in the ends.
Why the math works: 9 spokes create 8 spaces, and each space gets one shell, so there are 8 upper scallops. The loops in Row 12 run from one shell center to the next. Eight centers have 7 gaps between them, so you get 7 full lower scallops, plus 2 half scallops at the edges. This offsets the lower tier under the gaps between the upper shells, which creates the layered two-tier hem. In Row 13, the 10 sc anchors (2 edge sc + 8 shell centers) match the 10 sc made in Row 12. The dc count is 7 × 9 = 63 in the full scallops plus 2 × 6 = 12 in the half scallops, for 75 total.
Final Blocking
- Wet the body and both wings, then roll them in a towel to remove extra water.
- Draw a guide on paper under plastic: a triangle 3 3/4 in (9.5 cm) tall and 4 1/4 in (10.8 cm) wide at the base, with a 4 1/2 in (11.4 cm) hem line.
- Pin the bodice at the top point. Pin each of the 9 spokes straight, fanning out evenly.
- Pin the tip of every lower scallop and the 14 picots. Pin each upper shell so it lies in a smooth arch.
- Pin each wing as a fan wedge 1 1/2 in (3.8 cm) long, pinning each picot outward.
- Spray with starch or brush on fabric stiffener, and let everything dry completely.
- Assemble: sew the gathered end of the head to the bodice point (the neck). Sew each wing’s ring point and the first 1/2 in (1.3 cm) of its lower edge to the back of the bodice, angling the wing upward about 30°.
- Tilt the halo behind the head and tack it at 2 points.
- Fold the cord in half. Use the beading needle to thread both tails through a gold bead, the pearl and the second gold bead, leaving a 1 1/4 in (3.2 cm) loop. Sew the tails into the top of the head, just in front of the halo, and weave them in.
Final Quality-Control Checklist
- The head is round, firm and 5/8 in (1.6 cm) across.
- The bodice is padded but flat, with no stuffing showing.
- There are 9 straight, evenly spaced skirt spokes.
- The hem has 8 upper shells, 7 full lower scallops and 2 half scallops.
- All 14 skirt picots and 12 wing picots are open and pinned out.
- The two wings are the same size and angle.
- The halo sits behind the head and does not hide the face area.
- The ornament hangs straight from the loop.
- Total height is 4 3/4 in (12.1 cm) and hem width is 4 1/2 in (11.4 cm).
Troubleshooting
- The skirt cups or ruffles: your chain spaces are too long or loose. Chain more tightly, or go down a hook size for Rows 6–10.
- The skirt curls inward: the chains are too tight. Loosen them slightly and block flat with more pins.
- The spokes lean: make sure both dc go into the 2 dc of the pair below, never into the chain space.
- Stuffing shows through the head: use less fiberfill or go down to a 1.5 mm hook for the head.
- The lower scallops are flat: check for 3 dc between picots, and starch them with each tip pinned.
- The ornament tilts: move the cord’s anchor point so it sits at the exact top center of the head.
Care
Dust the ornament gently, or spot clean it with cool water, then re-starch and pin it to dry. Store it flat in tissue paper to protect the picots.
Final Notes
The measurement chain is easy to follow. The head is 5/8 in (1.6 cm) across and the bodice is 3/4 in (1.9 cm) wide. The skirt reaches 4 1/4 in (10.8 cm) wide at Row 10. The scalloped border adds 1 in (2.5 cm) of depth and brings the hem to 4 1/2 in (11.4 cm), for a finished angel 4 3/4 in (12.1 cm) tall. If each checkpoint matches, your angel will hang light, lacy and balanced.
Happy crocheting!