

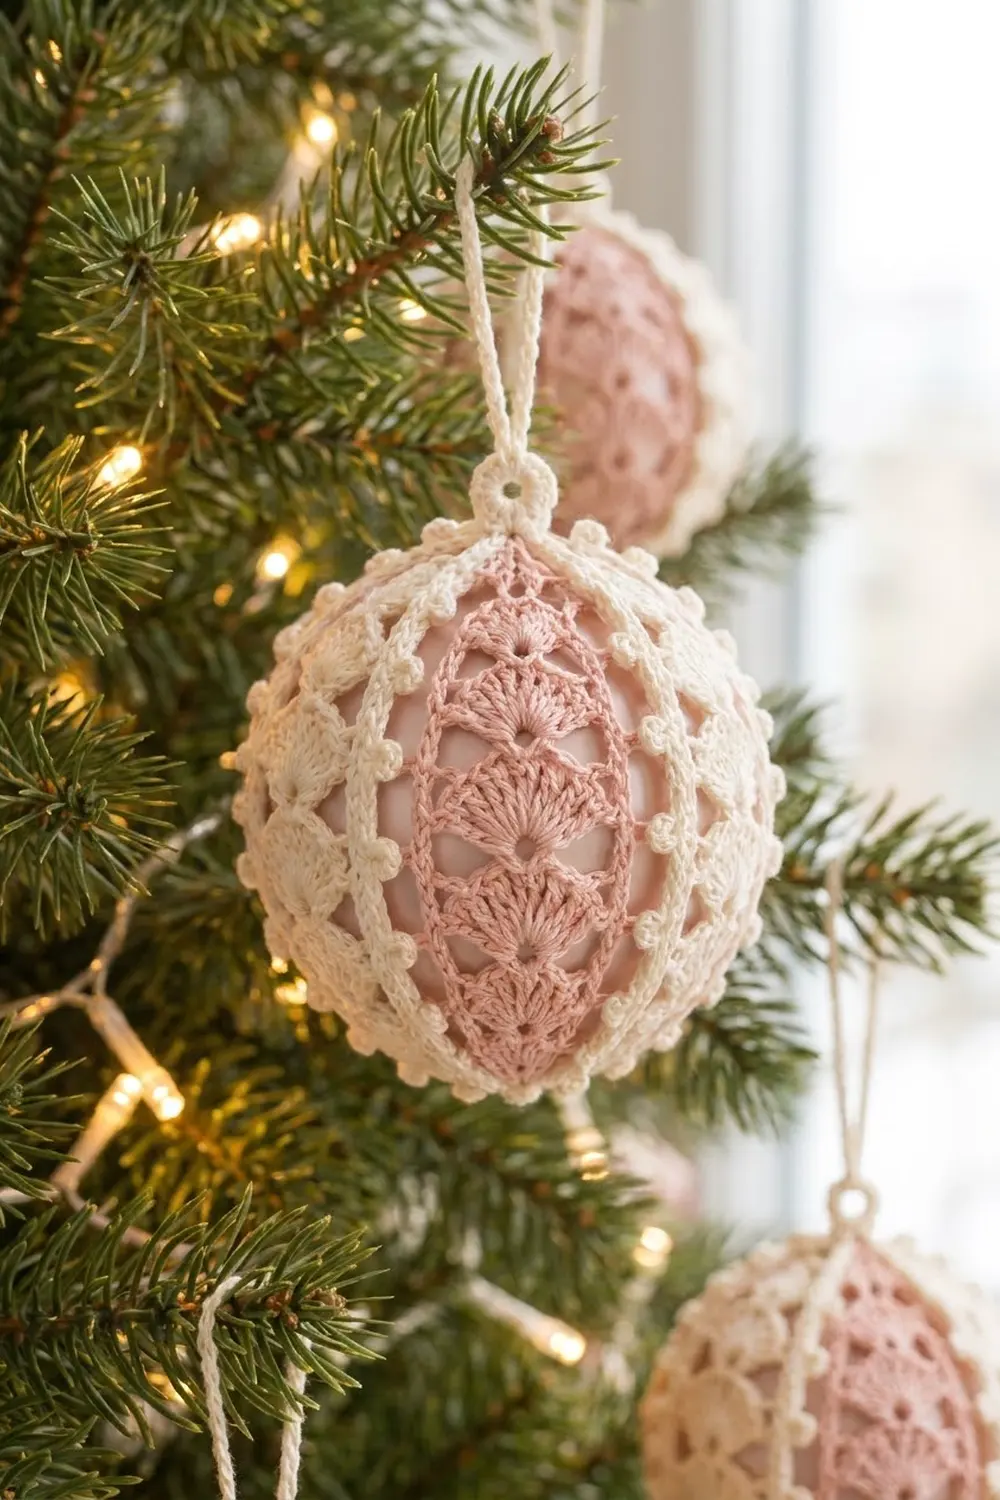
This ornament is a soft, vintage-style ball made from six pointed lace panels. Each panel has a column of stacked shell fans in the middle, with chain-mesh triangles on each side and a smooth outline around it. Cream ribs with tiny picots sit over every seam, and a cream ring and corded loop finish the top.
The palette is blush pink and cream. Three pink panels alternate with three cream panels, so the ball looks striped from every side. A pale pink inner ball shows through the lace and makes the fans stand out.
The pattern uses US crochet terms. The finished ball body measures 3 in (7.6 cm) in diameter, or 3.25 in (8.3 cm) across the picots. It stands 3.5 in (8.9 cm) tall from the bottom cap to the top of the ring, and the hanging loop adds about 2.75 in (7.0 cm) more.
Construction is simple and modular. You crochet a fan strip in rows, outline it in rounds to make the pointed lens shape, and edge it in cream. Then you join the six panels around a ball form, add picot ribs over the seams, and finish with the top and bottom caps and the loop.
Finished Size and Construction
- Finished size: 3 in (7.6 cm) ball body; 3.25 in (8.3 cm) across picots; 3.5 in (8.9 cm) tall without the loop
- Skill level: Intermediate (thread crochet, shaping with stitch heights)
- Terminology: US
- Yarn weight: Size 10 mercerized cotton crochet thread (lace weight)
- Hook: 1.75 mm steel hook
- Number of pieces: 6 panels, plus 2 small caps and 1 loop
- Layout: 6 panels around the ball, alternating pink and cream
- Panel size (blocked flat): 4.25 in (10.8 cm) tip to tip × 1.5 in (3.8 cm) wide
- Size before border (joined, no ribs): 3 in (7.6 cm) diameter
- Border depth: Picot ribs stand about 0.125 in (0.3 cm) proud of each seam
Materials
Use a firm, mercerized size 10 cotton thread. It holds the fan shapes clearly and takes starch well. Avoid fuzzy or very soft threads, because the mesh will lose its shape.
- Color A, Blush Pink: 10 g (about 52 m)
- Color B, Cream: 15 g (about 78 m)
Both quantities include a safety margin of about 25%.
Tools:
– 1.75 mm steel crochet hook
– Tapestry needle with a small eye
– 2.75 in (7.0 cm) pale pink satin or plastic ball for the inner form
– Rustproof pins and a foam blocking board
– Liquid fabric starch or a sugar-water stiffener
– Small scissors and a ruler
Abbreviations (US Terms)
- ch – chain
- sl st – slip stitch
- sc – single crochet
- hdc – half double crochet
- dc – double crochet
- tr – treble crochet
- sp – space
- st(s) – stitch(es)
- tch – turning chain
- RS / WS – right side / wrong side
Special stitches:
– V-st: (dc, ch 3, dc) in the same stitch. The ch-3 becomes the eyelet hole at the base of the next fan.
– Picot: (sl st, ch 3, sl st) in the same stitch.
Gauge and Checkpoints
Gauge: 8 dc and 4 dc rows = 1 in (2.5 cm), and 8 sc = 1 in (2.5 cm).
Make one complete panel before anything else, and check these measurements without stretching it:
- After Row 11 (fan strip): 2.75 in (7.0 cm) long × about 1.25 in (3.2 cm) wide
- After Round 2 (pink outline): 4 in (10.2 cm) tip to tip × 1.375 in (3.5 cm) wide
- After Round 3 (cream edge): 4.25 in (10.8 cm) × 1.5 in (3.8 cm), lightly blocked
If the panel is too big: go down to a 1.5 mm hook, or tighten the chain loops in Round 1.
If it’s too small: go up to a 2.0 mm hook.
Getting the gauge right matters because six panels at 1.5 in (3.8 cm) each, plus the seams, have to match the 9.42 in (23.9 cm) circumference of a 3 in (7.6 cm) ball.
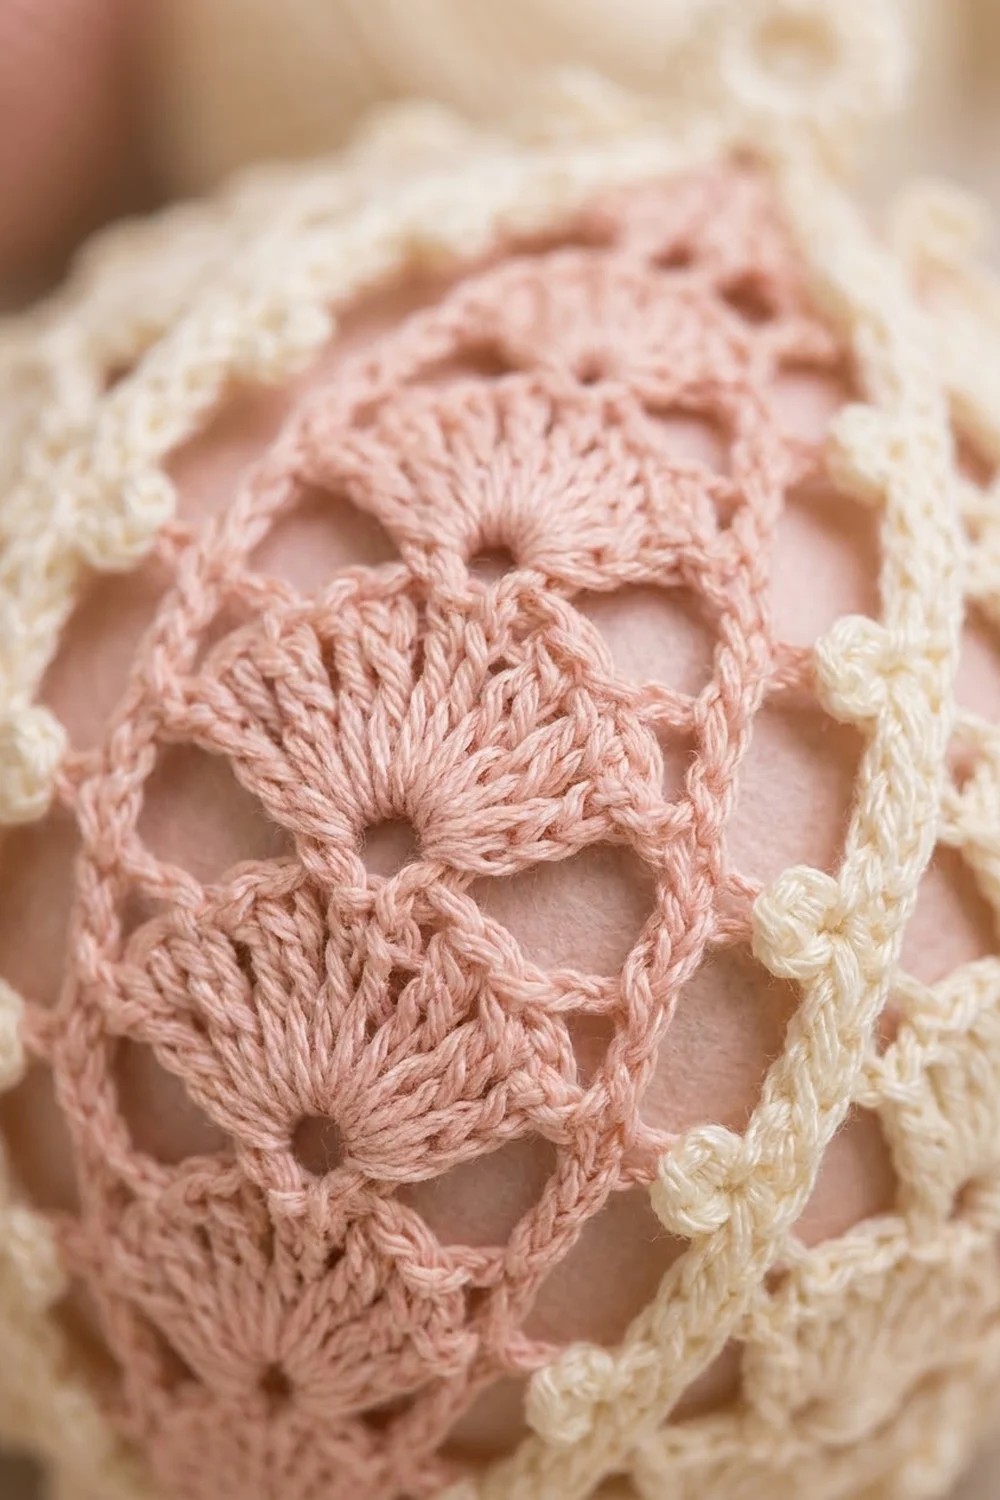
Panel: Fan Strip (Rows 1–12)
Make 3 panels in Color A and 3 in Color B. Each panel is worked entirely in its main color through Round 2.
Foundation: Ch 4, sl st in the first ch to form a ring. This ring is the bottom tip of the panel.
Row 1 (RS): Ch 3 (counts as dc), 8 dc in the ring. Turn. (9 dc — first fan)
Row 2 (WS): Ch 3 (counts as dc), skip next 3 dc, V-st in next dc (the 5th st), skip next 3 dc, dc in top of tch. Turn. (4 dc, 1 ch-3 sp)
Row 3: Ch 3 (counts as dc), 9 dc in the ch-3 sp, dc in top of tch. Turn. (11 dc — 9-dc fan plus 2 edge dc)
Row 4: Ch 3 (counts as dc), skip next 4 dc, V-st in next dc (the 6th st), skip next 4 dc, dc in top of tch. Turn. (4 dc, 1 ch-3 sp)
Rows 5–11: Repeat Rows 3 and 4 three more times, then work Row 3 once more. Odd rows have 11 dc and even rows have 4 dc and 1 ch-3 sp. You now have 6 fans (Rows 1, 3, 5, 7, 9 and 11), each sitting over an eyelet.
Checkpoint: 2.75 in (7.0 cm) long.
Row 12 (top tip): Ch 1, sc in first dc, ch 3, skip next 4 dc, (sc, ch 7, sc) in next dc (the 6th st), ch 3, skip next 4 dc, sc in top of tch. Do not turn. (4 sc, 2 ch-3 sps, 1 ch-7 tip loop)
Panel: Lens Outline (Rounds 1–3)
Round 1 (mesh): Continue along the side edge you are now facing. Ch 5, then sc around the post of the end dc of Row 10. Make 4 more ch-5 loops the same way, ending in Rows 8, 6, 4 and 2. Ch 5, (sc, ch 7, sc) in the foundation ring. Work up the other side: ch 5, sc around the end post of Row 2. Then (ch 5, sc around the end post) at Rows 4, 6, 8 and 10. Ch 5, sl st in the first sc of Row 12.
(12 ch-5 loops, 6 per side; 1 ch-7 bottom tip loop)
These loops form the triangular mesh openings between the fans and the outline.
Round 2 (graduated outline): Sl st in the next ch-3 sp, ch 1, 2 sc in the same sp. Work (3 sc, ch 3, 3 sc) in the top ch-7 loop, then 2 sc in the next ch-3 sp.
Work down the first side, putting these stitches into the 6 ch-5 loops in order:
– 4 hdc in the first loop
– 5 dc in the next loop
– 5 tr in each of the next 2 loops
– 5 dc in the next loop
– 4 hdc in the last loop
Work (3 sc, ch 3, 3 sc) in the bottom ch-7 loop. Work up the second side with the same sequence: 4 hdc, 5 dc, 5 tr, 5 tr, 5 dc, 4 hdc. Join with a sl st to the first sc.
(72 sts and 2 ch-3 tip sps)
Each side has 28 sts in the loops (4 + 5 + 5 + 5 + 5 + 4). Counting from tip sp to tip sp, a side has 3 + 2 + 28 + 3 = 36 sts. Both sides together make 72.
The trebles in the middle loops stand taller than the hdc near the tips. That difference in height is what makes the lens shape.
Fasten off Color A on pink panels. On cream panels, simply continue with Color B.
Round 3 (cream edge, all panels): Join Color B in the bottom ch-3 tip sp. Ch 1, (sc, ch 2, sc) in the same sp. Sc in each st to the top tip sp, work (sc, ch 2, sc) in the top tip sp, then sc in each st to the end. Join to the first sc. Fasten off and leave a 6 in (15.2 cm) tail.
(76 sc: 72 worked 1 per st + 4 added at the tips; 2 ch-2 tip sps)
Per-side count: Each long side has 38 sc. That count includes the sc on each side of both tip ch-2 sps. Do not add tip stitches again.
Checkpoint: 4.25 in (10.8 cm) × 1.5 in (3.8 cm). The curved edge measures about 4.75 in (12.1 cm), which matches 38 sc at 8 sc per inch.
Make All Pieces
- Panels in Color A (pink): 3, made with Rows 1–12 and Rounds 1–2 in pink and Round 3 in cream
- Panels in Color B (cream): 3, made entirely in cream
- Caps and loop: Color B, made after joining
Layout (looking down from the top, going around the ball):
[P] – [C] – [P] – [C] – [P] – [C] – back to first [P]
 1     2     3     4     5     6
All top tips point up to the top cap, and all bottom tips meet at the bottom cap.
Joining
Block all six panels before joining (see below). It makes the stitches much easier to match.
Method: Hold two panels with WS together and RS facing out, so the seam ridge forms on the outside as a rib. Join Color B in the matching bottom tip ch-2 sps of both panels. Working through both loops of both layers, sc in each of the 38 matching stitches along one side, ending at the top tip ch-2 sps.
(38 sc per seam)
Stitch-to-stitch logic: Each side has exactly 38 sc, so every stitch has a partner. Nothing is skipped or added at the seam. Fasten off at the end of each seam.
Order:
1. Join Panel 1 to 2, then 2 to 3, and so on through 5 to 6. You now have a curved strip of six panels.
2. Slip the strip around the 2.75 in (7.0 cm) pink ball.
3. Close Seam 6 by joining Panel 6 to Panel 1 with the ball inside.
Tension: Keep the seam sc as loose as your panel stitches. A tight seam draws the panel tips in and makes the ball look ridged and lumpy.
Checkpoint: The joined ball measures 3 in (7.6 cm) across and 9.42 in (23.9 cm) around the middle. The tips should nearly meet at the top and bottom.
Border: Picot Ribs, Caps and Loop
Border gauge: 8 sc = 1 in (2.5 cm). That puts one picot about every 0.5 in (1.3 cm) along each seam.
Picot rib (each of the 6 seams): Join Color B at the bottom of the seam. Working into the tops of the 38 seam sc: sl st in the first sc, then sl st in each of the next 3 sc, picot in the next sc. Repeat from * 8 more times, then sl st in the last sc. Fasten off.
(38 sts worked: 1 + 9 × 4 + 1 = 38; 9 picots per seam, 54 picots in total)
Why the math works: The rib uses each seam sc exactly once. 1 + 36 + 1 = 38, so the 9 picots land evenly and no extra stitches build up at the tips.
Top cap: With Color B, ch 10 and sl st to form a ring.
– Round 1: Ch 1, 18 sc in the ring, then join. (18 sc)
– Place the cap over the top tips. Sl st each tip ch-2 sp to the cap at every 3rd sc. 18 ÷ 6 = 3, so the tips are evenly spaced.
Bottom cap: Ch 6 and sl st to form a ring.
– Round 1: Ch 1, 12 sc in the ring, then join. (12 sc)
– Attach the 6 bottom tips at every 2nd sc. 12 ÷ 6 = 2, so these are evenly spaced too.
Hanging loop: Join Color B in a top-cap sc halfway between two tips. Ch 70 and sl st in the cap sc directly opposite (9 sc away). Turn, then work 70 sc over the chain, one in each ch, and sl st to the cap. The cord loop hangs about 2.75 in (7.0 cm) above the cap.
Weave in all ends along the seam ribs.
Final Blocking
- Before joining, wet each panel and press out the excess water in a towel.
- Pin each panel flat to 4.25 in × 1.5 in (10.8 cm × 3.8 cm). Put one pin in each tip and four along each side at the widest points.
- Open every fan and mesh triangle with the tip of a pin. Let the panels dry completely.
- After assembly, brush or dab starch over the whole ball while it sits on the inner form.
- Smooth the ribs straight from pole to pole, and lift each picot with a pin.
- Hang the ornament by its loop to dry. Hang a small clip from the loop so it dries straight.
Final Quality-Control Checklist
- Each panel has 6 fans, 12 ch-5 mesh loops, and 76 sc in the edge round.
- Every long side has exactly 38 sc.
- Pink and cream panels alternate all the way around.
- Each seam has 38 sc and 9 picots.
- The top cap has 18 sc with 6 tips evenly attached, and the bottom cap has 12 sc with 6 tips.
- The ball measures 3 in (7.6 cm) across, or 3.25 in (8.3 cm) at the picots.
- The loop is centered and the ornament hangs straight.
- All ends are woven in and none show through the lace.
Troubleshooting
- The fans are lopsided: Check that the V-st sits in the center stitch (the 5th of 9 or the 6th of 11).
- The panel isn’t pointed enough: Use hdc, not dc, in the loops closest to the tips in Round 2.
- The panel is too wide in the middle: Your trebles are too tall. Pull up shorter loops, or try a smaller hook just for Round 2.
- The edge counts don’t match: Recount Round 2. It should have 36 sts per side between the tips.
- There are gaps at the poles: Pull the caps snug, or add a second sc round to the caps.
- The ball is too loose on the form: Re-starch it, or switch to a 3 in (7.6 cm) form.
Care
Dust the ornament gently with a soft brush. If it gets dirty, spot-clean it with cool water, then re-starch it on its form and let it dry completely before storing.
Final Notes
Here’s the measurement chain from start to finish:
- Matching the gauge (8 dc and 4 rows = 1 in / 2.5 cm) gives a 2.75 in (7.0 cm) fan strip.
- The outline brings the panel to 4.25 in × 1.5 in (10.8 cm × 3.8 cm), with 38 sc on each side.
- Six panels joined stitch for stitch make a ball 3 in (7.6 cm) across.
- The picot ribs bring it to 3.25 in (8.3 cm) at the widest point.
If each stage measures right, the next one will fit. Happy crocheting!