

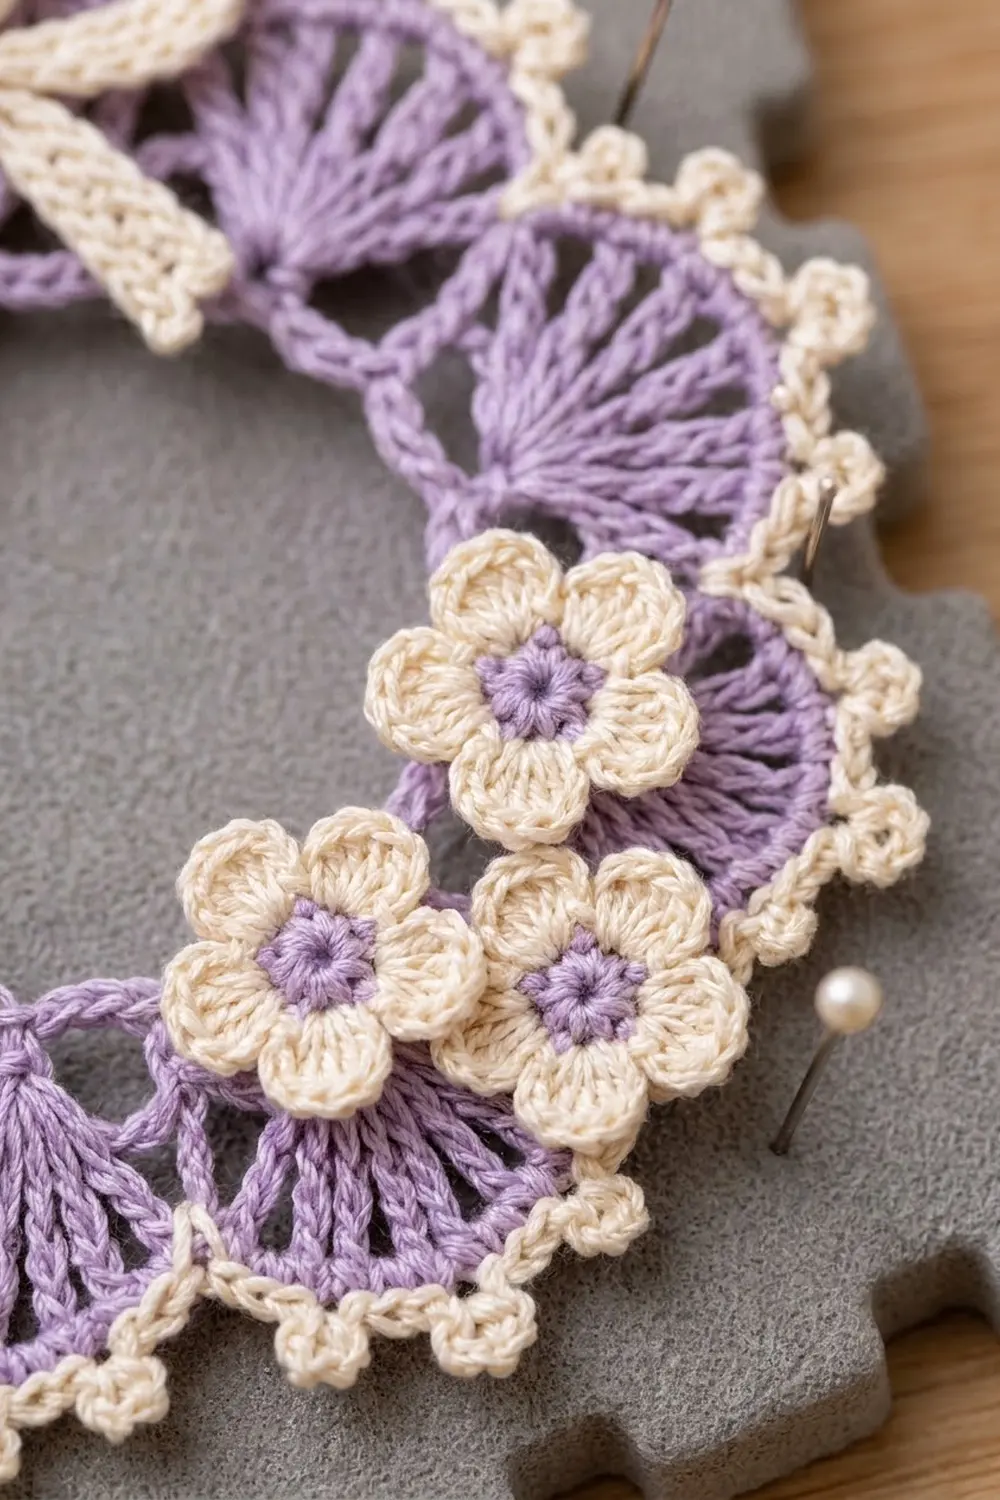
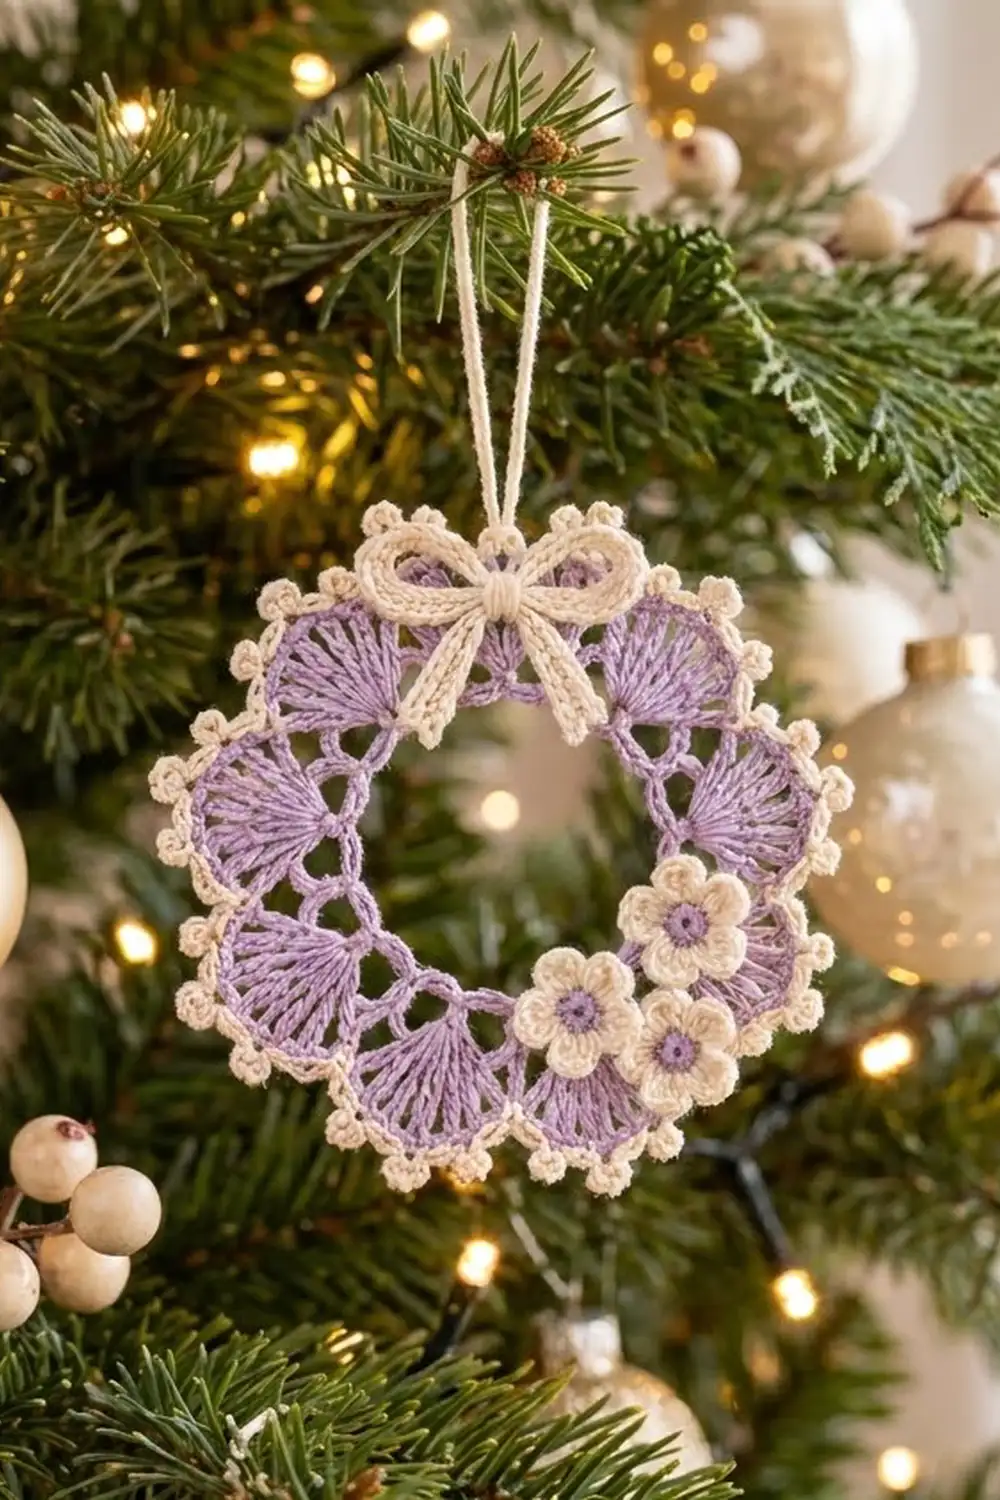
This small wreath uses soft lavender thread and has a cream picot edge, a tied cream bow, and three small cream flowers with lavender centers. It’s light and lacy and looks lovely on a tree, a window latch, or a wrapped gift.
The design is one round lace motif. A slim ring of single crochet forms the center opening, and two rounds of chain lattice go around it. Twelve fans of treble stitches then radiate outward. A round of chain arches caps the fans, and a cream round of tiny picots finishes the scalloped outer edge.
All instructions use US crochet terms. The finished wreath is 4 in (10.2 cm) across, or 5.25 in (13.3 cm) tall with the hanging loop. It fits easily in the palm of your hand.
You crochet the wreath in one piece, in the round. Then you add a cream hanging loop at the top, tie a slip-stitch cord into a bow, and sew three five-petal flowers in a small cluster at the lower right.
Finished Size and Construction
- Finished size: 4 in (10.2 cm) diameter; 5.25 in (13.3 cm) tall with loop
- Skill level: Intermediate (thread work, treble fans)
- Terminology: US crochet terms
- Yarn weight: Lace (0), size 10 crochet cotton thread
- Hook: 1.5 mm (US steel #8)
- Number of pieces: 1 wreath motif, plus 1 bow and 3 flowers sewn on as appliqués
- Layout: Single round motif. Bow at top center, flowers clustered at about 4 to 5 o’clock.
- Piece size: 4 in (10.2 cm) across
- Size before border: 3.75 in (9.5 cm) across
- Border depth: 0.125 in (0.3 cm) all around
- Center opening: 1.75 in (4.4 cm) across
Materials
Use a mercerized size 10 cotton thread. It holds its shape, shows the fan spokes clearly, and blocks crisply. Avoid fuzzy or very soft threads, because they blur the lattice and the picots.
- Lavender (A): 6 g, about 20 m, for the wreath body and flower centers
- Cream (B): 4 g, about 13 m, for the border, hanging loop, bow, and flower petals
These quantities include a margin of about 30% for a test piece and for weaving in ends. A standard ball of each color will make many ornaments.
Tools:
- 1.5 mm (US steel #8) hook
- Fine tapestry needle
- Small sharp scissors
- Blocking board or foam mat
- Rustproof pins
- Spray bottle and, if you like, light spray starch
- Stitch marker (optional, for the first fan)
Abbreviations (US Terms)
- ch – chain
- sl st – slip stitch
- sc – single crochet
- dc – double crochet
- tr – treble crochet
- sk – skip
- sp(s) – space(s)
- st(s) – stitch(es)
- picot – ch 3, sl st in 3rd ch from hook
Special stitch – Fan: Work (tr, [ch 1, tr] 6 times) all in one stitch. One fan has 7 tr and 6 ch-1 sps.
Gauge and Checkpoints
Exact gauge isn’t critical for an ornament, but it decides whether the fans lie flat. Make one wreath body (Rounds 1–5) as a test piece and measure it before adding any cream trim.
Base gauge: 10 sc = 1 in (2.5 cm).
Checkpoints (measured flat, unblocked):
- After Round 1: inner opening 1.75 in (4.4 cm); outer edge of ring 2 in (5.1 cm)
- After Round 3: 2.5 in (6.4 cm) across
- After Round 4: 3.5 in (8.9 cm) across
- After Round 5: 3.75 in (9.5 cm) across
- After Round 6 (border): 4 in (10.2 cm) across
If your piece is too big: Change to a 1.25 mm hook, or work your chains more snugly. Loose chains in Rounds 2 and 3 are the usual cause.
If your piece is too small, or the center puckers: Change to a 1.75 mm hook. If only the fans ruffle, use a 1.25 mm hook for Round 4 alone.
Thread tension tends to tighten as you relax into the work. If one test piece is close but not exact, make a second one before changing hooks.
Wreath Body
Work in lavender (A). Don’t turn at the end of rounds. The right side faces you throughout.
Round 1 (foundation ring): Ch 60. Without twisting, sl st in the first ch to form a ring. Ch 1, sc in each ch around, sl st in first sc to join. (60 sc: 60 ch worked 1 sc each, 0 added)
Lay the ring flat and check the opening. It should be 1.75 in (4.4 cm) across.
Round 2 (first lattice): Ch 1, sc in first sc, ch 5, sk 4 sc, sc in next sc; repeat from * 10 more times, ch 5, sk 4 sc, sl st in first sc to join. (12 sc and 12 ch-5 loops; 72 sts)*
Each repeat uses 5 sts of Round 1, so 12 × 5 = 60 sts, exactly the Round 1 count.
Round 3 (second lattice): Sl st in each of the next 3 ch to reach the center of the first ch-5 loop. Ch 1, sc in same loop, ch 6, sc in next ch-5 loop; repeat from * 10 more times, ch 6, sl st in first sc to join. (12 sc and 12 ch-6 loops; 84 sts)*
The sc of this round sit at the centers of the Round 2 loops. That offset creates the small diamond openings around the center.
Checkpoint: 2.5 in (6.4 cm) across.
Round 4 (fans): Sl st in each of the next 3 ch to reach the center of the first ch-6 loop. Ch 1, sc in same loop, ch 2, Fan in next sc, ch 2, sc in next ch-6 loop; repeat from * 10 more times, ch 2, Fan in next sc, ch 2, sl st in first sc to join. (12 Fans; 84 tr, 72 ch-1 sps, 12 sc, 24 ch-2 sps)*
Each fan grows from a single sc, so its spokes radiate from one point. The sc between fans anchors each pair apart and forms the small dips in the outline. Spread each fan with your fingers as you go, and place a marker in the first fan so the count is easy to check.
Checkpoint: 3.5 in (8.9 cm) across.
Round 5 (fan arches): Sl st in next 2 ch, sl st in next tr, sl st in first ch-1 sp of the first fan. Ch 1, sc in same sp, (ch 2, sc in next ch-1 sp) 5 times, ch 3, sc in first ch-1 sp of next fan; repeat from * 10 more times, (ch 2, sc in next ch-1 sp) 5 times, ch 3, sl st in first sc to join. Fasten off A. (72 sc, 60 ch-2 sps, 12 ch-3 sps; 72 sps total)*
Each fan gets 6 sc, 5 ch-2 sps, and 1 ch-3 sp. The ch-3 sp bridges the dip between two fans and passes over the sc and ch-2 sps of Round 4.
Checkpoint: 3.75 in (9.5 cm) across. Lay the piece on a table. The fans should sit flat and evenly spaced before you add the border.
Border
Work in cream (B). The border is a single trim round.
Border gauge: About 6 picots per 1 in (2.5 cm) along the outer edge.
Round 6 (picot trim): Join B with sl st in any ch-3 sp. Ch 1, (sc, picot, sc) in same sp, [(sc, picot, sc) in next ch-2 sp] 5 times, (sc, picot, sc) in next ch-3 sp; repeat from * 10 more times, [(sc, picot, sc) in next ch-2 sp] 5 times, sl st in first sc to join. Fasten off. (144 sc + 72 picots: 72 sps worked 2 sc each, plus 1 picot added per sp)*
Count per fan: Treat each fan as one “side.” It has 5 ch-2 sps + 1 ch-3 sp = 6 sps. Each space gets 2 sc and 1 picot, so one fan carries 12 sc and 6 picots. Twelve fans give 144 sc and 72 picots.
Why the math works: Round 5 has exactly 72 spaces, and every space takes the same group, so the picots are spaced evenly. The edge stays flat because 2 sc fills a ch-2 sp without stretching it. Every lavender arch gets one cream picot, which creates the beaded scalloped edge. The trim adds 0.125 in (0.3 cm) all around, so 3.75 in (9.5 cm) becomes 4 in (10.2 cm).
Hanging Loop
Choose the dip between two fans that will be the top of the wreath. With B, join with sl st in the picot above that dip. Ch 26, then sl st in the same picot. Ch 1, work 30 sc over the chain loop, and sl st in the base picot. Fasten off, leaving a 6 in (15.2 cm) tail. Weave the tail into the border.
The finished loop stands about 1.25 in (3.2 cm) tall. Covering it with sc makes it firm enough to hold its shape on a branch.
Bow
With B, ch 71. Sl st in the back bump of the 2nd ch from hook and in the back bump of each ch across. (70 sl sts) Fasten off, leaving a 6 in (15.2 cm) tail at one end.
The cord is about 5 in (12.7 cm) long. Tie it in a bow with two loops and two tails, each about 0.75 in (1.9 cm) long. The finished bow is about 1.75 in (4.4 cm) wide. Tighten the knot and even out the loops.
Center the bow over the base of the hanging loop. Use the tail to sew through the knot into the wreath. Then tack each bow loop flat to the two top fans with one hidden stitch, and tack each tail once so it rests on the fan below.
Flowers (Make 3)
Center: With A, make a magic ring. Ch 1, 5 sc in ring, sl st in first sc to join. Pull the ring tight and fasten off A. (5 sc)
Petals: Join B with sl st in any sc. (Ch 2, 3 dc, ch 2, sl st) in same sc, sl st in next sc; repeat from * 4 more times, working the last sl st into the joining st. Fasten off, leaving an 8 in (20.3 cm) tail. (5 petals)*
Each flower is about 0.75 in (1.9 cm) across. Weave in the lavender tail on the back so it doesn’t show through the cream petals.
Placement: Arrange the three flowers in a small triangle at about 4 to 5 o’clock on the wreath. Let them overlap the fans and the cream edge slightly. Sew each one down through its center and through the base of each petal so no petal lifts.
Final Blocking
- Weave in all remaining ends.
- Soak the wreath in cool water for 5 minutes. Roll it in a towel to press out water; don’t wring it.
- Lay it right side up on the board. Pin the center opening into a circle 1.75 in (4.4 cm) across.
- Pin the tip of each fan so the wreath measures 4 in (10.2 cm) across. Check the opposite fans to keep the circle true.
- Open each picot with the tip of a pin.
- Lift the flowers and bow loops gently with your fingers so they stay rounded.
- Mist with light starch if you want a stiffer ornament.
- Let it dry completely, at least 6 hours, before removing the pins.
If you prefer, you can block the wreath before sewing on the bow and flowers. Just steam the appliqués lightly afterward.
Final Quality-Control Checklist
- 12 fans, each with 7 tr
- 72 cream picots around the outer edge
- Wreath measures 4 in (10.2 cm) across
- Center opening measures 1.75 in (4.4 cm) across
- Loop is centered at the top and stands about 1.25 in (3.2 cm) tall
- Bow covers the loop base and is tacked flat
- Three flowers sit together at the lower right
- All ends are woven in securely on the back
Troubleshooting
Fans ruffle or cup: The trebles are too long for the chain loops. Use a smaller hook for Round 4 only.
Wreath curls toward the center: Your chains in Rounds 2 and 3 are too tight. Use a larger hook for those rounds.
Fan count is off: Count the Round 3 sc before you start Round 4. There should be exactly 12.
Picots disappear: Pull the sl st of each picot snug so the ch-3 stands up as a small bead.
Twisted ring: Check the foundation chain before you join it. If Round 1 ends up twisted, take it back to the chain and rejoin.
Bow droops: Add a second hidden tack near the end of each bow loop.
Care
Hand wash in cool water with mild soap, then pin flat to dry. Store the ornament flat or hanging so nothing presses on the fans.
Final Notes
Here’s the full measurement chain. The 60-sc ring gives a 1.75 in (4.4 cm) opening. The two lattice rounds bring the wreath to 2.5 in (6.4 cm), the twelve fans to 3.5 in (8.9 cm), and the arches to 3.75 in (9.5 cm). The picot border finishes it at 4 in (10.2 cm). Check each stage as you go. Once one wreath comes out right, make a few more in soft shades for a matching set of tree ornaments.
Happy crocheting!