

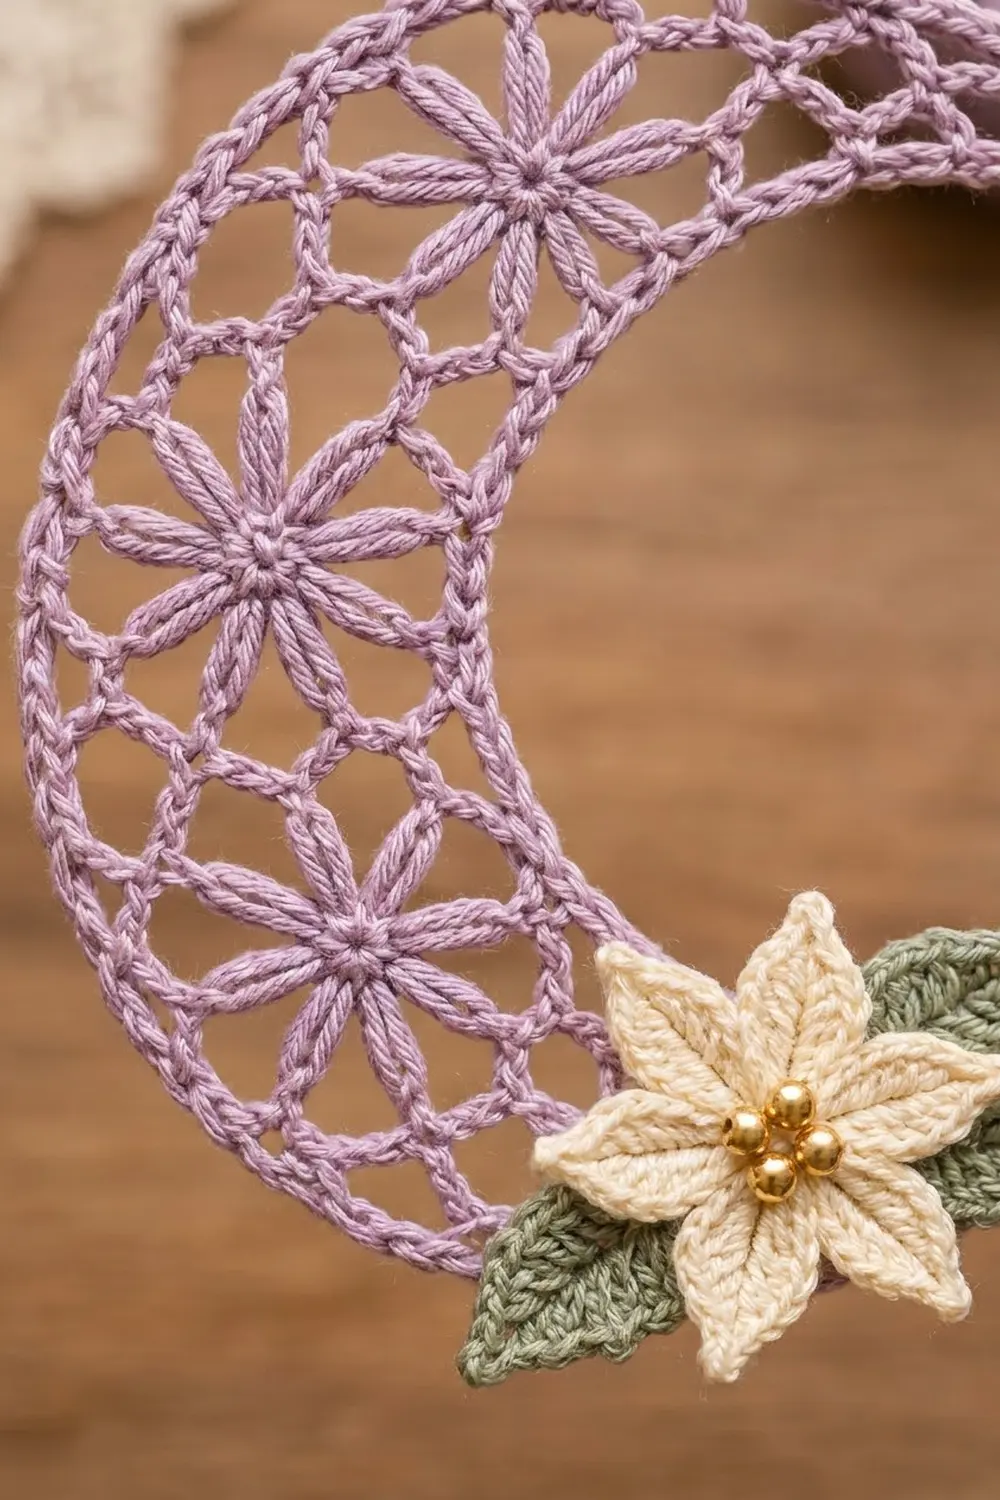
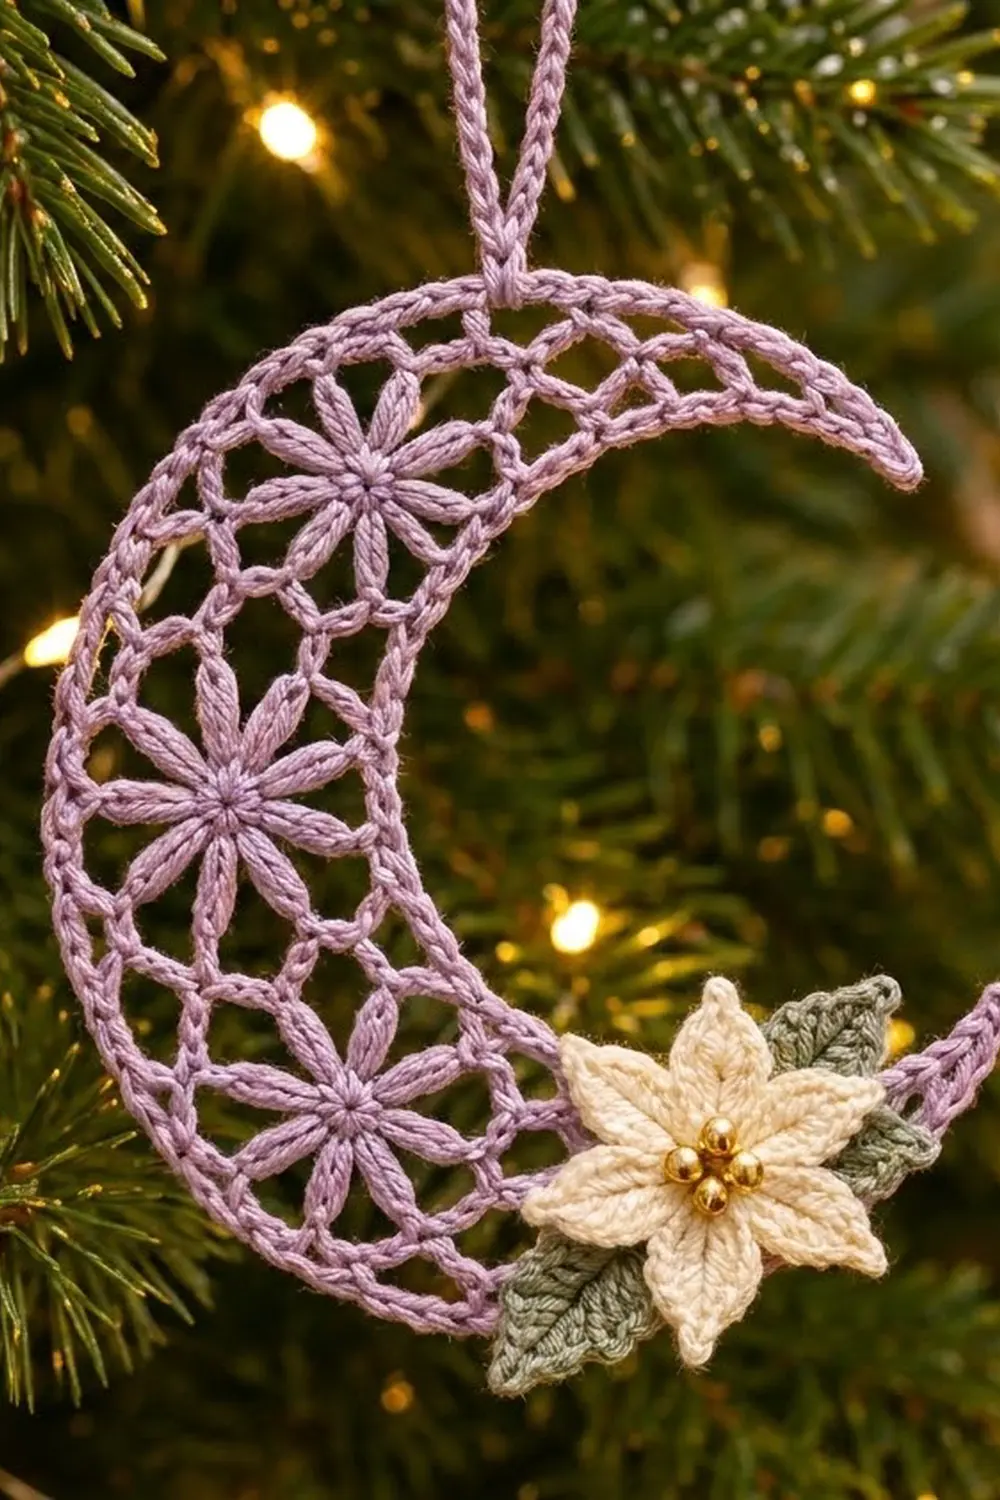
The Lilac Moonflower Crescent is a delicate lace ornament for the tree, a window, or a gift tag. A slim crescent moon is filled with open mesh and a row of eight-rayed flower stars. A small cream flower with gold bead stamens and two sage leaves sits near the lower tip.
The palette is soft and wintry: lilac for the moon, cream for the flower, sage green for the leaves, and a touch of gold at the center. Fine cotton thread keeps the lace crisp, and a rope-like reverse single crochet edge gives the outline a polished look.
This pattern uses US crochet terms. The finished crescent is 5 in (12.7 cm) tall from tip to tip and 3.75 in (9.5 cm) wide. The hanging loop adds 1.25 in (3.2 cm).
You work the moon flat in six rows, starting at the inner curve and moving outward. Rows 3 and 4 build the flower stars, and Rows 5 and 6 add length to the outer curve so the piece bends into a crescent. Two edging rounds go all the way around and form the hanging loop. Then you add the flower and leaves.
Finished Size and Construction
- Finished size: 5 in (12.7 cm) tall tip to tip × 3.75 in (9.5 cm) wide
- Band width: 1.5 in (3.8 cm) at the widest point
- Hanging loop: 1.25 in (3.2 cm) tall
- Skill level: Intermediate
- Terminology: US
- Yarn weight: Size 10 cotton crochet thread (Lace, 0)
- Hook: 1.5 mm (US steel 8)
- Number of pieces: 1 crescent body, plus 1 flower and 2 leaves sewn on
- Layout: Single ornament with the appliqué cluster near the lower tip
- Size before border: 4.75 in (12.1 cm) tall × 3.5 in (8.9 cm) wide, band 1.25 in (3.2 cm)
- Border depth: about 1/8 in (0.3 cm) on every edge
Materials
Choose mercerized cotton thread in size 10. It holds a crisp shape after blocking and shows the stitch definition. Avoid fuzzy or stretchy fibers because the mesh will lose its shape.
- Lilac: 10 g / 52 m (moon body, edging, hanging loop)
- Cream: 3 g / 16 m (flower)
- Sage green: 2 g / 10 m (leaves)
Tools:
- 1.5 mm (US steel 8) crochet hook
- Fine tapestry needle
- 3 gold seed beads, 4 mm
- Beading needle and matching cream sewing thread
- Rustproof pins and a foam blocking mat
- Spray starch or a diluted fabric stiffener
- Scissors and a flexible tape measure
All quantities include a margin of about 20 percent for your gauge check and weaving in ends.
Abbreviations (US Terms)
- ch – chain
- sl st – slip stitch
- sc – single crochet
- hdc – half double crochet
- dc – double crochet
- tr – treble crochet
- rev sc – reverse single crochet (crab stitch)
- sk – skip
- sp(s) – space(s)
- st(s) – stitch(es)
Special stitches
- Half-Star (HS): Worked over 2 ch-3 sps. Yo twice, insert hook in sp, pull up a loop, [yo, draw through 2 loops] twice. Work this twice in the first sp and twice in the next sp. You will have 5 loops on the hook. Yo and draw through all 5 loops. These 4 legs form the lower half of a flower star.
- Star Fan (SF): (Tr, ch 1) 3 times, then tr, all in the top of the HS. That is 4 tr and 3 ch-1 sps. They fan upward to form the upper half of the star.
- Rev sc: Work single crochet from left to right (right-handed), inserting the hook into the next stitch to the right.
Gauge and Checkpoints
Gauge: 10 sc = 1 in (2.5 cm) in size 10 thread with a 1.5 mm hook.
This ornament is your swatch. Work Row 1, then measure before going on.
- After Row 1: The strip of 61 sc measures 6.1 in (15.5 cm).
- After Row 4: Each finished flower star measures about 0.8 in (2.0 cm) across.
- After Row 6: The outer edge measures 9.8 in (24.9 cm) along the curve, and the piece starts to curl into a crescent by itself.
- After the border: Pinned flat, the crescent measures 5 in (12.7 cm) tip to tip.
If Row 1 is longer than 6.1 in (15.5 cm), go down to a 1.25 mm hook. If it is shorter, go up to a 1.75 mm hook. Small gauge differences only change the size slightly, but the stitch counts must stay exactly the same so the curve forms correctly.
Crescent Body
Use lilac. Turn at the end of every row. The turning ch 1 does not count as a stitch.
Row 1 (inner curve): Ch 62. Sc in 2nd ch from hook and in each ch across. (61 sc)
Row 2 (base mesh): Ch 1, turn. Sc in first sc, [ch 3, sk 2 sc, sc in next sc] 4 times, [ch 3, sk 2 sc, dc in next sc] 12 times, [ch 3, sk 2 sc, sc in next sc] 4 times. (21 sts: 9 sc and 12 dc; 20 ch-3 sps)
The dc stitches in the middle raise the center of the band, and the sc at each end keep the tips low and narrow.
Row 3 (lower half-stars): Ch 1, turn. Sc in first sc, [ch 3, sc in next ch-3 sp] 3 times, ch 4, HS over next 2 ch-3 sps, [ch 4, sc in next ch-3 sp, ch 4, HS over next 2 ch-3 sps] 4 times, ch 4, sc in next ch-3 sp, [ch 3, sc in next ch-3 sp] 2 times, ch 3, sc in last st. (17 sts: 12 sc and 5 HS; 16 sps: 6 ch-3 and 10 ch-4)
Check the sp usage: 3 sps + 2 for the first HS + 12 for the repeats + 3 at the end = all 20 sps of Row 2.
Row 4 (upper half-stars): Ch 1, turn. Sc in first sc, [ch 3, sc in next ch-3 sp] 3 times, ch 3, sk ch-4 sp, SF in top of next HS, [ch 3, sk ch-4 sp, dc in next sc, ch 3, sk ch-4 sp, SF in top of next HS] 4 times, ch 3, sk ch-4 sp, [sc in next ch-3 sp, ch 3] 3 times, sc in last sc. (5 SF, 4 dc, 8 sc; 16 ch-3 sps)
Each HS and the SF on top of it now make one complete eight-rayed flower, with 4 rays below and 4 above. You should see 5 flowers in a row across the middle of the band.
Row 5 (outer mesh): Ch 1, turn. Sc in first sc, [ch 3, sc in next ch-3 sp] 4 times, [ch 3, sc in next ch-1 sp of SF] 3 times, [ch 3, sc in next ch-3 sp] 2 times; repeat from * 3 more times, [ch 3, sc in next ch-1 sp of SF] 3 times, [ch 3, sc in next ch-3 sp] 4 times, ch 3, sc in last sc. (33 sc; 32 ch-3 sps)*
This is the growth row. The flower zones go from 1 sp per flower to 3 sps per flower. The tips do not change, so only the outer middle gets longer, and that pulls the band into a crescent.
Row 6 (outer edge): Ch 1, turn. Sc in first sc, 3 sc in each ch-3 sp across, sc in last sc. (98 sc: 1 + 96 + 1)
Do not fasten off. The tip where Row 6 ends is the lower tip.
Border
Border gauge: Keep the same gauge of 10 sc = 1 in (2.5 cm). On the outer edge, work 1 border st into each Row 6 sc. On the inner edge, work 1 border st into each foundation ch, so neither curve is stretched or bunched.
Rnd 1 (sc edging): Do not turn. Rotate to work along the row ends of the lower tip.
- Lower tip: Work 2 sc, ch 2, 2 sc, spacing them evenly across the 6 row ends. (4 sc, 1 ch-2 point)
- Inner edge: Sc in the free loop of each foundation ch. (61 sc)
- Upper tip: Work 2 sc, ch 2, 2 sc evenly across the 6 row ends. (4 sc, 1 ch-2 point)
- Outer edge: Sc in each Row 6 sc. (98 sc) After the 20th sc of this edge, counted from the upper tip, ch 30 and sl st into the same 20th sc to form the hanging loop. Then continue in the 21st sc.
Join with sl st to the first sc. Total: 167 sc (4 + 61 + 4 + 98), 2 ch-2 points, 1 ch-30 loop.
Rnd 2 (rope edge): Ch 1, do not turn. Rev sc in each sc around, and work 2 rev sc in each ch-2 point. When you reach the hanging loop, work 45 sc firmly into the ch-30 loop, then continue in rev sc. Join with sl st and fasten off.
- Lower tip: 4 + 2 = 6 rev sc
- Inner edge: 61 rev sc
- Upper tip: 4 + 2 = 6 rev sc
- Outer edge: 98 rev sc
- Hanging loop: 45 sc
Total: 171 rev sc + 45 sc on the loop.
Why the math works: The inner edge has 61 sts because Row 1 has 61 sc. The outer edge has 98 sts because Row 6 has 1 + (32 × 3) + 1 = 98. The difference between the two edges, 98 − 61 = 37 sts or 3.7 in (9.4 cm), makes the curve. You only add sts at the two ch-2 points, which keeps the tips sharp without ruffling. Packing 45 sc onto 30 ch fills the loop solidly and gives it the firm, corded look.
Flower Appliqué
Use cream.
Rnd 1: Ch 4, sl st to form a ring. Ch 1, 10 sc in ring, join. (10 sc)
Rnd 2: Ch 1, 2 sc in each sc, join. (20 sc)
Rnd 3: Sk 1 sc, (hdc, dc, tr, ch 3, sl st in 3rd ch from hook, tr, dc, hdc) in next sc, sk 1 sc, sl st in next sc; repeat from * 4 more times. (5 pointed petals, each using 4 sc; 5 × 4 = 20)*
Fasten off and leave a 10 in (25.4 cm) tail. The flower measures about 1.5 in (3.8 cm) across. The ch-3 picot at the top of each petal makes the sharp point.
Leaves (Make 2)
Use sage green.
Ch 10. Starting in the 2nd ch from hook, sc, hdc, dc in each of next 3 ch, hdc, sc, sl st in next ch. (8 sts) Work (sl st, ch 2, sl st) in the last ch for the leaf tip. Rotate and work along the other side of the foundation ch: sl st, sc, hdc, dc in each of next 3 ch, hdc, sc. (8 sts) Join with sl st to the first sc. Fasten off and leave a tail.
Each leaf is about 0.9 in (2.3 cm) long. The foundation chain makes a center vein down the middle.
Assembly
- Sew the 3 gold beads to the center of the flower in a small triangle.
- Sew one leaf behind the flower, angled down and to the left. Sew the second leaf behind the flower, angled up and to the right.
- Place the cluster on the lower part of the crescent, about 1.25 in (3.2 cm) from the lower tip, so it slightly overlaps the inner edge.
- Stitch through the flower center and each leaf base into the mesh. Keep the stitches small and hidden.
Final Blocking
- Weave in all ends along the solid edging, not through the open mesh.
- Wet the crescent, roll it in a towel, and press out the excess water.
- Lay it right side up on the blocking mat. Leave the appliqué cluster unstarched.
- Pin the outer curve into a smooth arc, with about 12 pins evenly spaced.
- Pin each ch-2 point outward to sharpen the tips. Check that the tips are 5 in (12.7 cm) apart.
- Shape each flower star round with your fingertip and open the mesh evenly.
- Spray with starch or dab with stiffener. Let it dry completely, then unpin.
Final Quality-Control Checklist
- Five complete eight-rayed flowers sit across the widest part of the band.
- The inner edge has 61 sts, the outer edge has 98 sts, and each tip has 6 sts.
- Both tips are pointed and are 5 in (12.7 cm) apart.
- The band measures 1.5 in (3.8 cm) at its widest.
- The hanging loop is fully covered with 45 sc and stands 1.25 in (3.2 cm) tall.
- The flower cluster is secure and there are no loose ends.
Troubleshooting
- Crescent stays straight: Recount Row 5. You should have 33 sc and 32 sps. Missing sps over the SFs is the most common cause.
- Outer edge ruffles: Your Row 6 is too loose. Re-work it with a smaller hook.
- Flower rays look uneven: Pull up each HS leg to the same height before you close the cluster.
- Tips are blunt: Pin the ch-2 points firmly during blocking and add a little more stiffener.
- Hanging loop twists: Pack the 45 sc evenly, and steam the loop flat while it is pinned straight.
- Mesh looks crowded: Your gauge is tight. Go up 0.25 mm and re-measure Row 1.
Care
Hand wash in cool water with mild soap, press dry in a towel, and re-block. Store the ornament flat in tissue so the points do not bend.
Final Notes
Here is the measurement chain to follow. Row 1 gives 61 sc and 6.1 in (15.5 cm) for the inner curve. Row 5 increases to 32 sps, and Row 6 gives 98 sc and 9.8 in (24.9 cm) for the outer curve. The border adds about 1/8 in (0.3 cm) all around. The finished moon measures 5 in (12.7 cm) tip to tip and 3.75 in (9.5 cm) wide. If you check gauge at Row 1 and recount Rows 5 and 6, the crescent will shape itself, and blocking will do the rest. Make one for each branch, or tie one onto a winter gift.
Happy crocheting!