

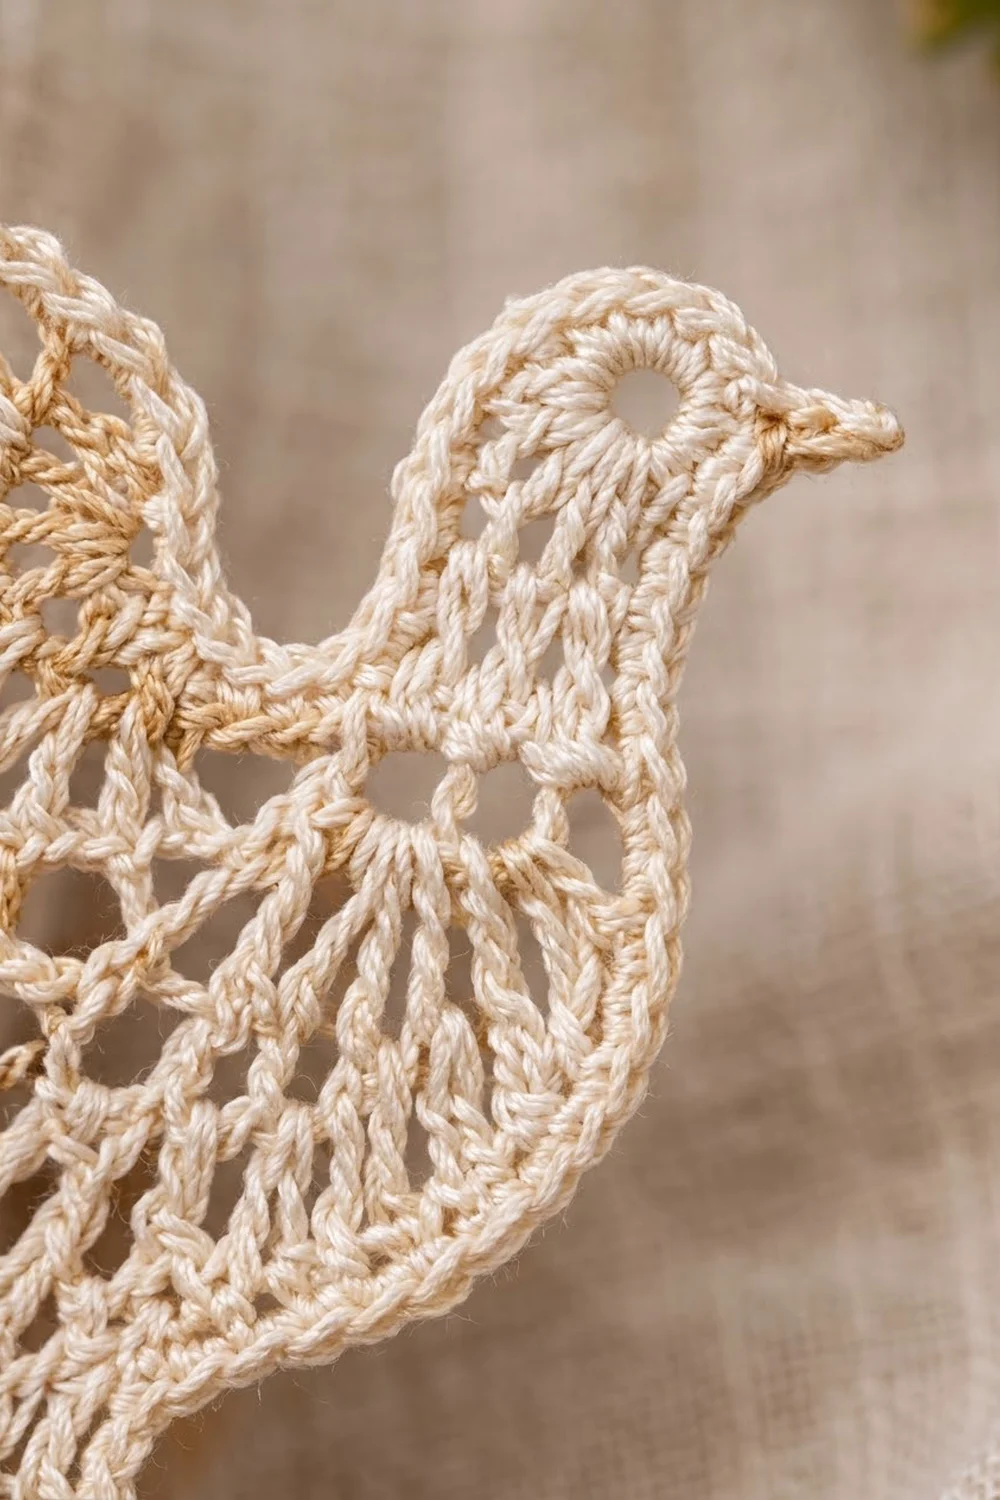
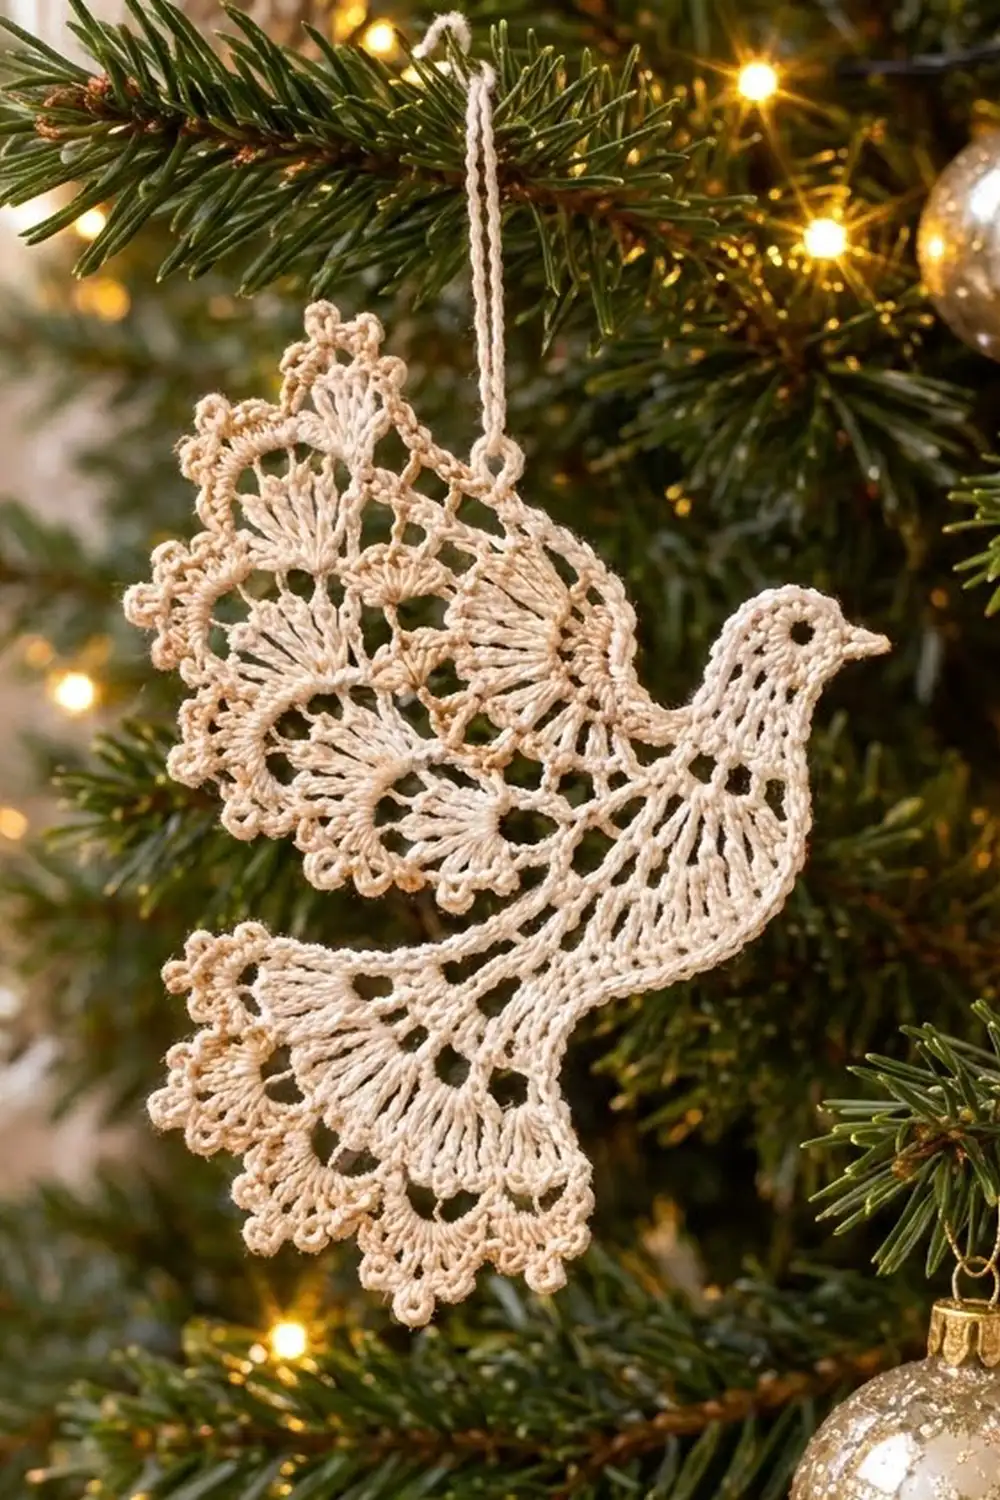
This lacy dove ornament is worked in fine cotton thread. It has a solid little body and a raised head with an open eyelet eye. A tall wing made of two tiers of fan shells rises from the back, and a fanned tail hangs below the body. A soft beige picot edging outlines the whole bird and gives the scallops their crisp look.
The colors are calm: ivory for the bird and a warm light beige for the edging. Hang it on a tree, tie it to a gift or pin it in a window. Several doves look lovely together, but this pattern makes one single ornament.
All instructions use US crochet terms. The finished dove measures 4.5 in wide x 4.75 in tall (11.4 cm x 12.1 cm), plus a 1.25 in (3.2 cm) hanging loop.
The construction is easy to follow. You crochet the body in rows, then work the head in short rows over one end. The wing grows up from the back edge, and the tail grows down from the foundation chain. One round of beige edging goes all the way around and also forms the beak. A twisted hanging loop finishes the piece.
Finished Size and Construction
- Finished size: 4.5 in wide x 4.75 in tall (11.4 cm x 12.1 cm), not counting the loop
- Skill level: Intermediate
- Terminology: US
- Yarn weight: Size 10 crochet cotton thread (Lace, weight 0)
- Hook: 1.5 mm (US steel 8)
- Number of pieces: 1
- Layout: Single motif, no joining
- Piece size before edging: 4.25 in wide x 4.5 in tall (10.8 cm x 11.4 cm)
- Edging depth: 1/8 in (0.3 cm) on every side
- Hanging loop: 1.25 in (3.2 cm)
Materials
Choose a mercerized size 10 cotton thread. It holds starch well and shows each stitch clearly. Avoid fuzzy or very soft thread, because the fans will not keep their shape.
- Color A, Ivory: 8 g, about 40 m (44 yd), for the body, head, wing, tail and loop
- Color B, Light Beige: 4 g, about 20 m (22 yd), for the edging
These amounts include a small margin for a gauge test and for weaving in ends.
Tools:
– 1.5 mm (US steel 8) steel hook
– Fine tapestry needle
– 2 stitch markers
– Blocking board and rustproof pins
– Fabric stiffener or spray starch
– Small scissors and a ruler
Abbreviations (US Terms)
- ch: chain
- sl st: slip stitch
- sc: single crochet
- hdc: half double crochet
- dc: double crochet
- tr: treble crochet
- st(s): stitch(es)
- sp(s): space(s)
- sk: skip
- tch: turning chain
- rep: repeat
- RS / WS: right side / wrong side
Special stitches:
– Picot: Ch 3, sl st in 3rd ch from hook.
– Small fan: (Dc, ch 1) 4 times, then dc, all in the same loop. Each small fan has 5 dc and 4 ch-1 sps.
– Large fan: (Dc, ch 1) 6 times, then dc, all in the same loop. Each large fan has 7 dc and 6 ch-1 sps.
Gauge and Checkpoints
Gauge: 10 dc and 4 dc rows = 1 in (2.5 cm) with a 1.5 mm hook, before blocking.
The body is your gauge test. Work Body Row 1 and measure it before you go on.
Checkpoints:
– After Body Row 1: 3 in (7.6 cm) long.
– After Body Row 3: 0.75 in (1.9 cm) tall.
– After Head Row 6: 1.5 in (3.8 cm) tall at the head end, measured from the foundation chain.
– After Wing Row 4: the wing rises 1.25 in (3.2 cm) above the back.
– After Wing Row 7: the wing rises 2.25 in (5.7 cm) above the back.
– After Tail Row 4: the tail hangs 0.75 in (1.9 cm) below the belly.
– After Tail Row 7: the tail hangs 1.5 in (3.8 cm) below the belly.
– Before edging: 4.25 in x 4.5 in (10.8 cm x 11.4 cm).
If Body Row 1 is longer than 3 in (7.6 cm), change to a 1.25 mm hook. If it is shorter, try a 1.75 mm hook. Get the gauge right now, because every later section is measured from this row.
Body
With Color A, ch 32.
Row 1 (RS): Dc in 4th ch from hook (the skipped chs count as the first dc) and in each ch across. 30 dc. Place a marker in the last st. This end is the head end.
Row 2 (WS): Ch 3 (counts as dc throughout), turn. Dc in each st across, ending with dc in top of tch. 30 dc.
Row 3 (RS): Ch 3, turn. Dc in each st across. 30 dc. You finish at the head end. Do not fasten off.
The body is now a small strip 3 in x 0.75 in (7.6 cm x 1.9 cm).
Head
You work the head over the first 9 sts at the head end of Row 3.
Row 4 (WS): Ch 3, turn. Dc in st at base of ch (increase), dc in next 8 sts. 10 dc. Leave the other 21 sts of Row 3 unworked for the wing.
Row 5 (RS): Ch 3, turn. Dc in next 5 sts, ch 1, sk next st (eye), dc in next 2 sts, dc in top of tch. 9 dc and 1 ch-1 sp (10 sts).
Row 6 (WS): Ch 1, turn. Sc in first st, hdc in next st, dc in next st, dc in ch-1 sp, dc in next 3 sts, hdc in next 2 sts, sl st in top of tch. 10 sts.
The stitches step up from sc to hdc to dc and back down, which rounds the crown. The ch-1 sp stays open as the eyelet eye. Fasten off.
Wing
You work the wing upward from the 21 unworked sts along the back of Row 3.
Row 1: With RS facing, join Color A in the first unworked st next to the head. Ch 1, sc in same st, ch 5, sk 3 sts, sc in next st; rep from * 4 more times. The last sc goes in the top of the beginning ch-3 at the tail end. 6 sc and 5 ch-5 loops (21 sts used).
Row 2: Ch 3, turn. 8 dc in next ch-5 loop, dc in next sc; rep from * 4 more times. 46 dc (1 + 5 x 9).
Row 3: Ch 1, turn. Sc in first dc, ch 5, sk 4 dc, sc in next dc; rep from * 8 more times. 10 sc and 9 ch-5 loops (1 + 9 x 5 = 46 sts used).
Row 4: Ch 1, turn. Sc in first sc, small fan in next loop, sc in next loop; rep from * 3 more times, small fan in last loop, sc in last sc. 5 small fans and 6 sc. The fans sit in loops 1, 3, 5, 7 and 9.
Row 5: Ch 6 (counts as tr and ch 2), turn. Sc in center (3rd) dc of next fan, ch 2, tr in next sc; rep from * 4 more times, with ch 2 between repeats. 6 tr, 5 sc and 10 ch-2 sps.
Row 6: Ch 1, turn. Sc in first tr, ch 7, sk (ch-2 sp, sc, ch-2 sp), sc in next tr; rep from * 4 more times. The last sc goes in the 4th ch of the ch-6. 6 sc and 5 ch-7 loops.
Row 7: Ch 1, turn. Sc in first sc, large fan in next loop, sc in next sc; rep from * 4 more times. 5 large fans and 6 sc. Fasten off.
Each large fan sits right above a small fan, so the wing shows two stacked tiers of shells.
Tail
The tail hangs down from the other side of the foundation chain. There are 30 foundation sts: the base of the beginning ch-3 plus 29 free loops.
Row 1: Turn the body so the foundation chain is on top. With RS facing, join Color A at the base of the beginning ch-3 at the tail end. Ch 1, sc in same place, ch 4, sk 2 loops, sc in next loop; rep from * 3 more times. 5 sc and 4 ch-4 loops (13 sts used: 1 + 4 x 3).
Row 2: Ch 3, turn. 6 dc in next ch-4 loop, dc in next sc; rep from * 3 more times. 29 dc (1 + 4 x 7).
Row 3: Ch 1, turn. Sc in first dc, ch 4, sk 3 dc, sc in next dc; rep from * 6 more times. 8 sc and 7 ch-4 loops (1 + 7 x 4 = 29 sts used).
Row 4: Ch 1, turn. Sc in first sc, small fan in next loop, sc in next loop; rep from * 2 more times, small fan in last loop, sc in last sc. 4 small fans and 5 sc.
Row 5: Ch 6 (counts as tr and ch 2), turn. Sc in center dc of next fan, ch 2, tr in next sc; rep from * 3 more times, with ch 2 between repeats. 5 tr, 4 sc and 8 ch-2 sps.
Row 6: Ch 1, turn. Sc in first tr, ch 7, sk (ch-2 sp, sc, ch-2 sp), sc in next tr; rep from * 3 more times. 5 sc and 4 ch-7 loops.
Row 7: Ch 1, turn. Sc in first sc, large fan in next loop, sc in next sc; rep from * 3 more times. 4 large fans and 5 sc. Fasten off.
Seventeen foundation sts stay free between the tail and the head end. They become the belly.
Edging
Edging gauge: about 8 sc per 1 in (2.5 cm) along row ends, plus a picot in every fan space.
Join Color B at the back of the neck, in the side of Wing Row 1 next to the head. Work 1 round in this order:
- Wing, neck side: 15 sc up the row ends (2 sc in each of Rows 1, 2, 3, 4, 6 and 7, and 3 sc in Row 5).
- Wing top: Sl st in first sc of Row 7, (sc, picot, sc) in each of next 6 ch-1 sps, sl st in next sc; rep from * 4 more times. 60 sc, 30 picots, 6 sl st.
- Wing, tail side: 15 sc down the row ends, as in step 1.
- Body tail end: 2 sc in the side of each of Body Rows 3, 2 and 1. 6 sc.
- Tail, outer side: 15 sc down the row ends, as in step 1.
- Tail bottom: Sl st in first sc of Row 7, (sc, picot, sc) in each of next 6 ch-1 sps, sl st in next sc; rep from * 3 more times. 48 sc, 24 picots, 5 sl st.
- Tail, inner side: 15 sc up the row ends.
- Belly: Sc in each of the 17 free foundation loops. 17 sc.
- Head front: 2 sc in the side of each of Body Rows 1, 2 and 3 and Head Rows 4 and 5. 10 sc.
- Beak: Ch 4, sl st in 2nd ch from hook, sc in next ch, hdc in next ch. This makes a small pointed beak.
- Head top: Sc in each of the 10 sts of Head Row 6. 10 sc.
- Back of head: 2 sc in the side of each of Head Rows 5 and 4. 4 sc.
Join with sl st to first sc. Round total: 215 sc, 54 picots and 11 sl st, plus the beak. Fasten off.
Why the math works: A dc row is about 0.25 in (0.6 cm) tall, so 2 sc per row end gives 8 sc per inch, and the edge lies flat without rippling. The tr row is taller, so it gets 3 sc. On the fans, 2 sc in each ch-1 sp adds just enough length for the curves to flare, and the picots form the scallops.
Hanging Loop
Join Color A in the 3rd picot of the center (3rd) wing fan. Ch 30, then sl st in the same picot. Sl st in each ch around to make a firm, twisted cord. Fasten off and weave in all ends.
Final Blocking
- Wet the dove and roll it in a towel to remove extra water.
- Lay it RS up on a blocking board.
- Pin the beak, the head and the tail end of the body first.
- Pin the wing to 2.25 in (5.7 cm) above the back and the tail to 1.5 in (3.8 cm) below the belly.
- Pin each picot outward so every fan opens evenly.
- Check the total size: 4.5 in x 4.75 in (11.4 cm x 12.1 cm).
- Spray with stiffener or starch, and let it dry completely before you unpin it.
Final Quality-Control Checklist
- Body Row 3 has 30 dc.
- The eyelet eye is open and round.
- Wing Row 7 has 5 large fans, and Tail Row 7 has 4 large fans.
- Each large fan sits above a small fan.
- The edging has 54 picots in total.
- The beak points forward in line with the body.
- The finished size is 4.5 in x 4.75 in (11.4 cm x 12.1 cm).
- The loop is secure and about 1.25 in (3.2 cm) tall.
Troubleshooting
- The wing cups or curls: Your chains are too tight. Loosen the ch-5 and ch-7 loops.
- The fans look crowded: Check that each Row 5 sc goes in the center dc of its fan.
- The edging ripples along the sides: Use 2 sc per dc row end, not 3.
- The edging pulls in on the fans: Work the picots loosely and keep 2 sc in every ch-1 sp.
- The eye closes up: Don’t work the Row 6 dc into the ch-1 sp too tightly.
- The dove hangs crooked: Move the loop one picot toward the heavier side.
Care
Hand wash in cool water with mild soap, then block flat again. Store flat, or hang away from damp and direct sun.
Final Notes
Everything follows from one measurement. Body Row 1 at 3 in (7.6 cm) sets the 0.75 in (1.9 cm) body. The wing rises 2.25 in (5.7 cm) and the tail drops 1.5 in (3.8 cm), which gives 4.25 in x 4.5 in (10.8 cm x 11.4 cm) before edging. The 1/8 in (0.3 cm) edging brings the dove to 4.5 in x 4.75 in (11.4 cm x 12.1 cm).
Happy crocheting!