

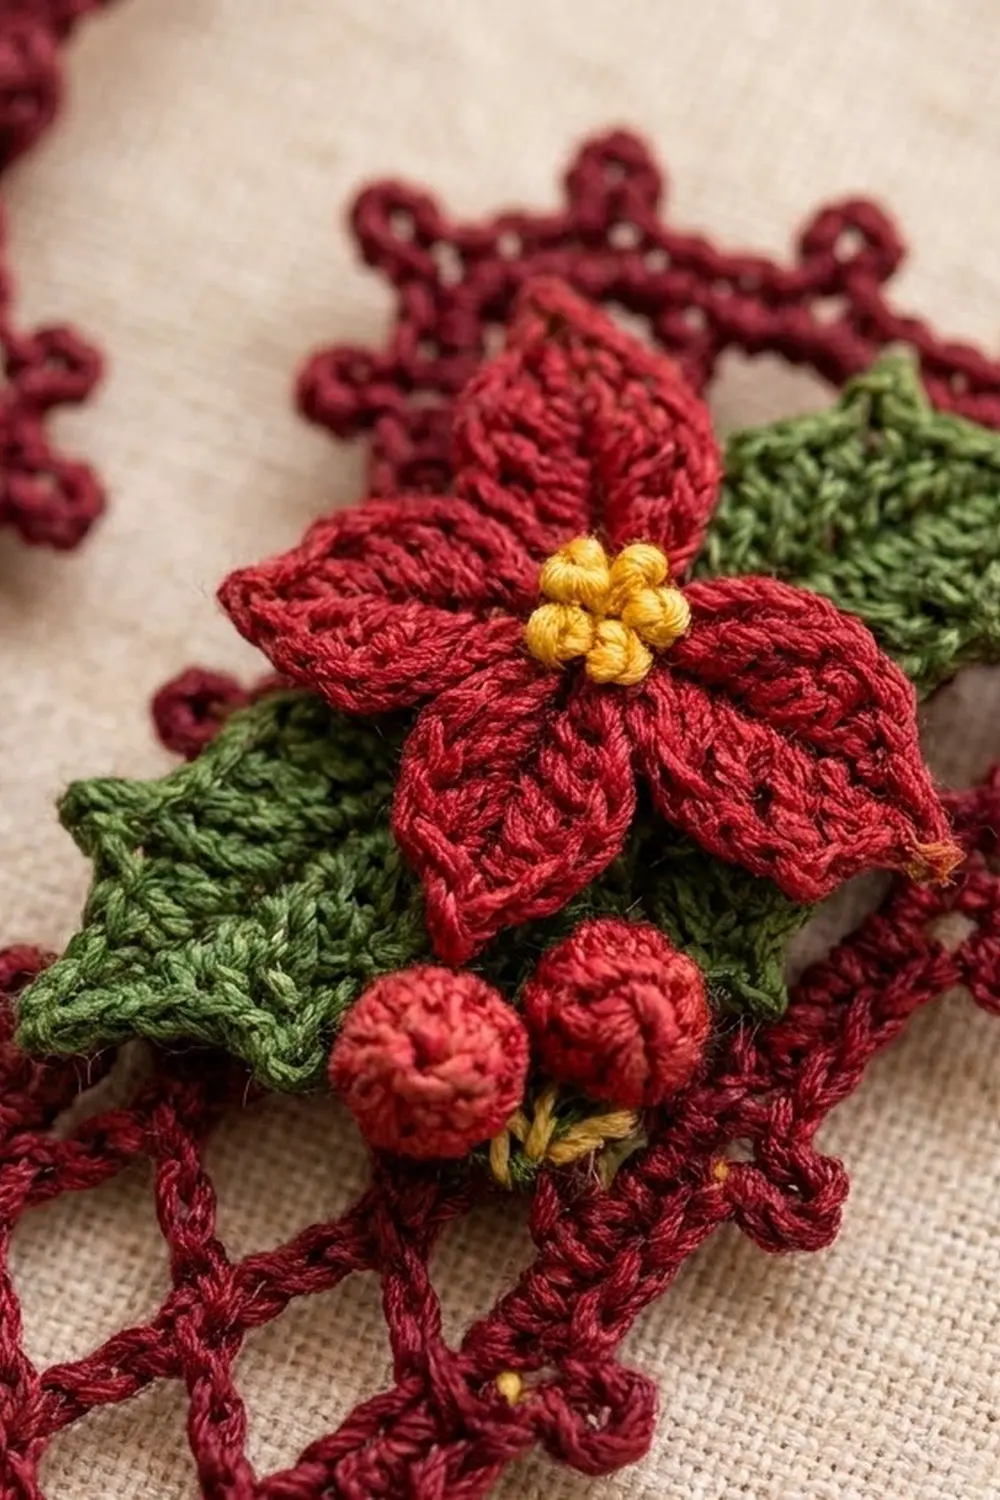
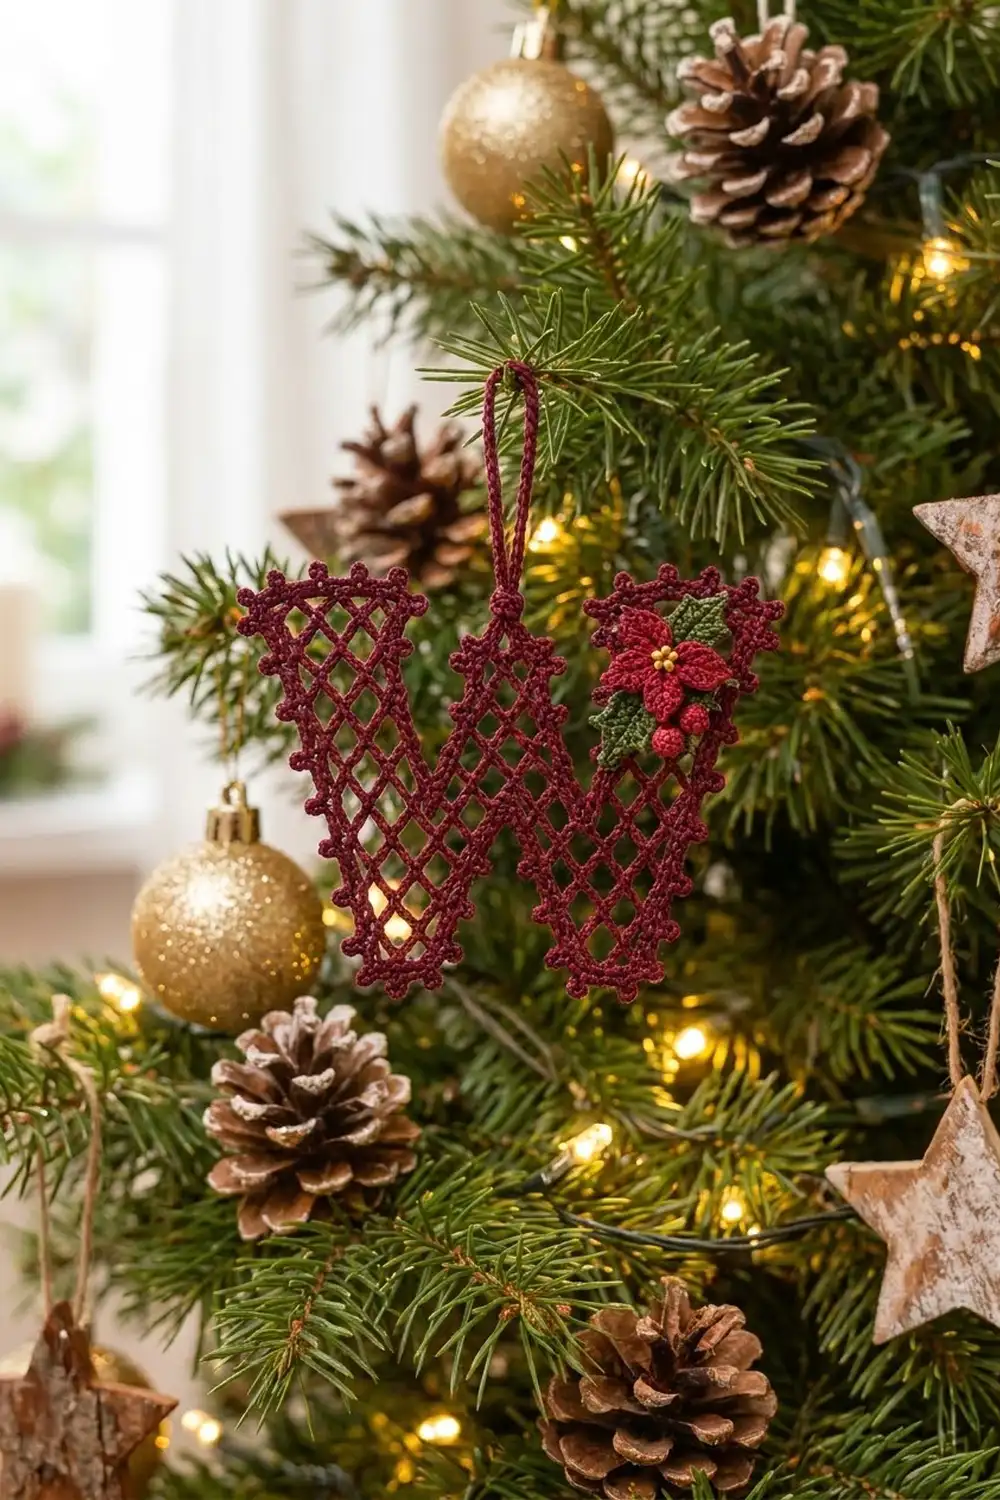
This Poinsettia Lattice Letter W is a single, flat thread-crochet ornament worked in open diamond mesh in deep burgundy. Tiny picots outline the whole letter, and a firm corded loop rises from the center peak. A small poinsettia with holly leaves and berries sits on the upper right arm.
The colors are classic Christmas: burgundy lace, bright red petals and berries, deep green leaves, and a golden yellow center. The ornament looks vintage and delicate, but the mesh is just chain-5 loops anchored with single crochet, repeated row after row.
The pattern uses US crochet terms. The finished ornament measures 5.75 in wide x 4.25 in tall (14.6 cm x 10.8 cm), not counting the hanging loop. The loop adds 1.5 in (3.8 cm).
You work the letter in one piece from the bottom up. First you make two separate feet. Next, you join them into a band, then split the work into three arms. A two-round picot border goes around the whole outline. Finally, you make the poinsettia, leaves and berries, stack them, and sew them on.
Finished Size and Construction
- Finished size: 5.75 in x 4.25 in (14.6 cm x 10.8 cm), plus a 1.5 in (3.8 cm) loop
- Skill level: Intermediate (thread work and shaping)
- Terminology: US crochet terms
- Yarn weight: Size 10 crochet thread (lace weight)
- Hook: 1.5 mm steel hook
- Number of pieces: 1 lace letter, plus 6 small appliqué pieces (1 flower, 2 leaves, 3 berries)
- Layout: One W shape with two feet, a joined band, and three arms
- Piece size before border: 5.25 in x 3.75 in (13.3 cm x 9.5 cm)
- Border depth: 0.25 in (0.6 cm) on every edge
Materials
Use mercerized cotton size 10 crochet thread. It holds a crisp shape and blocks well. Avoid fuzzy threads, because they blur the diamonds.
- Burgundy (main color): 8 g, about 41 m (45 yd)
- Red (petals and berries): 2 g, about 10 m (11 yd)
- Green (leaves): 1 g, about 5 m (5.5 yd)
- Golden yellow embroidery floss (center): 20 in (50.8 cm)
All quantities include a margin for a gauge swatch and small mistakes.
Tools:
- 1.5 mm steel crochet hook
- Fine tapestry needle and sharp embroidery needle
- Rust-proof pins and a blocking board or folded towel
- Spray bottle and optional light starch
- Small scissors and a ruler
Abbreviations (US Terms)
- ch: chain
- sl st: slip stitch
- sc: single crochet
- hdc: half double crochet
- dc: double crochet
- tr: treble crochet
- sk: skip
- rep: repeat
- loop: a ch-5 space in the mesh
Special stitches:
- Mesh row: Ch 5, turn, sc in first loop, (ch 5, sc in next loop) across. The loop count stays the same.
- Inc: (Sc, ch 5, sc) in one edge loop. This adds 1 loop.
- Start dec: Turn, sl st in next 3 ch of first loop, ch 5, sc in next loop, then continue across. This removes 1 loop.
- End dec: Work across, ending with sc in the next-to-last loop, and leave the last loop unworked. This removes 1 loop.
- Picot: Ch 3, sl st in 3rd ch from hook.
Every count in this pattern is the number of ch-5 loops in that row.
Gauge and Checkpoints
Mesh gauge: 8 loops x 16 rows = 3 in x 3 in (7.6 cm x 7.6 cm), lightly pinned. One loop is 0.375 in (1.0 cm) wide, and one row is 0.1875 in (0.5 cm) tall. Two rows make one diamond, so the diamonds sit square.
Border gauge: 8 sc = 1 in (2.5 cm).
Test first: The foundation chain is always 4 times the number of loops, plus 2. For the swatch, ch 34. Sc in 6th ch from hook, then (ch 5, sk 3 ch, sc in next ch) 7 times, for 8 loops. Work 15 mesh rows, then pin the swatch flat without stretching it. If it is wider than 3 in (7.6 cm), go down a hook size. If it is narrower, go up a size. Mesh stretches, so always measure it pinned.
Checkpoints:
- Row 8 (each foot): 5 loops, 1.875 in (4.8 cm) wide, 1.5 in (3.8 cm) tall
- Row 10 (band): 12 loops, 4.5 in (11.4 cm) wide, 1.875 in (4.8 cm) total height
- Row 20 (arms): 5.25 in x 3.75 in (13.3 cm x 9.5 cm)
- After the border: 5.75 in x 4.25 in (14.6 cm x 10.8 cm)
If any checkpoint is off by more than 0.25 in (0.6 cm), adjust your tension before you continue. Tight tension usually makes the rows short, not the loops narrow.
The Feet (Rows 1–8, Make 2)
On each foot, the inner edge is the edge with the starting tail. The outer edge is the opposite edge.
Row 1: With burgundy, ch 14. Sc in 6th ch from hook, (ch 5, sk 3 ch, sc in next ch) 2 times. (3 loops)
Row 2: Mesh row. (3 loops)
Row 3: Ch 5, turn, sc in first loop, ch 5, sc in next loop, ch 5, inc in last loop. (4 loops)
Rows 4–5: Mesh row. (4 loops)
Row 6: Ch 5, turn, inc in first loop, (ch 5, sc in next loop) 3 times. (5 loops)
Rows 7–8: Mesh row. (5 loops)
Row 3 ends at the inner edge, and Row 6 starts there. Both increases make the inner edge slant toward the center, while the outer edge stays straight. Row 8 ends at the outer edge.
Fasten off Foot 1. Do not fasten off Foot 2.
Checkpoint: Each foot is 1.125 in (2.9 cm) wide at the bottom and 1.875 in (4.8 cm) wide at Row 8.
The Band (Rows 9–10)
Lay Foot 1 beside Foot 2 so their inner (tail) edges face each other. Turn Foot 1 over if needed. The mesh has no wrong side.
Row 9 (joining row): Ch 5, turn, inc in first loop of Foot 2, (ch 5, sc in next loop) 4 times. Ch 5, sc in first loop of Foot 1, (ch 5, sc in next loop) 3 times, ch 5, inc in last loop. (5 + 5 + 2 = 12 loops)
The 5 loops of each foot carry straight up. The 2 increases add 1 loop at each outer edge.
Row 10: Mesh row. (12 loops)
Checkpoint: 4.5 in (11.4 cm) wide. The inverted V between the feet closes 1.5 in (3.8 cm) up from the bottom.
The Arms (Rows 11–20)
Row 10 divides into three groups of 4 loops: Arm A (loops 1–4, on the Foot 2 side), the middle (loops 5–8), and Arm B (loops 9–12).
Arm A
Row 11: Ch 5, turn, sc in first loop, (ch 5, sc in next loop) 3 times. Leave the rest of the row unworked. (4 loops)
Rows 12–14: Mesh row. (4 loops)
Row 15: Ch 5, turn, inc in first loop (outer edge), (ch 5, sc in next loop) 3 times. (5 loops)
Rows 16–20: Mesh row. (5 loops) Fasten off.
Middle Peak
Row 11: Join burgundy with a sl st in the Row 10 sc between loops 4 and 5. Ch 5, sc in loop 5, (ch 5, sc in next loop) 3 times. (4 loops)
Row 12: Mesh row. (4 loops)
Row 13: Start dec. (3 loops)
Row 14: Mesh row. (3 loops)
Row 15: End dec. (2 loops)
Row 16: Mesh row. (2 loops)
Row 17: Start dec. (1 loop)
Row 18: Ch 5, turn, sc in the loop. (1 loop) Fasten off.
The decreases alternate sides, so the middle tapers to a point. It finishes 2 rows below the outer arms, 3.375 in (8.6 cm) from the bottom.
Arm B
Row 11: Join burgundy with a sl st in the Row 10 sc between loops 8 and 9. Ch 5, sc in loop 9, (ch 5, sc in next loop) 3 times. (4 loops)
Rows 12–14: Mesh row. (4 loops)
Row 15: Ch 5, turn, sc in first loop, (ch 5, sc in next loop) 2 times, ch 5, inc in last loop (outer edge). (5 loops)
Rows 16–20: Mesh row. (5 loops) Do not fasten off. Row 20 ends at the inner top corner, which is where the border starts.
Checkpoint: 14 loops across the arm tops, measuring 5.25 in (13.3 cm), and 20 rows tall, measuring 3.75 in (9.5 cm). Two V notches open where the middle narrows.
Border
Border gauge: 8 sc = 1 in (2.5 cm). One loop is 0.375 in (1.0 cm) wide, so it takes 3 sc. Two rows are also 0.375 in (1.0 cm) tall, so each turning ch-5 on a side edge, which covers 2 rows, also takes 3 sc.
Round 1: Ch 1. Work sc around the whole letter, in this order and with these exact counts:
| Edge | Sc |
|---|---|
| Arm B inner edge (rows 11–20) | 15 |
| Middle side (rows 11–18) | 12 |
| Middle top (1 loop) | 3 |
| Middle other side (rows 11–18) | 12 |
| Arm A inner edge (rows 11–20) | 15 |
| Arm A top (5 loops) | 15 |
| Arm A outer edge (rows 1–20) | 30 |
| Foot 2 bottom (3 loops) | 9 |
| Foot 2 inner edge (rows 1–8) | 12 |
| Foot 1 inner edge (rows 1–8) | 12 |
| Foot 1 bottom (3 loops) | 9 |
| Arm B outer edge (rows 1–20) | 30 |
| Arm B top (5 loops) | 15 |
| Total | 189 |
At outer corners, work the last sc of one edge and the first sc of the next edge into the same corner space. At the three inner points (two V notches and the crotch), do not add or skip stitches. Just keep the thread snug. Join with a sl st to the first sc. (189 sc)
Round 2: Ch 1, sc in next 3 sc, picot; rep from * around. Join. (189 sc, 63 picots) Fasten off.
Why the math works: Every edge count is a multiple of 3, and 189 ÷ 3 = 63. That puts a picot every 0.375 in (1.0 cm), one per diamond, with no partial repeats. Edge by edge, the picots are 5, 4, 1, 4, 5, 5, 10, 3, 4, 4, 3, 10 and 5, which totals 63. The two rounds add 0.25 in (0.6 cm) on every side. That makes the ornament 5.25 + 0.5 = 5.75 in (14.6 cm) wide and 3.75 + 0.5 = 4.25 in (10.8 cm) tall.
Hanging Loop
With burgundy, ch 31. Sl st in the back bump of the 2nd ch from hook and of each ch across. (30 sl st, about 3 in / 7.6 cm)
Fold the cord in half and knot the ends together. Sew the knot to the picot at the top of the middle peak. The loop stands 1.5 in (3.8 cm) tall.
Poinsettia Appliqué
Flower (red, make 1): Ch 4, sl st in first ch to form a ring.
- Rnd 1: Ch 1, 10 sc in ring, join. (10 sc)
- Rnd 2: Ch 6, sl st in 2nd ch from hook, sc in next ch, hdc in next ch, dc in next ch, tr in next ch, sk 1 sc, sl st in next sc; rep from * 4 more times. (5 pointed petals)
Fasten off. The flower is about 1 in (2.5 cm) across. Work 5 French knots in yellow floss in the center.
Leaves (green, make 2): Ch 8. Sl st in 2nd ch from hook, sc in next ch, hdc in next ch, dc in next 2 ch, hdc in next ch, sc in last ch. (7 sts) Ch 2. Working along the other side of the foundation chain, sc in first ch, hdc in next ch, dc in next 2 ch, hdc in next ch, sc in next ch, sl st at the tip. (7 sts) Fasten off. Each leaf is about 0.875 in (2.2 cm) long.
Berries (red, make 3): Ch 2, 6 sc in 2nd ch from hook, join. Thread the tail through all 6 sts and pull tight to form a ball. Each berry is about 0.25 in (0.6 cm) across.
Stacking: With the front of the ornament facing you, pin the leaves to the upper part of Arm B. Point one leaf up and to the right, just under the top border, and the other down and to the left. Center the flower over the leaf bases, and tuck the 3 berries under the lower right petals. Sew each piece in place with matching thread through the mesh bars, keeping the stitches hidden.
Final Blocking
- Weave in all ends.
- Mist the lace until it is damp but not dripping. Keep the appliqué mostly dry.
- Pin the ornament face down to 5.75 in x 4.25 in (14.6 cm x 10.8 cm).
- Pin the outer corners first, then the three inner points.
- Pin out the picots along the long outer edges so the diamonds open evenly.
- For a stiffer ornament, mist with light starch.
- Let it dry completely, at least 4 hours.
- Unpin it, turn it face up, and fluff the petals.
Final Quality-Control Checklist
- Each foot has 5 loops at Row 8, and the band has 12 loops at Row 10.
- Each arm has 5 loops at the top, and the middle ends with 1 loop at Row 18.
- Round 1 has 189 sc, and Round 2 has 63 picots.
- The ornament measures 5.75 in x 4.25 in (14.6 cm x 10.8 cm).
- The diamonds are square and open, with no twisted loops.
- The loop is centered and the ornament hangs level.
- The appliqué is secure, and no stitches show on the front.
Troubleshooting
- The W leans: An increase is probably on the wrong edge. Check Row 15 on both arms.
- The diamonds are tall and narrow: Your sc are too tight. Loosen up and keep each ch-5 full length.
- The border ruffles: There are extra sc. Recount each edge against the table.
- The border puckers: Spaces were skipped. Check the inner points and the turning loops.
- The peak is off-center: Pin it straight while blocking. The half-loop offset disappears.
- The ornament hangs tilted: Move the loop knot slightly toward the higher side.
Care
Hand wash in cool water with mild soap. Press out the water in a towel, re-block flat, and store flat in tissue.
Final Notes
Every measurement comes from one unit: a loop is 0.375 in (1.0 cm) wide, and 2 rows are the same height. The feet grow from 3 to 5 loops. Row 9 joins them into 12 loops, 4.5 in (11.4 cm) wide. The arms finish at 14 loops across, 5.25 in x 3.75 in (13.3 cm x 9.5 cm). Then 189 border sc and 63 picots bring the letter to 5.75 in x 4.25 in (14.6 cm x 10.8 cm). Check your swatch and each checkpoint, and the finished ornament will match.
Happy crocheting!