

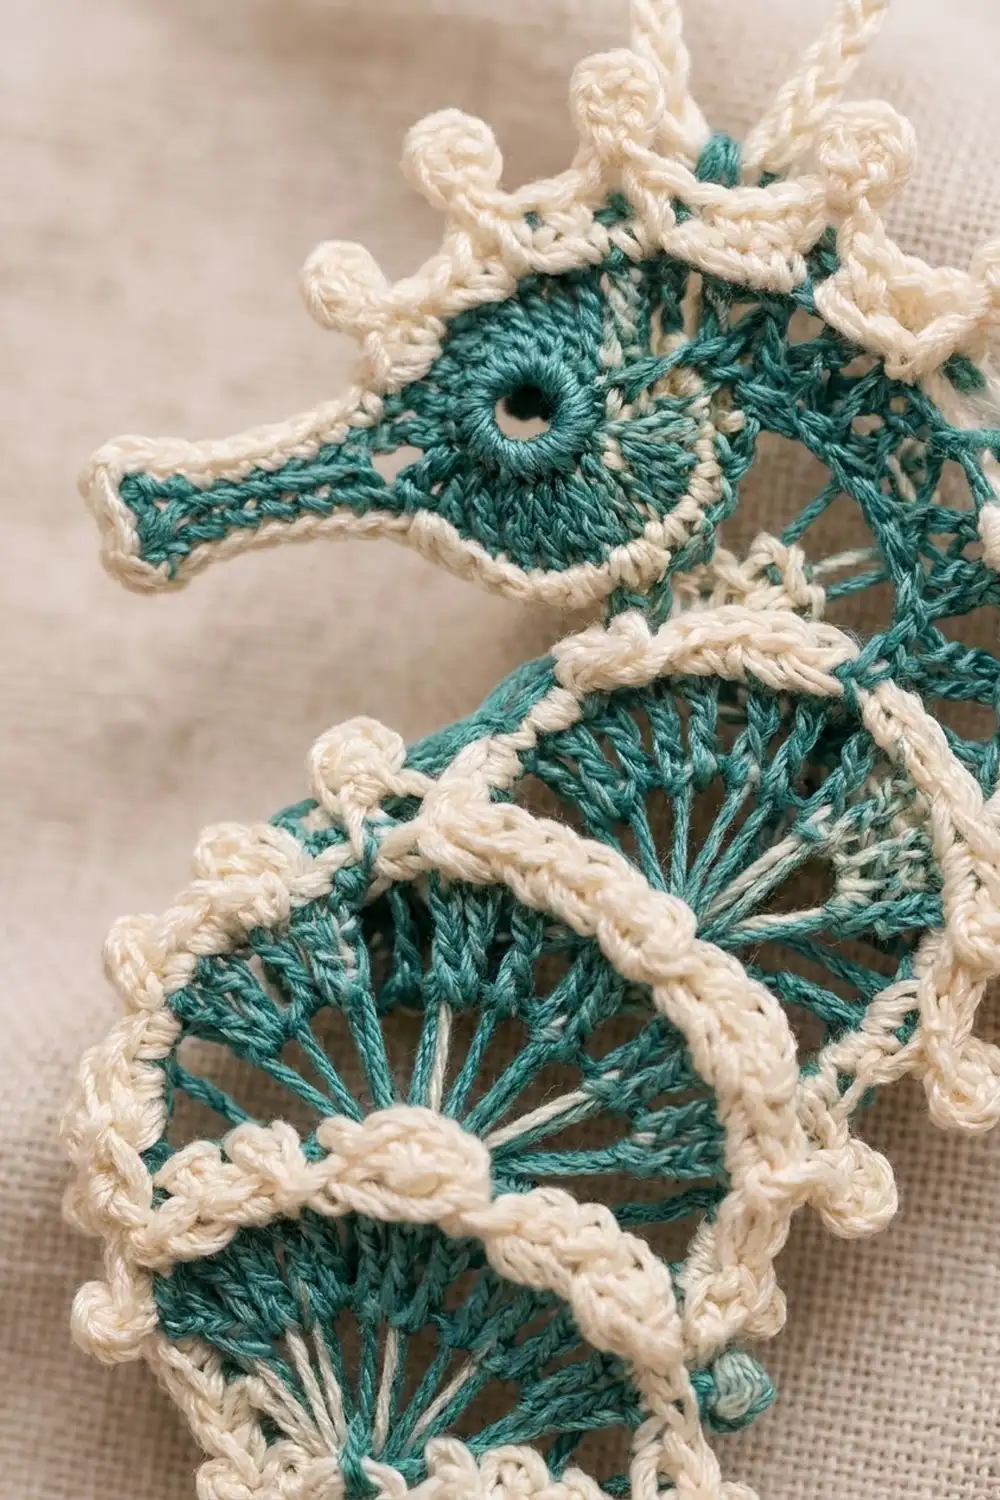
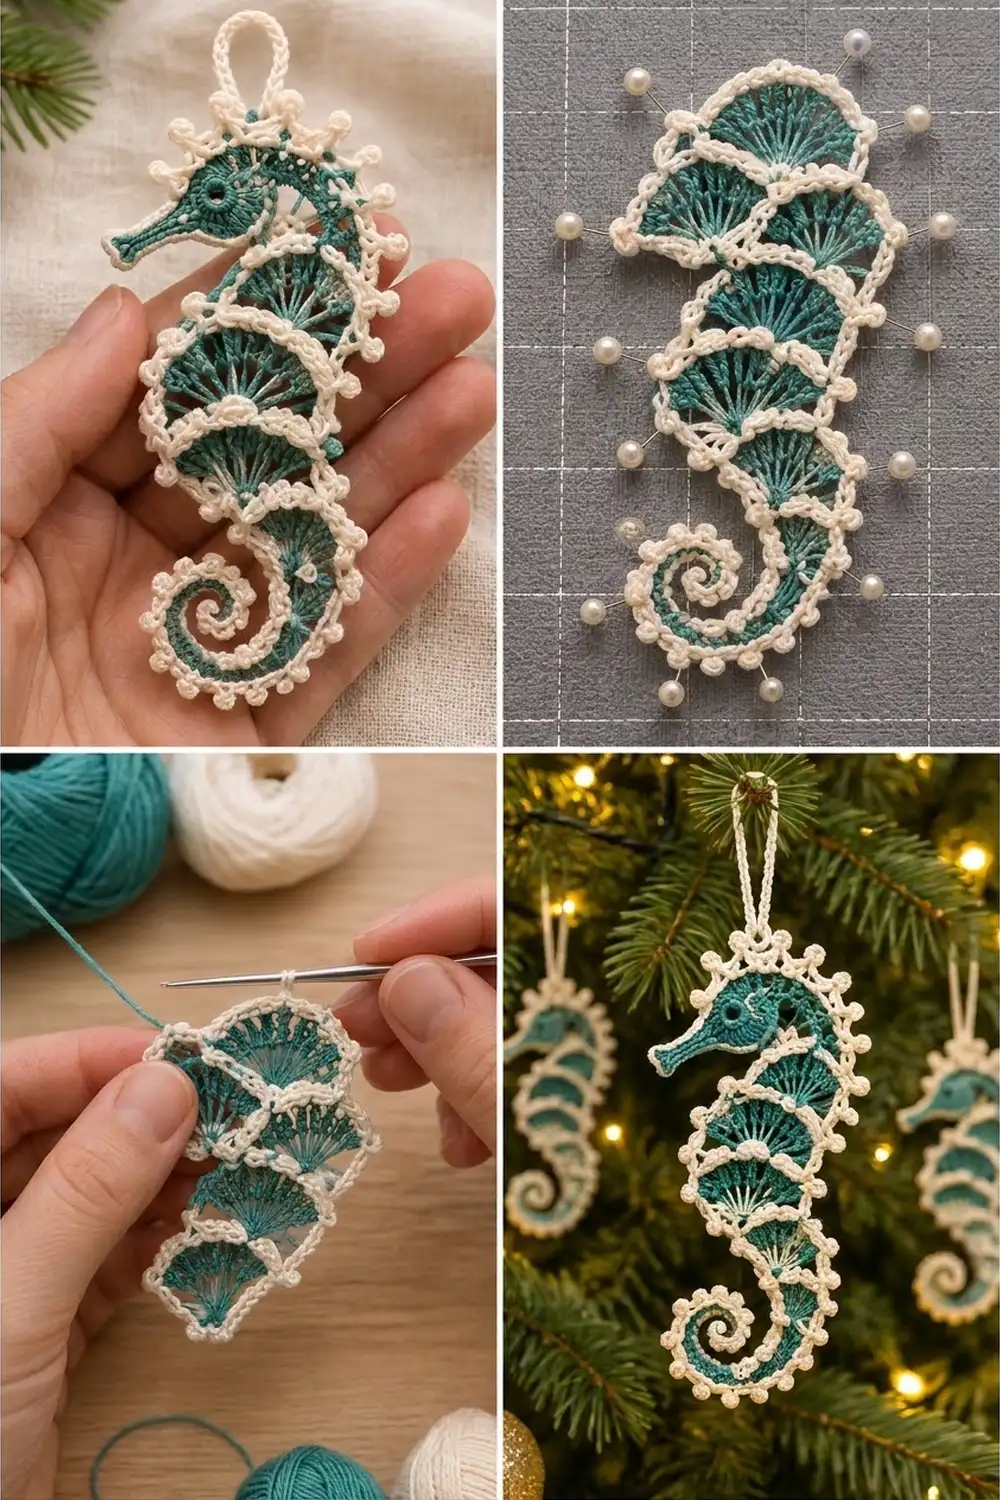
This little seahorse is a single lacy ornament worked in fine cotton thread. Its body is a stack of six open teal fans, each one capped with a crisp cream arch, so the whole piece reads like layered shells. A curled tail spirals at the bottom, a slim snout points forward, and a row of round cream picots runs along the crown, the back and the outside of the tail.
The palette is just two colors. Deep sea teal is used for the fans, head and tail. Warm cream is used for the arches, border, picots and hanging loop. The cream frames every teal section, so the shape stays clear even from across a room. It suits a coastal Christmas tree, a window or a gift tag.
The pattern uses US crochet terms. The finished seahorse is 5 in (12.7 cm) tall without the loop and 6 in (15.2 cm) tall with it. It is 2 in (5.1 cm) wide across the body and 2.4 in (6.1 cm) wide across the head and snout.
The whole ornament is made in one piece. You start with a tapered teal tail strip that ends in the first fan. Then you work upward, alternating a teal fan row and a cream arch row six times. A short teal head with an eyelet eye and a snout sits on top. One cream border round with picots and a hanging loop goes all the way around. The tail is then curled and tacked during blocking.
Finished Size and Construction
- Finished size: 5 in (12.7 cm) tall, 6 in (15.2 cm) with loop; 2 in (5.1 cm) wide at the body
- Skill level: Intermediate
- Terminology: US crochet terms
- Yarn weight: Lace (size 10 cotton crochet thread)
- Hook: 1.75 mm (US steel #4)
- Number of pieces: 1 (single ornament, no joining)
- Layout: Vertical seahorse: tail spiral at the bottom, 6 stacked fan segments, head and crown at the top
- Piece size before border: 3.4 in (8.6 cm) from the base of Fan 1 to the crown; 1.5 in (3.8 cm) across the widest fan; tail strip 3.25 in (8.3 cm) long
- Border depth: 0.25 in (0.6 cm) including picots
Materials
Use a mercerized size 10 cotton thread. It holds starch well, gives sharp stitch definition and keeps the fan spokes straight. Avoid fuzzy or very soft threads, which blur the open fans.
- Teal (Color A): 8 g, about 41 m, for the tail, fans and head
- Cream (Color B): 8 g, about 41 m, for the arches, border, picots and loop
Each ornament actually uses about 5 g of each color. The quantities above include a margin for a gauge swatch and weaving in.
Tools:
- 1.75 mm (US steel #4) crochet hook
- Fine tapestry needle
- Small sharp scissors
- 2 locking stitch markers
- Ruler or tape measure
- Blocking board and rustproof pins (pearl-head pins work well)
- Spray starch or fabric stiffener
Abbreviations (US Terms)
- ch – chain
- sl st – slip stitch
- sc – single crochet
- hdc – half double crochet
- dc – double crochet
- tr – treble crochet
- sc2tog – single crochet 2 together
- BLO – back loop only
- sp – space
- st(s) – stitch(es)
- p – picot
Picot (p): Ch 3, sl st in the 3rd ch from hook. A picot is an added bump. It never counts as a stitch.
Fan: All stitches of a fan go into one single stitch. Example: “(tr, ch 1) 8 times, tr” makes 9 tr and 8 ch-1 sps.
Arch row: Sc in each fan stitch and 1 sc in each ch-1 sp. A fan with N stitches gives an arch of N + (N − 1) sc.
Gauge and Checkpoints
Gauge: 9 sc and 10 sc rows = 1 in (2.5 cm). One tr is about 0.4 in (1.0 cm) tall.
Make a test swatch before you start. Ch 19, sc in the 2nd ch from hook and in each ch across (18 sc). Work 9 more rows. The swatch should be 2 in (5.1 cm) wide and 1 in (2.5 cm) tall.
Checkpoints:
- Tail strip: 3.25 in (8.3 cm) long, about 0.3 in (0.8 cm) wide at the dc end.
- After Arch 1: Fan 1 is 0.9 in (2.3 cm) across.
- After Arch 4: The widest fan is 1.5 in (3.8 cm) across.
- After Arch 6: 2.8 in (7.1 cm) from the base of Fan 1 to the top of Arch 6.
- After the head: 3.4 in (8.6 cm) from the base of Fan 1 to the crown.
- After border and curling: 5 in (12.7 cm) tall and 2 in (5.1 cm) wide at the body.
If your piece is too big: go down to a 1.5 mm hook, or tighten your chain spaces. If it is too small: go up to a 2 mm hook. Change the hook, not the stitch counts, because the counts set the shape.
Pattern
Part 1: Tail Strip and Fan 1 (Teal)
With teal, ch 30.
Row 1: Sl st in the 2nd ch from hook and in the next 5 ch (6 sl st). Sc in the next 8 ch. Hdc in the next 8 ch. Dc in the next 6 ch. You have used 28 ch and 1 ch remains.
Fan 1: In the last ch, work (dc, ch 1) 6 times, dc. (7 dc and 6 ch-1 sps.)
The strip tapers from a sl st tip to dc height, and Fan 1 opens out in a half circle at the wide end. Do not fasten off. Drop teal and leave the loop on a stitch marker.
Part 2: Arch 1 (Cream)
Arch 1: Join cream with sc in the first dc of Fan 1. (Sc in the next ch-1 sp, sc in the next dc) 6 times. (13 sc: 7 + 6.)
You end next to the teal loop. Drop cream onto a marker.
Part 3: Fan and Arch Segments 2–6
Each segment uses the same steps:
- Teal travel: Pick up teal and turn. Sl st in the BLO of the arch sc up to the center stitch. Keep these sl sts loose. They sit at the back and the new fan hides them.
- Teal fan: Work the fan in the BLO of the center sc of the arch. Drop teal.
- Cream arch: Pick up cream and carry it loosely up the edge (the border will cover this). Sc in the first st of the new fan, then sc in each ch-1 sp and each st across. Sl st in the end sc of the arch below on this side to anchor it. The sl st is not counted. Drop cream.
The colors swap sides every segment, so each strand is always waiting where it’s needed next.
Segment 2: Travel: sl st in the BLO of the next 6 sc. Fan 2 in the 7th sc: (dc, ch 1) 8 times, dc (9 dc, 8 ch-1 sps). Arch 2: 17 sc (9 + 8).
Segment 3: Travel: sl st in the BLO of the next 8 sc. Fan 3 in the 9th sc: (tr, ch 1) 8 times, tr (9 tr, 8 ch-1 sps). Arch 3: 17 sc (9 + 8).
Segment 4: Travel: sl st in the BLO of the next 8 sc. Fan 4 in the 9th sc: (tr, ch 1) 10 times, tr (11 tr, 10 ch-1 sps). Arch 4: 21 sc (11 + 10).
Check: Arch 4 should be 1.5 in (3.8 cm) straight across.
Segment 5: Travel: sl st in the BLO of the next 10 sc. Fan 5 in the 11th sc: (tr, ch 1) 10 times, tr (11 tr). Arch 5: 21 sc (11 + 10).
Segment 6: Travel: sl st in the BLO of the next 10 sc. Fan 6 in the 11th sc: (tr, ch 1) 8 times, tr (9 tr). Arch 6: 17 sc (9 + 8).
Fasten off cream and leave a 4 in (10.2 cm) tail. Check: 2.8 in (7.1 cm) from the base of Fan 1 to the top of Arch 6.
Part 4: Head (Teal)
Row 1: Pick up teal and turn. Sl st in the BLO of the next 4 sc. Sc in the next 9 sc, leaving 4 sc unworked. (9 sc.)
Row 2: Ch 1, turn. 2 sc in the first st, sc in the next 7 sts, 2 sc in the last st. (11 sc.)
Row 3: Ch 1, turn. Sc in each st across. (11 sc.)
Row 4 (eye): Ch 1, turn. Sc in the next 6 sts, ch 2, skip 2 sts, sc in the last 3 sts. (9 sc + one ch-2 sp = 11 sts.)
The eyelet sits toward the end of this row. That side is the front of the head.
Row 5 (snout): Ch 7. Sc in the 2nd ch from hook and in the next 5 ch (6 snout sc). Continue along the head: sc in the next 3 sc, 2 sc in the ch-2 sp, sc in the last 6 sc (11 head sc). (17 sc total.)
Row 6 (crown): Ch 1, turn. Sc2tog, sc in the next 7 sts, sc2tog. Leave the 6 snout sts unworked. (9 sts.)
Fasten off teal. Check: 3.4 in (8.6 cm) from the base of Fan 1 to the crown.
Border (Cream)
Border gauge: Same as the main gauge, 9 sc = 1 in (2.5 cm). Work 1 sc per stitch or row end. Keep the tension relaxed so the edge lies flat without cupping.
Join cream with sl st in the first st of Row 6 at the front of the crown. Work one round in this order:
- Crown (9 sts of Row 6): Sc 1, (p, sc 2) twice. (5 sc.) Loop: Ch 20, sl st in the same sc. Work 30 sc over the ch-20 loop, then sl st in the same sc. Continue (sc 2, p) twice. (Crown: 9 sc, 4 p.)
- Back of head (row ends of Rows 6–1): (Sc 2, p) 3 times. (6 sc, 3 p.)
- Back of body (6 segments, top to bottom): On each segment’s exposed back edge, work sc 3, p, sc 3. (36 sc, 6 p.)
- Outer tail edge (tops of the 28 Row 1 sts): (Sc 4, p) 7 times. (28 sc, 7 p.)
- Tail tip: 3 sc in the tip. (3 sc.)
- Inner tail edge (28 free loops of the foundation ch): Sc in each. (28 sc.)
- Belly (6 segments, bottom to top): 4 sc evenly on each segment’s front edge. (24 sc.)
- Front of head (row ends of Rows 1–4): 4 sc. (4 sc.)
- Snout: 6 sc in the free loops along the underside, 3 sc at the tip, 6 sc along the top. (15 sc.)
- Snout to crown: 2 sc. (2 sc.)
Join with sl st to the first sc. Fasten off.
Round total: 9 + 6 + 36 + 28 + 3 + 28 + 24 + 4 + 15 + 2 = 155 sc, plus 20 picots and the loop.
Why the math works: Every edge gets exactly 1 sc per stitch or row end, so the border matches the length of the piece and won’t ruffle or pull. On the body, the back gets 6 sc per segment and the belly gets 4, because the back is the longer, outer side of the curve. The 3 sc at the tail tip and at the snout tip turn the work 180°, and they’re counted once only. Picots are extra bumps and never change the sc count, so the back edge carries 20 picots without stretching.
Final Blocking
- Weave in all ends along the cream edges, where they won’t show through the lace.
- Soak the seahorse in cool water for 5 minutes, then roll it in a towel to press out the water.
- Pin it face up on the blocking board. Pin the crown first, then the snout tip.
- Open each fan so the spokes lie straight and evenly spaced. Pin the end of every arch.
- Curl the tail toward the belly into about 1.5 turns, 1.1 in (2.8 cm) across. Pin the outside of the spiral at each picot.
- Check the size: 5 in (12.7 cm) from the bottom of the spiral to the crown, and 2 in (5.1 cm) across the body.
- Spray with starch or brush on stiffener. Let it dry completely, about 12 hours.
- Unpin it. Using the cream tail, tack the spiral in 3 places on the wrong side.
Final Quality-Control Checklist
- Fan counts are 7, 9, 9, 11, 11 and 9 stitches from bottom to top.
- Arch counts are 13, 17, 17, 21, 21 and 17 sc.
- The eyelet is open and round, near the snout side.
- The border has 155 sc and 20 picots, with all picots on the crown, back and outer tail.
- The hanging loop is centered on the crown and hangs about 1 in (2.5 cm).
- The ornament hangs straight with no twist.
- The finished size is 5 in × 2 in (12.7 cm × 5.1 cm).
Troubleshooting
- Fans ruffle: Your ch-1 spaces are too loose. Tighten them or go down a hook size.
- Fans cup or won’t open: The arch sc are too tight. Work them more loosely and block firmly.
- Teal shows through the cream: Pull the travel sl sts gently to the back, and work them through the BLO only.
- Gaps between fans: Make sure you sl st into the end of the arch below at the end of each arch row.
- Picots lean or flatten: Pull each picot sl st snug and pin the picots during blocking.
- Tail uncurls: Starch again and add a fourth tack stitch.
- Head twists to one side: Check that Row 1 starts 4 sc in from the end of Arch 6.
Care
Hand wash in cool water with mild soap, then reshape it and starch it again while it dries flat. Store it flat, or hang it somewhere away from damp air.
Final Notes
The measurement chain is short and simple. A 2 in (5.1 cm) gauge swatch gives a 3.25 in (8.3 cm) tail strip. That gives a widest fan of 1.5 in (3.8 cm) and 2.8 in (7.1 cm) of stacked segments. The head brings the piece to 3.4 in (8.6 cm). The 0.25 in (0.6 cm) border and the curled tail finish it at 5 in (12.7 cm) tall, or 6 in (15.2 cm) with the loop. Check each step and your seahorse will match.
Happy crocheting!