

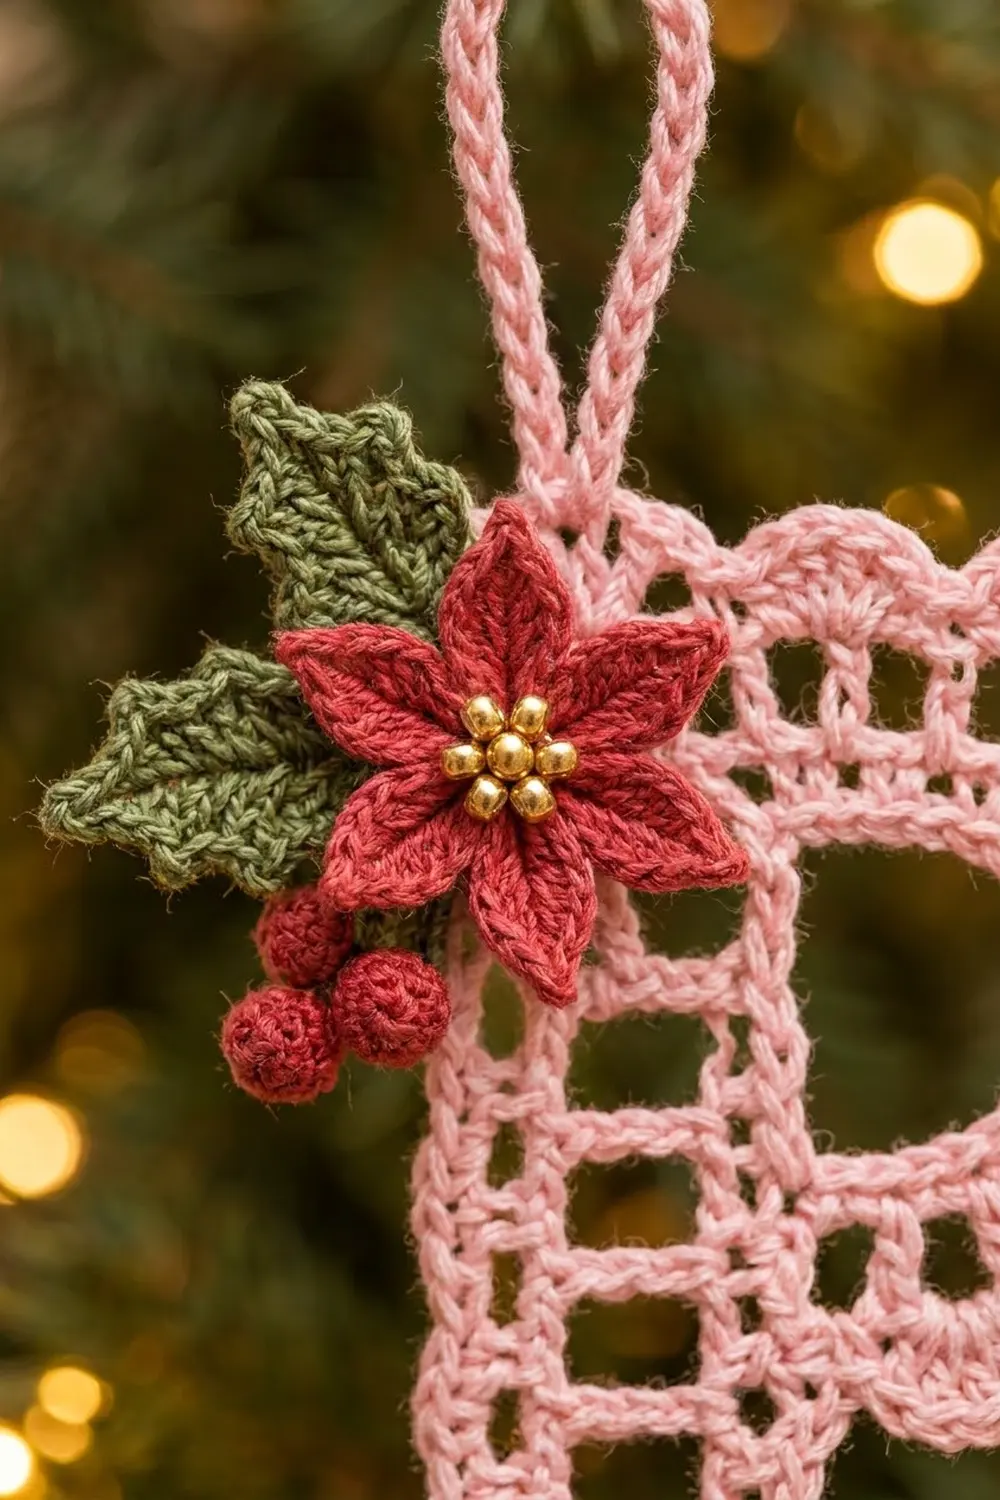
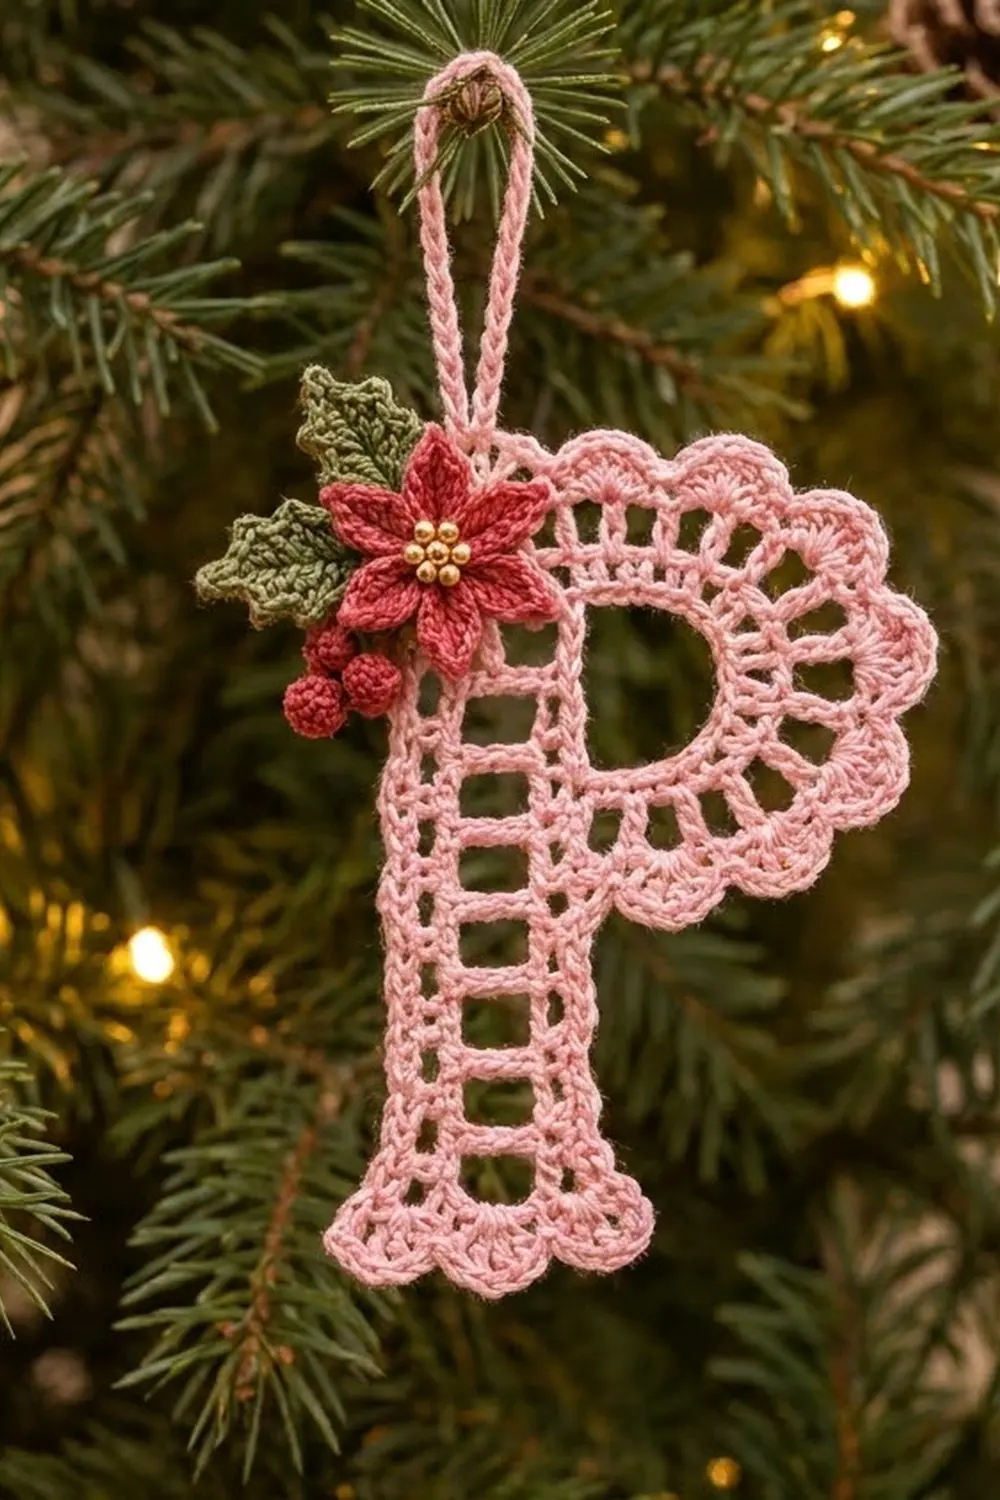
This delicate letter P ornament is crocheted in soft pink cotton thread. It has a ladder-window stem, a scalloped bowl and a small flared foot. A red poinsettia with gold bead stamens, two green holly leaves and three red berries sit on the top-left corner, so the letter reads as Christmas while staying light and lacy.
The ornament is one flat piece of lace with small appliqués sewn on. It works well as a personalized tree ornament, a gift tag or a package topper. The pastel pink against red and green gives it a vintage, cottage-style look.
The pattern uses US crochet terms. The finished letter is 4.5 in (11.4 cm) tall and 3 in (7.6 cm) wide. The hanging loop adds 1.5 in (3.8 cm), for a total hanging height of 6 in (15.2 cm).
Construction overview: You work the stem in rows, alternating solid rungs and open windows. Then you add the flared foot to the foundation chain. Next, the bowl is built outward from a chain arch anchored to the right side of the stem. A single crochet edge finishes the stem, and the hanging loop is worked last. The poinsettia, leaves and berries are made separately and sewn on.
Finished Size and Construction
- Finished size: 4.5 in (11.4 cm) tall × 3 in (7.6 cm) wide; 6 in (15.2 cm) including the loop
- Skill level: Intermediate (thread crochet, working into row-ends)
- Terminology: US crochet terms
- Yarn weight: Size 10 cotton crochet thread (Lace, weight 0)
- Hook: 1.75 mm steel hook (US steel 6)
- Number of pieces: 1 letter, plus 1 poinsettia, 2 leaves and 3 berries as appliqués
- Layout: Single piece. No joining is needed.
- Stem width: 0.75 in (1.9 cm)
- Size before border: 4.4 in (11.2 cm) tall × 2.9 in (7.4 cm) wide
- Border depth: 0.1 in (0.3 cm), along the left side and top of the stem
Materials
Use a mercerized cotton size 10 thread. It gives crisp stitch definition and holds starch well. Avoid fuzzy or acrylic threads, because the windows will not stay open.
- Light pink (MC): 8 g / about 40 m, for the letter, edging and loop
- Red (CC1): 2 g / about 10 m, for the poinsettia and berries
- Green (CC2): 1 g / about 5 m, for the holly leaves
All quantities include a margin of about 25% for your gauge swatch and tails.
Tools:
– 1.75 mm steel crochet hook
– Fine tapestry needle
– Sharp sewing needle and pink or red sewing thread
– 5 gold seed beads, size 8/0
– Blocking mat, rustproof pins and spray starch
– Small scissors and a ruler
Abbreviations (US Terms)
- ch – chain
- sl st – slip stitch
- sc – single crochet
- hdc – half double crochet
- dc – double crochet
- tr – treble crochet
- sc2tog – single crochet 2 together
- sp – space
- st(s) – stitch(es)
- tch – turning chain
- RS – right side
Special stitch – picot: Ch 3, then sl st in the 3rd ch from the hook.
Shell: Work 5 dc in the stitch named.
Gauge and Checkpoints
Gauge: 8 dc = 1 in (2.5 cm). One rung row plus one window row = 0.5 in (1.3 cm): the rung row is 0.2 in (0.5 cm) and the window row is 0.3 in (0.8 cm).
Work the first 5 stem rows and measure before you continue.
- After Row 1: the rung is 0.75 in (1.9 cm) wide.
- After Row 15: the stem is 3.7 in (9.4 cm) tall.
- After the foot: the stem plus foot is 4.4 in (11.2 cm) tall, and the foot is 1.5 in (3.8 cm) wide at the scallop tips.
- After Bowl Row 2: the D hole is 0.9 in (2.3 cm) deep and 2 in (5.1 cm) tall.
- After Bowl Row 5: the bowl reaches 1.8 in (4.6 cm) out from the stem’s right edge.
- After Bowl Row 6: the bowl reaches 2.15 in (5.5 cm) out, so the letter is 2.9 in (7.4 cm) wide.
If your work is too big, go down to a 1.5 mm hook. If it is too small, go up to a 2 mm hook. Keep your treble posts upright and even. If they are short, the windows close up and the letter gets shorter.
Stem
With MC, ch 8.
Row 1 (rung, RS): Dc in 4th ch from hook and in each ch across. Turn. (6 dc, with the skipped 3 ch counting as the first dc.)
Row 2 (window): Ch 4 (counts as tr), ch 4, skip next 4 dc, tr in top of tch. Turn. (2 tr and 1 ch-4 sp.)
Row 3 (rung): Ch 3 (counts as dc), 4 dc in ch-4 sp, dc in 4th ch of tch. Turn. (6 dc.)
Rows 4–15: Repeat Rows 2–3 six more times. Do not fasten off yet.
The finished stem has 15 rows: 8 rungs (the odd rows) and 7 windows (the even rows). It is 3.7 in (9.4 cm) tall: 8 × 0.2 in plus 7 × 0.3 in. Fasten off.
Foot
Turn the stem upside down. You will work into the unused loops of the foundation chain.
Foot Row 1: Join MC in the first foundation ch. Ch 4 (counts as tr), tr in the same ch, then 2 tr in each of the next 5 ch. Turn. (12 tr.)
Foot Row 2: Ch 1, sc in first tr, skip 1 tr, shell in next tr, skip 1 tr, sc in next tr. Repeat from * once more. Then skip 1 tr, shell in next tr, and sc in the last tr.
That gives 4 sc and 3 shells, for 3 scallops and 19 stitches. Fasten off.
The foot flares to 1.5 in (3.8 cm) wide and adds 0.7 in (1.8 cm) of height.
Bowl
Hold the stem RS facing, top up. The bowl is worked on the right-hand edge. Each bowl row ends with a sl st into the stem, then you turn.
Bowl Row 1 (arch): Join MC with a sl st in the right row-end of Row 7, which is a rung. Ch 36, then sl st in the top of the last dc of Row 15 at the top-right corner. Turn.
The chain forms the curved inner edge of the D-shaped hole.
Bowl Row 2 (base): Ch 1, work 25 sc evenly over the ch-36 arch. Sl st in the right row-end of Row 6. Turn. (25 sc.)
Bowl Row 3 (inner windows): Ch 4 (counts as tr), ch 1, skip 1 sc, tr in next sc. Repeat from * across. Sl st in the top-right corner dc of Row 15. Turn.
That gives 13 tr and 12 ch-1 sps, for 25 stitches. The tr posts fan out like spokes and form the inner ring of windows.
Bowl Row 4 (solid band): Ch 3 (counts as dc), then work 2 dc in each ch-1 sp and 1 dc in each tr across. Sl st in the right row-end of Row 5. Turn.
Count: 25 stitches worked one per stitch, plus 12 extra (one more in each sp) = 37 dc. These increases let the outer curve lie flat.
Bowl Row 5 (outer windows): Ch 4 (counts as tr), ch 1, skip 1 dc, tr in next dc. Repeat from * across. Sl st in the top-right corner dc of Row 15. Turn.
That gives 19 tr and 18 ch-1 sps, for 37 stitches.
Bowl Row 6 (scallops): Ch 1, sc in first tr, skip ch-1 sp, shell in next tr, skip ch-1 sp, sc in next tr. Repeat from * across. Sl st in the right row-end of Row 4.
The shells go into the even-numbered tr and the sc into the odd-numbered tr. That gives 10 sc and 9 shells, or 55 stitches, with 9 scallops. Fasten off.
The bowl now runs from the top corner down to Row 4. It stands 2.15 in (5.5 cm) out from the stem.
Border: Stem Edging and Hanging Loop
Border gauge: 6 sc = 1 in (2.5 cm) along row-ends, and 8 sc = 1 in (2.5 cm) along the tops of stitches.
Edging Pass 1 (left side and top):
– Join MC with sc in the left row-end of Row 1.
– Work up the left side, with 2 sc around each tr row-end and 1 sc in each dc row-end. That is 7 × 2 + 8 × 1 = 22 sc.
– Ch 1 for the corner.
– Work across the top of Row 15 with 1 sc in each dc: 6 sc.
– Total: 28 sc and 1 corner ch. Do not fasten off.
Why the math works: The left side is 3.7 in (9.4 cm) tall, and 22 sc ÷ 6 per inch = 3.7 in. The top is 0.75 in (1.9 cm) wide, and 6 sc ÷ 8 per inch = 0.75 in. Each count matches its edge exactly, so the stem neither ruffles nor pulls in.
Hanging loop:
– Sl st back across to the 3rd sc of the top edge.
– Ch 30, then sl st in the same sc.
– Ch 1, work 42 sc over the ch-30 loop, and sl st in the same sc.
– Fasten off.
The covered loop is 1.5 in (3.8 cm) tall.
Edging Pass 2 (right side below the bowl): Join MC in the right row-end of Row 3. Work 1 sc in Row 3, 2 sc around Row 2 and 1 sc in Row 1, for 4 sc. Fasten off.
Appliqués
Poinsettia (make 1, CC1)
Ch 4 and sl st to the first ch to form a ring.
Rnd 1: Ch 1, 10 sc in the ring, sl st to the first sc. (10 sc.)
Rnd 2 (front petals): Sl st in the front loop of the first sc. Ch 5, sl st in 2nd ch from hook, then sc, hdc and dc in the next 3 ch. Skip the next sc and sl st in the front loop of the following sc. Repeat from * 4 more times. (5 small petals.)
Rnd 3 (back petals): Work into the back loops of the 5 sc skipped in Rnd 2. Sl st in back loop. Ch 7, sl st in 2nd ch from hook, then sc, hdc, dc, dc and hdc in the next 5 ch. Repeat from * 4 more times.
That gives 5 large petals, each set between the front petals. Fasten off. The flower is 1.1 in (2.8 cm) across.
Sew 5 gold seed beads in a cluster in the center.
Holly Leaves (make 2, CC2)
Ch 9.
Side 1: Sc in 2nd ch from hook, hdc in next ch, dc in next ch, picot, dc in next ch, dc in next ch, picot, hdc in next ch, sc in next ch.
Tip: In the last ch, work sc, picot, sc.
Side 2: Working along the opposite side of the chain, mirror Side 1: sc, hdc, dc, picot, dc, dc, picot, hdc, sc. Sl st to the first sc and fasten off.
Each leaf is about 1 in (2.5 cm) long and has 5 points.
Berries (make 3, CC1)
Ch 2, 6 sc in 2nd ch from hook, then sl st to join. Ch 1, sc2tog 3 times. (3 sts.)
Fasten off, leaving an 8 in (20.3 cm) tail. Push the tail inside to stuff the berry, then cinch the top closed. Each berry is 0.25 in (0.6 cm) across.
Assembly
- Pin the leaves so they overlap the top-left corner of the stem. Angle one leaf up and one leaf left.
- Place the poinsettia over the leaf bases, centered on the corner.
- Tuck the 3 berries below the flower at the lower left.
- Sew each layer through the back with small, hidden stitches.
Final Blocking
- Wet the letter in cool water and press out the excess in a towel. Do not wring it.
- Lay it RS up on the mat.
- Pin each window corner of the stem to keep the posts straight, keeping the stem 0.75 in (1.9 cm) wide.
- Pin the tip of each of the 9 bowl scallops and the 3 foot scallops.
- Check the measurements: 4.5 in (11.4 cm) tall and 3 in (7.6 cm) wide.
- Pin the loop straight up.
- Spray with starch and let it dry fully.
- Unpin, then sew on the appliqués if you blocked before assembly. The appliqués can be steamed lightly but should not be flattened.
Final Quality-Control Checklist
- [ ] The stem has 7 even windows and 8 straight rungs.
- [ ] The foot has 3 matching scallops.
- [ ] The D hole is smooth, about 0.9 in × 2 in (2.3 cm × 5.1 cm).
- [ ] The bowl has 13 inner spokes, 19 outer spokes and 9 scallops.
- [ ] The left edge is flat, with 22 sc.
- [ ] The loop is centered and secure.
- [ ] The poinsettia petals are offset, and all 5 beads are tight.
- [ ] All tails are woven in invisibly.
- [ ] The letter measures 4.5 in × 3 in (11.4 cm × 7.6 cm).
Troubleshooting
- Bowl ruffles: Your Row 4 or Row 5 is too loose. Go down a hook size for the bowl only.
- Bowl cups or curls: You have too few stitches. Check that Row 4 has 2 dc in every ch-1 sp, for 37 dc.
- Windows look squashed: Your tr are too short. Pull up each loop to full height.
- Stem leans: You are missing the tch stitch at the end of a row. Recount 6 dc on each rung.
- D hole is too narrow: Work the arch loosely, or use ch 38 instead of 36 with 25 sc.
- Left side waves: Use exactly 2 sc per tr row-end, not 3.
- Petals curl: Pin them flat and starch them lightly.
Care
Spot clean or hand wash cool, then re-block with light starch. Store flat in tissue so the scallops and loop keep their shape.
Final Notes
The measurement chain starts at 8 dc = 1 in (2.5 cm), which makes a stem 0.75 in (1.9 cm) wide. Fifteen rows bring the stem to 3.7 in (9.4 cm), and the 0.7 in (1.8 cm) foot brings it to 4.4 in (11.2 cm). The six bowl rows reach 2.15 in (5.5 cm), for a width of 2.9 in (7.4 cm). The 0.1 in (0.3 cm) edging takes the letter to 4.5 in × 3 in (11.4 cm × 7.6 cm), and the loop adds 1.5 in (3.8 cm). If you check each step as you go, your letter will block out crisp and true.
Happy crocheting!