

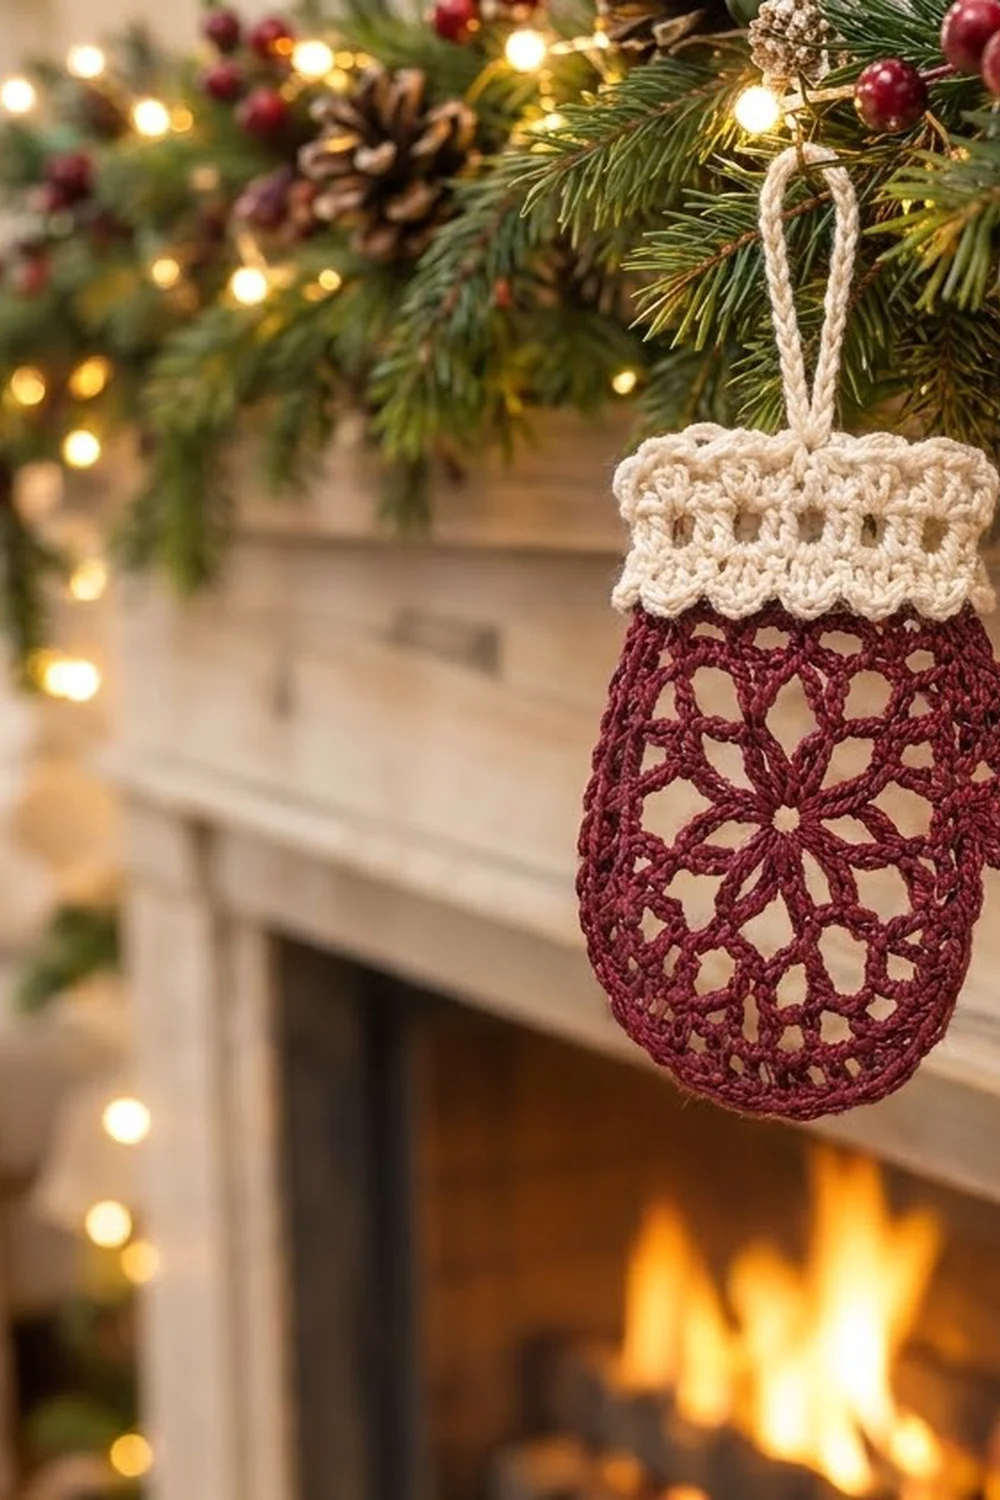
The Hearthside Star Mitten is a small, flat lace ornament. It’s made for tree branches, mantel garlands, and gift tags. An eight-petal openwork flower fills the palm, open mesh rounds out the bottom of the mitten, and a cream cuff with a row of eyelets and two picot edges finishes the top.
The colors are classic holiday: deep burgundy for the mitten and warm cream for the cuff and hanging loop. The lace lets light through, so the ornament looks especially good against string lights or a fire.
This pattern uses US crochet terms. The finished ornament measures 3.75 in (9.5 cm) wide including the thumb and 4.5 in (11.4 cm) tall without the loop. The loop adds about 1.5 in (3.8 cm).
Construction is all in one piece. You work a lace circle in the round, then work flat rows off the top of it for the wrist and off the right side for the thumb. Next comes a single crochet edging in one continuous pass, and then the cream cuff and loop. You only sew in the ends.
Finished Size and Construction
- Finished size: 3.75 in (9.5 cm) wide x 4.5 in (11.4 cm) tall, plus a 1.5 in (3.8 cm) loop
- Skill level: Easy-intermediate
- Terminology: US crochet terms
- Yarn weight: Sport weight (CYC 2), cotton or cotton blend
- Hook: 3.0 mm
- Number of pieces: 1
- Layout: Single standalone ornament
- Lace circle size: 2.75 in (7.0 cm) across
- Body size before border: 2.75 in (7.0 cm) wide x 3.5 in (8.9 cm) tall
- Border depth: Burgundy edging 0.125 in (0.3 cm); cream cuff 1 in (2.5 cm)
Materials
Use a smooth, mercerized sport-weight cotton. Cotton shows lace clearly and holds its shape after blocking. Fuzzy or very soft acrylic will hide the flower.
- Burgundy: 10 g (about 33 m / 36 yd)
- Cream: 5 g (about 17 m / 18 yd)
Both quantities include a margin for a gauge swatch and weaving in ends.
Tools:
– 3.0 mm crochet hook
– Tapestry needle
– 2 locking stitch markers
– Scissors
– Blocking mat and rustproof pins
– Spray bottle with water
Abbreviations (US Terms)
- ch – chain
- sl st – slip stitch
- sc – single crochet
- dc – double crochet
- tr – treble crochet
- dtr – double treble crochet (yarn over 3 times, insert, pull up a loop, [yarn over, pull through 2] 4 times)
- dc2tog – double crochet 2 together
- sp – space
- BLO / FLO – back loop only / front loop only
- RS / WS – right side / wrong side
- st(s) – stitch(es)
Special stitch – picot: Ch 3, sl st in the 3rd ch from the hook.
Position numbering: In Round 4, each dc and each ch-1 sp counts as one “position,” for 48 positions total. Position 1 is the beginning ch-3. Odd positions are dc and even positions are ch-1 spaces.
Gauge and Checkpoints
Gauge: 22 dc and 12 dc rows = 4 in (10.2 cm) with a 3.0 mm hook.
Make the lace circle (Rounds 1–4) as your test piece. If it measures correctly, keep going on that same piece.
Checkpoints (lightly flattened, not stretched):
– After Round 1: 1 in (2.5 cm) across
– After Round 2: 1.75 in (4.4 cm) across
– After Round 3: 2.25 in (5.7 cm) across
– After Round 4: 2.75 in (7.0 cm) across
– After wrist Row 3: 3.5 in (8.9 cm) tall
– After edging: 3 in (7.6 cm) wide across the body
– Cuff Row 1: 3.1 in (7.9 cm) wide
If your circle is too big: Go down to a 2.75 mm hook, or tighten the chain arches in Rounds 2 and 3.
If it’s too small: Go up to a 3.25 mm hook.
If it cups: Your chains are too tight. Loosen only the chain arches.
If it ruffles: Your chains are too loose. Tighten them slightly.

Mitten Body: Lace Circle
Work with burgundy and the RS facing. Do not turn between rounds.
Round 1: Make a magic ring. Ch 3 (counts as dc), work 15 dc in the ring, then sl st to the top of the beginning ch-3. Pull the ring closed, leaving a small center hole. (16 dc)
Round 2 (petals): Ch 2, dc in the next st (this counts as the first dc2tog), ch 5. Dc2tog over the next 2 sts, ch 5. Repeat from * 6 more times. Sl st to the top of the first dc. (8 clusters, 8 ch-5 sps)*
The eight ch-5 arches are the petals of the flower.
Round 3 (web): Sl st in each of the next 3 ch, which puts you at the center of the first ch-5 arch. Ch 1, sc in the same sp, ch 6. Sc in the next ch-5 sp, ch 6. Repeat from * 6 more times. Sl st to the first sc. (8 sc, 8 ch-6 loops)*
Round 4 (mesh ring): Sl st into the first ch-6 loop. Ch 4 (counts as dc + ch 1). In the same loop work [dc, ch 1] twice. In the next ch-6 loop work [dc, ch 1] 3 times. Repeat from * 6 more times. Sl st to the 3rd ch of the beginning ch-4. (24 dc, 24 ch-1 sps = 48 positions)*
Fasten off. Lay the circle flat with the Round 4 join (position 1) at the bottom. Positions count counterclockwise: position 13 is at the right side, 25 at the top, and 37 at the left side. Place markers at position 18 and position 32.
Wrist Rows
These rows square off the top of the circle into straight mitten sides.
Row 1 (RS): Join burgundy with a sl st in the ch-1 sp at position 18. Ch 5 (counts as dtr), ch 1. Then work:
– tr in position 20, ch 1
– dc in position 22, ch 1
– dc in position 24, ch 1
– dc in position 26, ch 1
– dc in position 28, ch 1
– tr in position 30, ch 1
– dtr in position 32
Turn. (8 posts: 2 dtr, 2 tr, 4 dc; plus 7 ch-1 sps = 15 sts)
The dtr and tr at the ends make up for the curve of the circle, so the shoulders come out level with the center.
Row 2 (WS): Ch 4 (counts as dc + ch 1), [dc in next post, ch 1] 6 times, dc in the top of the beginning ch-5. Turn. (8 dc, 7 ch-1 sps = 15 sts)
Row 3 (RS): Ch 4 (counts as dc + ch 1), [dc in next dc, ch 1] 6 times, dc in the 3rd ch of the turning ch-4. (8 dc, 7 ch-1 sps = 15 sts)
Don’t fasten off. Keep the loop on your hook and set it aside, or use a marker to hold it. The edging starts from here.
Checkpoint: The body is 2.75 in (7.0 cm) wide and 3.5 in (8.9 cm) tall from the bottom of the circle to the top of Row 3.
Thumb
The thumb is worked off positions 11–15 on the right side of the circle, below the wrist rows. Use a separate length of burgundy.
Row 1 (RS): Join burgundy with a sl st in the dc at position 11. Ch 3 (counts as dc), then work dc in position 12, position 13, position 14, and position 15. Turn. (5 dc)
Row 2 (WS): Ch 4 (counts as dc + ch 1), skip the next dc, dc in the next dc, ch 1, skip the next dc, dc in the top of the turning ch-3. Turn. (3 dc, 2 ch-1 sps = 5 sts)
Row 3 (RS): Ch 2, dc in the next ch-1 sp (counts as the first dc2tog). Dc in the middle dc. Dc2tog over the next ch-1 sp and the 3rd ch of the turning ch-4. (3 sts)
Fasten off. The thumb is about 0.75 in (1.9 cm) wide and 1 in (2.5 cm) long. The edging will round its tip.
Positions 16 and 17 stay unworked. They form the inner corner between the thumb and the wrist.
Border: Edging and Cuff
Border gauge: Along Round 4, use 1 sc per position, which is 5.5 sc per in (2.5 cm). On row ends, use 3 sc per dtr row end and 2 sc per dc row end.
Burgundy Edging
Pick up the live loop from wrist Row 3, at the upper left corner. With the RS facing, ch 1 and work counterclockwise:
- Left side: 2 sc in the Row 3 end, 2 sc in the Row 2 end, 3 sc in the Row 1 dtr end. (7 sc)
- Bottom curve: 1 sc in each of positions 33–48, then positions 1–10. (26 sc)
- Thumb, lower side: 2 sc in each of the 3 thumb row ends. (6 sc)
- Thumb tip: 2 sc in the first st, sc in the middle st, 2 sc in the last st. (5 sc)
- Thumb, upper side: 2 sc in each of the 3 thumb row ends. (6 sc)
- Inner corner: sc in position 16, sc in position 17. (2 sc)
- Right side: 3 sc in the Row 1 dtr end, 2 sc in the Row 2 end, 2 sc in the Row 3 end. (7 sc)
Total: 7 + 26 + 17 + 2 + 7 = 59 sc. Fasten off. Leave the top edge unedged; the cuff is worked there.
Why the math works: The bottom curve gets exactly one sc per Round 4 position, so it has the same stitch count as the round underneath and stays flat. On the row ends, the sc count follows the row height: a dtr is about 3 sc tall and a dc is about 2 sc tall. The 2 sc in the inner corner keep the join between thumb and body snug without puckering.
Cream Cuff
Row 1 (RS): Join cream with a sl st in the BLO of the last edging sc at the top right corner. Ch 1 and sc in the same st. Work 1 sc in the BLO of each of the 15 sts of wrist Row 3. On a ch-1 sp, work into the back strand of the chain. Finish with sc in the BLO of the first edging sc at the top left corner. Turn. (15 + 2 = 17 sc)
Row 2 (WS, eyelets): Ch 4 (counts as dc + ch 1), skip the next st. [Dc in the next st, ch 1, skip the next st] 7 times, dc in the last st. Turn. (9 dc, 8 ch-1 sps = 17 sts)
Row 3 (RS): Ch 1. Sc in the first dc, then [sc in the ch-1 sp, sc in the next dc] 7 times, sc in the ch-1 sp, sc in the 3rd ch of the turning ch-4. Turn. (17 sc)
Row 4 (WS, top picot edge): Ch 1, sc in the first st. [Picot, sc in each of the next 2 sts] 8 times. (17 sc, 8 picots)
Fasten off.
Lower picot trim: Turn the ornament so the RS faces you, with the cuff at the top. Join cream in the first free front loop at the right end of wrist Row 3, just below cuff Row 1. Ch 1, sc in the same loop. [Picot, sc in each of the next 2 free front loops] 8 times. (17 sc, 8 picots) Fasten off. This ridge sits along the bottom edge of the cuff and overlaps the burgundy.
Checkpoint: The cuff is 3.1 in (7.9 cm) wide and 1 in (2.5 cm) deep. It’s slightly wider than the wrist, which gives it a soft flare.
Hanging Loop
Find the center sc of cuff Row 4. It’s the 9th sc, between the 4th and 5th picots. Join cream there. Ch 20, then sl st in the same st to form a ring. Ch 1 and work 26 sc into the ch-20 ring. Sl st into the base st. Fasten off, leaving a 6 in (15.2 cm) tail. Use the tail to make 2–3 small stitches through the base of the loop and the cuff so the loop can’t twist or loosen. The finished loop stands about 1.5 in (3.8 cm) tall.
Final Blocking
- Weave in all ends along stitches of the same color. Leave about 0.5 in (1.3 cm) before trimming.
- Spray the ornament until it’s evenly damp but not dripping.
- Lay it RS up on the blocking mat.
- Pin the center hole open, then pin out the tip of each of the eight petal arches.
- Pin the bottom curve to a 2.75 in (7.0 cm) circle and the body to 3 in (7.6 cm) wide.
- Pin the wrist sides straight and the top corners square.
- Shape the thumb so it angles slightly upward, with the tip at 3.75 in (9.5 cm) from the left edge.
- Pin each picot on both cuff edges into a small point. Pin the cuff flat at 3.1 in (7.9 cm) wide.
- Let it dry completely, at least 8 hours. For crisper lace, spray lightly with fabric stiffener before drying.
Final Quality-Control Checklist
- The ornament is 3.75 in (9.5 cm) wide and 4.5 in (11.4 cm) tall without the loop
- The center hole is small and round, and all eight petals are visible
- Round 4 has 24 dc and 24 ch-1 sps
- The wrist rows have 15 sts each, with level shoulders
- The edging has 59 sc and lies flat with no ruffles
- The cuff rows have 17 sts, and Row 2 has 8 even eyelets
- There are 8 picots on the top edge and 8 on the lower trim
- The loop is centered and securely stitched
- No ends are visible on the RS
Troubleshooting
Center hole is too large: Pull the magic ring tighter before joining Round 1. Secure it with the tail on the WS.
Petals look flat or crowded: Your Round 2 chains are too tight. Work them slightly looser, or use ch 6 instead of ch 5 and keep everything else the same.
Shoulders dip below the center: Make sure you used dtr at positions 18 and 32 and tr at positions 20 and 30. Then block the corners square.
Thumb sticks straight out: Pin it at a slight upward angle while it dries. Spray stiffener helps it hold that angle.
Edging ruffles on the curve: You’ve added extra sc. Use exactly 26 sc across positions 33–48 and 1–10.
Cuff is narrower than the wrist: Check that cuff Row 1 includes the two corner edging sts, for 17 sc total.
Loop twists: Add one more anchoring stitch through the base, front to back.
Care
Hand wash in cool water, press out the water in a towel, and reshape it flat to dry. Store it flat or hanging so the lace doesn’t crease.
Final Notes
Each stage of the ornament builds on the one before:
- The 16-dc center grows into a 48-position mesh circle 2.75 in (7.0 cm) across.
- Three 15-st wrist rows bring the body to 3.5 in (8.9 cm) tall.
- A 5-st thumb comes off positions 11–15.
- The 59-sc edging brings the body to 3 in (7.6 cm) wide and 3.75 in (9.5 cm) with the thumb.
- The 17-st cuff adds 1 in (2.5 cm), for a total height of 4.5 in (11.4 cm).
- The 1.5 in (3.8 cm) loop goes on last.
Check each measurement as you reach it, and the finished ornament will come out the right size and shape.
Happy crocheting!