

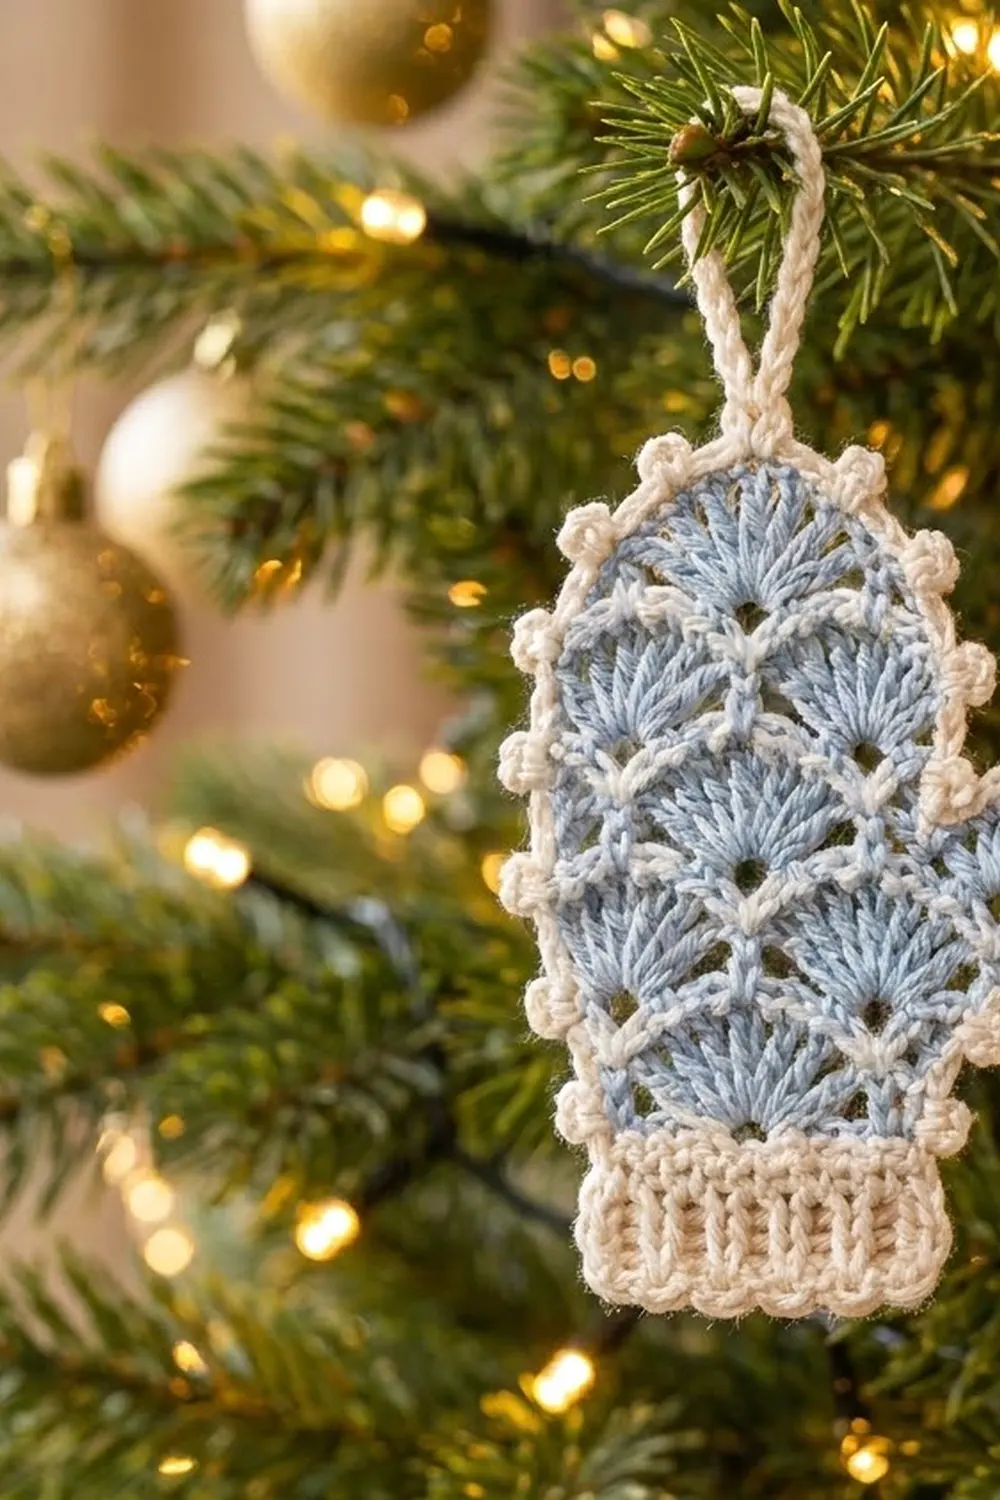
This little mitten ornament looks like frost on a window. The hand is powder blue and covered in staggered fan shells, and a thin cream line runs over the top of every row of shells. A ribbed cream cuff, a picot border and a single-crochet hanging loop finish it in a soft winter style.
The pattern uses US crochet terms. After blocking, the mitten is 3.75 in (9.5 cm) wide across the thumb and 4.5 in (11.4 cm) tall, not counting the loop. The loop adds about 1 in (2.5 cm).
You make it as one flat piece. First you work the ribbed cuff in rows. Then the hand goes up in pairs of rows: one blue shell row, then one cream single-crochet row. Both colors are carried, so you only fasten off at the top. After the hand is done, you work the thumb out from the right-hand edge. Last comes one cream border with picots and the loop.
Each section has stitch counts and size checkpoints, so you can check your work as you go.
Finished Size and Construction
- Finished size: 3.75 in × 4.5 in (9.5 cm × 11.4 cm), plus a 1 in (2.5 cm) loop
- Skill level: Intermediate
- Terminology: US crochet terms
- Yarn weight: Fingering-weight cotton or size 3 crochet thread (super fine, #1)
- Hook: 2.25 mm (US B-1)
- Number of pieces: 1
- Layout: One flat mitten: cuff, hand, rounded top and thumb, all in one piece
- Hand width before border: 2.75 in (7.0 cm)
- Size before border: 3.25 in × 4 in (8.3 cm × 10.2 cm)
- Border depth: 0.25 in (0.6 cm), including picots
Materials
Use smooth mercerized cotton. It shows the shell texture clearly and holds its shape after starching. Choose a yarn of about 125 m per 50 g.
- Powder blue: 5 g (about 13 m)
- Cream: 4 g (about 10 m)
These amounts include a safety margin of roughly 20%.
Tools:
– 2.25 mm (US B-1) crochet hook
– 2 locking stitch markers
– Tapestry needle
– Scissors
– Blocking board and rustproof pins
– Spray starch or a fabric stiffener (optional)
Abbreviations (US Terms)
- ch: chain
- sl st: slip stitch
- sc: single crochet
- dc: double crochet
- fpdc: front post double crochet
- bpdc: back post double crochet
- st(s): stitch(es)
- RS / WS: right side / wrong side
Special stitches:
– Shell: 5 dc in the same stitch.
– Half shell: at the start of a row, ch 3 (counts as 1 dc) and work 2 dc in the first stitch, for 3 stitches. At the end of a row, work 3 dc in the last stitch.
– Picot: ch 3, then sl st in the first of those 3 chains.
Same-direction color pairs: After a blue row, don’t turn. Put the blue loop on a locking marker. Go back to the edge where that blue row started, pick up the cream (it is waiting there), and work the cream row in the same direction. Now both yarns are at the same edge. Turn, and start the next pair.
Gauge and Checkpoints
Gauge: 19 sts = 2.75 in (7.0 cm). One pair of rows (a blue shell row plus a cream sc row) = 0.5 in (1.3 cm) tall.
The cuff is your swatch. Before you go on, work Rows 1–4 and measure them. A tiny piece shows gauge errors quickly, so check these points:
- After Row 4: 2.75 in × 0.75 in (7.0 cm × 1.9 cm)
- After Row 14: 2.75 in × 3.25 in (7.0 cm × 8.3 cm)
- After Row 18: 4 in (10.2 cm) tall, measured at the center
- After the thumb: 3.25 in (8.3 cm) wide
- After the border and blocking: 3.75 in × 4.5 in (9.5 cm × 11.4 cm)
If the cuff measures more than 2.75 in (7.0 cm), change to a 2 mm hook. If it is under 2.6 in (6.6 cm), change to a 2.5 mm hook. Shell rows that come out short usually mean the dc are pulled too tight, so make each one fully tall.

Cuff
Use cream.
Row 1 (RS): Ch 21. Dc in the 4th ch from the hook and in each ch across. (19 sts; the skipped 3 ch count as the first dc)
Row 2 (WS): Ch 3 (counts as dc). Bpdc around the next st, fpdc around the next st. Repeat from * to * 7 more times. Bpdc around the next st, then dc in the top of the turning ch. (19 sts: 1 + 9 bpdc + 8 fpdc + 1)
Row 3 (RS): Ch 3. Fpdc around the next st, bpdc around the next st. Repeat from * to * 7 more times. Fpdc around the next st, then dc in the top of the turning ch. (19 sts) The ribs now stand out on the RS.
Row 4 (WS): Ch 1. Sc in each st across. (19 sc) Turn, but don’t cut the cream.
Checkpoint: 2.75 in × 0.75 in (7.0 cm × 1.9 cm).
Hand
Work in same-direction pairs. Each blue row is followed by a cream row worked in the same direction. Turn only after the cream row.
Row 5 (RS, blue): Pull up a blue loop in the first st and ch 1. Sc in the same st. Skip 2 sts, shell in the next st, skip 2 sts, sc in the next st. Repeat from * to * 2 more times. (19 sts: 3 shells + 4 sc) Drop the blue onto a marker.
Row 6 (RS, cream): Go back to the start of Row 5. Pull up the cream in the first st and ch 1. Sc in each st across. (19 sc) Turn.
Row 7 (WS, blue): Pull the blue up to the hook. Work a half shell (ch 3, 2 dc) in the first st. Skip 2 sts, sc in the next st, skip 2 sts, shell in the next st. Repeat from * to * once more. Skip 2 sts, sc in the next st, skip 2 sts, 3 dc in the last st. (19 sts: 3 + 1 + 5 + 1 + 5 + 1 + 3) Drop the blue.
Row 8 (WS, cream): Go back to the start of Row 7. Sc in each st across, including the top of the ch-3. (19 sc) Turn.
Rows 9–10: Repeat Rows 5–6. (19 sts each)
Rows 11–12: Repeat Rows 7–8. (19 sts each)
Rows 13–14: Repeat Rows 5–6. (19 sts each) Turn.
Each new row of shells sits over the sc of the row below it. This gives the staggered fans, with an eyelet between each pair of shells.
Checkpoint: 2.75 in × 3.25 in (7.0 cm × 8.3 cm).
Rounded Top
Row 15 (WS, blue): Sl st in the first 3 sts (these don’t count). Sc in the next st (st 4). Skip 2 sts and work 7 dc in the next st. Skip 2 sts, sc in the next st. Skip 2 sts, 7 dc in the next st, skip 2 sts, sc in the next st (st 16). Leave the last 3 sts unworked. (17 sts: 1 + 7 + 1 + 7 + 1) Drop the blue.
Row 16 (WS, cream): Carry the cream loosely behind the 3 sl sts. Pull it up in the first sc of Row 15 and ch 1. Sc in each st across. (17 sc) Turn.
Row 17 (RS, blue): Sl st in the first 4 sts (these don’t count). Sc in the next st. Skip 3 sts and work 9 dc in the next st. Skip 3 sts, sc in the next st. Leave the last 4 sts unworked. (11 sts: 1 + 9 + 1) Fasten off the blue.
Row 18 (RS, cream): Carry the cream behind the 4 sl sts. Pull it up in the first sc of Row 17 and ch 1. Sc in each st across. (11 sc) Fasten off.
Checkpoint: 4 in (10.2 cm) tall at the center. The top should be a smooth dome with one large fan at the peak.
Thumb
Hold the mitten with the RS facing you and the cuff at the bottom. You will work along the right-hand edge.
Row T1 (RS, blue): Join the blue with a sl st in the side of Row 6 and ch 1. Work 13 sc evenly up the edge to the side of Row 14. Put 1 sc in each cream row end and 2 sc in each blue row end. (13 sc) Turn.
Row T2 (WS, blue): Ch 1. Sc in the first st. Skip 2 sts, shell in the next st, skip 2 sts, sc in the next st. Repeat from * to * once more. (13 sts: 2 shells + 3 sc) Drop the blue.
Row T3 (WS, cream): Go back to the start of T2. Pull up the cream in the first sc and ch 1. Sc in each st across. (13 sc) Turn.
Row T4 (RS, blue): Sl st in the first 3 sts (these don’t count). Sc in the next st. Skip 2 sts and work 7 dc in the next st. Skip 2 sts, sc in the next st. Leave 3 sts unworked. (9 sts) Fasten off the blue.
Row T5 (RS, cream): Carry the cream behind the 3 sl sts. Pull it up in the first sc of T4 and ch 1. Sc in each st across. (9 sc) Fasten off.
Checkpoint: 3.25 in (8.3 cm) wide across the hand and thumb. The thumb sticks out 0.5 in (1.3 cm).
Weave in the blue tails now. Leave the cream tails for the border to cover.
Border
Border gauge: 7 sc = 1 in (2.5 cm) along the edges. That is 1 sc per cream row end and 2 sc per blue or cuff row end.
Round 1 (RS, cream): With the RS facing, join the cream with sc in the first foundation ch at the bottom-left corner. Work counterclockwise:
- Bottom edge: 2 more sc in the same ch, 1 sc in each of the next 17 ch, then 3 sc in the last ch. (23 sc)
- Right side, Rows 1–5: 7 sc up the cuff and 2 sc in the side of Row 5. (9 sc)
- Thumb: 4 sc up the lower side. Then 13 sc around the tip: 2 down each stepped end and 1 in each T5 sc. Then 4 sc down the upper side. (21 sc)
- Rounded top: 25 sc evenly from the side of Row 15 to the side of Row 15 on the other edge. (25 sc)
- Left side, Rows 14–1: 15 sc down the hand and 7 sc down the cuff. (22 sc)
Sl st in the first sc to join. (100 sc)
Why the math works: 23 + 9 + 21 + 25 + 22 = 100. If you number the stitches 1 to 100, they fall into these blocks:
- Sts 1–3: bottom-left corner group
- Sts 4–20: bottom edge
- Sts 21–23: bottom-right corner group
- Sts 24–30: right side of the cuff
- Sts 31–93: picot section, 63 sts
- Sts 94–100: left side of the cuff
The picot section starts at the right side of Row 5 and ends at the left side of Row 5. It has 63 sts, and 63 = 21 × 3, so the 3-stitch picot repeat fits exactly. The center of the top arc is st 36 of that section, and 36 is also a multiple of 3. That means a picot lands exactly at the top center, and the loop takes its place.
Round 2: Ch 1.
– Sc in st 1, 3 sc in st 2, then sc in sts 3–21. Work 3 sc in st 22, then sc in sts 23–30. (34 sc)
– Sc in the next 2 sts, then (sc, picot) in the next st. Repeat from * to * 21 times. On the 12th repeat, which is the top center, make the loop in place of the picot: (sc, ch 18, sl st in the same sc). (63 sc, 20 picots, 1 loop)
– Sc in sts 94–100. (7 sc)
Sl st in the first sc to join. (104 sc: 100 + 4 corner increases)
Loop: Sl st into the ch-18 space. Work 26 sc tightly into the space, then sl st into the base sc. Fasten off and weave in all tails.
Checkpoint before blocking: about 3.75 in × 4.5 in (9.5 cm × 11.4 cm).
Final Blocking
- Soak the mitten in cool water for 10 minutes, then roll it in a towel to press out the water.
- Lay it RS up on the blocking board.
- Pin the cuff corners 2.75 in (7.0 cm) apart, with the cuff edge straight.
- Pin the top center so the total height is 4.5 in (11.4 cm), not counting the loop.
- Pin out the thumb tip until the width is 3.75 in (9.5 cm).
- Put a pin through the eyelet between each pair of shells along the edge so the fans open evenly.
- Shape each picot into a little round bead with your fingertip.
- Spray it with starch if you’d like a stiffer ornament. Let it dry completely before you unpin it.
Final Quality-Control Checklist
- Every row count was correct: 19 sts through Row 14, then 17 and 11 at the top, and 13 then 9 on the thumb.
- Each cream line sits evenly over its row of shells.
- An eyelet shows between every pair of shells.
- The cuff ribs run straight up and down.
- 20 picots are evenly spaced, and the loop is centered.
- The bottom corners are square, and the cuff is plain sc with no picots.
- No carried yarn shows through the border.
- The blocked size is 3.75 in × 4.5 in (9.5 cm × 11.4 cm).
Troubleshooting
The shells lean to one side. Check that every row of shells sits over the sc of the row below. Count the 2 skipped stitches carefully.
The cream lines pucker. Your sc are too tight. Make each loop a little looser, or go up a hook size for the cream rows only.
The edges wave. Too many border sc. Count each section against the numbers in Round 1.
The thumb cups. Make T1 exactly 13 sc, and block the thumb flat while it is damp.
The carried yarn shows at the edges. Carry it loosely along the side, and put Round 1 of the border right over it.
The loop twists. Work the 26 sc firmly, then steam the loop flat.
Care
Hand wash in cool water and dry flat, then reshape it and starch it again if needed. Store it flat so the picots don’t crush.
Final Notes
The sizes build on each other, so check each one before you go on:
- The cuff is 19 sts, or 2.75 in (7.0 cm) wide.
- Five pairs of rows bring the piece to 3.25 in (8.3 cm) tall.
- The rounded top brings it to 4 in (10.2 cm).
- The thumb widens it to 3.25 in (8.3 cm).
- The 100-stitch border and blocking give 3.75 in × 4.5 in (9.5 cm × 11.4 cm).
Hang it on the tree, tie it onto a gift, or keep one in your winter bowl. Happy crocheting!