

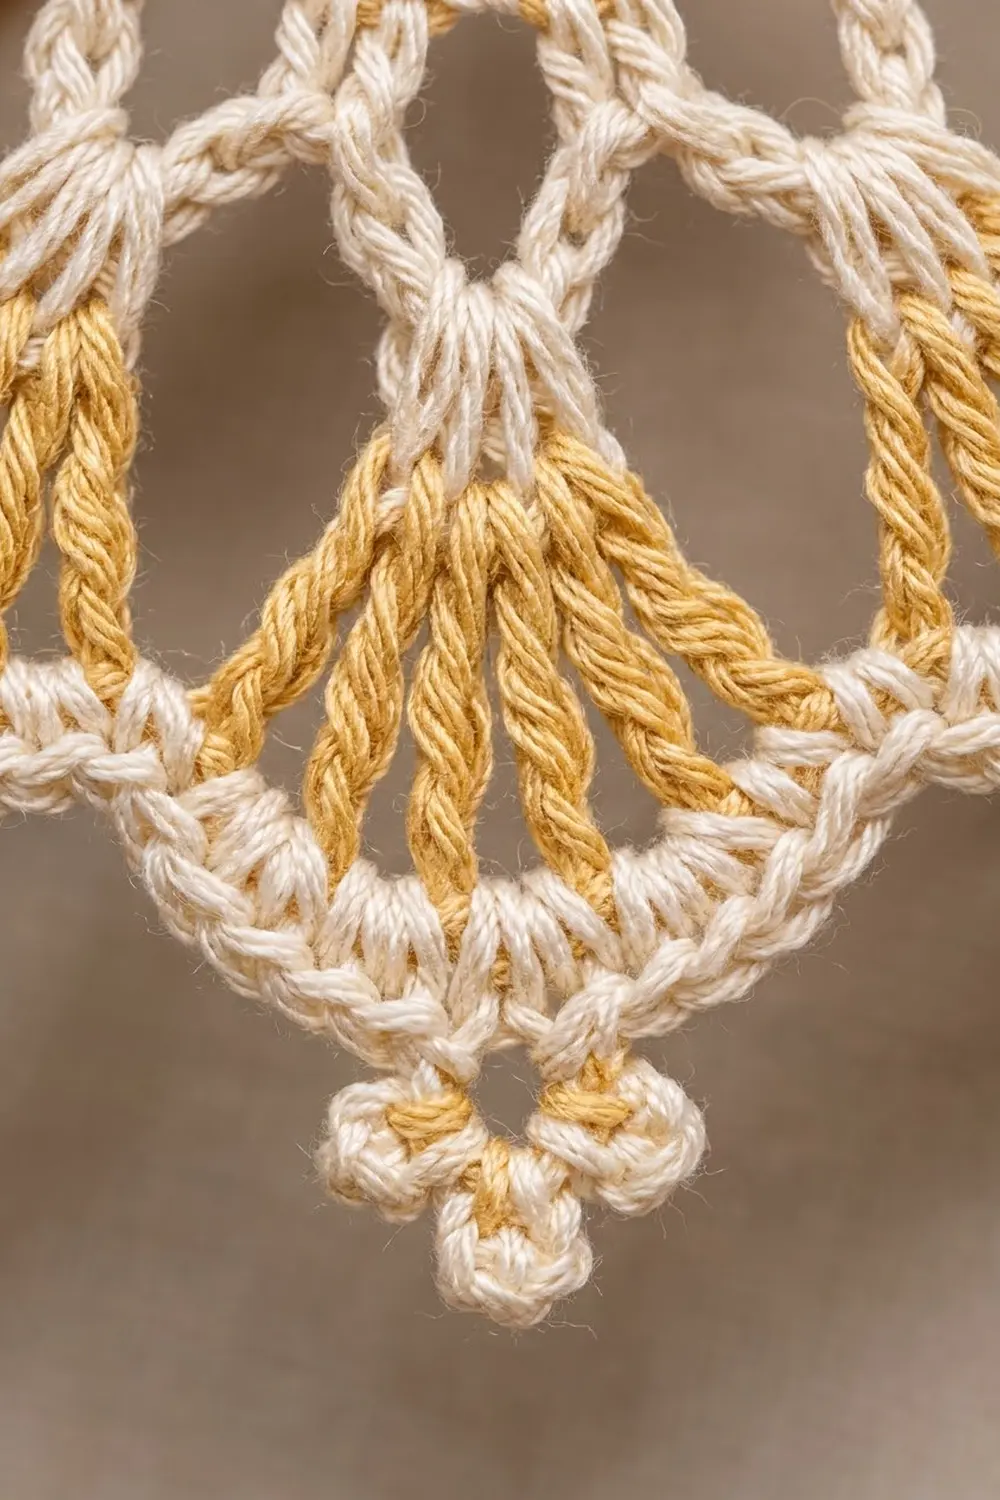
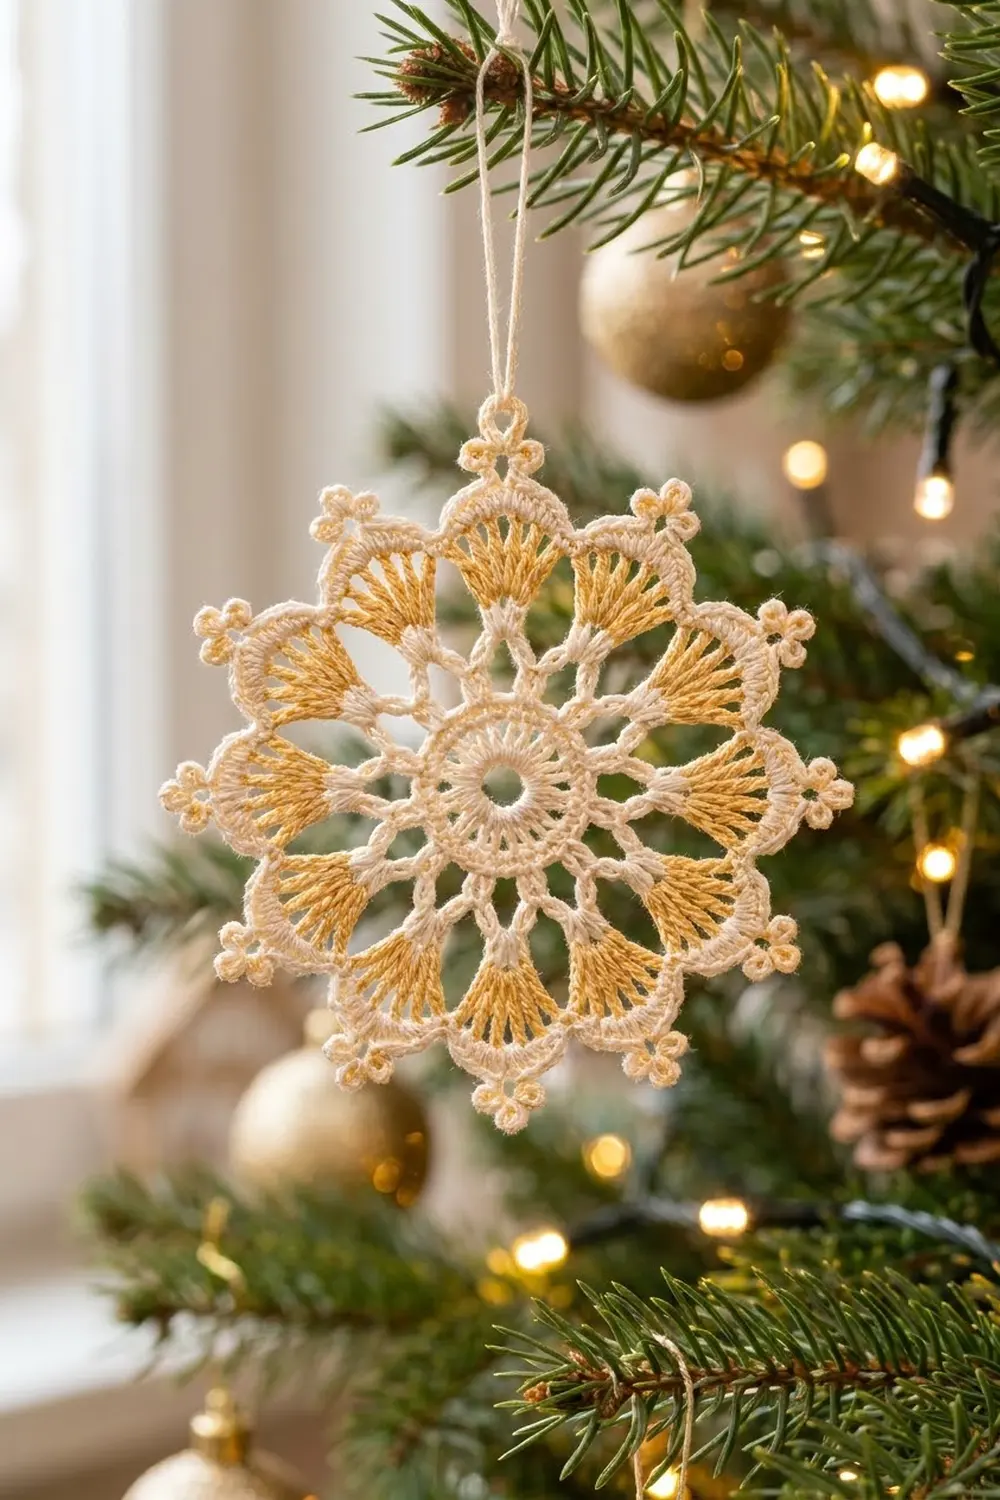
This snowflake ornament combines a cream lace frame with twelve gold fans. A small open ring sits at the center, surrounded by a light chain lattice. Each gold fan is outlined with a cream scallop, and each point between scallops ends in a little trefoil of picots. These make the edge look beaded.
The colors are cream and soft gold. The cream gives the ornament its structure, and the gold fills the petals so the snowflake catches the light on the tree. Use mercerized cotton thread for a crisp, slightly shiny finish.
This pattern uses US crochet terms. After blocking, the ornament measures 4.25 in (10.8 cm) across from trefoil tip to trefoil tip, plus a 1.5 in (3.8 cm) hanging loop.
Construction overview: You work the whole motif in the round from the center out, as one piece. Rounds 1 to 4 build the cream center, lattice, and shells. Round 5 adds the gold fans. Round 6 is the cream scallop-and-trefoil edging, which acts as the border. Finally, you add the hanging loop and block the ornament flat.
Finished Size and Construction
- Finished size: 4.25 in (10.8 cm) diameter, tip to tip
- Skill level: Intermediate (thread work and picots)
- Terminology: US crochet terms
- Yarn weight: Size 10 crochet thread (lace weight, 0)
- Hook: 1.75 mm steel hook
- Number of pieces: 1 single motif
- Layout: Single round motif with 12 repeats
- Piece size before border (after Round 5): 3.5 in (8.9 cm)
- Border depth (Round 6): 0.375 in (1.0 cm) on each side
Materials
Thread: Choose mercerized cotton crochet thread in size 10. It holds picots crisply and takes starch well. Don’t use fuzzy or acrylic blends, because the lattice will look blurry and won’t hold its shape.
- Color A, Cream: 6 g / about 28 m
- Color B, Soft Gold: 3 g / about 14 m
Tools:
– 1.75 mm steel crochet hook
– Fine tapestry needle or beading-eye needle
– Small sharp scissors
– Blocking mat and rustproof pins (at least 12)
– Spray starch or a fabric stiffener
– Ruler or tape measure
The thread amounts include a margin of about 25% for your gauge swatch, weaving in ends, and the hanging loop.
Abbreviations (US Terms)
- ch – chain
- sl st – slip stitch
- sc – single crochet
- dc – double crochet
- sp – space
- st(s) – stitch(es)
- rep – repeat
- beg – beginning
- tp – trefoil picot (special stitch)
Special stitch – Trefoil Picot (tp):
1. Ch 5.
2. Sl st in the 3rd ch from the hook (picot 1).
3. [Ch 3, sl st in the same ch as the last sl st] twice (picots 2 and 3).
4. Sl st in each of the 2 remaining stalk ch, back to the base.
This makes three ch-3 picots clustered on a 2-ch stalk.
Gauge and Checkpoints
Gauge matters less for an ornament than for a garment. Still, a consistent size means your snowflakes will match. Before you make a batch, crochet one full ornament as your test piece.
Measurement checkpoints (measure unblocked and laid flat):
– After Round 1: 0.75 in (1.9 cm) across
– After Round 2: 1.25 in (3.2 cm) across
– After Round 3: 2 in (5.1 cm) across
– After Round 4: 2.75 in (7.0 cm) across
– After Round 5: 3.5 in (8.9 cm) across
– After Round 6: 4.25 in (10.8 cm) tip to tip
A difference of ±0.125 in (0.3 cm) at any checkpoint is fine.
If your piece is too big, go down to a 1.5 mm hook. Check that your chain loops in Rounds 2 and 3 aren’t loose and floppy.
If your piece is too small, go up to a 2.0 mm hook. Also check whether you’re pulling the dc loops tight, because that shortens the fans.
Pattern
Round 1 – Center Ring (Color A, Cream)
Ch 6 and join with a sl st to the first ch to form a ring.
Ch 3 (counts as dc). Work 23 dc into the ring, then join with a sl st to the top of the beg ch-3.
Stitch count: 24 dc.
The ring leaves a small open hole at the center. Check: 0.75 in (1.9 cm).
Round 2 – Inner Loops
Ch 1. Sc in the same st as the join, ch 5, skip the next dc.
*Sc in the next dc, ch 5, skip the next dc; rep from * 10 more times. Join with a sl st to the first sc.
Stitch count: 12 sc and 12 ch-5 loops.
Each sc sits on every other dc of Round 1, so 24 ÷ 2 = 12 loops. Check: 1.25 in (3.2 cm).
Round 3 – Lattice
Sl st in each of the next 3 ch to reach the center of the first ch-5 loop. Ch 1, sc in the same loop, ch 7.
*Sc in the next ch-5 loop, ch 7; rep from * 10 more times. Join with a sl st to the first sc.
Stitch count: 12 sc and 12 ch-7 loops.
The longer loops open the lattice and make the spoke shapes you can see between the center and the fans. Check: 2 in (5.1 cm).
Round 4 – Shells
Sl st into the first ch-7 loop. Ch 3 (counts as dc), then work (dc, ch 3, 2 dc) in the same loop and ch 1.
*(2 dc, ch 3, 2 dc) in the next ch-7 loop, ch 1; rep from * 10 more times. Join with a sl st to the top of the beg ch-3.
Stitch count: 48 dc (12 shells × 4 dc), 12 ch-3 sps, and 12 ch-1 sps.
Fasten off Color A. Each V-shaped shell forms the cream base of one fan. Check: 2.75 in (7.0 cm).
Round 5 – Gold Fans (Color B, Soft Gold)
Join Color B with a sl st in any ch-3 sp. Ch 3 (counts as dc) and work 8 dc in the same sp, then sc in the next ch-1 sp.
*9 dc in the next ch-3 sp, sc in the next ch-1 sp; rep from * 10 more times. Join with a sl st to the top of the beg ch-3.
Stitch count: 120 sts (108 dc in 12 fans of 9 dc, plus 12 sc).
Fasten off Color B. Each fan starts narrow at the shell and spreads out into a solid gold wedge. The sc between fans pulls the edges down so each fan stands on its own. Check (size before border): 3.5 in (8.9 cm).
Border – Round 6: Scallops and Trefoil Points
Border gauge: 12 sc around each 9-dc fan. At the right tension, each scallop arc measures about 0.875 in (2.2 cm) along its outer curve.
Round 6 (Color A, Cream)
Join Color A with a sl st in any sc between two fans.
Ch 1. Work (sc, tp, sc) in the same sc, then work across the next fan:
– sc in each of the next 3 dc
– 2 sc in each of the next 3 dc
– sc in each of the next 3 dc
*Work (sc, tp, sc) in the next sc between fans, then across the next fan: sc in each of the next 3 dc, 2 sc in each of the next 3 dc, sc in each of the next 3 dc. Rep from * 10 more times. Join with a sl st to the first sc.
Count per repeat: (9 sc worked 1 per existing dc + 3 extra sc) = 12 sc over the fan, plus 2 sc and 1 tp at the point.
That makes 14 sc and 1 tp per repeat. Round total: 12 × 14 = 168 sc and 12 tp.
Fasten off. Check: 4.25 in (10.8 cm) tip to tip.
Why the math works: The fan’s outer edge is a convex curve, so it’s longer than the fan’s base. If you worked 1 sc per dc, the 9 sc would pull the curve in and cup the fan. The 3 increases in the center of each fan add just enough length for a smooth, rounded scallop that lies flat.
The two sc at each point sit in a single stitch, so they make a sharp V that dips between scallops. The trefoil picot then sticks out from that V and forms the beaded tip. With 12 fans and 12 points, the repeat lines up exactly, and no stitches are added or skipped at the join.
Hanging Loop
Join Color A with a sl st in the center picot of any tp. Ch 30, then sl st in the same picot. Fasten off and weave in the ends.
The loop hangs about 1.5 in (3.8 cm) above the trefoil.
Final Blocking
- Weave in all ends before blocking. Hide the gold tails inside the gold fans and the cream tails along the cream sc edge.
- Wet the ornament in cool water, then press it gently in a towel. Don’t wring it.
- Starch it. Dip it in diluted fabric stiffener or spray it generously with starch.
- Pin the center. Put one pin through the center hole to anchor it, then shape Round 1 into a neat circle.
- Pin the 12 trefoils. Use a grid mat. Pin opposite points first, so 12 and 6 o’clock, then 3 and 9, then fill in the rest. Each tip should be 2.125 in (5.4 cm) from the center.
- Open the picots. Use a pin tip to lift each of the three picots in every trefoil so they look round.
- Smooth the scallops. Run a fingertip along each scallop so the cream edge curves evenly around its gold fan.
- Let it dry completely, usually 8 to 12 hours, before you unpin it.
Final Quality-Control Checklist
- Diameter is 4.25 in (10.8 cm) ±0.125 in (0.3 cm)
- There are 12 gold fans, each with 9 dc
- There are 12 trefoil points, each with 3 open picots
- Every scallop has 12 sc and looks symmetrical
- The center hole is round and open
- No gold shows through the cream edging, and no cream shows inside the fans
- All ends are woven in securely and invisibly
- The ornament lies flat and doesn’t cup or ruffle
- The hanging loop is centered over a trefoil
Troubleshooting
Fans curl inward (cupping): Your Round 6 is too tight. Rework it with a slightly looser tension, or add a 4th increase at the fan’s center.
Scallops ruffle: There are too many sc, or your tension is too loose. Check that you have exactly 12 sc per fan and 2 sc at each point.
Lattice sags or looks lopsided: Your chain lengths are uneven. Count each ch-5 and ch-7 loop, and keep your chain tension steady.
Trefoils collapse into a lump: Make each picot chain fully before you slip stitch, and open the picots with a pin while blocking.
Gold fans look gappy at the base: Pull the first dc of each fan snug against the ch-3 sp.
The ornament won’t stay stiff: Use a stronger starch mix and dry it completely flat.
Care
Hand wash in cool water with mild soap. Reshape and re-starch the ornament, then pin it flat to dry. Store it flat between layers of tissue paper so the picots don’t get crushed.
Final Notes
Here is the measurement chain:
– Round 1: 0.75 in (1.9 cm)
– Round 2: 1.25 in (3.2 cm)
– Round 3: 2 in (5.1 cm)
– Round 4: 2.75 in (7.0 cm)
– Round 5: 3.5 in (8.9 cm)
– Round 6: 4.25 in (10.8 cm)
The stitch counts follow the same chain: 24 dc, then 12 loops twice, then 12 shells with 48 dc, then 12 fans totaling 120 sts, and finally 168 sc with 12 trefoils.
If you match the checkpoints on your first ornament, the rest of the batch will come out the same size. That makes these snowflakes easy to make as a matching set for the tree or to tuck into gift wrap.
Happy crocheting!