

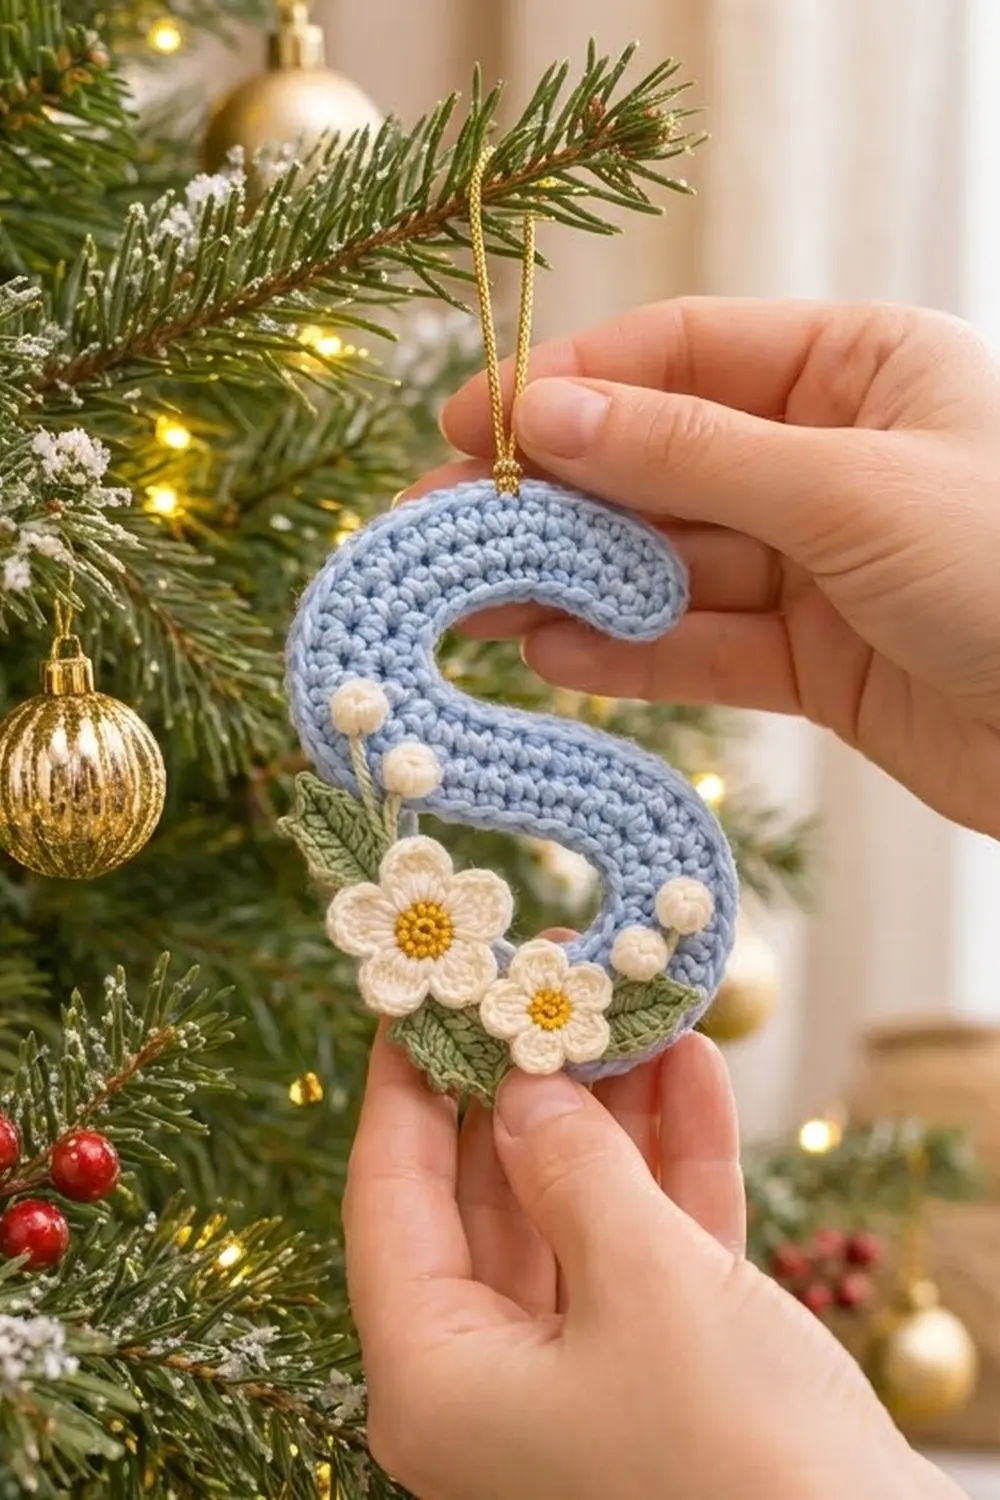
The Winter Blossom Letter S is a flat, single-piece monogram ornament. It is worked in soft powder blue and finished with a small layered flower cluster in cream, mustard yellow and sage green. A gold cord loop at the top makes it a personalized tree ornament or gift tag.
The letter is a chunky, rounded S with blunt tips and a neat, slightly raised rim. Two cream five-petal flowers with yellow centers, two serrated holly-style leaves and four tiny cream berries sit together on the lower left of the letter.
The pattern uses US crochet terms. The finished ornament is about 6 in (15.2 cm) tall and 4 in (10.2 cm) wide, and the blue strip is 1.6 in (4.1 cm) wide.
You start with a chain along the centerline of the S, then work rounds around both sides of it. Increases on the outer edge of each curve and decreases on the inner edge bend the strip into an S. A two-round border finishes the edge. The appliqués are made separately and sewn on.
Finished Size and Construction
- Finished size: about 6 in (15.2 cm) tall x 4 in (10.2 cm) wide
- Skill level: Intermediate (shaping with increases and decreases)
- Terminology: US crochet terms
- Yarn weight: DK (light, #3)
- Hook: 3.5 mm (E-4) for the letter; 3.0 mm for the appliqués
- Number of pieces: 1 letter plus 8 small appliqués (2 flowers, 2 leaves, 4 berries)
- Layout: single piece, no joining
- Strip width before border: 1.2 in (3.0 cm)
- Size before border: about 5.6 in (14.2 cm) x 3.6 in (9.1 cm)
- Border depth: 0.2 in (0.5 cm) on every edge
Materials
Use a smooth cotton or cotton-blend DK yarn. It shows the curved rounds clearly and holds a crisp edge after blocking. Avoid fuzzy or splitty yarn, especially for the small appliqués.
- Powder blue (letter): 15 g, about 34 m
- Cream (flowers and berries): 5 g, about 11 m
- Mustard yellow (flower centers): 2 g, about 5 m
- Sage green (leaves): 3 g, about 7 m
- Gold metallic cord: one piece, 7 in (17.8 cm) long
All quantities include a margin for your gauge swatch and sewing tails.
Tools:
– 3.5 mm (E-4) and 3.0 mm crochet hooks
– 6 locking stitch markers
– Tapestry needle and scissors
– Blocking mat, rustproof pins and a spray bottle
Abbreviations (US Terms)
- ch: chain
- sl st: slip stitch
- sc: single crochet
- hdc: half double crochet
- dc: double crochet
- sc2tog: single crochet 2 together. Insert hook in next st and pull up a loop, insert hook in following st and pull up a loop, then yarn over and pull through all 3 loops.
- BLO: back loop only
- st(s): stitch(es)
- sp: space
Special stitch, picot: ch 2, sl st in 2nd ch from hook.
Gauge and Checkpoints
Gauge: 10 sc and 10 rows = 2 in (5.1 cm) with the 3.5 mm hook.
This is a single piece, so your test is a small swatch followed by Round 1 of the letter. Work 12 sc for 12 rows, then measure the central 10 x 10 stitches.
Checkpoints:
– After Round 1: laid straight, the strip is about 8.2 in (20.8 cm) long and 0.4 in (1.0 cm) wide.
– After Round 3: the strip is 1.2 in (3.0 cm) wide and the S is about 5.6 in (14.2 cm) x 3.6 in (9.1 cm).
– After the border: the strip is 1.6 in (4.1 cm) wide and the S is about 6 in (15.2 cm) x 4 in (10.2 cm).
If the piece is too big, go down half a hook size. If it is too small, go up half a hook size. If the outer curves ruffle, your tension is too loose. If they cup upward, it is too tight.

Letter S
The S looks the same when you turn it upside down, so both long sides of the strip use the same instructions. Each side has five zones:
- Tip zone: 2 sts
- Outer curve: the first curve you reach on each side is always the outside of the bend
- Middle zone: 2 sts
- Inner curve: the second curve is always the inside of the bend
- Tip zone: 2 sts
Work each round in this order: Side 1, End B cap, Side 2, End A cap. Do not turn. Join each round with a sl st to its first sc.
With powder blue and the 3.5 mm hook, ch 41.
Round 1: Sc in 3rd ch from hook and in each of next 37 ch (38 sc, Side 1). Work 4 sc in last ch (End B). Working along the opposite side of the foundation chain, sc in each of next 38 ch (Side 2). Work 4 sc in the skipped ch (End A). Join. (84 sc)
Check: 38 + 4 + 38 + 4 = 84.
Now mark the zones on each side. Counting from the start of the side:
– sts 1–2 are the tip
– sts 3–18 are the outer curve (16 sts)
– sts 19–20 are the middle
– sts 21–36 are the inner curve (16 sts)
– sts 37–38 are the tip
Move the markers up as you work each round.
Round 2: Ch 1.
– Side: sc in next 2 sts. Outer curve: sc in next st, (2 sc in next st, sc in next 2 sts) 5 times (21 sts). Sc in next 2 sts. Inner curve: (sc2tog, sc in next st) 5 times, sc in next st (11 sts). Sc in next 2 sts. (38 sts)
– End cap: 2 sc in each of next 3 sts, sc in next st. (7 sts)
– Work Side and End cap once more. Join. (90 sc)
Check: 2 x 38 + 2 x 7 = 90.
Round 3: Ch 1.
– Side: sc in next 2 sts. Outer curve: (2 sc in next st, sc in next 3 sts) 5 times, sc in next st (26 sts). Sc in next 2 sts. Inner curve: (sc2tog, sc in next st) 3 times, sc2tog (7 sts). Sc in next 2 sts. (39 sts)
– End cap: (sc in next st, 2 sc in next st) 3 times, sc in next st. (10 sts)
– Work Side and End cap once more. Join. (98 sc)
Check: 2 x 39 + 2 x 10 = 98.
The strip should now curve into a clear S. Lay it flat and compare it with the Round 3 checkpoint. Keep the yarn attached for the border.
Appliqués
Make these with the 3.0 mm hook so they stay firm and a little finer than the letter. Leave a 10 in (25.4 cm) tail on each piece for sewing.
Large Flower (make 1)
Finished size: about 1.4 in (3.6 cm) across.
Round 1: With mustard yellow, make a magic ring and work 10 sc in it. Pull closed and join. (10 sc) The center is about 0.5 in (1.3 cm) across. Fasten off.
Round 2: Join cream in any st. Sl st in next st, (hdc, 3 dc, hdc) in next st; repeat from * 4 more times. Join. (5 petals, 30 sts)* Fasten off.
Small Flower (make 1)
Finished size: about 1 in (2.5 cm) across.
Round 1: With mustard yellow, make a magic ring and work 5 sc in it. Pull closed and join. (5 sc) Fasten off.
Round 2: Join cream. Work (sc, hdc, dc, hdc, sc) in each st around. Join. (5 petals, 25 sts) Fasten off.
Leaves (make 2)
Finished size: about 1.6 in (4.1 cm) long and 0.6 in (1.5 cm) wide.
With sage green, ch 9.
Round 1: Sl st in 2nd ch from hook, sc in next ch, hdc in next ch, dc in next 2 ch, hdc in next ch, sc in next ch, then (sc, ch 2, sc) in last ch for the tip. Working along the opposite side of the chain, sc in next ch, hdc in next ch, dc in next 2 ch, hdc in next ch, sc in next ch, then sl st in same ch as first sl st. (16 sts plus a ch-2 tip)
Round 2 (serrated edge): Sl st in next 3 sts, picot, sl st in next 3 sts, picot, sl st in next 2 sts, (sl st, ch 3, sl st) in ch-2 sp, sl st in next 2 sts, picot, sl st in next 3 sts, picot, sl st in next 3 sts. (4 picots plus tip) Fasten off.
Check: 3 + 3 + 2 = 8 sts on each side, 16 in total.
With one strand of green, backstitch a center vein from base to tip. Pull gently so it sinks into the leaf.
Berries (make 4)
Round 1: With cream, make a magic ring and work 6 sc in it. (6 sc)
Round 2: Sc in each st around. (6 sc)
Fasten off. Tuck the yarn tails inside as stuffing, weave the tail through the front loops and pull closed. Each berry is about 0.4 in (1.0 cm) across.
Border
Border gauge: the border uses the body gauge of 5 sc per 1 in (2.5 cm). One sc round adds 0.2 in (0.5 cm) to each edge. The slip-stitch round makes a raised rim but adds no measurable width.
Return to the letter.
Round 4: Ch 1.
– Side: sc in next 2 sts. Outer curve: (2 sc in next st, sc in next 5 sts) 4 times, sc in next 2 sts (30 sts). Sc in next 2 sts. Inner curve: (sc2tog) 3 times, sc in next st (4 sts). Sc in next 2 sts. (40 sts)
– End cap: (sc in next 2 sts, 2 sc in next st) 3 times, sc in next st. (13 sts)
– Work Side and End cap once more. Join. (106 sc)
Check: 2 x 40 + 2 x 13 = 106.
Round 5: Ch 1, sl st in BLO of each st around. Join. (106 sl st) Fasten off and weave in the ends.
Why the math works:
– On each curve, the outer edge travels a longer path than the centerline and the inner edge a shorter one.
– The outer curve grows 16, 21, 26, 30 sts and the inner curve shrinks 16, 11, 7, 4 sts. This roughly follows the change in path length as each round adds 0.2 in (0.5 cm).
– Each rounded end gains 3 sts per round (4, 7, 10, 13), the usual rate for a semicircle in sc.
– The tip and middle zones stay at 2 sts.
– Every round total equals 2 x (side) + 2 x (end cap).
Final Blocking
- Lightly mist the letter until it is damp, not wet.
- Lay it right side up on the blocking mat.
- Pin both tips first, then the outer curves, using 10–12 pins around the edge.
- Shape the inner curves so the openings form narrow, even slots.
- Measure: 6 in (15.2 cm) tall and 4 in (10.2 cm) wide. Adjust the pins if needed.
- Check that the strip is 1.6 in (4.1 cm) wide all the way along.
- Let it dry completely, at least 6 hours, then unpin.
- Leaves: place the first leaf on the lower left of the S, where the middle stroke turns into the bottom curve. Point it up and to the left so it overhangs the edge by about 0.3 in (0.8 cm). Place the second leaf lower and to the right, pointing along the bottom curve. Sew both down.
- Large flower: sew it over the base of the first leaf, slightly overlapping the left edge of the letter.
- Small flower: sew it just below and to the right of the large flower, so it overlaps the large flower and covers the base of the second leaf.
- Berries: sew 2 berries above the large flower. Embroider a cream stem-stitch stem about 0.6 in (1.5 cm) long from behind the large flower to each one. Sew the other 2 berries side by side to the right of the small flower.
- Loop: fold the gold cord in half. Thread both ends through the top of the upper curve from front to back and knot them on the back. The loop should stand about 2 in (5.1 cm) tall.
Sew through the back loops of each appliqué so no stitches show on the front.
Final Quality-Control Checklist
- Round totals are 84, 90, 98, 106 and 106.
- The S lies flat, with no ruffling or cupping.
- Both tips are smooth and rounded.
- The slip-stitch rim is even all the way around.
- The finished size is 6 in (15.2 cm) x 4 in (10.2 cm).
- The leaves sit under the flowers, and the small flower overlaps the large one.
- All 4 berries are firmly attached.
- The gold loop is centered at the top and securely knotted.
- All ends are woven in on the back.
Troubleshooting
The outer curve ruffles. You may have extra increases or loose tension. Recount the outer curve, then try a smaller hook.
The inner curve puckers. Work the sc2tog stitches a little more loosely, and check that you did not skip a stitch.
The S looks like a straight bar. On one side, the outer and inner curves may be swapped. On each side, the first curve you reach is always the outer one.
The tips look pointed. Recount the end caps. They should be 4, 7, 10 and 13 sts.
The petals curl. Steam them lightly and flatten them with your fingers before sewing.
The ornament is floppy. Crochet with tighter tension, or mist it with fabric stiffener while blocking.
Care
Spot clean with cool water and mild soap, then reshape and dry flat. Store flat or hanging, away from direct sunlight.
Final Notes
Each measurement leads to the next:
– A gauge of 10 sc and 10 rows = 2 in (5.1 cm) gives a Round 1 strip 8.2 in (20.8 cm) long.
– Three body rounds make the strip 1.2 in (3.0 cm) wide and the letter 5.6 in (14.2 cm) x 3.6 in (9.1 cm).
– The border adds 0.2 in (0.5 cm) to every edge.
– The finished ornament is 6 in (15.2 cm) x 4 in (10.2 cm).
Check each stage and the final size will follow.
Happy crocheting!