

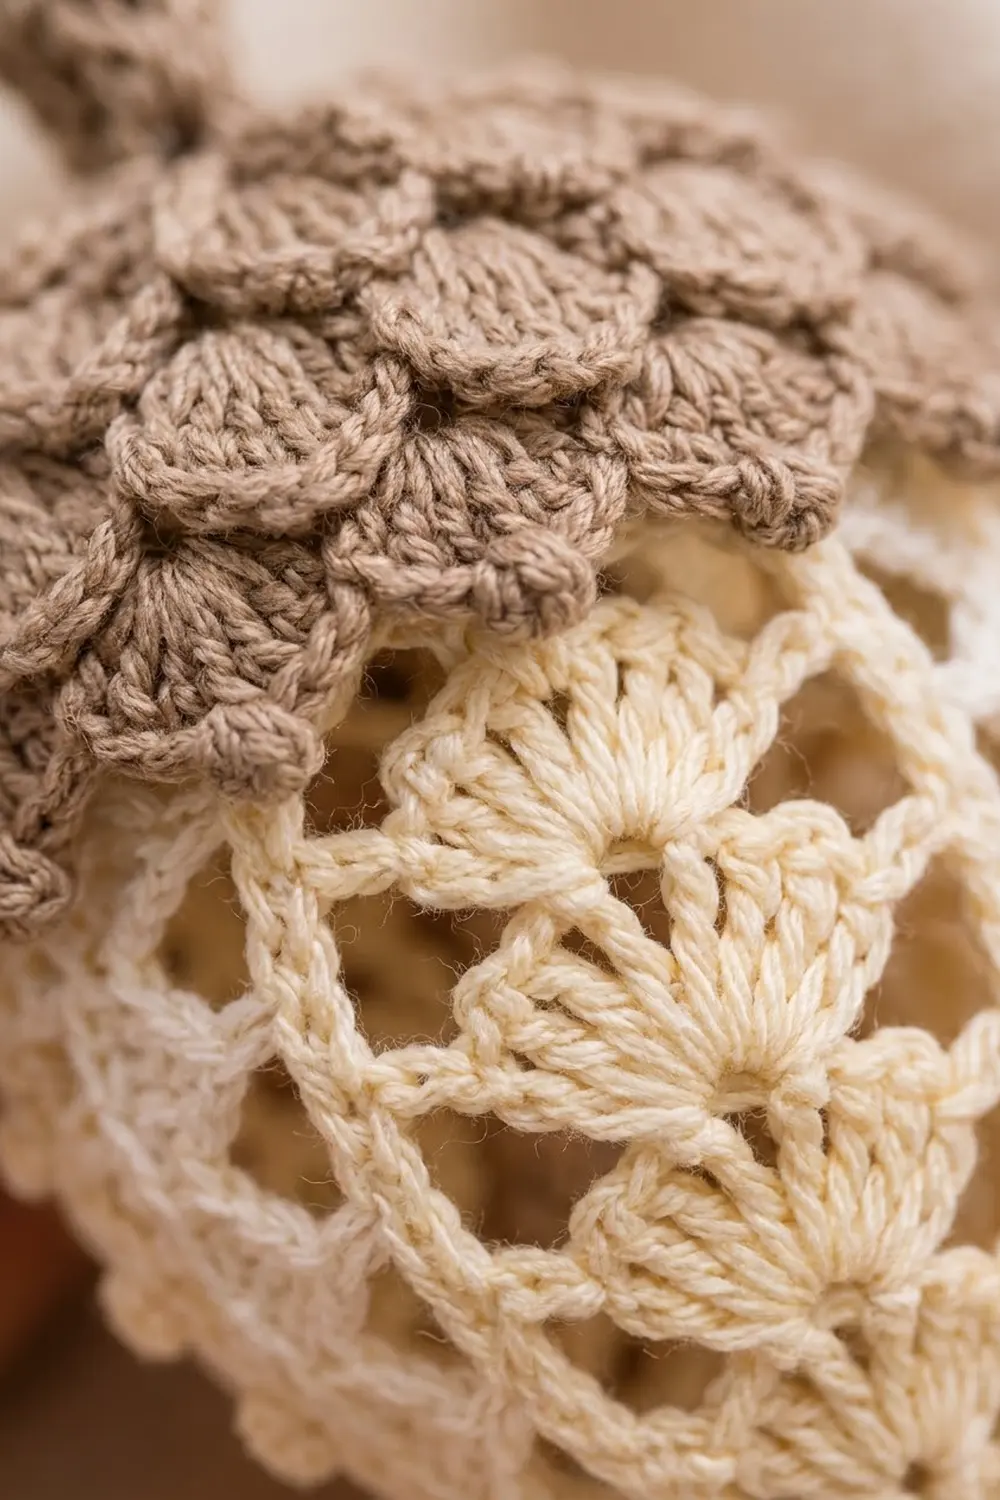
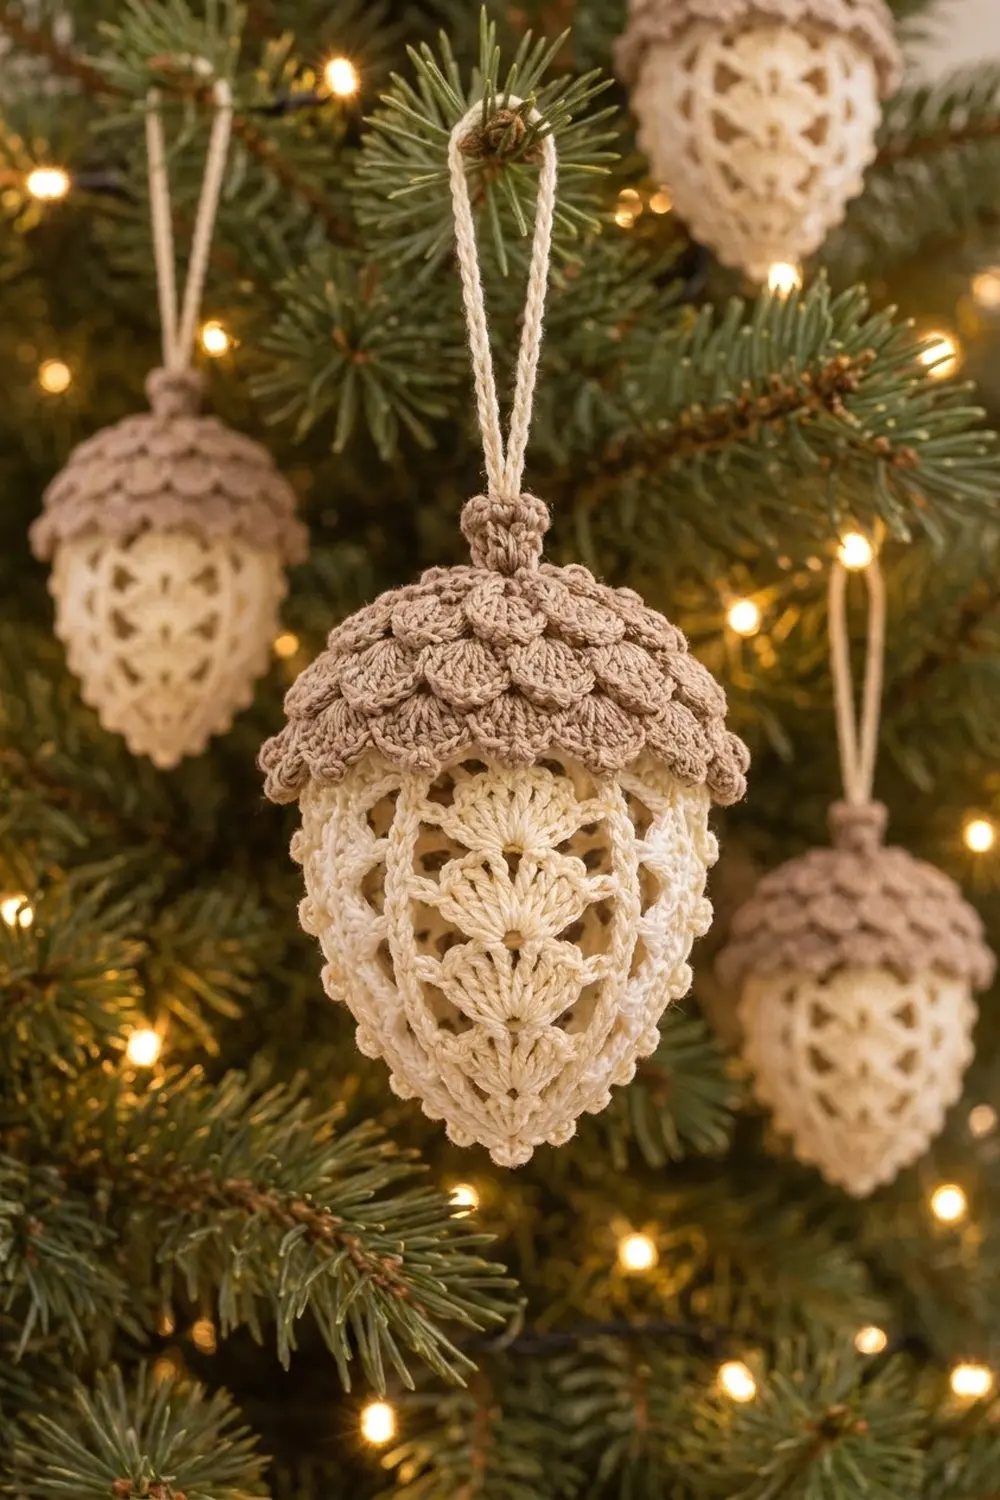
The Ivory Lace Acorn is a small three-dimensional ornament with an open lace body and a textured, scaled cap. The body is cream, with stacked fan columns separated by an open chain lattice and tiny picots along the ridges. The cap is a soft taupe and is covered in overlapping crocodile-stitch scales, with a short stem nub and a cream hanging loop on top.
It has a vintage, heirloom look and suits a Christmas tree, a gift tag, or a seasonal bowl. The pattern uses US crochet terms throughout.
The finished ornament is 3.5 in (8.9 cm) tall, not counting the loop, and 2.25 in (5.7 cm) across at its widest point. The cap measures 2.5 in (6.4 cm) across at the rim.
You work the body in the round from the bottom tip upward in 4 identical repeats and finish it with a short single-crochet rim. You work the cap separately, from the stem down. Then you block the body over a small egg-shaped insert, sew the cap over the rim stitch for stitch, and add the loop.
Finished Size and Construction
- Finished size: 3.5 in (8.9 cm) tall x 2.25 in (5.7 cm) wide, without the loop
- Skill level: Intermediate
- Terminology: US crochet terms
- Yarn weight: Size 3 cotton crochet thread (Lace / Super Fine range)
- Hook: 2.25 mm (US B-1)
- Number of pieces: 1 ornament made of 2 components: a lace body and a scaled cap
- Layout: The cap sits over the top of the body and overlaps it by 0.5 in (1.3 cm)
- Body size: 2.75 in (7.0 cm) tall; 7 in (17.8 cm) around at the widest round
- Body size before border: 2.5 in (6.4 cm) tall
- Border depth: 2 rounds, 0.25 in (0.6 cm)
- Cap size: 2.5 in (6.4 cm) across x 1.25 in (3.2 cm) tall, including the stem
Materials
Use a smooth, mercerized cotton thread in size 3. Mercerized cotton gives crisp fans, holds picots well, and blocks firmly. Avoid fuzzy blends, because they blur the lattice.
- Cream (body and loop): 12 g, about 20 m (22 yd)
- Taupe (cap and stem): 12 g, about 20 m (22 yd)
These quantities include a margin of about 20%. The crocodile-stitch scales use more thread than you’d expect for their size.
Tools:
- 2.25 mm (US B-1) crochet hook
- Tapestry needle with a blunt tip
- 4 stitch markers
- Scissors
- Cream egg-shaped insert, about 2 in (5.1 cm) wide x 2.5 in (6.4 cm) tall (a plastic or foam egg, or a lightly stuffed cream fabric pouch)
- Spray bottle, rustproof pins, and a blocking mat
- Optional: liquid fabric stiffener
Abbreviations (US Terms)
- ch – chain
- sl st – slip stitch
- sc – single crochet
- dc – double crochet
- sk – skip
- sp(s) – space(s)
- st(s) – stitch(es)
- blo – back loop only
- rep – repeat
Special stitches:
- V-st (V-stitch): (dc, ch 1, dc) in the stitch or space indicated.
- sc-picot: Sc in the indicated st, ch 3, then sl st into the front loop and left vertical bar of the sc you just made.
- Scale (crocodile stitch): Turn the work so the posts of the V-st lie horizontally. Work 5 dc around the post of the first dc of the V-st, from the top of the post to the bottom. Ch 1. Then work 5 dc around the post of the second dc, from the bottom to the top. Each Scale is 10 dc plus 1 ch at its tip, and it hangs down over the round below.
Gauge and Checkpoints
Gauge: 8 sc = 1 in (2.5 cm). One dc round is about 0.25 in (0.6 cm) tall.
This is a small piece, so the first rounds of the body act as your gauge swatch. Work Rounds 1–4, then lay the piece flat without stretching it.
- After body Round 4: a flat circle 1.5 in (3.8 cm) across
- After body Round 8: 7 in (17.8 cm) around
- After body Round 13: 6 in (15.2 cm) around the rim; 2.5 in (6.4 cm) tall
- After body Round 15 (border): 2.75 in (7.0 cm) tall
- After cap Round 6: a flat disc 1 in (2.5 cm) across
- Finished cap: 2.5 in (6.4 cm) across the scale tips
If your Round 4 circle is larger than 1.5 in (3.8 cm), go down one hook size. If it’s smaller, go up one hook size. Don’t change any stitch counts. The cap fits the body because both are built around 48 stitches.
Body (Cream)
Work the body in joined rounds without turning. It has 4 repeats. Each repeat has one fan column and one ridge sc, with a chain-space lattice on each side of the fan. Always work the ridge sc into the ridge sc of the round below, and mark each ridge sc as you go.
Round 1: Make a magic ring, ch 1, work 8 sc in the ring. Join with a sl st to the first sc. (8 sc)
Round 2: Ch 3 (counts as dc), dc in the same st, then 2 dc in each of the next 7 sts. Join to the top of the ch-3. (16 dc)
Round 3: Ch 1, sc in next st, ch 2, sk 1, V-st in next st, ch 2, sk 1; rep from * 3 more times. Join to the first sc. (4 sc, 4 V-sts, 8 ch-2 sps)*
Round 4 (Fan 1): Ch 1, sc in sc, ch 3, 5 dc in ch-1 sp of V-st, ch 3; rep from * 3 more times. Join. (4 sc, 20 dc, 8 ch-3 sps)*
Round 5: Ch 1, sc-picot in sc, ch 4, sk 2 dc, V-st in next dc (the center of the fan), ch 4, sk the remaining 2 dc and the ch-3 sp; rep from * 3 more times. Join. (4 sc-picots, 4 V-sts, 8 ch-4 sps)*
Round 6 (Fan 2): Ch 1, sc in sc, ch 4, 7 dc in ch-1 sp of V-st, ch 4; rep from * 3 more times. Join. (4 sc, 28 dc, 8 ch-4 sps)*
Round 7: Ch 1, sc-picot in sc, ch 5, sk 3 dc, V-st in next dc (the 4th dc, center), ch 5; rep from * 3 more times. Join. (4 sc-picots, 4 V-sts, 8 ch-5 sps)*
Round 8 (Fan 3, widest): Ch 1, sc in sc, ch 5, 9 dc in ch-1 sp of V-st, ch 5; rep from * 3 more times. Join. (4 sc, 36 dc, 8 ch-5 sps)*
Checkpoint: the body should measure 7 in (17.8 cm) around.
Round 9: Ch 1, sc-picot in sc, ch 5, sk 4 dc, V-st in next dc (the 5th dc, center), ch 5; rep from * 3 more times. Join. (4 sc-picots, 4 V-sts, 8 ch-5 sps)*
Round 10 (Fan 4): Ch 1, sc in sc, ch 4, 7 dc in ch-1 sp of V-st, ch 4; rep from * 3 more times. Join. (4 sc, 28 dc, 8 ch-4 sps)*
The shorter chains and smaller fans start drawing the body in toward the top.
Round 11: Ch 1, sc-picot in sc, ch 4, sk 3 dc, V-st in next dc (the 4th dc, center), ch 4; rep from * 3 more times. Join. (4 sc-picots, 4 V-sts, 8 ch-4 sps)*
Round 12 (Fan 5): Ch 1, sc in sc, ch 3, 5 dc in ch-1 sp of V-st, ch 3; rep from * 3 more times. Join. (4 sc, 20 dc, 8 ch-3 sps)*
Round 13 (conversion round): Ch 1, *sc in sc, 3 sc in ch-3 sp, sc in each of the next 5 dc, 3 sc in ch-3 sp; rep from * 3 more times. Join.
Each repeat has 6 sc worked one per existing stitch (1 in the ridge sc and 5 in the dc), plus 6 sc added in the two ch-3 sps. That gives 12 sc per repeat. (24 worked into stitches + 24 added = 48 sc)
Don’t fasten off. Go straight on to the Border rounds below.
Cap (Taupe)
Work the cap in joined rounds from the stem down. The scales point downward and overlap like brickwork.
Round 1: Make a magic ring, ch 1, work 6 sc in the ring. Join. (6 sc)
Rounds 2–3: Ch 1, sc in each st around. Join. (6 sc)
This short tube is the stem nub.
Round 4: Ch 1, 2 sc in each st. Join. (12 sc)
Round 5: Ch 1, sc in next st, 2 sc in next st; rep from * 5 more times. Join. (18 sc)*
Round 6: Ch 1, sc in next 2 sts, 2 sc in next st; rep from * 5 more times. Join. (24 sc)*
Checkpoint: a flat disc 1 in (2.5 cm) across.
Round 7 (Base 1): Ch 4 (counts as dc and ch 1), dc in the same st, sk 2 sts, V-st in next st; rep from * 6 more times, sk the last 2 sts. Join to the 3rd ch of the ch-4. (8 V-sts)* This round uses all 24 sts (8 x 3).
Round 8 (Scales 1): Work a Scale over the next V-st, then sl st into the gap between the 2 skipped sts before the next V-st; rep from * 7 more times. (8 Scales, 8 sl sts)*
Round 9 (Base 2): Ch 4 (counts as dc and ch 1), dc in the last sl st made, ch 2, V-st in the next sl st between Scales, ch 2; rep from * 6 more times. Join to the 3rd ch of the ch-4. (8 V-sts, 8 ch-2 sps)*
Each V-st sits between two Scales from Round 8, so the next tier is offset.
Round 10 (Scales 2): Work a Scale over the next V-st, then sl st into the next ch-2 sp; rep from * 7 more times. (8 Scales, 8 sl sts)*
Round 11 (Base 3): V-st in the sl st in the next ch-2 sp, then V-st in the ch-1 sp of the next Round 9 V-st (reach behind its Scale); rep from * 7 more times. Join to the first dc. (16 V-sts)*
Each V-st has 3 attachment points (dc, ch-1 sp, dc). 16 x 3 = 48 points, the same as the body rim.
Round 12 (Scales 3): Work a Scale over the next V-st, then sl st in the gap between this V-st and the next; rep from * 15 more times. (16 Scales)*
Fasten off and leave a 20 in (50.8 cm) tail for sewing. Pull the magic ring closed and weave in the starting tail inside the stem.
Border (Body Rim)
The border gives the body a firm rim to sew the cap to. You work it over the 48 sc of body Round 13.
Border gauge: 8 sc = 1 in (2.5 cm), so 48 sc = 6 in (15.2 cm) around.
Round 14: Ch 1, sc blo in each st around. Join. (48 sc: 12 per repeat x 4 repeats)
Round 15: Ch 1, sc in each st around. Join. (48 sc: 12 per repeat x 4 repeats)
Fasten off, leaving a 6 in (15.2 cm) tail, and weave it in.
Why the math works: The rim has no corners, so treat each repeat as one “side” of 12 sts. 4 repeats x 12 sts = 48 sts. The cap’s Round 11 also has 48 attachment points: 16 V-sts x (dc, ch-1 sp, dc). When you sew the cap on, each attachment point lines up with exactly one rim sc, so you don’t need to ease in or skip any stitches. Working Round 14 in the back loop only leaves a ridge that helps the rim stand upright under the cap.
Final Blocking
- Soak the body and cap in cool water for 10 minutes, then press the water out in a towel.
- Lay the body flat on the blocking mat with one fan column centered. Pin out each picot and lattice point so the diamonds open evenly. At Round 8, the flattened body should measure 3.5 in (8.9 cm) across.
- Let it dry about halfway, then unpin it.
- Insert the egg through the rim with the narrow end down. Center the bottom point of the body on the tip of the egg.
- If you want a firmer finish, brush on fabric stiffener now.
- Shape the cap over a rounded form about 2.5 in (6.4 cm) wide, such as a small jar lid. Fan the scales outward so the rows lie flat and overlap.
- Let both parts dry completely, about 12 hours.
- Place the cap over the body rim. Using the long taupe tail and working from underneath the scales, whipstitch each Round 11 attachment point to one Round 15 sc. That’s 48 stitches.
- Join cream thread at the top of the stem and ch 35 for a loop about 1.75 in (4.4 cm) tall. Sl st into the same stem stitch, fasten off, and weave the end into the stem.
Final Quality-Control Checklist
- The body is 2.75 in (7.0 cm) tall, and the whole ornament is 3.5 in (8.9 cm) tall
- Each column has 5 fans stacked straight, with no spiraling
- Each of the 4 ridges has picots from Rounds 5, 7, 9, and 11
- The rim has exactly 48 sc
- The cap has 3 tiers of scales (8, 8, 16), and each tier is offset from the one above it
- The cap overlaps the body evenly by 0.5 in (1.3 cm) all the way around
- No taupe sewing stitches show below the scales
- The loop is centered and the ornament hangs straight
Troubleshooting
The fan columns spiral. A ridge sc was worked into a chain instead of into the ridge sc below. Keep the 4 markers moving up as you go.
The body is too wide at Round 8. Your chains are loose. Chain more tightly, or change the ch-5 to ch-4 in Rounds 7–9. Keep the dc counts the same.
The cap doesn’t fit over the rim. Recount cap Round 11 (48 points) and body Round 15 (48 sc). If both counts are right, block the cap over a slightly larger form.
The scales curl inward. Pin them flat while damp, or work the dc a little looser around the posts.
The bottom tip gapes. Pull the magic ring tail tight and secure it with a few stitches before weaving it in.
Care
Spot clean with cool water and mild soap, then reshape and dry flat. If you used stiffener, don’t soak the ornament again, and store it in a box so the scales don’t get crushed.
Final Notes
There are only a few measurements to check. Round 4 should be 1.5 in (3.8 cm) across, and Round 8 should be 7 in (17.8 cm) around. The 48-stitch rim should be 6 in (15.2 cm) around, and the cap’s 48 attachment points match the rim one to one. If those numbers check out, the body finishes at 2.75 in (7.0 cm). The assembled acorn will be 3.5 in (8.9 cm) tall and 2.25 in (5.7 cm) wide. Make one for the tree, or a small batch with different cap shades.
Happy crocheting!