

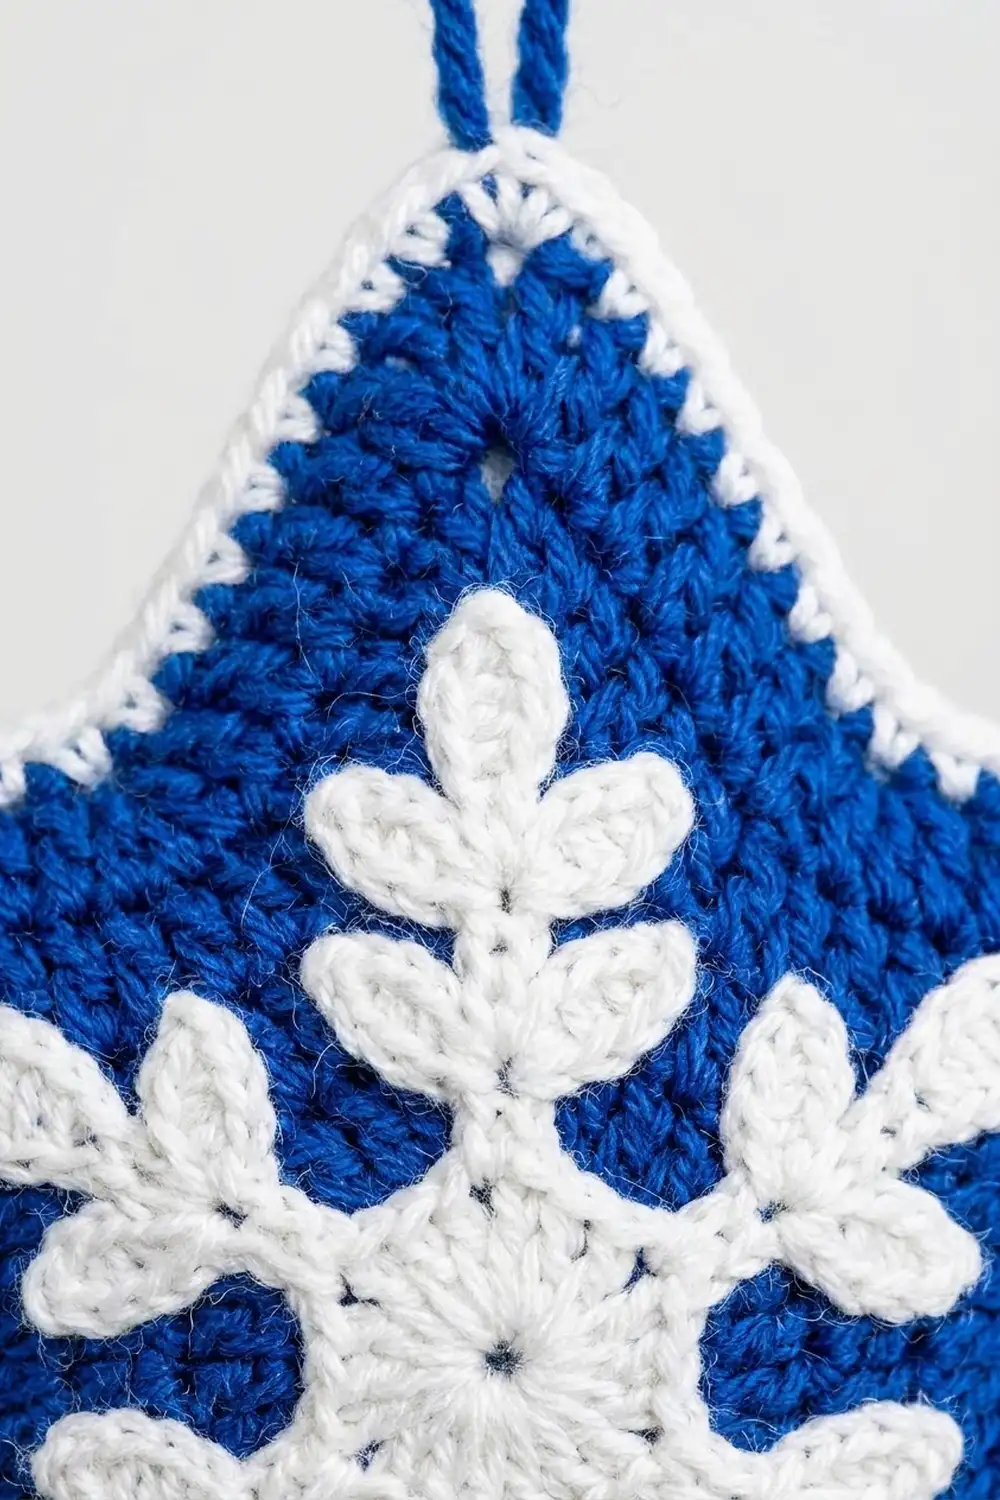
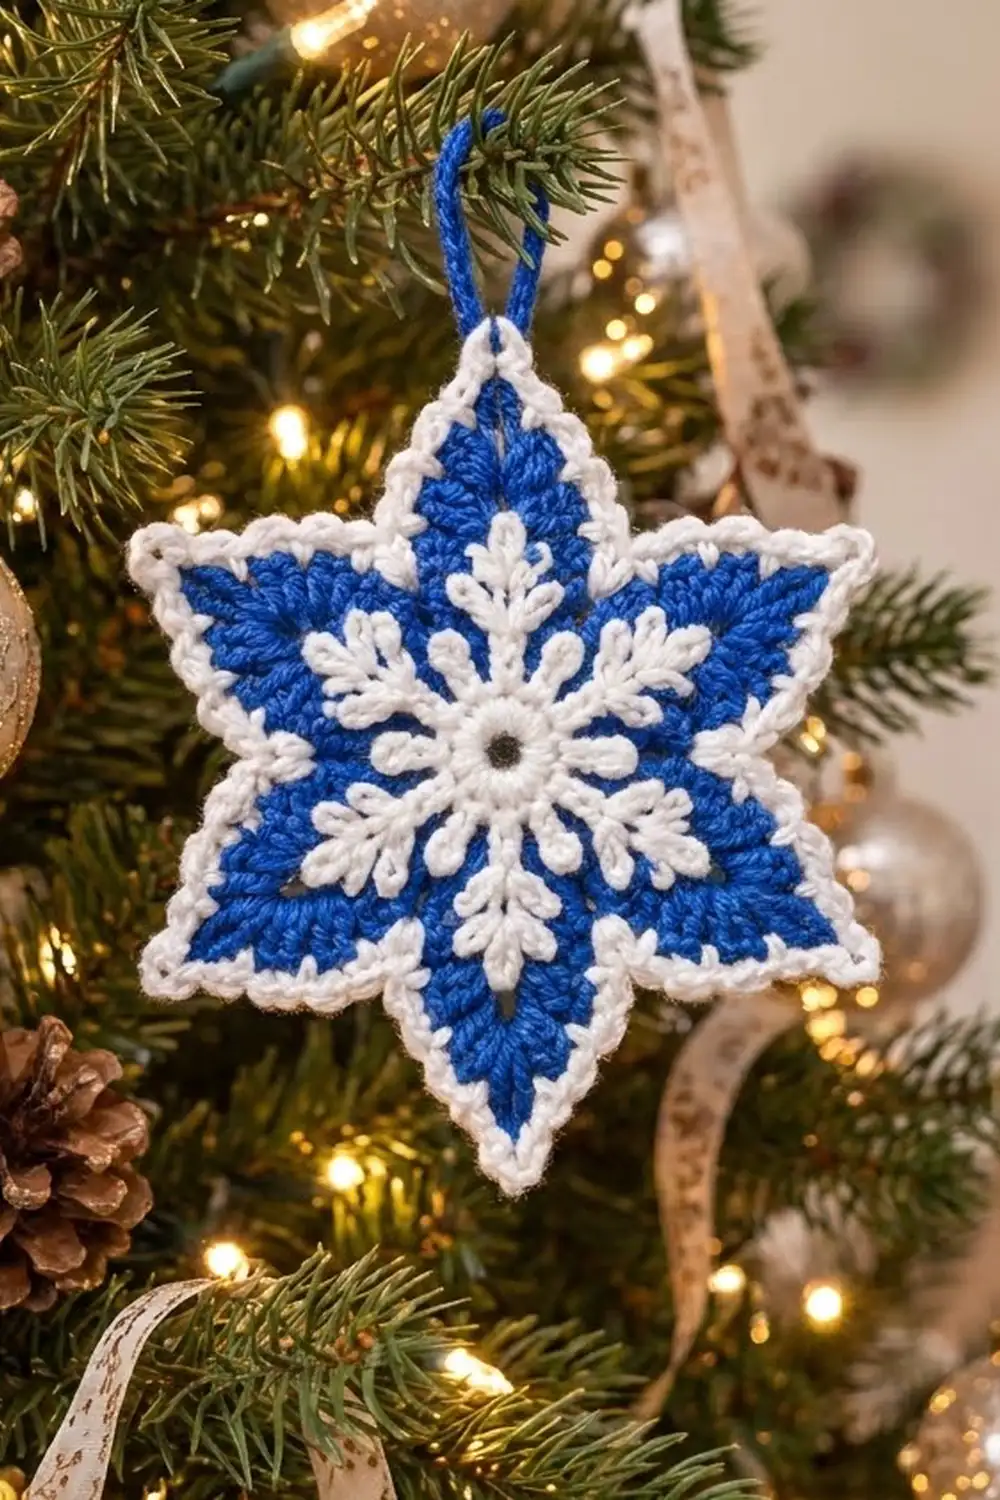
The Frosted Sapphire Star is a flat six-pointed ornament. It has a deep royal blue base, a white snowflake sewn on top, and a crisp white beaded edge. It looks wintry and a little vintage, and it makes a good hanging decoration or gift topper.
Only two colors are used: royal blue for the star base and hanging loop, and bright white for the snowflake and border. The crab stitch edge gives a raised, rope-like outline that makes each point stand out.
The pattern uses US crochet terms. The finished ornament measures 5.5 in (14.0 cm) from tip to tip, not counting the loop.
Construction is simple. You crochet the blue star in the round, then work the six points in short rows that decrease to a tip. Next you make a separate white snowflake and sew it to the center. Finally you add a two-round white border and a covered blue hanging loop.
Finished Size and Construction
- Finished size: 5.5 in (14.0 cm) tip to tip
- Skill level: Intermediate
- Terminology: US crochet terms
- Yarn weight: DK / light (#3)
- Hook: 3.5 mm (E-4)
- Number of pieces: 1 ornament, made from 2 crocheted layers (star base + snowflake appliqué)
- Layout: Single motif; snowflake centered on the star, with each arm pointing to a star tip
- Snowflake size: 3.5 in (8.9 cm) tip to tip
- Size before border: 5 in (12.7 cm) tip to tip
- Border depth: 0.25 in (0.6 cm) per edge, so the border adds 0.5 in (1.3 cm) to the tip-to-tip measurement
- Hanging loop: 1.25 in (3.2 cm) tall
Materials
Choose a smooth, tightly plied DK cotton or cotton blend. Mercerized cotton gives the clearest stitch definition and holds its points well after blocking. Avoid fuzzy or very splitty yarn, because the snowflake branches and the crab stitch edge will lose their shape.
- Royal blue: 10 g, about 23 m (25 yd)
- White: 6 g, about 14 m (15 yd)
These quantities include a margin for gauge swatching and weaving in ends.
Tools:
– 3.5 mm (E-4) crochet hook
– Tapestry needle
– Stitch markers (2–3)
– Scissors
– Blocking mat and rustproof pins
– Spray bottle or steamer
– Optional: fabric stiffener for a firmer ornament
Abbreviations (US Terms)
- ch: chain
- sl st: slip stitch
- sc: single crochet
- hdc: half double crochet
- dc: double crochet
- sc2tog: single crochet 2 together
- dc2tog: double crochet 2 together
- rsc: reverse single crochet (crab stitch)
- st(s): stitch(es)
- sp: space
- RS / WS: right side / wrong side
Special stitches:
Leaf: Ch 4, sl st in 2nd ch from hook, sc in next ch, hdc in next ch. This makes one solid leaf branch, 3 sts long.
Reverse single crochet (rsc): Working from left to right, insert the hook into the next stitch to the right, yarn over, pull up a loop, yarn over, and pull through both loops on the hook.
Gauge and Checkpoints
Gauge: 20 sc and 22 rows = 4 in (10.2 cm) in sc with a 3.5 mm hook. Gauge is not critical for an ornament, but it does control the final size and how well the snowflake fits the star.
Make one star base before you commit to a batch. Check these measurements as you go:
- Star Round 1: 1 in (2.5 cm) across
- Star Round 2: 1.75 in (4.4 cm) across
- Star Round 3: 2.4 in (6.1 cm) across
- Each point: 1.3 in (3.3 cm) from the Round 3 edge to the tip
- Star before border: 5 in (12.7 cm) tip to tip (2.4 in + 1.3 in + 1.3 in)
- Snowflake Round 1: 0.75 in (1.9 cm) across
- Snowflake complete: 3.5 in (8.9 cm) tip to tip
- Finished ornament: 5.5 in (14.0 cm) tip to tip
If your piece is too big, switch to a 3.25 mm (D-3) hook. If it is too small, switch to a 3.75 mm (F-5) hook. Change the hook for both layers so the snowflake stays in proportion to the star. If Round 3 ruffles, your dc are too tall; tighten them or go down a hook size. If it cups, go up a hook size.
Part 1: Blue Star Base
Use royal blue.
Round 1 (RS): Make a magic ring. Ch 3 (counts as dc), work 11 dc in the ring, then sl st to the top of the beginning ch-3. Pull the ring fully closed. (12 dc)
Round 2: Ch 3 (counts as dc), dc in the same st, then work 2 dc in each st around. Sl st to the top of the ch-3. (24 dc)
Round 3: Ch 3 (counts as dc), dc in the same st, dc in next st, 2 dc in next st, dc in next st; repeat from * around. Sl st to the top of the ch-3. (36 dc)*
Checkpoint: the circle measures 2.4 in (6.1 cm) and lies flat.
The 36 stitches now divide into 6 sections of 6 sts each. Each point is worked on one section. Do not fasten off.
Points
Row 1 (RS): Ch 2 (does not count as a st). Dc in the same st as the sl st and in each of the next 5 sts. (6 dc)
Row 2 (WS): Ch 2 (does not count), turn. Dc2tog, dc in next 2 sts, dc2tog. (4 sts)
Row 3 (RS): Ch 2 (does not count), turn. Dc2tog twice. (2 sts)
Row 4 (WS): Ch 2 (does not count), turn. Dc2tog. (1 st, the tip)
Travel to the next point: Keep these slip stitches loose. Work 1 sl st in the row-end of each of Rows 3, 2 and 1 down the left edge of the point (3 sl st). Then sl st in the first unworked st of Round 3, which is the first st of the next section.
Repeat Rows 1–4 and the travel step for the other 5 points. After the 6th point, sl st down its edge, sl st in the base of the first point, and fasten off.
Checkpoint: You should have 6 points, each 1.3 in (3.3 cm) tall, with sharp valleys between them. The base measures 5 in (12.7 cm) tip to tip. Weave in the center tail now, because the snowflake will cover it.
Part 2: White Snowflake Appliqué
Use white.
Round 1: Ch 6 and sl st to the first ch to form a ring. Ch 1, work 12 sc in the ring, then sl st to the first sc. (12 sc) Do not pull the ring closed. The open center is about 0.25 in (0.6 cm) across, and the blue shows through it.
Checkpoint: 0.75 in (0.6 cm hole, 1.9 cm ring) across.
Round 2 (arms): Ch 1. Work the following 6 times, once for each arm:
- Sc in next sc, then ch 9 for the spoke.
- Tip leaf: Work 1 Leaf, then sl st in the 9th spoke ch (the top ch of the spoke, next to the leaf).
- Sl st in the next spoke ch (8th).
- Node 1: In the 7th spoke ch, work sl st, Leaf, sl st in the same ch, Leaf, sl st in the same ch.
- Sl st in each of the next 2 spoke ch (6th and 5th).
- Node 2: In the 4th spoke ch, work sl st, Leaf, sl st in the same ch, Leaf, sl st in the same ch.
- Sl st in each of the remaining 3 spoke ch (3rd, 2nd, 1st).
- Sl st in the sc at the base of the arm, then sc in the next sc of Round 1.
Sl st to the first sc and fasten off. Leave a 12 in (30.5 cm) tail for sewing.
Count per arm: 9 spoke ch, 1 tip leaf and 4 side leaves (2 at each node), on 2 Round 1 sts. Six arms use all 12 sts of Round 1.
At each node, nudge one leaf to each side of the spoke so the branches form a V that points outward, as in the photo. The tip leaf continues straight on from the spoke and gives a rounded end.
Checkpoint: The snowflake measures 3.5 in (8.9 cm) tip to tip. Lightly steam it flat and pin each leaf into position before sewing.
Part 3: Attach the Snowflake
- Lay the star RS up and place the snowflake on top, with the centers matched.
- Turn the snowflake so each arm points straight at a star tip.
- Pin through the center ring, at each node, and at each tip leaf.
- Using the white tail, whipstitch around the inner edge of the center ring. Then travel along the back of each spoke with small, hidden stitches, tacking down both leaves at each node and the tip leaf.
- Keep the stitches snug but not tight. The snowflake should lie flat without puckering the blue base.
The tip leaves end about 0.5 in (1.3 cm) short of the star tips, so the blue shows around every arm.
Border
Border gauge: One dc row-end is about as tall as 2 sc, so 2 sc per row-end keeps the edge flat. The valleys need a decrease and the tips need an increase.
Round 1 (white): With the RS facing, join white at any valley. For the sc2tog that forms each valley, insert the hook into the Row 1 row-end of the previous point and pull up a loop. Then insert it into the Row 1 row-end of the next point, pull up a loop, yarn over and pull through all 3 loops.
Work each point as follows:
– Valley: sc2tog across the two Row 1 row-ends (1 st)
– Rising edge: 2 sc in the Row 2 row-end, 2 sc in the Row 3 row-end, and 1 sc in the tip st (5 sc)
– Tip: ch 2, then 1 sc in the same tip st
– Falling edge: that tip sc, then 2 sc in the Row 3 row-end and 2 sc in the Row 2 row-end (5 sc)
Each point uses 1 + 5 + 5 = 11 sts plus 1 ch-2 sp. The tip sc on each side is counted inside that side’s 5. Work the travel slip stitches into your sc along the left edges. Sl st to the first sc2tog. (66 sts, 6 ch-2 sp)
Round 2 (white): Ch 1. Do not turn. Working in rsc from left to right, work 1 rsc in each st. In each ch-2 tip sp, work rsc, ch 1, rsc. Work 1 rsc in each valley sc2tog with no further decrease. The crab stitch is low and pulls in a little, so the valleys stay sharp. Sl st to the first rsc and fasten off. (13 rsc per point; 78 rsc and 6 ch-1 tips in total)
Why the math works: Round 1 decreases once at each valley (a concave corner) and adds a ch-2 at each tip (a convex corner), so the edge neither ruffles nor cups. Round 2 adds 2 sts at each tip (11 + 2 = 13 per point; 6 × 13 = 78), which lets the beaded edge wrap the tip without pulling it blunt. The two rounds add 0.25 in (0.6 cm) at each end of the star, taking it from 5 in (12.7 cm) to 5.5 in (14.0 cm).
Hanging Loop
Join blue in the ch-1 sp at any tip. Ch 16 and sl st in the same sp. Ch 1, work 24 sc over the loop, then sl st to the first sc. Fasten off.
The covered loop stands 1.25 in (3.2 cm) tall. Weave the tails into the blue base on the WS.
Final Blocking
- Weave in all remaining ends on the WS. Hide the white ends inside the border and the blue ends inside the dc rows.
- Lightly mist the ornament with water, or wet it and press it in a towel.
- Draw or imagine a 5.5 in (14.0 cm) circle on the blocking mat.
- Pin the 6 tips evenly on that circle, about 2.75 in (7.0 cm) from the center, so the points are 60 degrees apart.
- Push each valley gently toward the center to sharpen it. Add a pin there if a valley drifts.
- Shape the snowflake leaves with a fingertip so the V-branches sit symmetrically.
- For a firmer ornament, brush on a light coat of fabric stiffener now.
- Let it dry completely, then unpin. Steam the loop and pull it straight.
Final Quality-Control Checklist
- Tip to tip: 5.5 in (14.0 cm) on all three axes
- 6 points of equal height, 1.3 in (3.3 cm) each before the border
- Border Round 1: 66 sts plus 6 ch-2 tips
- Border Round 2: 78 rsc plus 6 ch-1 tips
- Snowflake: 3.5 in (8.9 cm), with arms lined up to the tips
- Center hole open; blue visible through it
- No puckering where the snowflake is sewn on
- Hanging loop centered on its tip and fully covered
- All ends woven in and invisible from the front
Troubleshooting
Points lean or twist: You may be starting a point one stitch off. Recount so each point sits on exactly 6 Round 3 sts.
Points look stubby: Your dc2tog are too tight. Loosen them, or make sure the ch-2 turning chains are not being counted as stitches.
Border ruffles at the tips: Work just one ch between the tip sc instead of two.
Valleys look rounded: Make sure the valley sc2tog spans both Row 1 row-ends and does not use two sts on the same point.
Snowflake arms curl: Steam-block the snowflake on its own before sewing it on, and keep the spoke slip stitches loose.
Ornament cups: Go up a hook size for the star base, or block more firmly.
Crab stitch looks messy: Keep the loops even and the hook angled downward. Practice a few rsc on a swatch first.
Care
Hand wash in cool water with a mild soap, press out the water in a towel, and re-pin to dry. Do not tumble dry, and avoid crushing the ornament when you store it.
Final Notes
The measurement chain runs like this. The star center grows to 2.4 in (6.1 cm), and each point adds 1.3 in (3.3 cm), giving 5 in (12.7 cm) before the border. The white border adds 0.25 in (0.6 cm) per edge, for a finished 5.5 in (14.0 cm). The 3.5 in (8.9 cm) snowflake sits centered on top, and the 1.25 in (3.2 cm) loop finishes the piece. If each checkpoint matches, your ornament will match too.
Happy crocheting!