

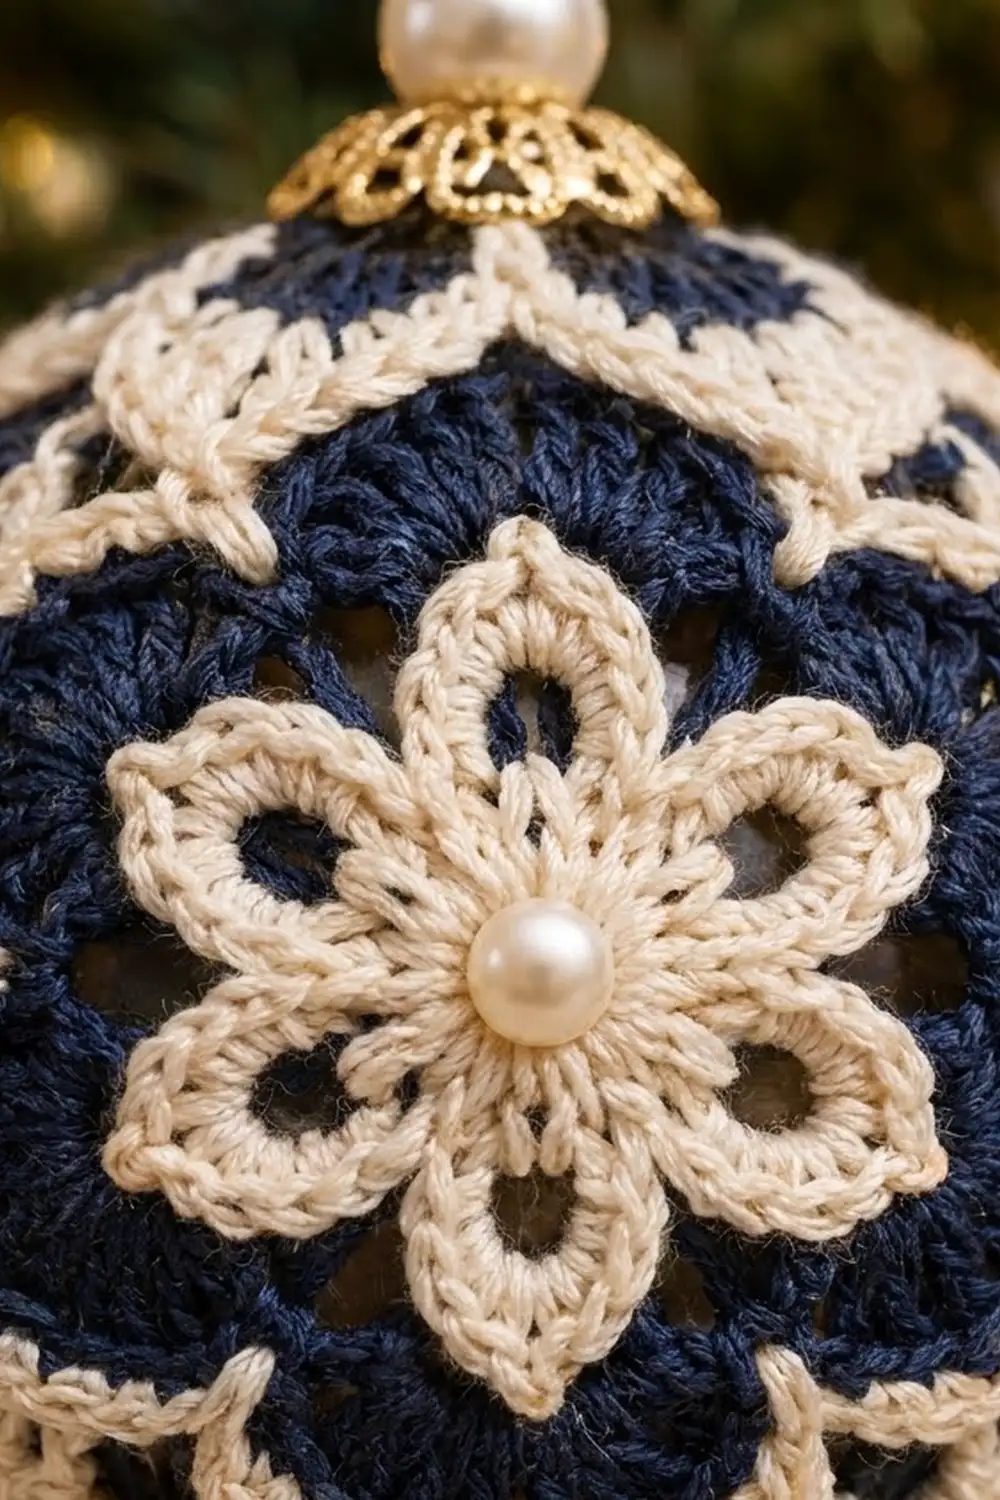
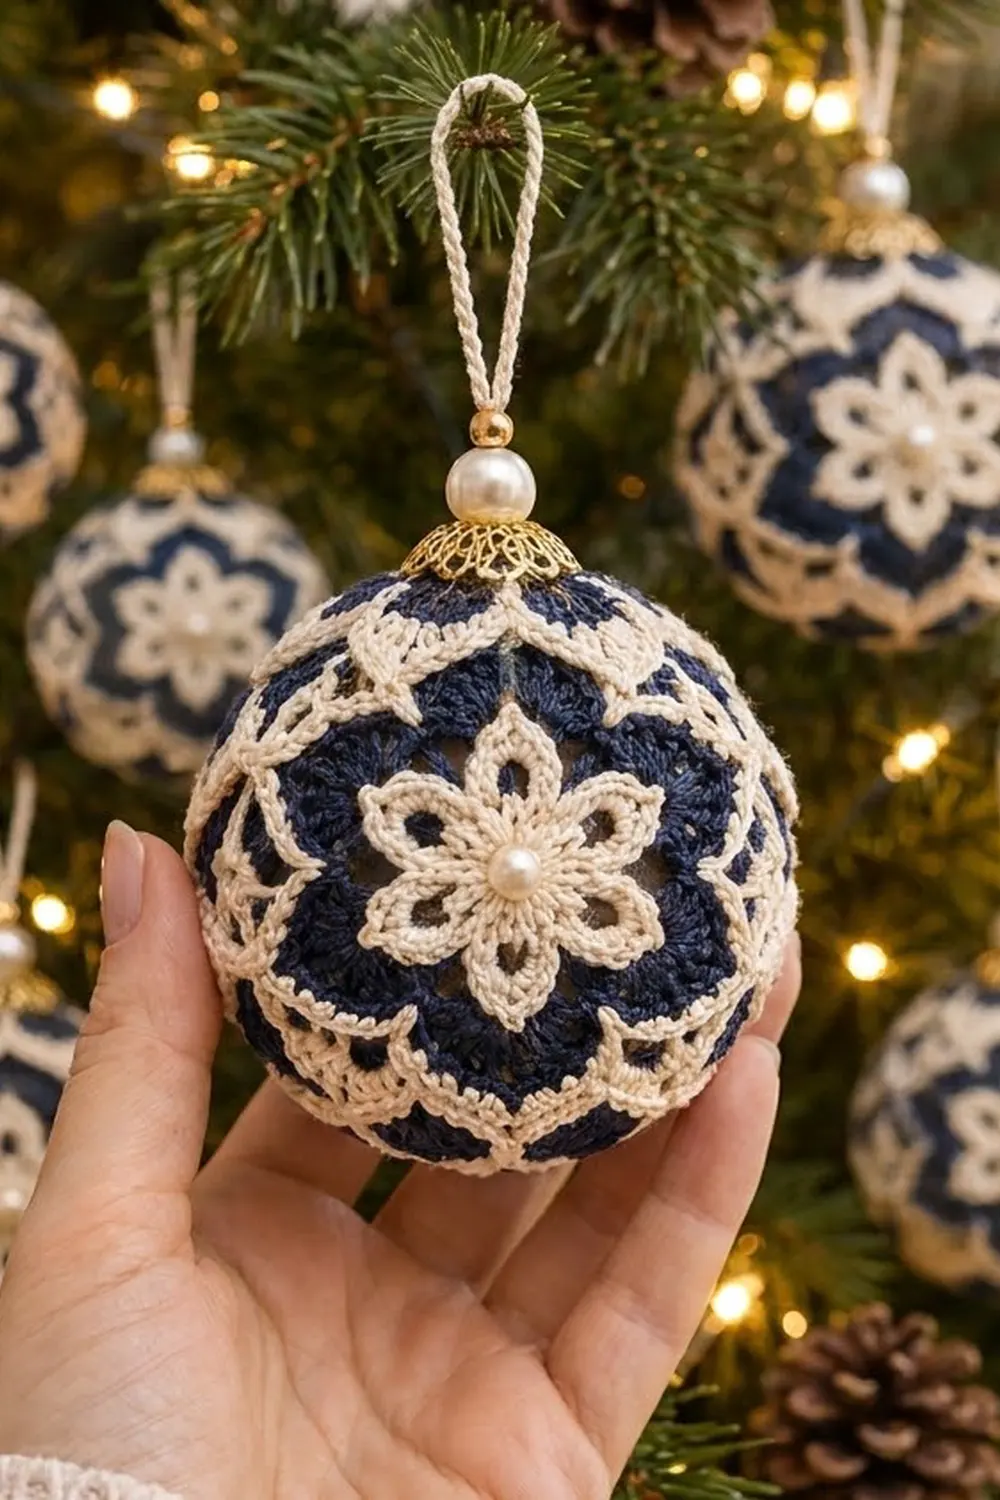
The Midnight Pearl Lace Ornament Cover is a lacy thread-crochet medallion that wraps around a 3 in (7.6 cm) ball ornament. A cream eight-petal flower with a pearl bead in the middle sits in the center front. Two rings of solid navy petals frame it, each one outlined in cream, and a ring of cream scallops finishes the edge.
The palette is just navy and cream with a little gold and pearl. It looks like vintage tatting, but you only need basic stitches: chains, single crochet, half double crochet, double crochet, and treble crochet. All terms in this pattern are US crochet terms.
Worked flat, the medallion measures 6 in (15.2 cm) across. You stretch it over the front and sides of the ball and draw it closed at the back with a drawstring. Last, you sew on a twisted cream hanging loop threaded through a pearl bead and a gold filigree bead cap.
The cover is one piece worked in rounds from the center out. First you make the cream flower, then navy petal ring 1 and its cream outline, then navy petal ring 2 and its outline. Three cream border rounds finish it: a chain mesh, the scallops, and a drawstring round.
Finished Size and Construction
- Finished size (flat): 6 in (15.2 cm) diameter
- Fits: 3 in (7.6 cm) ball ornament
- Skill level: Intermediate (fine thread, simple stitches)
- Terminology: US crochet terms
- Yarn weight: Size 10 crochet cotton (Lace / 0)
- Hook: 1.75 mm steel hook
- Number of pieces: 1 (single medallion)
- Layout: Circle with the flower at the center front and 8 petal sections around it
- Piece size before border (after Round 9): 4.5 in (11.4 cm)
- Border: Rounds 10–12, adding 0.75 in (1.9 cm) on each side
Materials
Use a mercerized size 10 cotton. Its tight twist shows stitch detail clearly and holds up when you stretch it over the ball. A matte cotton will work too, but the petals will look softer. The amounts below assume a thread that runs about 258 m per 50 g.
Choose a navy with good depth. A pale or dusty blue will blend into the cream and lose the high-contrast, layered look. Wind off a small ball of each color before you start so the full balls don’t tangle when you switch colors.
- Cream: 15 g (77 m), used for the flower, outlines, border, and hanging loop
- Navy: 10 g (52 m), used for both petal rings
These quantities include a margin for a gauge swatch and weaving in ends.
Tools and notions:
- 1.75 mm steel crochet hook
- Navy satin or navy-painted shatterproof ball ornament, 3 in (7.6 cm) diameter, with the metal cap and hook removed
- 1 pearl bead, 6 mm (flower center)
- 1 pearl bead, 8 mm (hanger)
- 1 gold filigree bead cap, 10 mm
- Fine tapestry needle and a beading needle
- Sewing thread in cream
- Stitch marker
- Blocking mat, rust-proof pins, and spray starch or a starch solution
Abbreviations (US Terms)
- ch – chain
- sl st – slip stitch
- sc – single crochet
- hdc – half double crochet
- dc – double crochet
- tr – treble crochet
- sp – space
- st(s) – stitch(es)
- rep – repeat
Special stitch – Petal shell: a group of stitches worked into one chain loop, shaped low–high–low so it forms a rounded or pointed petal. The exact sequence is given in each round.
Gauge and Checkpoints
Work Rounds 1–3 first and measure them before you go on. Gauge matters here because the cover has to fit a ball of a fixed size.
- After Round 1: 0.75 in (1.9 cm) diameter
- After Round 3 (flower): 1.75 in (4.4 cm) tip to tip
- After Round 6: 3.25 in (8.3 cm)
- After Round 9: 4.5 in (11.4 cm)
- After Round 11: 5.5 in (14.0 cm)
- After Round 12: 6 in (15.2 cm)
Measure the piece lying flat, without stretching it, across two opposite petal tips.
If the flower measures more than 1.75 in (4.4 cm), switch to a 1.5 mm hook. If it measures less than 1.5 in (3.8 cm), switch to a 2.0 mm hook. A cover that comes out 0.25 in (0.6 cm) big or small will still fit, because the drawstring takes up the difference.
Keep your chain tension the same as your stitch tension. Tight chain loops are the most common reason a lace medallion cups instead of lying flat.
Pattern
Round 1 (cream)
Make a magic ring. Ch 3 (counts as dc), then work 15 dc in the ring. Join with a sl st to the top of the ch-3. Pull the ring closed, leaving a tiny hole.
Count: 16 dc.
Round 2 (cream) – petal loops
Ch 1. Sc in the same st, ch 7, skip next st. Sc in next st, ch 7, skip next st. Rep from * 6 more times. Join with a sl st to the first sc.
Count: 8 sc and 8 ch-7 loops.
Round 3 (cream) – flower petals
Sl st into the first ch-7 loop. In each ch-7 loop, work: (sc, hdc, 2 dc, tr, ch 2, tr, 2 dc, hdc, sc). Join with a sl st to the first sc. Fasten off.
Count: 80 sts (10 per petal) and 8 ch-2 tips.
Each petal rises to a pointed tip. The ch-7 loops leave small open windows between the petals and the center ring, the same airy look the finished flower has.
Round 4 (navy) – ring 1 loops
Join navy with a sc in any ch-2 tip. Ch 9. Sc in next ch-2 tip, ch 9. Rep from * 6 more times. Join with a sl st to the first sc.
Count: 8 sc and 8 ch-9 loops.
The loops run from tip to tip, so each navy petal will sit in the gap between two cream petals.
Round 5 (navy) – ring 1 petals
Sl st into the first ch-9 loop. In each ch-9 loop, work: (sc, hdc, 2 dc, 5 tr, 2 dc, hdc, sc). Join with a sl st to the first sc. Fasten off.
Count: 112 sts (14 per petal).
These petals are rounded and solid. They show navy behind and between the cream flower petals.
Round 6 (cream) – ring 1 outline
Join cream with a sc in the first sc of any petal. This is a conversion round. For each petal: sc in the next 7 sts (the joining sc counts as the first one on the first petal), ch 2, sc in the next 7 sts. Join with a sl st to the first sc. Fasten off.
Count: 112 sc (112 worked 1 per st + 0 added) and 8 ch-2 sps.
This makes a thin cream line around each navy petal, with a small point at its center.
Round 7 (navy) – ring 2 loops
Join navy with a sc in any ch-2 sp. Ch 11. Sc in next ch-2 sp, ch 11. Rep from * 6 more times. Join with a sl st to the first sc.
Count: 8 sc and 8 ch-11 loops.
Round 8 (navy) – ring 2 petals
Sl st into the first ch-11 loop. In each ch-11 loop, work: (sc, hdc, 3 dc, 7 tr, 3 dc, hdc, sc). Join with a sl st to the first sc. Fasten off.
Count: 136 sts (17 per petal). The center tr is the 9th st of each petal.
The second ring is offset from the first, the way the layered petals look on the finished ornament.
Round 9 (cream) – ring 2 outline
Join cream with a sc in the first sc of any petal. This is a conversion round. For each petal: sc in the next 8 sts (the joining sc counts as the first), work (sc, ch 3, sc) in the center tr, then sc in the next 8 sts. Join with a sl st to the first sc. Do not fasten off.
Count: 144 sc (136 worked 1 per st + 8 added, 1 per petal) and 8 ch-3 tips. That is 18 sc per petal section.
Checkpoint: 4.5 in (11.4 cm) across. If you are over by more than 0.25 in (0.6 cm), rework Rounds 7–9 with tighter chain loops before you start the border.
Border
Border gauge: each ch-5 loop in Round 10 should span about 0.6 in (1.5 cm) along the edge. Each finished scallop in Round 11 should measure about 0.6 in (1.5 cm) wide and 0.25 in (0.6 cm) deep.
The 8 petal sections act as the “sides” of the circle. Between any two ch-3 tips there are exactly 18 sc: the 9 after one tip and the 9 before the next.
Round 10 (cream) – mesh
Sl st into the next ch-3 tip. Ch 1, then work the following for each section:
Sc in the ch-3 tip, ch 5, skip 5 sc, sc in the next sc, ch 5, skip 6 sc, sc in the next sc, ch 5, skip 5 sc. Rep from * 7 more times. Join with a sl st to the first sc.
Per section: 5 + 1 + 6 + 1 + 5 = 18 sc used, giving 3 sc and 3 ch-5 loops.
Count: 24 sc and 24 ch-5 loops.
Round 11 (cream) – scallops
Sl st into the first ch-5 loop. In each ch-5 loop, work: (sc, hdc, 3 dc, hdc, sc). Join with a sl st to the first sc.
Count: 168 sts (7 per scallop). That is 3 scallops and 21 sts per section.
Checkpoint: 5.5 in (14.0 cm).
Round 12 (cream) – drawstring round
Sl st across to the center dc of the first scallop (the 4th st). Ch 1. Sc in the center dc, ch 4, skip to the center dc of the next scallop. Rep from * 23 more times. Join with a sl st to the first sc. Fasten off.
Count: 24 sc and 24 ch-4 sps (3 of each per section).
Checkpoint: 6 in (15.2 cm).
Why the math works: each section has 18 sc. That divides evenly into 3 mesh loops, the loops become 3 scallops, and the scallops become 3 drawstring spaces. The pattern repeats exactly 8 times, so it never drifts. The border adds 0.5 in (1.3 cm) per side in Rounds 10–11 and 0.25 in (0.6 cm) per side in Round 12. That is 0.75 in (1.9 cm) per side in total, taking the piece from 4.5 in to 6 in (11.4 cm to 15.2 cm).
Final Blocking
- Weave in all ends on the wrong side. Run each tail through stitches of its own color.
- Sew the 6 mm pearl over the magic ring with cream sewing thread.
- Soak the medallion in cool water and roll it in a towel to press out the excess.
- Pin it flat to 6 in (15.2 cm). Pin every ch-2 and ch-3 tip and every scallop, and use a ruler to keep the circle round.
- Spray it lightly with starch and let it dry completely.
- Cut a 12 in (30.5 cm) length of cream thread. Weave it in and out of the 24 ch-4 sps of Round 12.
- Center the flower on the front of the ball. Smooth the lace back over the sides and pull the drawstring snug at the back. Knot it twice, then weave the tails in.
- For the hanger, twist a 2-strand cream cord about 5 in (12.7 cm) long and fold it into a 2.5 in (6.4 cm) loop. Thread both ends through the 8 mm pearl and then the bead cap, so the cap opens downward. Sew the ends securely into the Round 9–10 stitches at the top of the ornament.
Final Quality-Control Checklist
- The flower has 8 pointed petals and the pearl is centered.
- Both navy rings have 8 petals each, and ring 2 is offset from ring 1.
- The cream outlines sit flat, with no ruffling or cupping.
- There are 24 even scallops.
- The flat piece measured 6 in (15.2 cm) before you fitted it to the ball.
- The flower is centered on the front of the ball and the gathered opening is at the back.
- The bead cap sits snugly and the hanging loop is secure.
Troubleshooting
- Medallion cups: your chains are too tight. Work the ch-9 and ch-11 loops more loosely, or go up a hook size for the loop rounds only.
- Medallion ruffles: your tension is too loose, or you added extra stitches in the outline rounds. Recount to 112 and 144 sc.
- Navy petals lean sideways: check that each sc of Rounds 4 and 7 went into a tip space and not into a neighboring st.
- Scallops are uneven: recount the skips in Round 10 (5, 6, 5). One extra skip pulls a whole section out of line.
- Cover won’t reach the back: the drawstring is pulled too tight too early. Loosen it, ease the lace over the sides, then tighten again.
- Pearl sags: sew through the Round 1 stitches twice, crossing your stitches in an X.
- Gaps show the ornament: use a navy ball so any gaps read as part of the design.
Care
Spot clean with a damp cloth. If the lace goes limp, remove it, wash it gently, and starch and reblock it to 6 in (15.2 cm).
Final Notes
Check your measurements at each stage: 0.75 in (1.9 cm) after Round 1, 1.75 in (4.4 cm) after the flower, 3.25 in (8.3 cm) after ring 1, 4.5 in (11.4 cm) after ring 2, 5.5 in (14.0 cm) after the scallops, and 6 in (15.2 cm) after the drawstring round. If each checkpoint matches, the cover will fit a 3 in (7.6 cm) ball. Once you have made one, it is easy to make a whole set in matching colors.
Happy crocheting!