

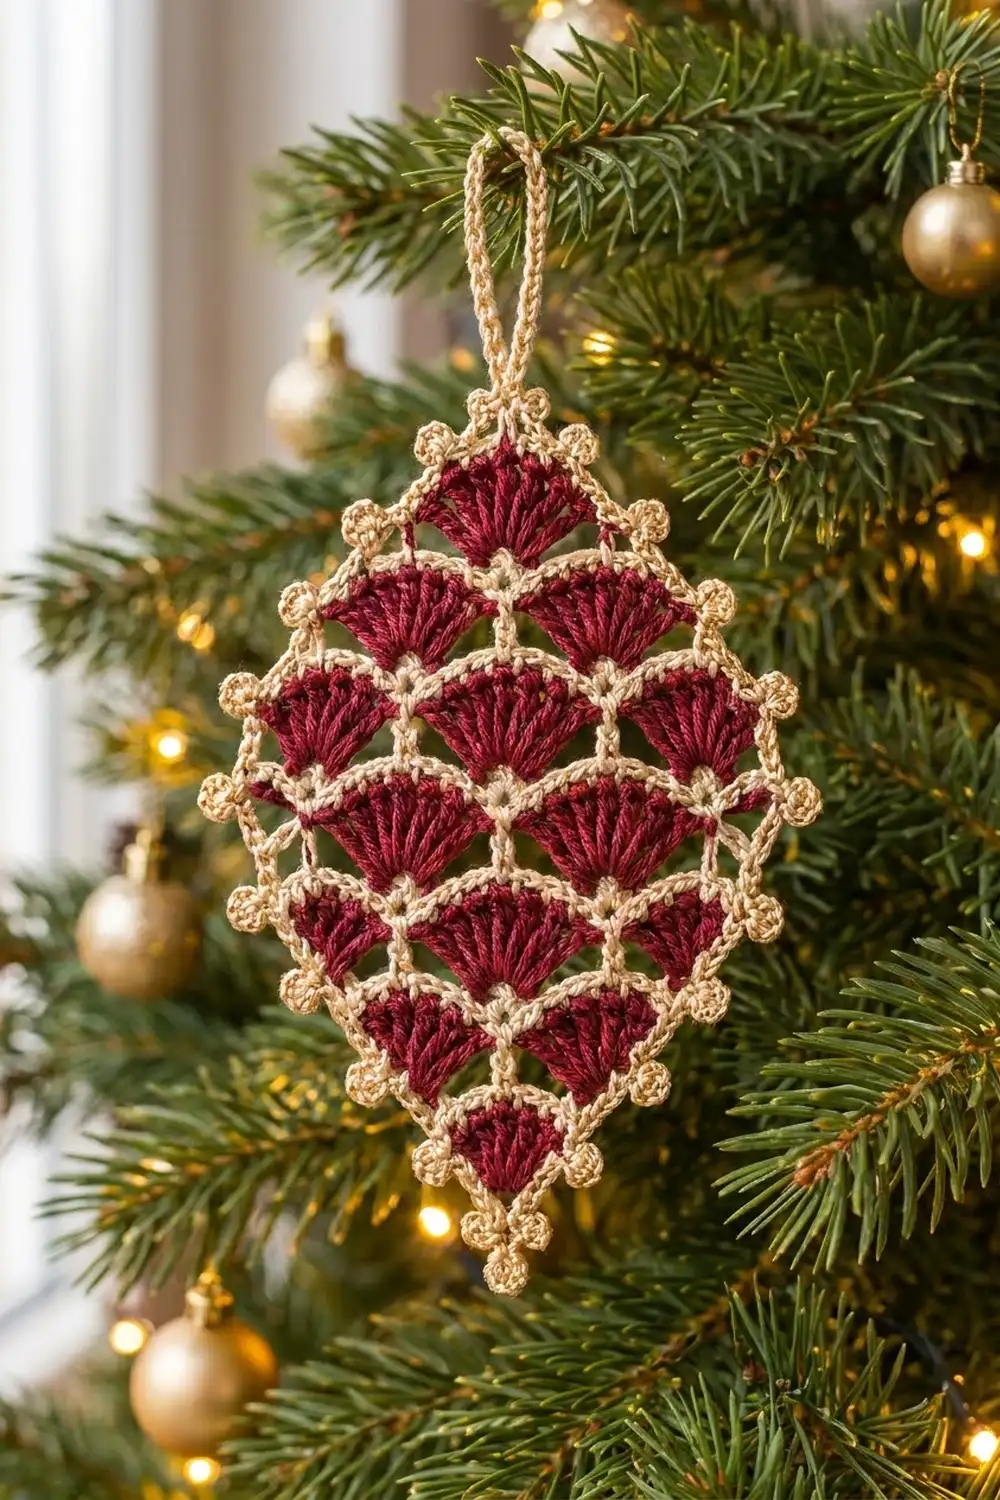
The Ruby Lattice Diamond is a flat Christmas ornament made of rich burgundy fans held in a fine cream lattice. Each fan points down and opens up like a small scallop. The fans sit in a brick pattern that widens and then narrows, which gives the piece its diamond shape.
Two colors do all the work. Burgundy fills the fans, and a warm cream with a golden tone outlines every tier, forms the edging, adds the little picot “beads,” and makes the hanging loop. The look is classic and a little vintage, like old lace with a holiday color scheme.
The pattern uses US crochet terms. The finished ornament measures about 4 3/8 in (11.1 cm) wide and 5 3/4 in (14.6 cm) tall at the border edge. It is about 6 in (15.2 cm) tall to the tip of the bottom picot, or 7 1/4 in (18.4 cm) including the hanging loop.
You work the body in rows from the bottom point up. Each burgundy fan row is followed by a cream single crochet row. Rows 1–4 increase, Rows 5–7 decrease, and then two cream border rounds and a loop finish the piece.
Finished Size and Construction
- Finished size: 4 3/8 in (11.1 cm) wide x 5 3/4 in (14.6 cm) tall at the border, about 4 5/8 in (11.7 cm) across the picot tips
- Skill level: Intermediate
- Terminology: US crochet terms
- Yarn weight: Size 3 cotton crochet thread (fingering, CYC 1)
- Hook: 2.25 mm (US B-1)
- Number of pieces: 1
- Layout: One diamond with 16 fans in tiers of 1-2-3-4-3-2-1
- Piece size before border: 3 7/8 in (9.8 cm) wide x 5 1/4 in (13.3 cm) tall
- Border depth: 1/4 in (0.6 cm) on every edge (2 rounds)
Materials
Use a smooth, mercerized cotton thread. The sheen makes the fans look crisp and helps the lattice hold its shape after blocking. A slightly golden cream gives the warm look in the photos. Pure white looks sharper and more modern.
- Color A, burgundy: 6 g, about 16 m
- Color B, warm cream: 7 g, about 19 m
- 2.25 mm (US B-1) crochet hook
- 2 locking stitch markers
- Tapestry needle
- Scissors
- Blocking mat and rust-proof pins
- Optional: spray starch or a fabric stiffener
These quantities include a margin for a gauge test, tails, and the hanging loop.
Abbreviations (US Terms)
- ch – chain
- sl st – slip stitch
- sc – single crochet
- dc – double crochet
- sk – skip
- st(s) – stitch(es)
- A / B – burgundy / cream
Special stitches
- Fan: 7 dc in the same st.
- Standing sc: With a slipknot on the hook, insert the hook into the st, yarn over, pull up a loop, yarn over, and pull through both loops.
- Picot: Ch 3, sl st in the 3rd ch from the hook.
- Triple picot: [Ch 3, sl st in 3rd ch from hook] 3 times, which makes a cluster of three dots.
Gauge and Checkpoints
Gauge: 8 sc = 1 in (2.5 cm) across a cream row. One tier (one fan row plus one cream row) = 3/4 in (1.9 cm) tall. One fan is 7 sts, or 7/8 in (2.2 cm) across its top.
Test first. Use Rows 1 through C2 below as your swatch. At C2 it should be 15 sts and 1 7/8 in (4.8 cm) wide, and 1 1/2 in (3.8 cm) tall. If it matches, keep going, because the swatch is also the start of the ornament.
Checkpoints:
- After C1: 7 sts, 7/8 in (2.2 cm) wide, 3/4 in (1.9 cm) tall
- After C2: 15 sts, 1 7/8 in (4.8 cm) wide, 1 1/2 in (3.8 cm) tall
- After C3: 23 sts, 2 7/8 in (7.3 cm) wide
- After C4: 31 sts, 3 7/8 in (9.8 cm) wide, 3 in (7.6 cm) tall
- After C7: 5 1/4 in (13.3 cm) tall
- After the border: 4 3/8 in (11.1 cm) x 5 3/4 in (14.6 cm)
Too big? If C2 is wider than 1 7/8 in (4.8 cm), go down to a 2.0 mm hook. Too small? If C2 is narrower than 1 3/4 in (4.4 cm), go up to a 2.5 mm hook. Being off by up to 1/8 in (0.3 cm) is fine at the swatch stage.
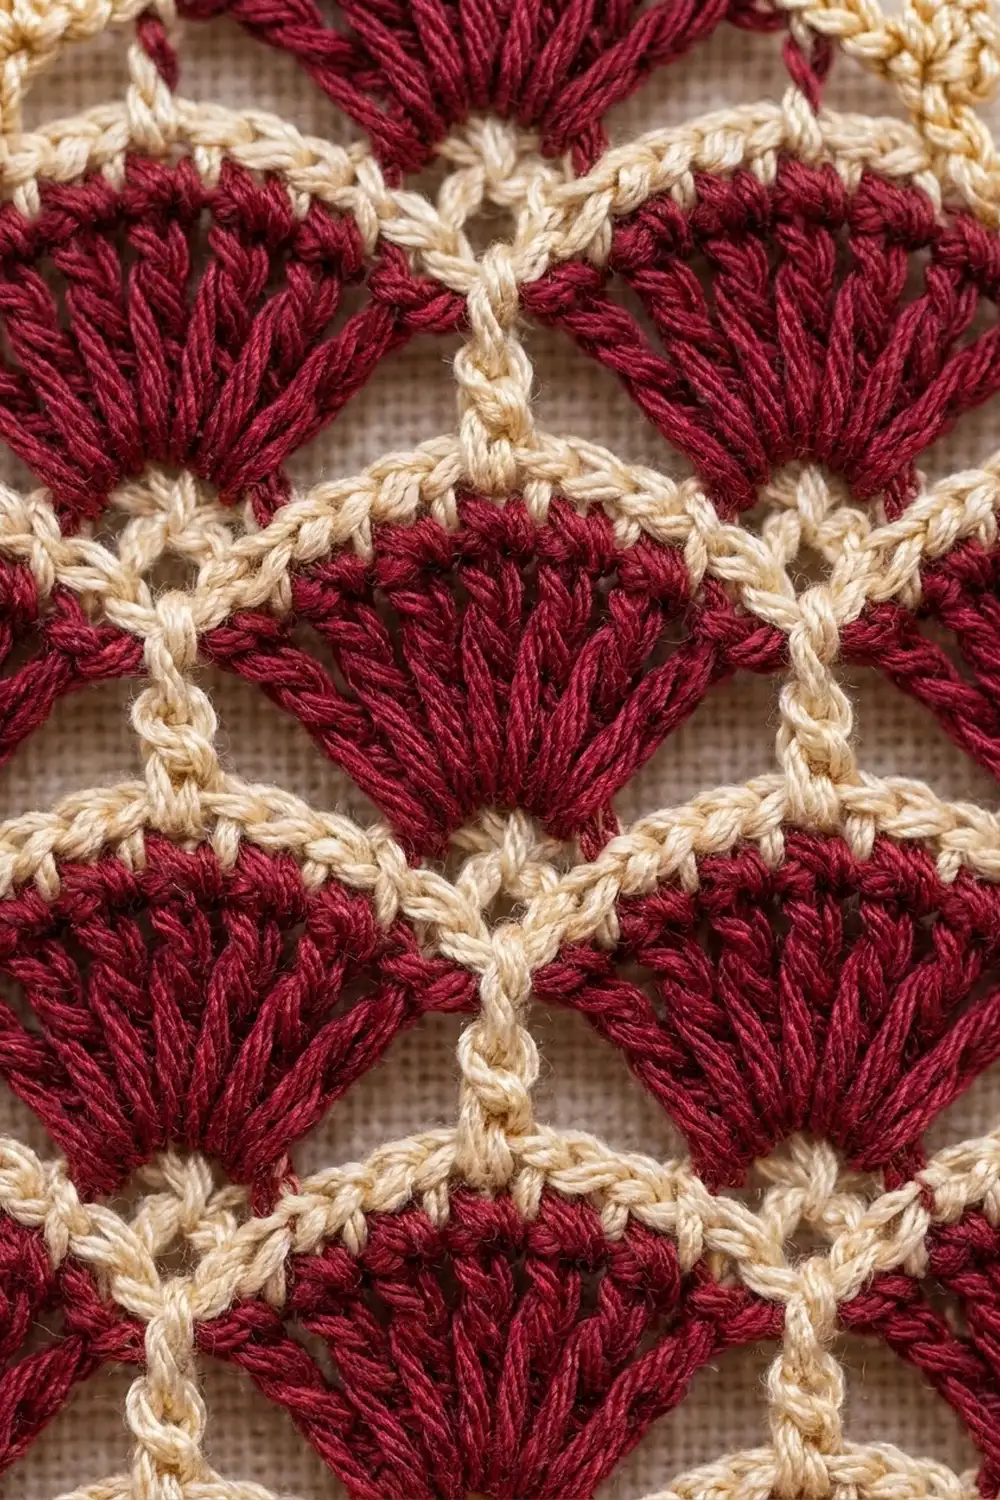
Yarn Route (Rows 1–4)
For Rows 1–4, you carry both colors up the side edges, so nothing needs to be cut. Follow this rhythm:
- After a burgundy row: turn, then work the cream row.
- After a cream row: do not turn. Burgundy is waiting at the edge where that cream row began. Pick it up there and work the next fan row in the same direction.
The carried strands lie along the side edges, and Border Round 1 covers them. Keep the loop of the color you’re not using on a locking marker so it can’t unravel. The fans look the same from both sides, so the row direction doesn’t show.
Main Pattern: The Diamond Body
In each cream row, stitches are numbered from where you start that row. The pattern is symmetrical, so the numbering works in either direction.
Increase Tiers
Row 1 (A): Ch 4. Work 6 dc in the 4th ch from the hook. The skipped ch-3 counts as the first dc. (7 dc, 1 fan) Turn.
This single fan is the bottom point of the diamond.
Row C1 (B): Join B with a standing sc in the first st. Sc in each remaining st. (7 sc) Place B’s loop on a marker. Do not turn.
Row 2 (A): Pick up A. Ch 3 (counts as a dc), 6 dc in the first st (fan made). Sk 2, sc in st 4 (the center of the fan below), sk 2, fan in st 7. (2 fans + 1 sc = 15 sts) Turn.
Each new edge fan goes into the outermost st, so every increase row grows by one fan.
Row C2 (B): Ch 1, sc in each st across. (15 sc) Do not turn.
The fan tops are now sts 1–7 and 9–15. St 8 is the junction between them.
Row 3 (A): Ch 3, 6 dc in st 1. Sk 2, sc in st 4, sk 3, fan in st 8 (the junction), sk 3, sc in st 12, sk 2, fan in st 15. (3 fans + 2 sc = 23 sts) Turn.
Row C3 (B): Ch 1, sc in each st across. (23 sc) Do not turn.
Row 4 (A): Ch 3, 6 dc in st 1. Sk 2, sc in st 4, sk 3, fan in st 8, sk 3, sc in st 12, sk 3, fan in st 16, sk 3, sc in st 20, sk 2, fan in st 23. (4 fans + 3 sc = 31 sts) Fasten off A. Turn.
Row C4 (B): Ch 1, sc in each st across. (31 sc) Fasten off B.
This is the widest row: 3 7/8 in (9.8 cm). The fan tops are sts 1–7, 9–15, 17–23, and 25–31. The junctions are sts 8, 16, and 24. The fan centers are sts 4, 12, 20, and 28.
Decrease Tiers
From here on, start every row with a standing sc and fasten off at the end. Turn the piece between rows as usual. Crochet over the tails as you go to save weaving later.
Row 5 (A): Standing sc in st 4. [Sk 3, fan in next st, sk 3, sc in next st] 3 times. The fans land in sts 8, 16, and 24, and the sc land in sts 12, 20, and 28. (3 fans + 4 sc = 25 sts) Fasten off.
C4 sts 1–3 and 29–31 stay unworked. They form the first cream “step” on each upper side.
Row C5 (B): Standing sc in the first st, sc in each st across. (25 sc) Fasten off.
The positions are: edge sc 1, fan 2–8, junction 9, fan 10–16, junction 17, fan 18–24, edge sc 25.
Row 6 (A): Standing sc in st 5. Sk 3, fan in st 9, sk 3, sc in st 13, sk 3, fan in st 17, sk 3, sc in st 21. (2 fans + 3 sc = 17 sts) Fasten off.
Row C6 (B): Standing sc in the first st, sc in each st across. (17 sc) Fasten off.
The positions are: edge 1, fan 2–8, junction 9, fan 10–16, edge 17.
Row 7 (A): Standing sc in st 5. Sk 3, fan in st 9, sk 3, sc in st 13. (1 fan + 2 sc = 9 sts) Fasten off.
Row C7 (B): Standing sc in the first st, sc in each st across. (9 sc) Fasten off.
The body now has 16 fans and measures 3 7/8 in (9.8 cm) x 5 1/4 in (13.3 cm). Weave in the burgundy tails before you start the border.
Border
Border gauge: Each border round adds 1/8 in (0.3 cm) to every edge. Two rounds add 1/4 in (0.6 cm) per edge, or 1/2 in (1.3 cm) to both the width and the height.
The two side points are the outer ends of C4. On each upper side, you work down the side of a tier, then across the unworked cream “step” stitches below it.
Round 1 (B): With the right side facing, join B with a standing sc in the first st of C7. Then work around as follows:
- Top: sc in each st of C7. (9 sc, including the standing sc)
- Upper right side:
- Tier 7: 3 sc down the side of Row 7 and C7, then 1 sc in each of the 4 unworked C6 sts.
- Tier 6: 3 sc down the side, then 1 sc in each of the 4 unworked C5 sts.
- Tier 5: 3 sc down the side, then 1 sc in each of the next 2 unworked C4 sts. (19 sc)
- Right point: 3 sc in the last C4 st. (3 sc)
- Lower right side: 3 sc along the edge fan of Row 4, 1 sc in the end of C3, 3 sc along Row 3, 1 sc in the end of C2, 3 sc along Row 2, 1 sc in the end of C1, and 3 sc along Row 1. (15 sc)
- Bottom point: 3 sc in the base ch of Row 1. (3 sc)
- Lower left side: mirror the lower right side. (15 sc)
- Left point: 3 sc in the C4 end st. (3 sc)
- Upper left side: mirror the upper right side. (19 sc)
Join with a sl st to the first sc. (86 sc: 9 + 19 + 3 + 15 + 3 + 15 + 3 + 19)
Round 2 (B): Ch 1. Work 1 sc in each of the 86 sts, plus 1 extra sc at each of the 3 points (86 + 3 = 89 sc). Place the picots as follows:
- Top: sc in each of 9 sts. (9 sc)
- Upper right side: sc in next 3 sts, [picot, sc in next 4 sts] 4 times. (19 sc, 4 picots)
- Right point: sc in the first corner st, (sc, triple picot, sc) in the center corner st, sc in the third corner st. (4 sc)
- Lower right side: [sc in next 4 sts, picot] 3 times, sc in next 3 sts. (15 sc, 3 picots)
- Bottom point: work as for the right point. (4 sc + triple picot)
- Lower left side: sc in next 3 sts, [picot, sc in next 4 sts] 3 times. (15 sc, 3 picots)
- Left point: work as for the right point. (4 sc)
- Upper left side: [sc in next 4 sts, picot] 4 times, sc in next 3 sts. (19 sc, 4 picots)
Join with a sl st to the first sc. Fasten off. (89 sc, 14 single picots, 3 triple picots)
Hanging loop (B): Join B with a sl st in the 5th (center) sc of the top edge. Ch 20, then sl st in the same st. Work 30 sc into the ch-20 loop, then sl st in the same st. Fasten off. The loop stands about 1 1/4 in (3.2 cm) tall.
Why the math works: Round 1 puts one sc in each row end and each exposed cream st, so the side counts follow the stepped tiers exactly.
- Each upper side has 7 + 7 + 5 = 19 sts.
- Each lower side has 4 fan sides x 3 sc + 3 cream row ends = 15 sts.
- The three 3-sc points let the edge turn sharp corners without cupping.
- Round 2 is 1 sc per st (86) plus 1 extra sc at each of the 3 points (+3), for 89 sc.
- The picot repeats use exactly 19 and 15 sts, so each side comes out even.
Final Blocking
- Weave in all remaining tails through cream sts so nothing shows through the open lattice.
- Soak the ornament in cool water for 10 minutes. Press out the water in a towel without wringing.
- Lay it right side up on the blocking mat.
- Pin the center of the top edge and the bottom triple picot 5 3/4 in (14.6 cm) apart, measured at the border edge.
- Pin the two side points 4 3/8 in (11.1 cm) apart.
- Pin along each side so the edges run straight, and pin each triple picot open.
- With a fingertip, ease each fan into a smooth half-circle.
- If you want a stiffer ornament, spray lightly with starch. Let it dry completely before unpinning.
Final Quality-Control Checklist
- 16 fans in tiers of 1-2-3-4-3-2-1, each with 7 dc
- Cream row counts: 7, 15, 23, 31, 25, 17, 9
- Border Round 1 = 86 sc; Round 2 = 89 sc
- 14 single picots: 4 on each upper side, 3 on each lower side
- 3 triple picots: one at the bottom and one at each side point
- Both halves mirror each other
- Size is 4 3/8 in (11.1 cm) x 5 3/4 in (14.6 cm) at the border
- Loop is centered and firmly anchored
Troubleshooting
Fans ruffle or overlap. Your dc are too loose or too tall. Go down a hook size, or keep the first loop of each dc shorter.
Cream rows pull the fans narrow. Your sc are too tight. Relax your tension, or use a hook 0.25 mm larger for the cream rows only.
Wrong fan count. Check your skips. The outer side of each edge fan uses sk 2, and every other gap uses sk 3. Count each cream row before you work the next fan row.
Carried strands show at the sides. Keep the carried yarn snug but not tight, and make sure the Border Round 1 sc cover it.
Border cups or ripples. Cupping means too few sts or too tight a hand. Ripples mean extra sts along the fan sides, so stick to 3 sc per fan side.
Diamond leans to one side. Count both halves and compare them. Usually one step on an upper side got the wrong number of sts.
Care
Hand wash in cool water with mild soap, press dry in a towel, and reshape flat. Store it flat or hanging, where heavier ornaments can’t crush it.
Final Notes
The ornament’s size comes from one chain of measurements. A gauge of 8 sc per 1 in (2.5 cm) gives a widest row of 31 sts at 3 7/8 in (9.8 cm). At 3/4 in (1.9 cm) per tier, seven tiers make a body 5 1/4 in (13.3 cm) tall. Two border rounds add 1/4 in (0.6 cm) on every edge, for a finished ornament of 4 3/8 in (11.1 cm) x 5 3/4 in (14.6 cm). Check each link as you go, and the diamond will come out even and crisp.
Happy crocheting!