

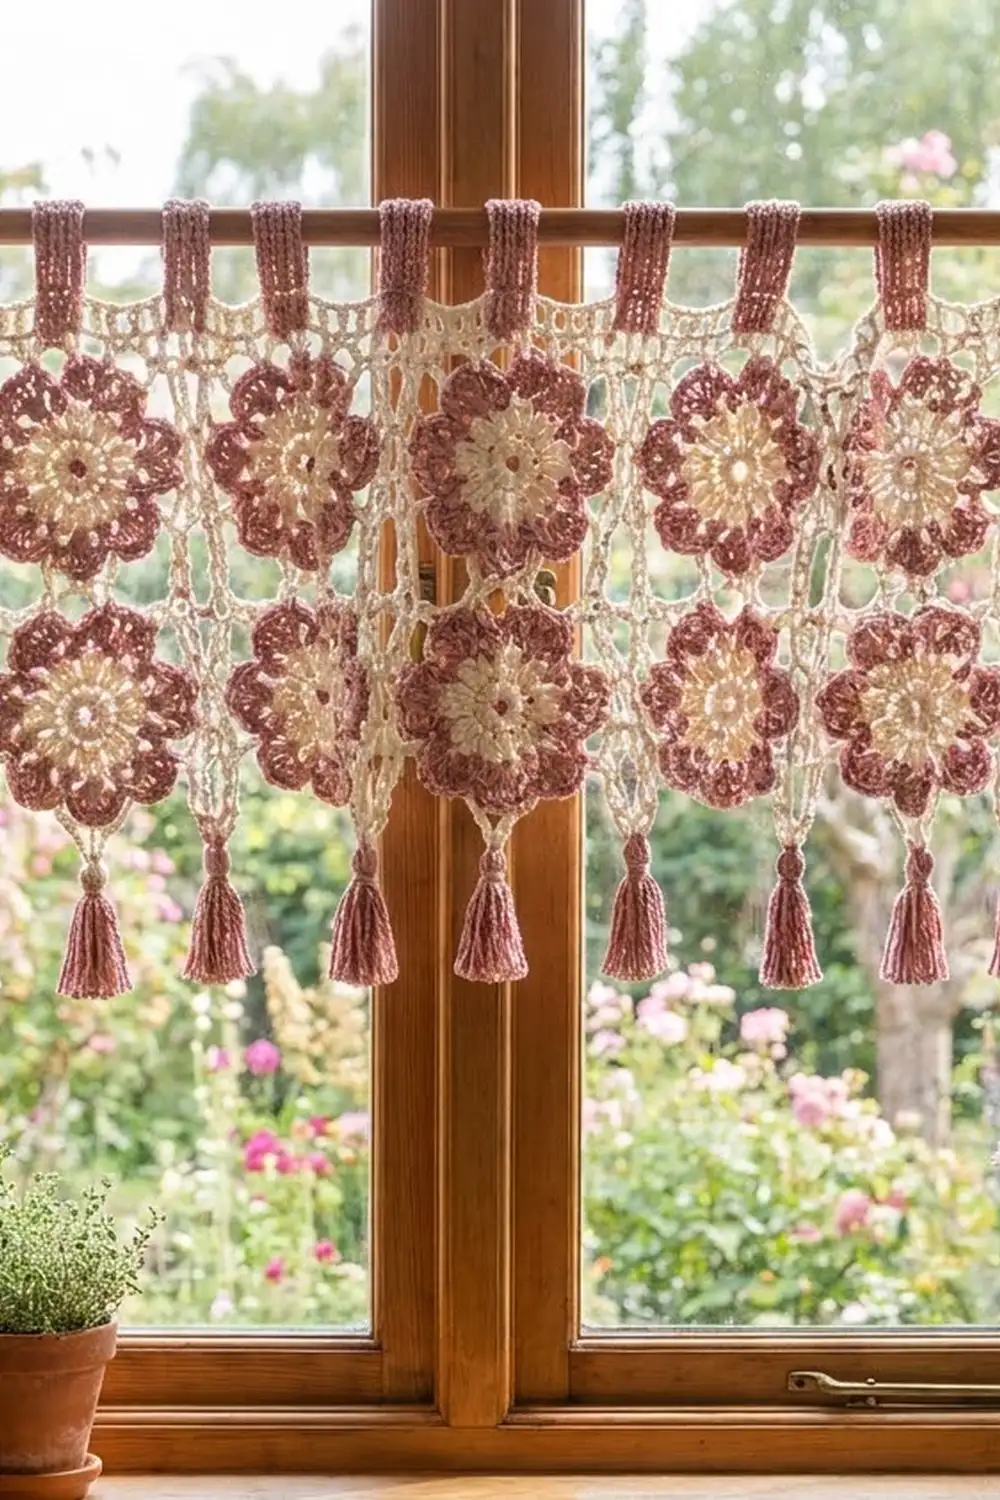
The Rose Lattice Café Curtain is made of 15 layered flower motifs set in an open cream lattice. Each flower has a soft cream center surrounded by larger dusty-rose petals. The light through the window shows off the lacy spaces between the motifs. Eleven rose tabs hang the curtain from a rod, and eleven matching tassels finish the bottom edge.
The look is cottage style with a light vintage feel, in two colors only: cream and dusty rose. A cotton yarn holds the petal shapes well and is easy to block flat.
This pattern uses US crochet terms. The finished panel measures 31.5 x 19.5 in (80.0 x 49.5 cm) without tabs and tassels. Including the tab loops and tassels, the curtain hangs about 24.5 in (62.2 cm).
Here is how it comes together. You make 15 flower motifs and square each one off with a cream mesh frame. You then join them in a 5 x 3 grid with an open single crochet “ladder” join. Last, you add a two-round border, crochet the tabs directly onto the top edge, and tie the tassels to the bottom edge.
Finished Size and Construction
- Finished size: 31.5 x 19.5 in (80.0 x 49.5 cm) panel; about 24.5 in (62.2 cm) total drop
- Skill level: Intermediate
- Terminology: US
- Yarn weight: #4 worsted, cotton
- Hook: 4.5 mm (US 7)
- Number of pieces: 15 motifs, plus 11 tabs and 11 tassels
- Layout: 5 motifs across, 3 motifs down
- Motif size: 6 x 6 in (15.2 x 15.2 cm)
- Size before border: 30 x 18 in (76.2 x 45.7 cm)
- Border depth: 0.75 in (1.9 cm) on each side
Materials
Use a smooth worsted-weight cotton or cotton blend of about 78 m per 50 g. Cotton keeps the petals crisp and stands up to sunlight and washing.
- Cream: 200 g (about 312 m) for motif centers, motif frames, joining and border
- Dusty rose: 150 g (about 234 m) for the outer petals, tabs and tassels
Tools:
– 4.5 mm (US 7) crochet hook
– Tapestry needle
– Scissors
– Stitch markers
– A 3.5 in (8.9 cm) piece of cardboard for the tassels
– Blocking mats and rust-proof pins
– Spray bottle
The quantities include roughly a 15% safety margin.
Abbreviations (US Terms)
- ch – chain
- sl st – slip stitch
- sc – single crochet
- hdc – half double crochet
- dc – double crochet
- tr – treble crochet
- sk – skip
- sp(s) – space(s)
- st(s) – stitch(es)
- RS / WS – right side / wrong side
Special stitch: Back-post sc (bp-sc). Insert the hook from the back, around the post of the given stitch and out to the back again. Yarn over, pull up a loop, then yarn over and pull through both loops. This anchors the rose petal layer behind the cream petals.
Gauge and Checkpoints
Make one complete motif first and block it before you make the rest. Check its size at each of these stages:
- After Round 1: 1.5 in (3.8 cm) across
- After Round 3 (cream flower): 3.5 in (8.9 cm) across
- After Round 5 (rose flower): 4.75 in (12.1 cm) across
- After Round 6: about 5.25 in (13.3 cm) across, edge to edge
- After Round 7 (blocked): 6 x 6 in (15.2 x 15.2 cm)
If the motif is too big, switch to a 4 mm (US G-6) hook. If it’s too small, switch to a 5 mm (US H-8) hook. Being off by 1/4 in (0.6 cm) per motif adds up to 1.25 in (3.2 cm) across the width, so get the gauge right before you go on.
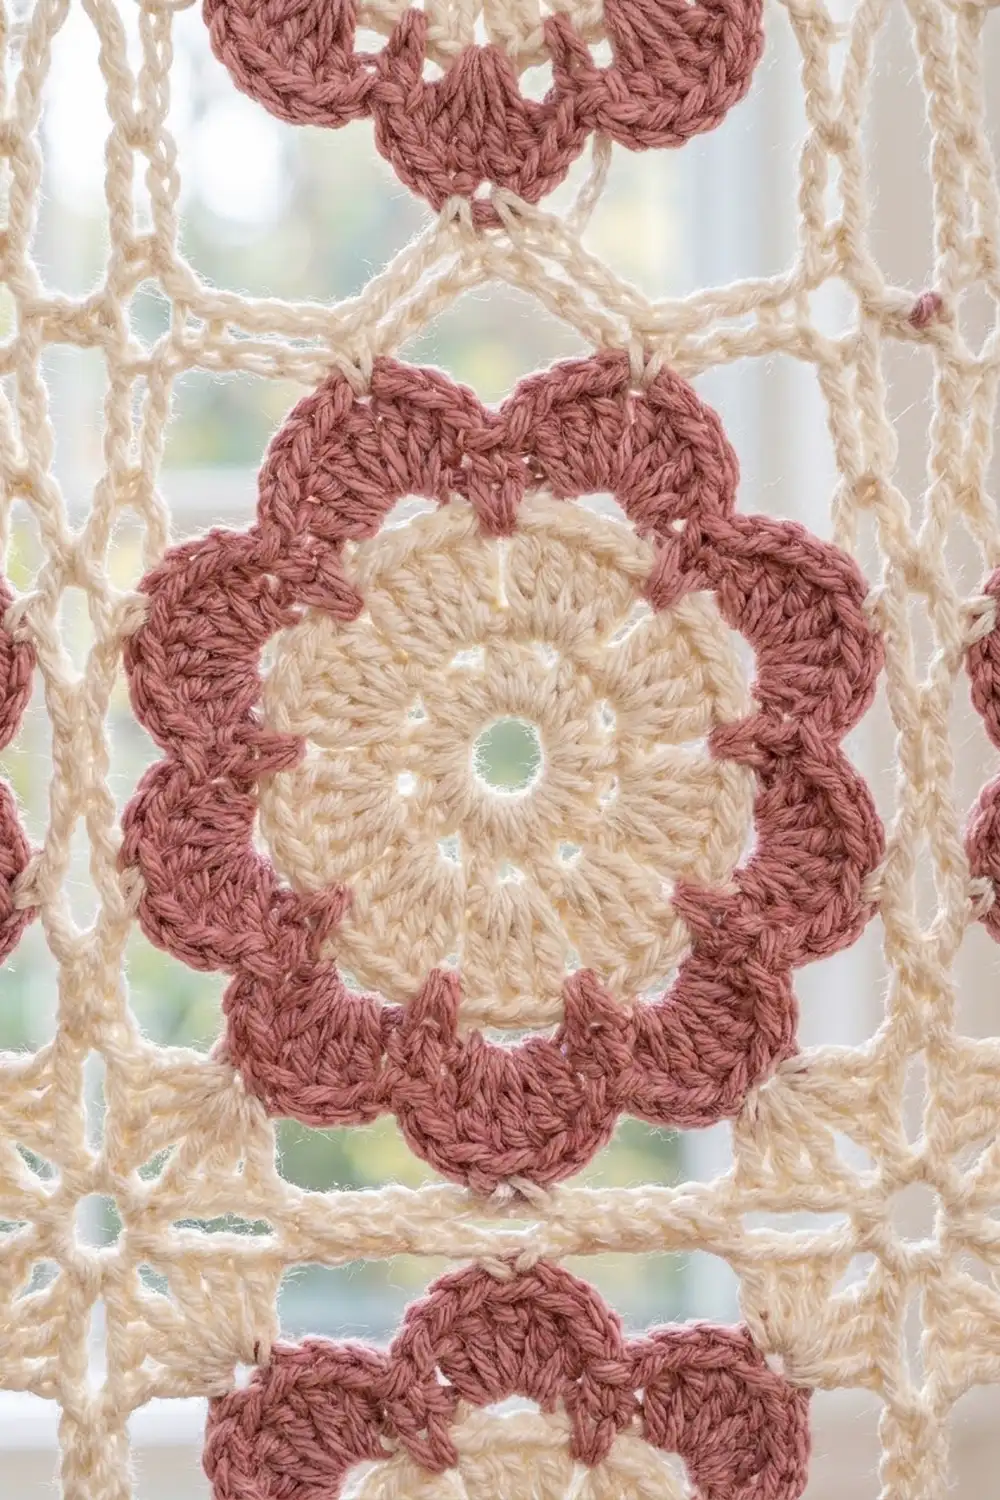
Flower Motif (Make 15)
Round 1 (cream): Make a magic ring. Ch 3 (counts as dc), then work 15 dc into the ring. Join with a sl st to the top of the ch-3. (16 dc)
Round 2 (cream): Ch 1, sc in the same st, ch 3, sk next dc. Sc in next dc, ch 3, sk next dc. Repeat from * 6 more times. Join with a sl st to the first sc. (8 sc, 8 ch-3 sps)
Round 3 (cream petals): Sl st into the next ch-3 sp. In each ch-3 sp, work (sc, hdc, 3 dc, hdc, sc). Join with a sl st to the first sc. Fasten off. (8 petals, 7 sts each = 56 sts)
The 8 sc from Round 2 now sit at the base between the petals. You’ll work the rose layer around them.
Round 4 (rose base loops): Turn the motif to the WS so the cream petals fold toward you. Join rose with a bp-sc around any Round 2 sc. Ch 5, bp-sc around the next Round 2 sc. Repeat from * 6 more times. Ch 5 and join with a sl st to the first bp-sc. (8 bp-sc, 8 ch-5 loops)
These loops sit behind the cream petals, so the rose petals come out between and behind them.
Round 5 (rose petals): Sl st into the next ch-5 loop. In each ch-5 loop, work (sc, hdc, 5 dc, hdc, sc). Join with a sl st to the first sc. Fasten off. (8 petals, 9 sts each = 72 sts)
The 3rd of the 5 dc in each petal is that petal’s center dc. Place a marker in it on 4 petals that are not next to each other. These will become the corners.
Round 6 (cream square-up): Join cream with a sl st in a marked center dc. Ch 7 (counts as tr + ch 3), then tr in the same st (first corner). Ch 5, sc in the center dc of the next petal, ch 5, then (tr, ch 3, tr) in the center dc of the next petal (corner). Repeat from * 2 more times. Ch 5, sc in the center dc of the next petal, ch 5, and join with a sl st to the 4th ch of the beginning ch-7. (8 tr, 4 sc, 4 corner ch-3 sps, 8 ch-5 sps)
Round 7 (cream mesh frame): Sl st into the next corner ch-3 sp. Ch 6 (counts as dc + ch 3), then dc in the same sp. Now work each side:
Ch 1, dc in the next tr, ch 1, (dc, ch 1, dc, ch 1, dc) in the ch-5 sp, ch 1, dc in the sc, ch 1, (dc, ch 1, dc, ch 1, dc) in the ch-5 sp, ch 1, dc in the next tr, ch 1. Then work (dc, ch 3, dc) in the corner sp. Repeat from * around. On the last side, skip the final corner and join with a sl st to the 3rd ch of the ch-6. Fasten off.
Stitch count per side: 11 dc, which includes 1 corner dc at each end. There are 10 ch-1 sps between them.
Round total: 44 dc (4 x 9 non-corner dc + 8 corner dc), 40 ch-1 sps, 4 corner ch-3 sps.
Block the motif to 6 x 6 in (15.2 x 15.2 cm).
Make All Pieces
Make 15 motifs in total. For each one:
– Cream: Rounds 1–3 and 6–7 (about 9 g per motif, 135 g total)
– Rose: Rounds 4–5 (about 5 g per motif, 75 g total)
Layout (M = motif):
Row 1:  M  M  M  M  M
Row 2:  M  M  M  M  M
Row 3:  M  M  M  M  M
Weave in all ends before you start joining.
Joining
Use an open sc ladder join in cream. Hold two motifs with WS together. Each side has 11 dc, so the dc on one motif line up one-for-one with the dc on the other.
Horizontal seams first: Lay out Row 1 and Row 2 so the touching edges match up. Join cream with a sc through both corner dc at the right end. Ch 1, sc through the next matching pair of dc. Repeat from * 9 more times. That gives 11 sc and 10 ch-1 sps per motif pair.
To move on to the next pair of motifs, ch 2. Skip the corner ch-3 sps of both motifs, then sc through the next pair of corner dc and repeat the seam. Join Row 2 to Row 3 the same way.
Vertical seams: Work them the same way, with 11 sc per motif pair and ch 2 across each horizontal seam. The skipped corner ch-3 sps leave a small open diamond where four corners meet, which is part of the lattice look.
Tension: Work the ch-1 and ch-2 at the same height as the ch-1 sps in the motifs. Chains that are too tight will pucker the seam. Chains that are too loose will let it sag.
Checkpoint: The joined panel should measure 30 x 18 in (76.2 x 45.7 cm).
Border
Border gauge: Border Round 1 matches the motif dc exactly, one stitch for one stitch, so it adds no extra length. The panel keeps 11 dc for every 6 in (15.2 cm) along each edge.
Starting counts:
– Long sides: 5 motifs x 11 dc = 55 dc, with 54 gaps between them (50 ch-1 sps inside the motifs + 4 seams)
– Short sides: 3 motifs x 11 dc = 33 dc, with 32 gaps (30 ch-1 sps + 2 seams)
Border Round 1 (cream): Join cream with a sl st in any outer corner ch-3 sp. Ch 6 (counts as dc + ch 3), then dc in the same sp. Along each side, dc in each motif dc. Ch 1 over each ch-1 sp, and ch 1 over each seam (skip the corner sps at the seam). In each of the other outer corner sps, work (dc, ch 3, dc). Join with a sl st to the 3rd ch of the ch-6.
- Long side: 55 + 2 new corner dc = 57 dc, with 54 ch-1 sps
- Short side: 33 + 2 = 35 dc, with 32 ch-1 sps
- Round total: 2 x 57 + 2 x 35 = 184 dc
Border Round 2 (cream): Sl st into the corner sp and ch 1. Work 3 sc in each corner ch-3 sp. Along each side, sc in each dc and sc in each ch-1 sp. Join with a sl st to the first sc. Fasten off.
- Long side: 57 + 54 = 111 sc between the corner groups
- Short side: 35 + 32 = 67 sc between the corner groups
- Round total: 2 x 111 + 2 x 67 + 4 x 3 = 368 sc
Why the math works: Round 1 matches the motif stitches one-for-one. The seams are treated as ch-1 sps, and the only new stitches are the 2 corner dc on each side. Round 2 simply places one sc on every dc and every space. Round 1 adds about 0.5 in (1.3 cm) and Round 2 about 0.25 in (0.6 cm), for a 0.75 in (1.9 cm) border. That brings the panel to 31.5 x 19.5 in (80.0 x 49.5 cm).
Tabs (Make 11)
The top edge has 113 sts: the 111 side sc plus the center sc of each corner group. Number them from right to left with the RS facing. Each tab is worked over 3 sts, with 8 sts between tabs. That works out as 11 x 3 + 10 x 8 = 113. Tabs start at sts 1, 12, 23, 34, 45, 56, 67, 78, 89, 100 and 111.
Row 1: With the RS facing, join rose in the first st of the tab. Ch 2 (doesn’t count as a st). Hdc in the same st, 2 hdc in the next st, hdc in the next st. Turn. (4 hdc)
Rows 2–12: Ch 2, hdc in each st across, turn. (4 hdc)
The tab strip should be 4 in (10.2 cm) long and about 1 in (2.5 cm) wide. Fasten off and leave a 10 in (25.4 cm) tail. Fold the tab to the WS and whipstitch Row 12 to the back of Border Round 1. This makes a loop about 2 in (5.1 cm) tall that fits rods up to 1 in (2.5 cm) in diameter.
Tassels (Make 11)
Wrap rose yarn 20 times around the 3.5 in (8.9 cm) card. Tie the top with a 12 in (30.5 cm) rose strand. Cut the loops at the bottom. Wrap a second strand around the bundle 0.5 in (1.3 cm) below the top and knot it. Trim the tassel to 3 in (7.6 cm).
On the bottom edge, number the same 113 sts. Attach one tassel at the center of each tab position directly above it: sts 2, 13, 24, 35, 46, 57, 68, 79, 90, 101 and 112. Thread the tie strand through the st, knot it securely, and hide the ends inside the tassel.
Final Blocking
- Soak the curtain in cool water for 10 minutes, then gently press out the water. Don’t wring it.
- Roll it in a towel to remove excess water.
- Lay it flat and pin it to 31.5 x 19.5 in (80.0 x 49.5 cm).
- Pin each motif corner to make a square grid, and check that each motif is 6 in (15.2 cm).
- Pin the tips of the rose petals outward, and gently shape the cream petals so they stay raised.
- Straighten the tabs and comb the tassels straight.
- Leave it to dry completely, which takes about 24 hours.
Final Quality-Control Checklist
- 15 motifs, each 6 x 6 in (15.2 x 15.2 cm) with 11 dc per side
- Rose petals sit evenly behind the cream petals, 8 of each
- 11 sc per motif pair along every seam, with an open diamond at each four-corner intersection
- Border Round 2: 111 sc on each long side, 67 sc on each short side
- 11 tabs evenly spaced, each folded to the same height
- 11 tassels lined up under the tabs, all 3 in (7.6 cm) long
- Panel is 31.5 x 19.5 in (80.0 x 49.5 cm)
- All ends woven in
Troubleshooting
Rose petals curl forward. Work Round 4 more loosely, or add 1 ch to each loop (ch 6).
Motif won’t square up. Pin the corner tr firmly while blocking. If it still won’t square, make the corner tr a little taller.
Seams pucker. The chains are too tight. Go up 0.5 mm in hook size for joining only.
The border flares. Check the counts. Round 1 should add only 2 dc per side.
Tabs are uneven. Count the gaps between tabs: each should be exactly 8 sts.
Tassels look thin. Wrap 24 times instead of 20.
Care
Hand wash in cool water with a mild detergent, then reshape and dry flat. Iron on a low setting through a cloth if needed, and don’t press the petals flat.
Final Notes
The measurements build on each other: one 6 in (15.2 cm) motif with 11 dc per side, joined into a 5 x 3 grid that measures 30 x 18 in (76.2 x 45.7 cm). The 0.75 in (1.9 cm) border brings it to 31.5 x 19.5 in (80.0 x 49.5 cm), and the tabs and tassels give a total drop of about 24.5 in (62.2 cm). If your first motif is the right size, the rest of the measurements will come out as planned.
Happy crocheting!