

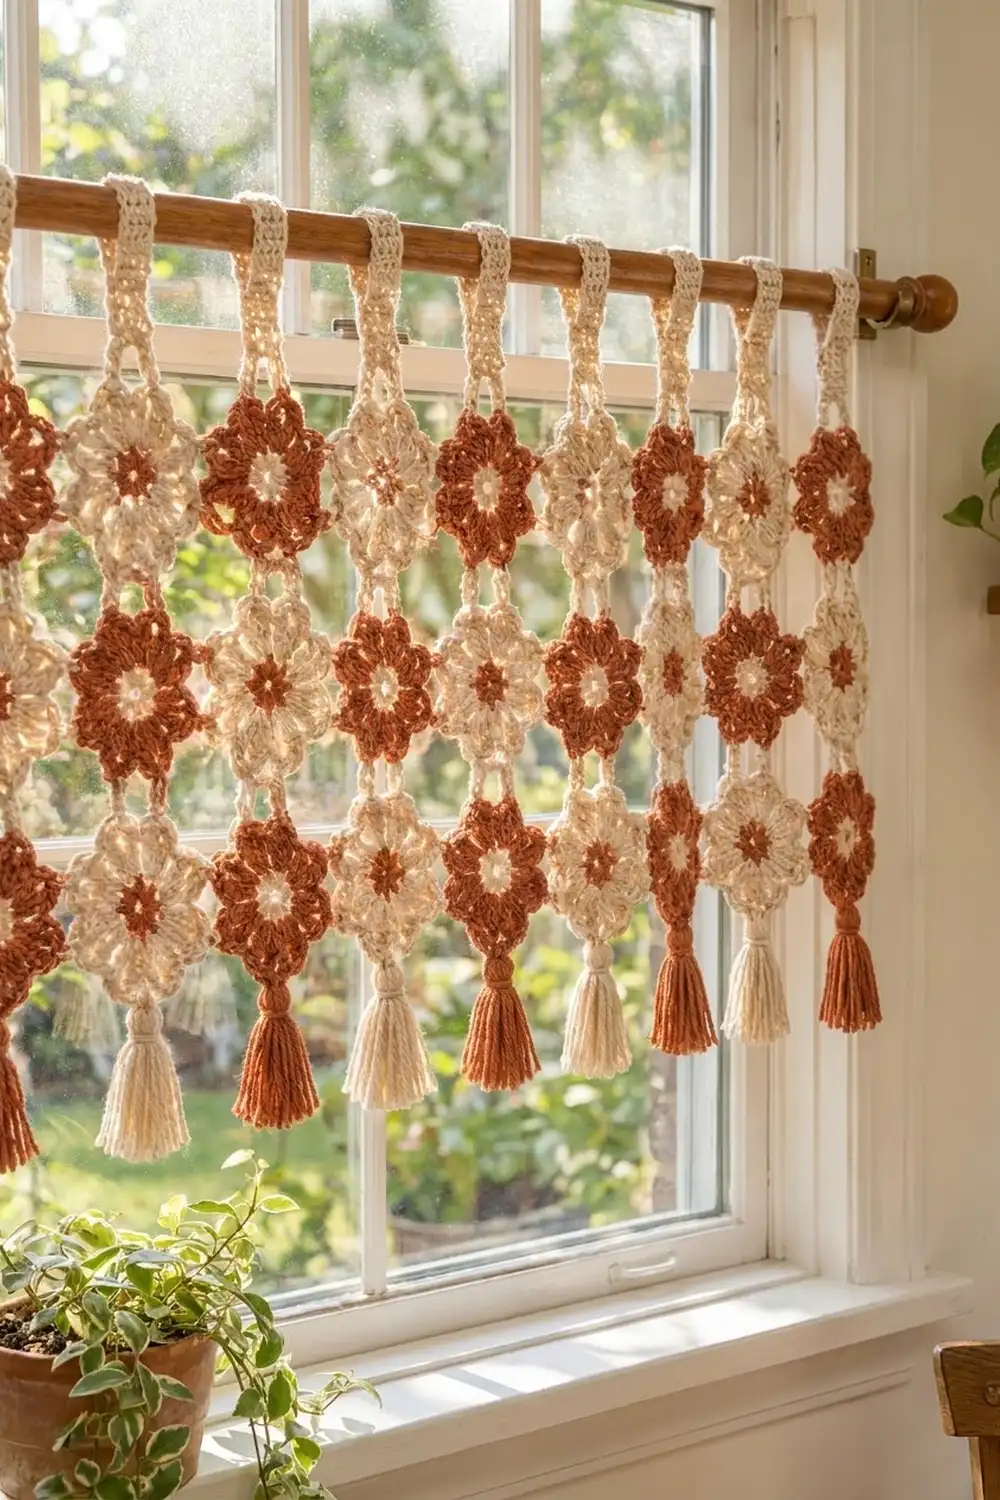
The Terracotta Bloom Café Curtain is a short, airy valance made of plump eight-petal flowers. Rust and cream blooms alternate in a checkerboard. The open spaces between the petals let sunlight through, which gives a warm boho feel to a kitchen or breakfast nook.
Every flower has two colors: a solid center ring in one shade and eight rounded petals in the other. Half the motifs are cream with rust centers, and half are rust with cream centers. Cream tabs at the top hold the valance on a rod, and alternating tassels finish the bottom edge.
This pattern uses US crochet terms. The flower section measures 40 in (101.6 cm) wide by 12 in (30.5 cm) deep. With the tabs and tassels, it hangs about 17 in (43.2 cm) from the rod to the tassel tips.
You make 30 identical-size flowers and join each one to its neighbors as you go. The joins happen in the last round, at the petal tips only. To finish, you add 10 tabs along the top edge and 10 tassels along the bottom.
Finished Size and Construction
- Finished size (flower section): 40 in × 12 in (101.6 cm × 30.5 cm)
- Total drop, rod to tassel tips: about 17 in (43.2 cm)
- Skill level: Easy-Intermediate
- Terminology: US
- Yarn weight: Worsted (#4), cotton or cotton blend
- Hook: 5.0 mm (H-8)
- Number of pieces: 30 flower motifs
- Layout: 10 columns × 3 rows, in a checkerboard
- Motif size: 4 in (10.2 cm), measured from one petal tip to the opposite tip
- Size before finishing: 40 in × 12 in (101.6 cm × 30.5 cm)
- Finishing depth: about 2 in (5.1 cm) of tab drop above the flowers and 3 in (7.6 cm) of tassels below
Materials
Choose a smooth mercerized or combed cotton in worsted weight, with about 170 m per 100 g. Cotton keeps the petals crisp, holds its shape in sunlight, and washes well. Acrylic also works, but it will drape more softly.
- Color A – Cream: 160 g (about 272 m)
- Color B – Rust/Terracotta: 140 g (about 238 m)
These quantities include a margin of roughly 20–25% for gauge swatches and tassel trimming.
Tools:
– 5.0 mm (H-8) crochet hook
– Tapestry needle
– Scissors
– Stitch markers
– A piece of cardboard 3.5 in (8.9 cm) wide, for the tassels
– Blocking mats and rust-proof pins
– Spray bottle
– A curtain rod up to 1 in (2.5 cm) in diameter
Abbreviations (US Terms)
- ch – chain
- sl st – slip stitch
- sc – single crochet
- hdc – half double crochet
- dc – double crochet
- tr – treble crochet
- sk – skip
- sp(s) – space(s)
- st(s) – stitch(es)
- rep – repeat
- MR – magic ring
Special stitch – Petal: In the stated ch-3 space, work (sc, hdc, dc, tr, ch 2, tr, dc, hdc, sc). Each petal has 8 stitches plus 1 ch-2 tip space.
Special stitch – Joining Tip: Work a petal as usual up to and including the first tr. Then ch 1, sl st into the ch-2 tip space of the neighboring motif, ch 1, and finish the petal with (tr, dc, hdc, sc). This replaces the ch-2 tip, so the stitch count does not change.
Gauge and Checkpoints
Make one full test motif before you start the curtain. Block it lightly and measure it.
- After Round 1: the center is 1.5 in (3.8 cm) across.
- After Round 2: the motif is 2.25 in (5.7 cm) across, measured over the ch-3 loops.
- After Round 3: the motif is 4 in (10.2 cm) from one petal tip to the opposite tip.
The tolerance is ±0.25 in (0.6 cm). If your motif is too big, go down half a hook size. If it is too small, go up half a size. A motif that is only 0.25 in (0.6 cm) too big adds 2.5 in (6.4 cm) across 10 columns, so adjust before you make all 30.
Tab gauge: 3 sc are 0.75 in (1.9 cm) wide, and 9 rows measure 2 in (5.1 cm).
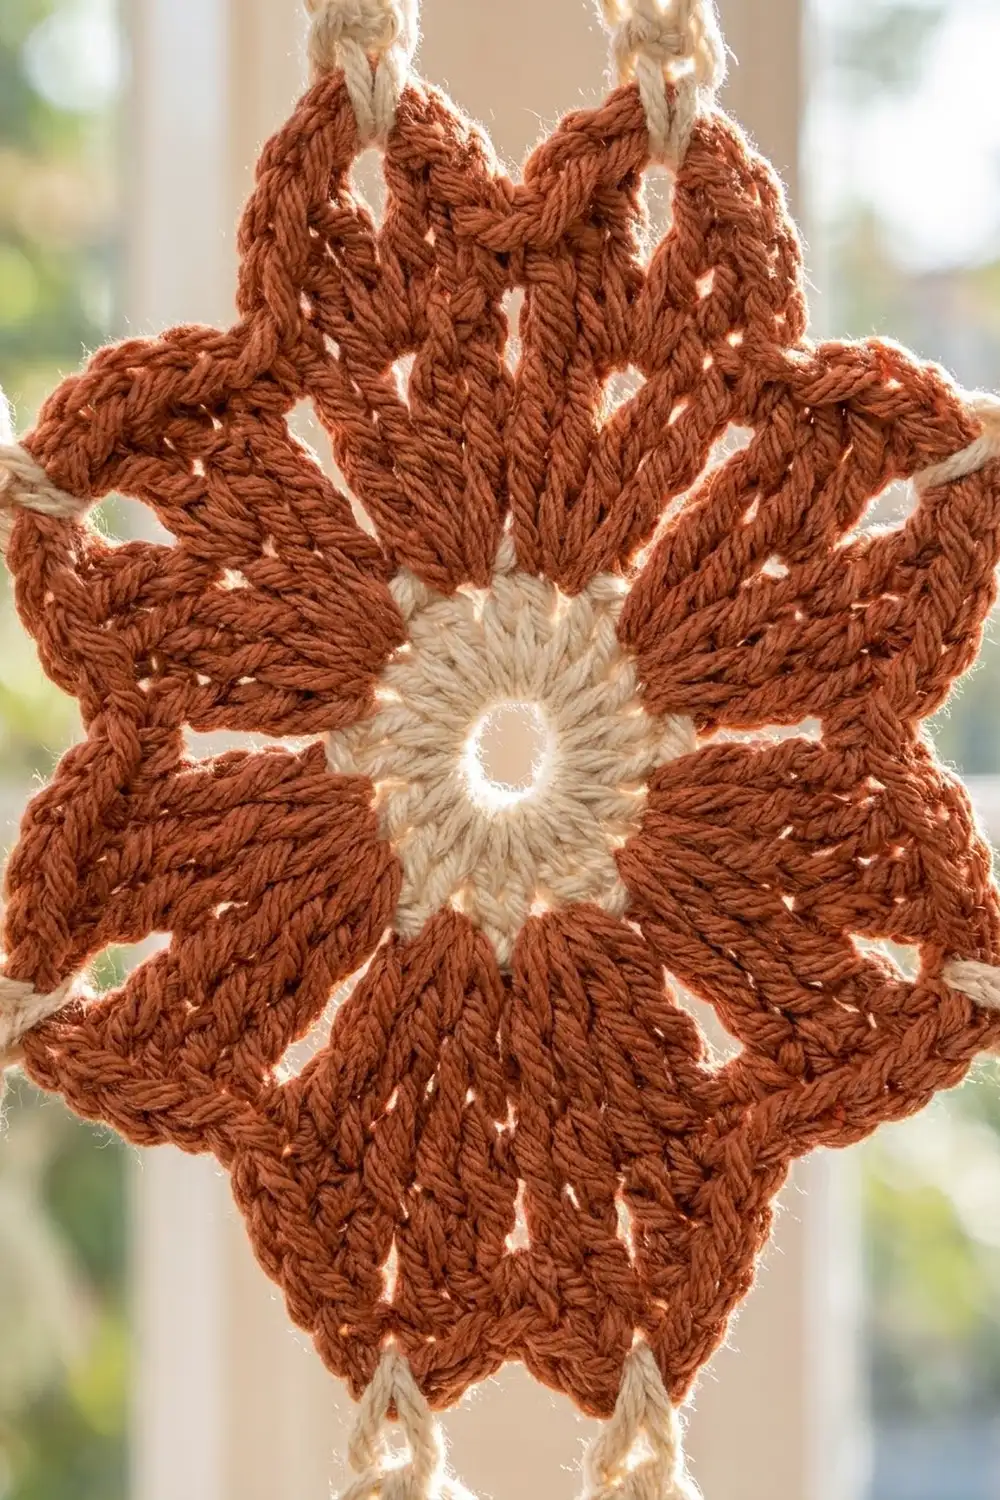
Flower Motif
Rounds are worked with the right side facing; do not turn. Rounds 1 and 2 are the same for every motif. Only Round 3 changes, depending on how many neighbors the motif joins to.
Motif A: rust center and cream petals. Motif B: cream center and rust petals.
Round 1 (center color): Make a MR. Ch 3 (counts as dc), then work 15 dc into the ring. Pull the ring closed and sl st to the top of the beginning ch-3. Fasten off. (16 dc)
Round 2 (petal color): Join the petal color with a sc in any dc. Ch 3, sk next dc, sc in next dc; rep from * 6 more times. Ch 3, sk last dc, and sl st to the first sc. (8 sc and 8 ch-3 sps)*
Check: 16 dc ÷ 2 stitches per repeat = 8 repeats.
Round 3 (petal color), stand-alone version: Sl st into the first ch-3 sp. Work a Petal in each of the 8 ch-3 sps, then sl st to the first sc. Fasten off and weave in the ends. (8 petals = 64 sts plus 8 ch-2 tip spaces)
Each petal sits inside its own ch-3 loop, and the Round 2 sc stay hidden between petals. The tr pair on either side of the ch-2 tip makes the rounded, puffy point you see on each petal. Number the petals 1 through 8 in the order you work them.
Make All Pieces
Make a total of 15 Motif A (cream petals, rust center) and 15 Motif B (rust petals, cream center).
Layout (top to bottom, left to right):
Row 1:  A B A B A B A B A B
Row 2:  B A B A B A B A B A
Row 3:  A B A B A B A B A B
Each row has 5 A and 5 B, for 15 of each across all 3 rows. Only the very first motif (Row 1, Column 1) is worked as the stand-alone version. Every other motif is joined in Round 3 while you make it.
Joining (Join-As-You-Go)
Joins happen only at the four tips that point straight up, down, left, and right. The four diagonal tips stay free and frame the open gaps between flowers.
Stitch logic: The two tips you join on any motif are always 2 petals apart, which is 90° around the flower. Use Joining Tips on petals 6 and 8. Work petals 1–5 and petal 7 as plain Petals.
- Right-handed (working counterclockwise): Petal 6 joins to the motif above, and petal 8 joins to the motif on the left.
- Left-handed (working clockwise): Petal 6 joins to the motif on the left, and petal 8 joins to the motif above.
How each position is joined:
– Row 1, Column 1: stand-alone, no joins.
– Row 1, Columns 2–10: 1 join, to the left neighbor’s tip that points toward the new motif. Work petal 6 as a plain Petal.
– Rows 2–3, Column 1: 1 join, to the bottom tip of the motif above. Work petal 8 as a plain Petal.
– Rows 2–3, Columns 2–10: 2 joins, one above and one on the left.
Join count: 9 side-to-side joins per row × 3 rows = 27. Add 10 top-to-bottom joins per row gap × 2 gaps = 20. That makes 47 joins in total.
Tension: Keep the ch 1 on each side of the joining sl st the same size as the chains in your normal ch-2 tips. If you pull them tight, the grid will pucker. If they are loose, the tips will gap.
Size checkpoint: After the joins, the tips meet tip to tip, so the width is 10 × 4 in = 40 in (101.6 cm) and the depth is 3 × 4 in = 12 in (30.5 cm). Measure after each completed row. Row 1 alone should be 40 in (101.6 cm) wide.
Border: Hanging Tabs and Tassel Edge
This valance has no stitched border around its edge. The finishing is a row of tabs along the top and a row of tassels along the bottom, each anchored to one petal tip. The left and right side edges are left open as free petal tips, just as in the photo.
Border gauge: Each tab is 3 sc wide, or 0.75 in (1.9 cm), and 18 rows long, or 4 in (10.2 cm).
Counts per side:
– Top edge: 10 motifs × 1 upward tip = 10 tabs. That is 10 × 3 sc = 30 tab stitches across the top.
– Bottom edge: 10 motifs × 1 downward tip = 10 tassels.
– Left and right sides: 3 free tips each, with nothing added.
Tabs (Color A, cream; make 10)
Row 1: With the right side facing, join A with a sl st in the upward ch-2 tip of a top-row motif. Ch 1 and work 3 sc in the same tip space. Turn. (3 sc)
Rows 2–18: Ch 1, sc in each sc across, turn. (3 sc in each row)
Fasten off, leaving an 8 in (20.3 cm) tail. Fold the tab to the back of the work and whipstitch the last row to the back of the two tr of that same petal. This makes a closed loop of about 4 in (10.2 cm). It fits a rod up to 1 in (2.5 cm) thick and drops about 2 in (5.1 cm).
For a thicker rod, add 7 rows to each tab for every extra 0.5 in (1.3 cm) of rod diameter.
Tassels (make 5 in A and 5 in B)
Each tassel matches the petal color of the motif it hangs from. Along Row 3 that gives cream, rust, cream, rust, and so on across.
- Wrap the yarn 25 times around the 3.5 in (8.9 cm) card.
- Slide a 10 in (25.4 cm) strand under the wraps at the top edge, then cut the wraps open along the bottom edge.
- Thread the tie strand through the downward ch-2 tip of the motif and knot it tightly so the tassel hangs from the tip.
- Wrap a separate strand 6 times around the bundle, 0.5 in (1.3 cm) below the top. Knot it and bury the ends inside the tassel.
- Trim the tassel evenly to 3 in (7.6 cm).
Why the math works: Each column carries exactly one tab and one tassel, so they all fall on 4 in (10.2 cm) centers, the same as the motif width. The tabs share the curtain’s weight evenly across the rod, the flower section stays straight, and the tassels line up under each column.
Final Blocking
- Weave in all the ends before blocking. Leave the tassels unblocked for now.
- Lay the valance face up on the blocking mats, with the tabs folded flat.
- Pin the outer edges to 40 in × 12 in (101.6 cm × 30.5 cm).
- Pin every free diagonal tip so each petal is open and evenly rounded.
- Spray the piece until it is evenly damp, but not soaking.
- Let it dry completely. Cotton can take 12–24 hours.
- Unpin it, then steam the tassels lightly and comb them straight.
Final Quality-Control Checklist
- 30 motifs in the A/B checkerboard, with no two of the same color side by side
- Every motif 4 in (10.2 cm) across, within 0.25 in (0.6 cm)
- 47 joins, all at tips that point straight up, down, left, or right
- All diagonal tips free and evenly open
- Flower section 40 in × 12 in (101.6 cm × 30.5 cm)
- 10 tabs of 18 rows each, all sewn at the same height
- 10 tassels trimmed to 3 in (7.6 cm), in alternating colors
- No loose ends showing on the front
Troubleshooting
- Petals cup or ruffle: Your tension is tight in Round 3. Go up half a hook size.
- The center ring shows a gap: Pull the magic ring tighter before you join Round 1. Use the yarn tail to snug the ring again when you weave in.
- The grid slants: You joined two tips that are only one petal apart. Rip back the last motif and use petals 6 and 8.
- The valance sags between tabs: The tabs have different lengths. Recount them to 18 rows.
- Tassels look thin: Add 5 more wraps per tassel. Allow about 1 g of extra yarn for each one.
Care
Hand wash in cool water with mild soap. Press out the water in a towel and dry flat, reshaping the petals as it dries. To keep the colors bright, avoid long periods of direct sun when the valance is wet.
Final Notes
The measurement chain is short and easy to check. Round 1 is 1.5 in (3.8 cm), Round 2 is 2.25 in (5.7 cm), and the finished motif is 4 in (10.2 cm). Ten columns give 40 in (101.6 cm) and three rows give 12 in (30.5 cm). The tabs add about 2 in (5.1 cm) and the tassels add 3 in (7.6 cm), for a drop of about 17 in (43.2 cm). If your first motif hits 4 in (10.2 cm), every later measurement follows.
Happy crocheting!